April 18, 2005

 
24p in Final Cut Pro HD and the DVX 100
By Graeme Nattress

 
Introduction
24p can be a very complex subject. 24p means a lot more than making video run at the same frame rate as film, so in this article, I will first provide a technical background to 24p, and then look at the practical considerations of using a 24p DV camera such as the Panasonic DVX100 in Final Cut Pro.

 
What is 24p
24p is more than just the latest “buzzword” in indie-filmmaking and video production. It’s a specification for shooting video with 23.98 progressive frames per second, instead of normal NTSC’s 29.97 frames per second, where each frame is made up of two interlaced fields, giving a total of 59.94 interlaced fields per second.

 
Fields and Frames, Interlaced and Progressive
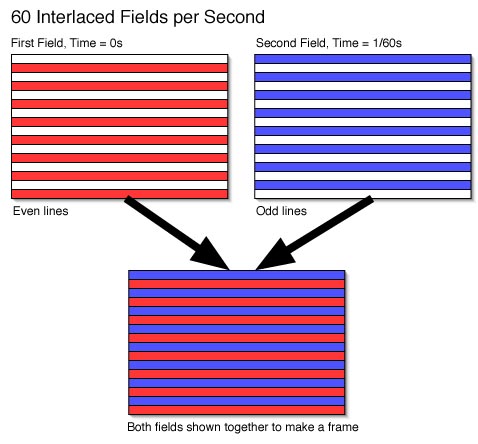
Right from the very first commercial television systems, the video signal that was broadcast has been interlaced. Interlace is in effect an early form of signal compression that gives about 70% of the vertical resolution of a progressive system, and the same smooth motion, but at 50% of the bandwidth. Interlacing works by instead of the camera taking, say, 60 full frames of video per second, it takes 60 “half-frames” or fields, as they are called, per second, each representing alternating horizontal rows of picture information. This works through the persistence of vision and the high speed at which the interlacing occurs to allow us to see smooth motion at a good level of detail. Because of the nature of interlaced video, it is important that the camera softens the image vertically to stop what is called “line twitter” where thin horizontal lines will flicker annoyingly.

Progressive scanning is not a completely new phenomena as some of the very earliest television systems were progressively scanned. Progressive scanning is where the entire video frame is taken in one go, rather than in two interlaced fields. Progressive scanning has many advantages in that we do not have “line twitter” and to worry about “field ordering” and other complications. However, for equivalent smoothness of motion, you need twice as much bandwidth to broadcast a progressive signal, although, when played back on progressive equipment, the resolution would also be slightly higher than the interlaced equivalent. Also, for any kind of post production work, interlacing and interlace artifacts can get in the way of creating a seamless effect. It’s not impossible to do great effects on interlaced video, but extra care is needed.

In the 60p diagram above, we see that each frame has all the lines
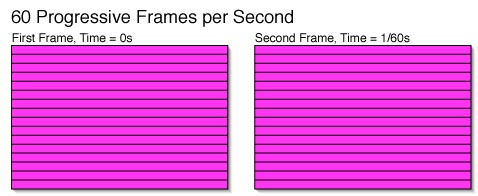
that make up the picture being captured by the camera for at once.

 
Trends
Progressive video has now become popular again for a number of reasons. Most modern television technologies are inherently progressive. As many manufactures stop making traditional CRT (cathode ray tube) based monitors, the new progressive technologies like DLP (Digital Light Projection), Plasma, LCD (Liquid Crystal Display) are taking over, especially with the move to high definition. Traditional CRT technology cannot be built to display the full detail from the higher resolution offered by high definition video, and is very heavy at the large sizes that are now becoming popular in many homes. It is also impossible to manufacture a CRT above a certain size.
Transmission technologies are also changing. Once upon a time, all television was broadcast via analogue methods, but now, digital broadcasting and delivery (over internet, satellite, cable, or optical disc) is taking over. With the types of compression used in these systems, progressive video is inherently more efficient, and given that the end user will most likely be using a progressive display, a fully progressive workflow makes a lot of sense.
Digital video has also become popular among independent film-makers. Film has nearly always been shot at the rate of 24 frames per second. This imparts a particular look to filmed productions that sets it apart from video in a way that is ingrained into our televisual culture. As independents tried to capture this look on a micro-budget they initially turned hardware “film look” solutions that used expensive proprietary tape to tape systems to impart the 24 frames per second look onto ordinary video. Now that most video editing is done non-linearly, and our computers are becoming increasingly powerful, software solutions have taken over, and are producing excellent results.
The next step in the journey to 24p was the introduction of high definition video cameras suitable for movie production work. They were designed from the start to allow the shooting of 24 progressive frames per second, but are very expensive. Recently, Panasonic (with their groundbreaking DVX100 and DVX100a cameras) and Canon (with it’s XL2) have produced DV cameras that are capable of shooting 24 progressive frames a second, bringing this once unaffordable technology to the masses.

 
Fractional Frame Rates
When commercial broadcast television systems were being first invented, it was decided for a number of reasons to set the frame rate equal to the frequency of the mains electricity supply. This meant that in Europe, the frame rate was 50 interlaced fields per second because the mains frequency was 50 hertz, and in North America, the 60 hertz mains frequency meant that 60 interlaced fields per second was used for television.
Everything worked well in North America until the introduction of color television. When color was added it was decided to make the new NTSC system backwards compatible with the old monochrome system by adding the color information on a sub-carrier. However, it was found that the color signal would interfere with the audio subcarrier, and hence it was decided to solve this by fractionally adjusting the frame rate of NTSC television from precisely 30 frames per second (60 interlaced fields per second) to approximately 29.97 frames per second (approximately 59.94 interlaced fields per second).

 
Naming Conventions
Television video formats are now being named for their frame rate and wether they’re interlaced rather than by saying they’re PAL or NTSC. PAL and NTSC are broadcast formats only. We can’t even say that PAL is a 50 interlaced fields per second format, because Brazil uses PAL-M which is a 59.94 interlaced fields per second format that shares more in common with NTSC than PAL!
Commonly with digital video, and now that we have high definition video that the terms PAL and NTSC really don’t apply to, we’re referring to video via it’s field or frame rate and it’s interlaced or progressive nature. However, we have to be careful as “NTSC” frame rates, those derived from 30 frames per second, are often named for the integer frame rate, rather than the more precise fractional frame rate, hence 24p, in video terms, is not 24 frames per second, but 23.98 frames per second.

Name Description
24p 23.98 progressive frames per second
50i 50 interlaced fields per second
25p 25 progressive frames per second
60i 59.94 interlaced fields per second
30p 29.97 progressive frames per second

 
Pulldown
Around the world, two different methods have been and still are used to convert the 24 frames per second of film to the local video standard. Two different methods are used because of the two video frame rates that are used around the world, 25 frames per second and 29.97 frames per second.

25 frames per second
To convert from film to video, the film is sped up by about 4% and then matched frame per frame to video. Sometimes this is called 2:2 pulldown because each frame of film gets matched to 2 fields (1 frame) or video.

 
29.97 frames per second
A method called 3:2 pulldown (sometimes called 2:3 pulldown or even 2:3:2:3 pulldown) is used to convert the film to video. This method is based around the fact that 60 divided by 24 is 2.5. That means that each frame of film needs to last for 2.5 fields of video. First the film is slowed ever-so-slightly to 23.98 frames per second to account for NTSC video not being precisely 30 frames per second. Obviously, we can’t have half fields, so instead we alternate between frames of film lasting 3 or 2 fields in duration, hence averaging out to be the necessary 2.5 fields. This pulldown method has a very characteristic look that NTSC television viewers are very familiar with, just as Europeans are used to the 4% speed up, which until modern audio technology necessitated a pitch change.
In Europe, film that was directly destined for television as also often shot at 25fps to match the video rate precisely and thus not incur the 4% speed up.

 
24p Culture
European video producers, having a very easy method to convert between video and film, and hence make video look like film, have not been caught up in the 24p culture the way that North Americans have. Although it is “easy” to make 50i video take on the temporal characteristics of film transferred to video by de-interlacing (removing interlace by blending or interpolating fields) to produce 25p, a high quality de-interlacer is needed to maintain as much of the quality as possible. With NTSC based video standards that use 29.97 frames per second and the 3:2 pulldown method, the conversion of 60i to look like film transfered to video, is not as simple and the “look” is harder to achieve. It is because of these difficulties that cameras that actually shoot 24p were invented, and now this feature is very much sought after in the specifications of any new camera.

 
24p Cameras
The first DV camera to offer 24p was the Panasonic DVX100, which was later upgraded to the DVX100a. Later on, Canon followed with the XL2 DV camera. These are currently the only DV cameras that offer true 24p. Panasonic also offer the SDX900 camera that uses DVCpro50, rather than DV, and does 24p.
Sony has not jumped on to the 24p bandwagon, but have instead offered faked “24p” modes on some of their affordable cameras. Sony is careful not to call these modes 24p because they are not. They use a very poor software simulation and do not look like 24p. Sony’s new HDV cameras, the FX1 and Z1U offer a mode called CF24, but it is not 24p and does not look like 24p. Sony, of course, does offer true 24p on their most expensive HDCAM based high definition cameras. Sony are also beginning to offer 24p on some of their high end standard definition models. The workflow to use 24p on all these cameras is very different to the DV cameras we’re discussing in this article, as is the workflow for the Panasonic Varicam which is high definition video camera that shoots true 24p.

 
The 24p Advantage
The main innovation the DVX100 camera brought was not just 24p shooting, but that it also offered a way for Final Cut Pro users to easily remove the extra duplicate fields that get added by the 3:2 pulldown method described above. Normally an application like Cinema Tools is needed to remove pulldown, but by altering the pulldown pattern slightly from normal 3:2 (3:2 is referred to as 2:3:2:3, to show how the pattern repeats) to a pattern of 2:3:3:2 (called advanced pulldown), the extra “pulldown” fields can be removed by Final Cut Pro so that the 24p footage can be edited on a 24p timeline. This has a number of advantages:

 
Better picture quality
When “normal” 2:3:2:3 pulldown is removed (in Cinema Tools, say) the DV video needs to be decompressed so that the pulldown fields can be extracted. Final Cut Pro can remove the “advanced” 2:3:3:2 pulldown without decompressing the video, and hence it’s “in camera” quality can be maintained.

 
Easier
Cinema Tools can remove “normal” 2:3:2:3 pulldown, but this is not automatic and cannot be done inside Final Cut Pro.

 
Less System Demands
Once the pulldown is removed, the data-rate of the remaining video is reduced from 25mbits to about 20mbits, and any rendering only needs to be done on 24 frames instead of 30, meaning that you’re going to render faster for the same time length of video.

 
Delivery Options
After editing video at 24p, it can be turned directly into a 24p DVD which allows you to achieve a higher quality end result as the MPEG2 compression has less frames to compress per second, or you can add 3:2 pulldown back to the video to allow it to be delivered on conventional video tape.

 
24p Shooting Decisions
When shooting 24p on a camera like the Panasonic DVX100a, there is one main decision to make, and that’s whether to shoot in 24p “Normal” 2:3:2:3 or 24p “Advanced” 2:3:3:2. Both have different workflows and lead more naturally to different end products.

 
24p Normal
When shooting in 24p Normal, the camera is adding normal standard 3:2 pulldown to the video, which results in 24p footage designed to work with any non-linear editing suite and it will play back and look good directly to any NTSC monitor. You can use 24p Normal footage just like normal video from any DV camera, and everything will work fine, but obviously, the footage will have a film look to it. If you’re just going straight back to NTSC video tape, then using 24p Normal is the simplest, easiest workflow. No special treatment of the footage is needed and you really can just edit as normal.

 
24p Advanced
Before you shoot 24p Advanced, you should fully understand it’s workflow implications. If you watch 24p Advanced footage before you’ve removed it’s pulldown, then it will look a bit jumpy and jerky. This is totally correct, because 24p Advanced is not designed to be viewed as is.
To use 24p Advanced and gain all it’s advantages, you should know that you cannot edit it as is (as this would leave it’s jerky looking pulldown intact), but you must first remove it’s pulldown. Final Cut Pro will do this for you, leaving you with the 24p footage without any of the extra “padding” fields that are added to make it’s frame rate 29.97fps. Now that your footage is 23.98fps, it must be edited on a 23.98fps timeline, and this can cause problems if you, for instance, want to include other footage, B-Roll, or stock footage, that comes from a different source. However, once you have your finished edit at 23.98fps, you can make a 24p DVD, which will allow you to compress your MPEG2 less than if you were making a normal 29.97fps NTSC DVD, and hence attain higher picture quality. Similarly, if you’re making a web movie, you will find it easier to get a higher quality result from 23.98fps media than normal NTSC media. 23.98fps movies are also easier to take out to film that 29.97fps movies.
If you are editing in a 23.98fps timeline, Final Cut Pro will add pulldown on the fly, over Firewire, so that you can see your movie on a normal NTSC monitor. Similarly, it will add pulldown when going back to DV tape. However, this will not work on a non-DV format output, say to Digital Betacam, and slower Macintoshes do not have the power to add 3:2 pulldown in realtime, falling back to lower quality pulldowns which although are not too bad while editing, will not make the final project look as acceptably good on television as a final product.

 
Capturing 24p with the DVX100
Final Cut Pro comes with some easy setups which make capturing easy - the trick is to use the right one for the situation. Because the work of producing 24p on DV is done in camera, it means that you don’t need a 24p capable DV camera to capture the 24p footage. You can use any DV deck you wish (although, I'm informed that the JVC BR-DV600UA DV deck does not work for 24pA advanced pulldown removal), and it will still allow you to capture the 24p. If you are using the 24p Advanced mode, the flags that tell Final Cut Pro which frames to remove are embedded in the DV data stream coming of tape, and this information is passed to Final Cut Pro no matter which deck or DV camera you choose to use to capture from. It should be noted that the Canon XL2 works in a very similar manner to the DVX100, but does not use the term “24p Advanced” to denote the 2:3:3:2 pulldown pattern.

Just some of Final Cut Pro’s Easy Setups, which are accessed from the Final Cut Pro Menu.

 
24p Normal - Use DV-NTSC Easy Preset

Because 24p Normal uses “normal” 3:2 pulldown to embed the 24p in a normal NTSC DV video, you can capture and edit just as normal DV NTSC.

 
24p Advanced - Use DV-NTSC 24p (23.98) Advanced Pulldown Removal to Capture

Although we are capturing 24p footage to edit on a 24p timeline, we must remember that the “extra” pulldown frames were flagged by the camera as they were recorded, so Final Cut Pro must capture all the 29.97 frames per second over Firewire so that it can make sure that it sees and removes all the flagged frames correctly. Using this easy preset will leave you with 24p DV media.

 
24p Advanced - Use DV-NTSC 24p (23.98) to Edit

If you are not capturing footage, but want an easy preset that makes a NTSC DV 24p sequence, then this is the one to pick. Also, if you shot 24p normal and removed the pulldown in Cinema Tools, then this is the option to pick in Final Cut Pro for your easy setup.

 
Anamorphic
None of the above 24p Easy Presets, have anamorphic widescreen variants. If you are shooting with the Canon XL2 for instance, which will shoot true widescreen and 24p, you will have to either create your own preset from the appropriate Easy Preset, adding in a tick in the Anamorphic checkbox, or modify your capture and timeline preferences to anamorphic afterwards. If you capture anamorphic widescreen video without the anamorphic checkbox checked, all is not lost as you can just open the movie properties in Final Cut Pro and set the video to be anamorphic.

 
24p Playback in Final Cut Pro
Final Cut Pro has the ability to playback 24p to a standard NTSC monitor. This functionality was added in Final Cut Pro 4. Because NTSC monitors only accept NTSC video at a frame rate of 29.97fps, Final Cut Pro will add in pulldown to your 24p timeline as it plays back over firewire to your DV deck or camera, and hence converts it to standard NTSC. This conversion is exactly the same embedding process that 24p DV cameras use to record 24p on a standard DV tape and hence preserves the visual appearance of 24p.
For Final Cut Pro to be able to add pulldown over Firewire, your 24p sequence must be set to precisely 23.98fps. This is because NTSC is 29.97fps, not 30fps. You are also given a choice of the type of pulldown which can be added. Adding the highest quality 3:2 pulldown can be quite processor intensive, although will produce the best quality motion on video tape, and should be used if making a broadcast master for normal NTSC viewing.
Rendering in a 24p timeline will be approximately 20% faster as their are 6 fewer frames to render for every second of video. Similarly, if you’re watching the video inside Final Cut Pro and not playing out to an external monitor with pulldown added, you should get a similar boost in real time performance due to less frames having to be processed every second.
For the addition of the higher quality modes of pulldown to work, you must also set “Playback Video Quality” to “High”.

Selecting the appropriate pulldown pattern for 24p playback.

2:3:2:3 This offers the highest quality of motion and is the choice to use for making a viewing master. It also requires the highest amount of processing power. This is the same as “Normal” pulldown.
2:3:3:2 This is the same pattern as used by “Advanced” pulldown on the DVX100. This does not offer the same quality of motion as 3:2, but uses less processor power, and also the highest quality if you were to recapture from a tape made using this mode and remove the pulldown. This mode would be the one to use if you were to make a 24p master tape with the intention that if ever you were to go back to the tape and recapture into Final Cut Pro you would be removing the pulldown to use the edit in a 24p project.
2:2:2:4 This is the lowest quality pulldown mode and is really only for use for viewing 24p on a slow Final Cut Pro System, or for maximizing real time playback of effects while editing.

 
24p Delivery

24p DVD
One of the best ways to deliver your 24p DV project is on a 24p DVD. Because the DVD specification allows for the 23.98fps frame rate, we can produce a 24p DVD without having to add pulldown. Because a 24p DVD will have 20% less frames on it than the equivalent 24p media encoded with the addition of 3:2 pulldown, a 24p DVD should allow you to compress the media less and either produce a better quality picture or allow you to fit more high quality video on a DVD. The DVD player itself will add 3:2 pulldown on playback of a 24p DVD so that it produces a standard NTSC video signal for viewing.
When making a 24p DVD, it is important to do the compression to MPEG2 the correct way. If you export direct to MPEG2 from Final Cut Pro using the Quicktime MPEG2 compressor or bring the 24p media into DVD Studio Pro to compress, they will not treat the 24p media correctly and not produce a 24p DVD.

The best workflow for making a 24p DVD is to export your 24p movie from Final Cut Pro: File -> Export -> Quicktime Movie...

In the Export Dialogue box, leave “Setting” as “Current Settings”. You may, if you wish, “Make Movie Self-Contained”, but this will make a large file on disc.

Now, in Compressor you can select from any of the available MPEG2 presets. Pick the one suitable for your project length and whether it is widescreen or not. All of the MPEG2 presets in Compressor do not alter the frame rate of the media. This means that if you put in normal 29.97fps NTSC media to be compressed, it will leave the MPEG2 at 29.97fps. Similarly, if you put in PAL media at 25fps, the end result will be 25fps, and most importantly for us, compressing 23.98fps media will result in a 23.98fp MPEG2 file for importing into DVD Studio Pro.

24p for Web
If you are compressing 24p media for the web, it is important to pick a preset that specifically states it’s frame rate is 24fps (or 23.98fps) or for you to modify the preset so that it is so. If you are finding the data rate too high, or file size too large, one of the usual techniques is to drop the frame rate. To ensure the best quality when this is done, it is wise to select a frame rate which divides into 24, so 12fps or 6fps will produce the best results in this situation.
24p has some advantages for compressing for the web. Again, as 24p has 6 less frames per second than normal NTSC, that means that less information is needed per second to make the web video, and this can mean higher quality or lower file sizes. Also, because the media is not interlaced, this can mean that you save time by not having to de-interlace before web compression.

 
I shot in the wrong mode! Help!
It is unfortunately quite easy to shoot in the wrong 24p mode on a 24p DV camera, and hence have footage that although looks great, does not fit in with the workflow you have decided upon. It is also possible to take normal 60i NTSC footage, say stock footage, or B-Roll from another camera and make it fit into either workflow and make it look very much like the real 24p footage that surrounds it.

Editing on a 23.98fps timeline, but shot some 24p Normal?
Final Cut Pro comes with an extra program called Cinema Tools. Cinema Tools has many useful features, and one of those is pulldown removal. It is designed to remove normal pulldown, so if you’ve shot some 24p Normal, but would like to edit it as 23.98fps, then Cinema Tools can be used to do this. It will generate new media for you which you can import into you 23.98fps project.

Editing on a 23.98fps timeline, but need to use some normal NTSC 60i Footage?
As mentioned above, various software solutions exist to make normal NTSC 60i footage look like 24p, and they can be used to convert the footage into a format that works and looks good on the 23.98fps timeline. Standards Conversion http://www.nattress.com has a feature whereby it will convert 60i footage to 24p, thus allowing it to be edited and look good on the 24p timeline.

Editing on a 29.97fps timeline with 24p Normal media, but shot some 24p Advanced footage?
There are a number of methods to incorporate 24p Advanced footage into 29.97fps timeline. You could just leave the advanced pulldown in the clip, and edit with it as if it were 24p Normal footage. On some shots it might not be noticeable that it was shot in the wrong mode.
Alternatively, and this is especially effective if there is a lot of footage that was shot in 24p Advanced, you can capture the 24p Advanced, remove the advanced pulldown, place the footage on a 23.98fps timeline and play it back to a new DV tape, adding in normal 3:2 pulldown, and recapture from this new master tape of your footage. This method can be time consuming, and it will slightly reduce the quality of your DV footage, but it works, and is free.
As part of the Standards Conversion http://www.nattress.com package, there is a plugin which directly converts 24p Advanced footage (as long as it hasn’t had it’s pulldown removed) to 24p Normal footage, and is a quick way to fix footage shot in the wrong mode.

Editing on a 29.97fps timeline with 24p Normal media, but need to use some normal NTSC 60i Footage?
In this case, we can just use the 60i NTSC footage as is. No conversion is necessary, but the 60i footage will have a different feel to the 24p footage. In some cases, this may be intentional, but in others, it is necessary to make the 60i NTSC footage look like the 24p Normal footage to ensure a consistent looking production. Film Effects http://www.nattress.com will convert 60i NTSC footage to 24p, immediately adding back in the 3:2 pulldown so that it has the same feel as the 24p Normal footage.

Editing in a 23.98fps timeline, but need to include some PAL footage?
Because the 25fps frame rate of PAL is very similar to the 23.98fps frame rate of 24p NTSC, it is possible to include your PAL material by first de-interlacing (if it is not already progressive footage) and then using the “Conform” option in Cinema Tools to slow down the footage to the 23.98fps rate. This will produce footage that is visually identical in look to true 24p footage, although you will have to shrink the footage dimensions down to NTSC size in Final Cut Pro. The only disadvantage of this method is that the audio and motion will be 4% slower than they were when the footage was shot.

 
Summary
The main problems that occur with using 24p in Final Cut Pro can be avoided by deciding on the most appropriate workflow ahead of time and shooting in the correct 24p mode for that workflow. When it comes to capture and edit in Final Cut Pro, any problems can be easily avoided by using the easy presets.
24p provides many advantages, not least that it provides a key part of the elusive “film look” that indie filmmakers crave. 24p can also put less strain on your Final Cut Pro edit system for many tasks due to the the reduced data rates of editing 24p as 24p with it’s pulldown removed, although you may still need a fast system for playing 24p footage back to tape with 3:2 pulldown.

The delivery options for 24p are also a very important part of why people shoot 24p. A 24p DVD has the potential to look better than a normal NTSC DVD due to the lower levels of compression that can be used, and similarly, a web movie version can have a smaller file size for the desired level of quality.

Graeme Nattress is the software developer at Nattress Productions Inc. where he enjoys researching cutting edge algorithms for the improvement of video quality. He is a frequent contributor to the kenstone.net, LAFCPUG, 2-Pop and Creative Cow websites and forums.

[Top]

copyright © www.kenstone.net 2005

© 2000 -2005 Apple Computer, Inc. All rights reserved. Apple, the Apple logo, Final Cut Pro, Macintosh and Power Mac
are either registered trademarks or trademarks of Apple. Other company and product names may be trademarks of their respective owners.

All screen captures, images, and textual references are the property and trademark of their creators/owners/publishers.