

DVD Studio Pro 2 and Photoshop September 29, 2003
Advanced Drop Zones
with DVD Studio Pro 2 and Photoshop
By: Alex Alexzander
DVD Studio Pro 2 and Photoshop September 29, 2003
Advanced Drop Zones
with DVD Studio Pro 2 and Photoshop
By: Alex Alexzander
Advanced drop zones are the building blocks of great templates. As with shape objects, drop zones can create a highly customized look and feel for your DVD projects. If you have spent any time at all browsing through Apple's templates, you have noticed they consist of background art and drop zones that allow you to complete the scene. Most of these drop zones are a simple rectangular or circular drop zone.
Summary
The focus of this document is to quickly show you how to create a circular drop zone that transfers opacity and faded edges around any picture or video object you drop into drop zone object. We'll use Adobe Photoshop 7 to create a shape object and focus most of our time on creating an opacity mask with feathered edges allowing the edges of any image or video we add to appear to fade off.
Getting started
I am assuming you are now comfortable with basic shapes and drop zones so we'll move more quickly into the layers of Photoshop to create our slightly more advanced drop zone.
I like to start off with a larger document and then trim it down at the end. You can create any size you like, but I like to start with large objects and shrink them in SP2 rather than start with small objects and stretch them beyond their true size. This makes for a sharper and less jaggy look overall. Make sure you select transparent for the background and the mode should be set to RGB.

As we use our marquee tool, do not deselect the circle selection at any time. We are going to be using it throughout all the layers we use to create our mask.
I have created a simple circle to start off with. You can do this with the Marquee Tool. Press and hold it down until you see the choices for the various Marquee shapes.
Select the circle-shape Marquee Tool and create a circle selection by holding down the shift key. This creates a perfect circle.
I have painted my inner circle pure white. Our objective here is to create a semi-opaque background for our future drop zone. The mask layer in our drop zone are what tells SP2 where to project the image or video we drop onto it. A solid white such as this will project a solid, non-transparent of what ever asset you drop into it. We'll create a mask layer much differently than the technique we used to create common shape objects.
SP2 will not understand a Photoshop opacity effect setting, so we'll focus on that next. In addition, we are going to create a nice fade effect around the edge of our drop zone so our future object will have a nice faded or feathered effect around the edge.
While we have or circle selected, use the top menu to select, Select > Modify > Contract.
We are going to contract our selection by 20 pixels. The purpose here is, we are going to inverse the selection, which will in effect keep the core of our circle protected while we add another affect to the outer area. This outer area will become the fade effect in the final drop zone.
Use the pull down menu and select Select > Inverse.
Then choose Filter > Blur > Gaussian Blur.
I set my radius for 7.5 pixels. Take a look at the image of our future mask layer on the right side. It has a nice fade effect.
We have two more steps in creating our mask layer.
The final drop zone will now project our future image or video asset onto this white area, however we are missing the black area that will allow our object to float on our menu. We also want that final image or video asset to take on a sort of transparency appearance. In order to create that opacity we must have the white area of the mask set as an opacity. Once we set that opacity we will create the back area behind our opacity and merge that into a single opacity based mask layer.
Before we get started creating our opacity layer, now is the perfect time to create our Icon layer.
I am going to duplicate my Layer 2 layer and name that new copy, "Icon".
On the left side, we create a copy of the white opacity layer and name it, "Icon".
On the right side we are going to merge the white opacity layer with the layer directly under it. This creates an opacity that SP2 will see. We also need to create a new layer, i.e. layer 4 here so that we can create the black area for our mask.
At this point, we must de-select with the Marquee Tool. We now intended to paint the entire layer 4 with black. Some of that black will show through our layer 2. Once I have painted my layer 4 black, I am going to merge Layer 4 with Layer 2 and name that one single layer as, "Mask".

This is my result. I have turned off the Icon layer to illustrate the effect here. I have one mask layer now. The mask layer was a complicated layer to create. You can see the edges are faded into black and the opacity setting is showing the black background that we have merged into this single layer. When SP2 projects an image or video onto this mask the results will be a 75% opacity with a feathered edge.
Take note I have my icon layer that we made before.
Create two new layers and name one, Shape and the other Highlight. Leave both of these layers empty.
Arrange these layers so that Icon is on top, followed by Highlight, then Shape then Mask.
Here is the completed drop zone. This drop zone is actually a shape object that we'll convert to a drop zone once inside SP2. The Shape and Highlight layers are both empty, but the Icon layer has my copy of the opacity white layer before I merged it with the black background to create our complex mask.
One of the benefits to using shape objects as drop zones are, I can easily go back to the Shape layer and add some kind of object if I would like to have some kind of shape that is always visible with this drop zone. I can also add a colored Highlight if I decide to use this as a motion menu button shape in the future. Remember that shape objects can be converted into drop zones and drop zones may be converted to shape objects for button shapes. In that regard, it's nice to follow the shape design rules to keep your created assets compatible with either type of object.
Importing our drop zone into DVD Studio Pro 2
Open SP2 and select the palette.
From within the palette, select Shapes > Custom > Import.
Select the shape object and import.
The icon layer shows up here as our button so we can see our object, however because there is no shape layer, it will not appear on our menu when I create a drop zone with this shape.
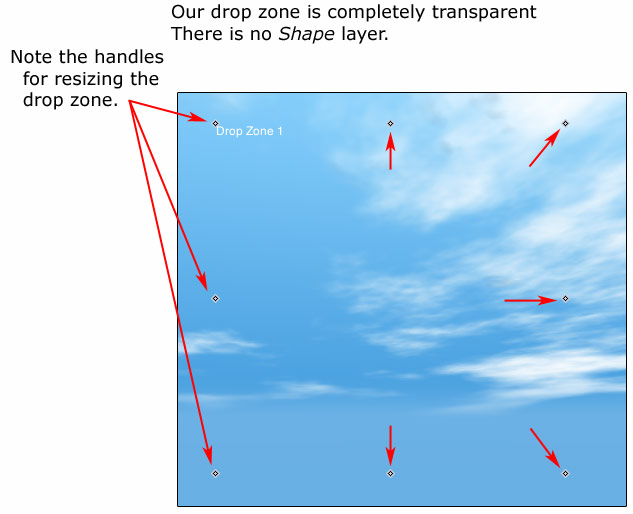
You can see the re-size handles, but nothing will appear until we drop a video or still image asset onto our drop zone.
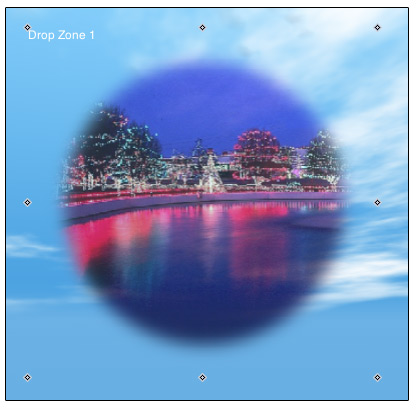
Here is the same drop zone after adding an image asset. The image is slightly grainy due to the opacity. For a sharper image, do not set opacity to the mask layer. You can see the feathered effect of the mask now has with our object.
Now just imagine you are creating a template and would like to be able to add images or motion video to a circle shape in your graphic background, such as the circular inner shape of a wedding ring. Perhaps you want to add a square shape to a television in the background of a template so that you can later add a video asset to your television. You can use these techniques to add drop zones to your background art.
That's it!
copyright © www.kenstone.net 2003