
How To January 29, 2001
How To January 29, 2001
Final Cut Pro v.1.2.5, an ambitious beginning...
by Charles Roberts AKA Chawla
Copyright Charles Roberts, 2000.
So you think you're good, huh? Got your Avid or Media 100 chops down cold and feel like you could be elected digital post-production dictator of this and other universes? Well then, its time to feel like a child again and learn a totally new interface and set of video standards...
The good news is that the new interface and standards are pretty easy to internalize if you keep on your toes (and read the suggested material). Final Cut Pro's interface is remarkably similar to both Avid's and Media 100's, so if you have previous NLE experience, you shouldn't really strain too much mentally to get this stuff down. If you're totally new to editing, you'll be able to approach Avid's and Media 100's much more confidence should the need arise. And the really great thing is that most of you could afford a turnkey system much like what we will be working with, if indeed, you don't already own the major components.
The set-up included here is specifically for those using NTSC Firewire capture and output. It does not even attempt to give info on PAL systems, Analog capture cards or even editing information. Its purpose is only to get a project started with preferences set for Firewire capture and to minimize the chances of running into dropped frames or losing media/project files.
 Before you begin ripping away at Final Cut, there are a few preparatory things you should take care of:
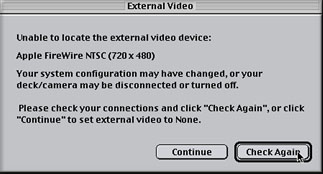
1. Make sure DV Deck/Camera is powered on. If not used for a while, it may power down into a sleep mode. When you start up FCP, you may get this message (right). If you do, chances are that the deck is not powered on. To see what you are doing in FCP, you need this deck/camera and an NTSC monitor (connected to your deck/camera using the analog outputs (rca or y/c cables) switched on. This is also how you will be outputting other tape formats (VHS, HI8, SVHS, even Beta), should you wish to do so. Simply patch the destination deck between the DV deck/camera and the NTSC monitor.
2. To monitor audio, simply patch audio out of your deck/camera to the NTSC monitor. At some times (and depending on your settings) you may also get audio from the Mac speakers. If it bothers you, you can disable it in prefs (later). If not ignore it.
3. Even if you are new to editing, I have one piece of advice for you above all other. Log your tapes. Make a VHS copy with a time code burned in (displayed in your DV deck/camera) and log that bad boy in the privacy of your home and in the comfort of your quilted bathrobe. Even a small drive like 10 gigs can hold 40 minutes of DV. which is more than enough for smaller projects. You just canŐt capture two hours of stuff that you wonŐt be using. Watch your VHS tape, write down the time code numbers of only the footage you want to use, and then use Batch Capturing to simply type the numbers in and have FCP go get the footage while you eat a sandwich. For more info about this, either get Lisa Brenneis' incredibly informative "FCP Visual QuickPro Guide" from Peachpit Press or take a C.E. class in non-linear editing. This is more important than you think.
Its really much less complicated than folks tend to think. The video footage on your DV tape isn't like VHS video. Its a file (just like this pdf). So when you capture it, you're just transferring the file from the tape to the drive. That's why we call it LOSSLESS, because its an exact copy of the file on the tape. Why is this important? Because when you play a clip in the FCP timeline (more later), the video file has to be read quickly unlike physical tape which crosses a tape head at realtime.
Now for common FCP usage, there are two kinds of DV files; files you captured using the firewire from deck/camera and files you create every time you render anything, i.e. dissolve, filters, etc. The former are called (and go into) "Capture" and the latter are called (and go into) "Render". Audio and Video captured from firewire are considered one file. Anything rendered is also a file. I recommend that your machine have at least 2 separate physical drives (ATA or SCSI makes no difference, FCP just sees drives, not flavors.). The first one, your start up drive, needn't be enormous (I happily use a 2 gig I ripped out of an old PC). It will contain only your system folder and various applications (including FCP).
The second drive, your capture and render drive, should be as large as possible. The cheapest way to put a system together is to use this configuration. The native ATA bus on your Macintosh (the start up drive that came with your machine is on this bus) can hold at most 2 drives. Your start up counts as one, so you can add one more. You'll want to make this as large as possible (60 gig ATA drives are available) because after that, you will have to add either an ATA or SCSI expansion card in the PCI slots in order to add more drives. Remember that DV data rates are about 5 minutes to the gig, so a sixty gig+ hard drive yields QUITE a bit of storage time-wise. You may never need another drive in the life of your system.
It should be noted that the Macintosh actually ships with not 1 but 2 ATA buses, each of which can hold 2 devices. The bus referred to above is Bus 1 and can hold one more drive in addition to the drive that ships with the Mac. The other bus, Bus 0, is the ATA bus that your CD/DVDROM drive and Zip Drive utilize (if you have one there) (take a look at Apple Menu>Apple System Profiler>Devices&Volumes; youŐll see what I mean). Now if you don't have one of these devices internal in your system (many don't buy the Zip, myself included), you can put another ATA drive in that slot, making 3 drives possible in your native system. Whether or not you choose to do this is a personal matter. I really don't recommend running a machine in the 20th century without a CD/DVDROM drive. The slot dedicated to the Zip Drive is narrow in the extreme and it can be pretty tough getting that drive to fit. I don't recommend it unless you know what you are doing.
The sharp reader has noticed that I have not mentioned partitioning. That is because partitioning, while appearing to create more than one drive, is really just divvying up slices of the same pie, so to speak. You will still be using one drive head to read the separate partitions. Partitioning your drives is fine, but it is highly recommended that you use a separate physical drive for media and the application itself. Partitioning your Start up drive is a great idea if you are using your Mac for other tasks such as Internet, word processing, gaming or anything else with weird extension sets but it is best not to partition for the use of capture and/or render. Information and details about doing so may be found elsewhere on 2 Pop. Use your own judgement. Its your machine. Just think logically. Just because it can work doesn't mean it always works, and those clutch moments are the ones you'll wish you chose to use the safe route.
Why is all this configuring necessary? As specified above, these files must be accessed quickly. As such, your media drive needs to be kept clean, fragmentation-free and available for FCPs nefarious uses instantly. Keeping your start up drive physically separate from your media drive will vastly improve performance in this regard. If you experience dropped frame warnings that you can ascertain are definitely not settings issues, it may be the result of such fragmentation. This is usually pretty easy to test and eliminate in any of a number of ways. 1) If you have the drive space, export a single file quicktime movie version of your sequence and then re-import it into your project. If the quicktime doesn't drop frames, then the problem is probably the result of the inability to access the original files because of fragmentation. Another way is, 2) Using the Cache Manager, delete the project's render files and then re-render. The resulting re-write of render files may eliminate the fragmentation. Obviously, this is more drastic and wouldn't be a good idea if you had three hours of rendered material, but if you determine you have unnacceptable fragging, this might clear it up.
There are a couple of things you can do to optimize your drives and avoid fragmentation or corruption. The first and most simple is to always use a storage buffer of 10% of the driveŐs size or 1 gig if larger than 10 gig. Giving the drive at least a 1 gig buffer will eliminate crowding on the drive which can slow down performance enormously (there are directions for setting this later in the document). Secondly, wipe your drives clean at the end of each project. Simply trashing the media files isn't as thorough. Do so by selecting the drive at the desktop level and choosing Special>Erase Disk. Careful, this is irreversible. Optimizing applications, such as Norton, are available, but will never be necessary if you take care of your drives, back up your project and use Timecode for re-capture. Other options are available if these don't do the trick, but can produce unpredictable results depending on your own particular config. Consult a professional 2 Pop-style.
That said:
Start up the whole system
1. When the Mac is finished booting, you will be looking at the desktop. To start FCP, double click on the Final Cut Pro Icon. When you start FCP, it will always open the last project that was open on the machine. When FCP is finished loading, there will probably be a project open and it may not be the project you want to work on. If not, just go the File Menu and select Close Project. You can really screw up your life by not keeping your eye on the ball.
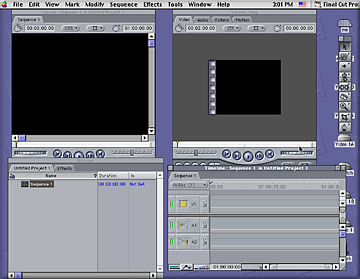
2. When FCP is completely loaded up, several windows should open up. More than likely, a previous project will open up as well, so immediately close any other project that may have opened, by going to the File menu and selecting Close Project. When there is no longer any project showing in the browser window (only the effects tab), go back to the File menu and select New Project (unless of course you already have a project you are working on, in which case you would merely open that project). On doing so, any number of the windows shown below will appear on screen.
This project you have opened will have the name Untitled assigned to it by FCP. That name is unacceptable. Do not let me catch you with Untitled anything. Name your files according to what they are. To name your project, select Save Project As from the File menu. A dialog box will immediately pop up asking you to name the damned thing. FOLLOW THE FOLLOWING METHOD EXACTLY !!! If you do not save your files in the appropriate locations, you will lose everything, hours and hours of work. Save your project files on the desktop and AT LEAST one MAC FORMATTED zip disk. This is REALLY important...
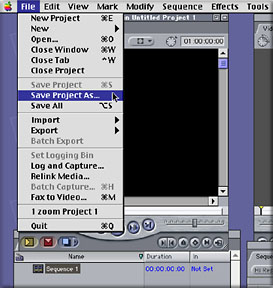
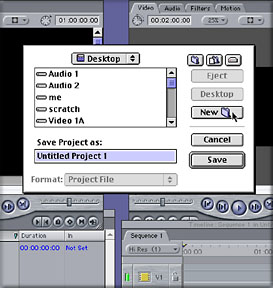
Do not name your project first. First, hit the Desktop button, then select New Folder. You will be asked to name the new folder. Name it with your project's name and the word "folder". Remember, unrecognizable stuff is WAY more likely to disappear. Hit OK and you will return to the Save Project dialog box. Change Untitled to something relevant and then hit OK.
Your project files will now be saved in YOUR folder on the desktop. To copy them to your zip disks periodically, simply re-name the folder with the date, pop in your zip and drag'em onto it. This will create a new backup of your project each time you work so that if you ever decide you went a wrong direction with your editing several days back, you can easily return to your previous version. (note-Remember never to run a FCP project from a zip disk. ALWAYS REMOVE YOUR ZIP FROM THE MAC BEFORE WORKING IN FCP.)
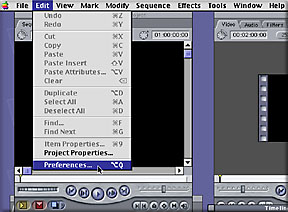 3. Now you must set your Preferences. Unlike many applications, where you can happily work without ever altering the default preferences, FCP needs you to set the prefs correctly in order to work correctly. FCP also has the annoying (or convenient, depending on your workstation needs) tendency to retain the preferences from the last project that was opened. This means that even if you have the right project open, FCP could do the wrong things to it.
EVERYTIME you start to work, go to Preferences and check to make sure that they are set the way that you want them. To do this, go to Preferences in the Edit menu. A window will come up that is divided into 5 tabs along the top. These are your Application Preferences. You must visit each of them, although it is conceivable that you may never have to change any of them. Just do it to make sure until you have it down cold, OK ? 90% of FCP problems are settings.
|
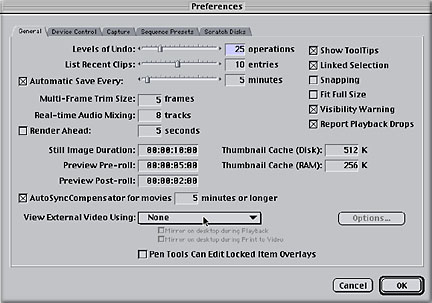
The first tab is for General Settings. If you are using a Canon camera, you may need to enable the Auto Sync. Keep Render Ahead off. If you are using a firewire connection to a deck or camera to monitor your work, then "View External Video" should be set to NTSC 720x480 DV. Until you are ready to push your system hard (i.e. when you know everything else works) unclick Mirror to Desktop. In certain situations, this can cause dropped frames. When you've got the whole kit and kaboodle functioning, you can go back and enable this, which will allow you to see real-time full motion video on your computer monitor as well as on your NTSC monitor. For this initial set-up, you will be using the NTSC monitor for your primary monitor. Leave "Report Playback Drops" enabled. This will be the only way you know you are dropping frames. If your system is dropping frames, you need to know this so that you can fix the problem. DROPPED FRAMES ARE NOT ACCEPTABLE!!! Be careful with the other settings on this tab and reference them in the FCP Quickstart Guide where they are explained in-depth.

The second tab is Device Control. This tab should rarely change, but you should still check it to make sure it is correct. The primary settings are Device Control enabled (unless you are using a source without time code (examples- Hi8 footage being captured using a D8 camera or passing video footage through a DV converter box)), Apple Firewire or Firewire Basic selected for Protocol (depending on your deck/camera) and DV Time selected for Time Source. If, in the course of your capturing, you encounter an error stating "Unable to Lock Deck Servo", you may need to boost pre-roll and post-roll settings by a few seconds. Some decks need more time to get up to speed.
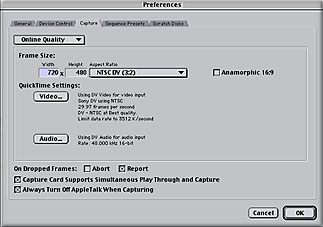
The third tab is the Capture Settings. The settings should be Online Quality and 720x480 NTSC DV (3:2). If your footage was shot in anamorphic 16X9 in the camera, you need to enable the 16x9 switch. In addition, you should hit the Quicktime Settings Video and Audio buttons and check them. They should be set to (1) Video: DV NTSC Quality=best (100) and 29.97 FPS and (2) Audio: uncompressed at 48Khz 16 bit device DV. If you wish to capture audio from another source, such as the built-in mike jack on the Mac, you can change the audio capture settings to capture from there. In that case, you would set Source as "Built In" and sample at "44.1". In this same box, you can tell FCP not to play back any audio through the Mac speakers when capturing. I also recommend that you enable "Always turn off Appletalk when capturing..." and "report" but not "abort" for "On Dropped Frames". If Appletalk is left running during a capture session, and you have a networked machine, the network may interrupt every so often. This steals the processor away from its job of putting all those frames in order for you and may lead to dropped frames. "Report" dropped frames is the only way that you will know you've dropped frames. Disabling it would be like pulling the battery out of a smoke alarm to prevent fires.
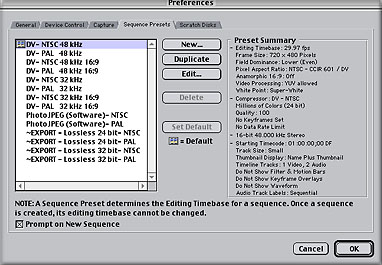 The fourth tab is Sequence Settings. This one, paired with the capture settings, is crucial. If your settings are not universal, you will have to render everything constantly, eliminating all the benefits of Firewire. The generic initial settings for this tab should be exactly as the preset "DV-NTSC 48k" or "DV-NTSC 32k" has them (below).
Edit Timebase= 29.97 FPS
Frame Size= 720x480
Field Dominance= Lower
Pixel Aspect Ratio= NTSC-CCIR 601/DV
Anamorphic 16x9 off
Video Processing: YUV allowed
Whites: Super-White
Compressor= DV-NTSC
Millions of Colors (24 bit)
Quality= 100
16 bit 48 Khz Stereo.
The rest of the settings are adjustable and should be set for your own needs, but the upper ones are really important. ALWAYS CHECK THEM FIRST. Some of these settings may change depending on your needs. For instance, you may use footage which is anamorphic 16x9 or you may have reason to use RGB instead of YUV for video processing. If this should be the case, create a duplicate of the Sequence Preset that most closely resembles what you want and edit the duplicate. Refer to the manual and/or Lisa B's QuickPro Guide for further info on how to do this.
If you are capturing video and, without adding effects, the FCP timeline says it needs to be rendered (a red line), then your settings are wrong, wrong, wrong. After you've done a project or two and begin to understand the different possibilities and formats you might work with, changing these may make sense. But as long as you are working from DV Firewire capture and mastering to a DV Firewire deck/camera, varying from this formula will only cause you grief.
NOTE- If you are not using DV Firewire, chances are these settings will not be correct for you. Duh!!! This whole document is limited to the community of FCP editors using Firewire capture.
As much as we'd lke it to be intuitive and human, FCP really is kind of a stupid machine. It can only do exactly what we tell it. It does not evaluate the data we give it, it simply re-produces that data according to how we have told it the data should be evaluated. If you tell FCP that the audio on your DV tape was recorded at 48k, when it was really recorded at 32k, it will process the audio at the wrong rate. Incorrect audio settings are the main source of out-of-sync audio and video on the timeline.
If your audio goes slowly out of sync as the playhead moves down the timeline, your settings were probably wrong at some point. It is important that you inform FCP what rate the audio was recorded at and that you keep the rates consistent across the application. This means that 48k audio should be set at 48k in the capture settings and sequence settings. Not all cameras record at 48k; the Sony VX1000 records at 32k, for instance. If using this camera, you must set up your project accordingly. If using audio from a different sample rate, simply change the sample rate in the Capture and Sequence settings to reflect this.
It is also recommended that you enable the "Prompt on New Sequence" switch. Many times, when creating a new sequence, folks forget that they will be using audio captured at a different sample rate. FCP allows you to mix sample rates on the timeline and will not inform you that you have a potential sync problem from mixed sample rates (it assumes that YOU know what you are doing). Thus its easy to forget to tell FCP not to use the default sample rate. By prompting to set the sequence settings for every new sequence, you will be forced to keep tabs on what sample rate is in use for each sequence.
The last tab is of EXTREME importance. It is called Scratch Disks. This is where all that initial talk of capture and render drives comes into play. This is where you tell FCP to direct the media it is capturing or rendering to a specific drive assignment. This is similar to telling an Avid or Media 100 which drives to use. In this instance, though, you will be choosing just one drive each for capture and render.
You must set this. If you forget, you will probably capture to your start-up drive which is a REAL NONO.
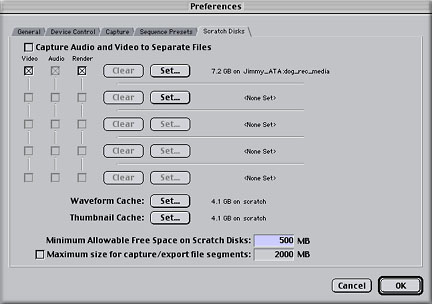 The first setting is to disable capturing Audio and Video to separate files. Once again, if you are not using Firewire to capture, this may not be correct for you. A/V should be separated when using much higher data rates, for example Targa, Igniter and other Analog capture boards. If you are using such hardware, the info on these prefs probably not only doesnŐt apply to you but could screw you up. This info is for DV Firewire capture ONLY. For particulars as to why, ask me or wait for the stimulating lecture.
If any drives are already listed on this window, hit clear to get rid of them. Start with a clean slate. Next, click Set on the topmost of the five Clear/Set combination lines. You will receive a dialog box asking you to select the appropriate folder/drive. Navigate the dialog box until you are looking at the desktop, then double click your Capture/Render drive. When you are inside your target capture/render drive, select "new folder". Enter the name of your project followed by "_media_folder". Hit OK, then back up the navigation drop down bar one step so that you see this "your project media folder", select it and hit "Select". Make sure that you name everything in the capture/render directory (exact path to the capture and render folders starting at the desktop level, the "Jimmy_ATA:dog_rec_media" following "7.2 GB on..." in the above picture.) with distinctly different names, using the underscore if necessary. FCP can confuse folder and drive names quite easily, so use a naming convention that makes sense to you but which is easy for FCP to keep organized.For instance, the drive names above are lousy choices; the difference between "Video 1" and "video 2" can escape FCP. "#1Video" and "#2Video" might be better choices. "Fred" and "Sam" would be even better, if you can keep them organized in your own head.
When you hit Select, you will return to the Scratch Disk box. The Drive/Partition and the "your_project_media_folder" folder you chose will be in the topmost line. Click in the check boxes for "Video" and "Render". If you have other drives you wish to dedicate as Capture/Render drives, follow the same process for each, leaving only the start-up drive un-allocated.
You may be asking yourself right now, "Why does Chawla want me to create a media folder for the project? FCP will create a "Capture folder" on the drive I select, so why bother?" The answer is Media Management, my friend. Suppose you have three projects on your system at the same time. If you finish one project, you could clear the media off the drive to provide more space for the other projects, BUT ONLY IF YOU CAN TELL WHICH MEDIA BELONGS TO WHICH PROJECT!!! If each project has its own media folder, you can just toss that media folder when finished with the project (always shut FCP down when you do this; FCP will freak out if you chuck media it is using). If you use the same Capture folder for all your projects, how will you know which media goes to which project? Media Management is way more important than you think. Don't whine that FCP has no Media Management tools. Take responsibility for your own Media Management. Never ask a desktop computer to do a job you can do better.
Another important setting for this preference menu is the "Minimum Allowable Free Space". "Minimum" should be set to avoid getting poor drive performance and possibly dropped frames as a result of drive fragmentation. Drive performance degrades dramatically past a certain point of drive capacity. In the old days, 85% capacity of a drive was generally considered the limit. This meant that on a ten gig drive, you could expect massive drive slow down after writing 8.5 gigs to it. Some really neurotic people (like me!!!) used 75%.
This is not a written-in-stone policy and there are a jillion variables that affect whether or not a drive becomes massively fragmented after a certain capacity. I generally set mine at 1 gig (or 1000mb). A 1 gig buffer leaves plenty of space to avoid fragmentation and is realistically only burning about 5 minutes of capture time. Not too bad. I would recommend that you choose a number that is either 10% of the total drive size or 1 gig, whichever is less. That should keep it happy. "Maximum Size for Capture/Export" should be left unchecked unless you are attempting something in particular that requires specific limitations on file sizes and/or you know what you are doing. This will not affect your systemŐs performance under generic capture and playback situations. Hit OK in the bottom right hand corner.
Another important setting for this preference menu is the "Minimum Allowable Free Space". "Minimum" should be set to avoid getting poor drive performance and possibly dropped frames as a result of drive fragmentation. Drive performance degrades dramatically past a certain point of drive capacity. In the old days, 85% capacity of a drive was generally considered the limit. This meant that on a ten gig drive, you could expect massive drive slow down after writing 8.5 gigs to it. Some really neurotic people (like me!!!) used 75%.
This is not a written-in-stone policy and there are a jillion variables that affect whether or not a drive becomes massively fragmented after a certain capacity. I generally set mine at 1 gig (or 1000mbs). A 1 gig buffer leaves plenty of space to avoid fragmentation and is realistically only burning about 5 minutes of capture time. Not too bad. I would recommend that you choose a number that is either 10% of the total drive size or 1 gig, whichever is less. That should keep it happy. "Maximum Size for Capture/Export" should be left unchecked unless you are attempting something in particular that requires specific limitations on file sizes and/or you know what you are doing. This will not affect your system's performance under generic capture and playback situations.Hit OK in the bottom right hand corner.
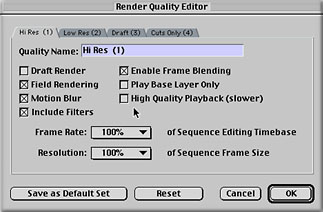
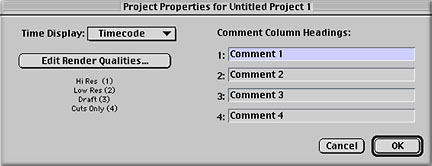 Ok, now the last setting and you're home free. Go to the Edit drop down menu and select Project Properties. The following box will open. Without altering anything, hit Edit Render Qualities. The next box that opens should look like this. Adjust the settings exactly as shown. The time will come when you can adjust these to benefit and streamline your process, but for now they will keep you from dropping frames.
Hit OK for this window, OK to close the Project Properties window and you have finished your settings. Now you can work reasonably assured that you are not going to drop frames.
 Remember, this is only a guide for preparing a generic project from and to firewire. Your own editing needs as well as your materials and configured system will determine how you should vary from this tried and true path. If, for instance, you attempt to do the Apple Manual Tutorial with these settings, you will quickly discover that they are not right. Settings depend on what you are using and what you intend to do. This is why much literature on FCP seems vague about settings. The possibilities are just too numerous. However if you are using Firewire in/out with "nothing weird" as they say, this should be just fine.
More Tips:
#1 Go out RIGHT NOW and buy Lisa Brenneis' "FCP QuickPro Guide" and/or Intelligent Media's "DV Companion" and/or the "PowerStart CD-ROM". You need it, trust me. Most of the answers and the best editing training for FCP are there.
#2 Shoot and edit little things first, don't start out with Moby Dick. By the time you do a couple of small things, you'll realize that you know what you're doing and can tackle the big ones. Trying to do a monster project before you're ready is just going to give you big headaches. Patience, grasshopper.
#3 Read the books. Learn how to use time code. It is the bestest tool you have. Without it, you are at the mercy of a merciless machine that likes to eat media.

#4 Boost the RAM allocation to 128,000k minimum and 150,000 preferred for FCP. Do this by selecting (but not double clicking) the FCP icon and hitting command-I (Get Info in the File drop down menu in the Finder). In the window that opens up, click the drop down and select memory and you will see the place to enter the values. Do not give FCP too much RAM; it won't use it anyway. Just assign the above values.
#5 There are some rendering bugs in FCP if using pre-4.1.2 Quicktime and/or pre-1.2.5 FCP. They are the "Luma clamping problem" and the "After Effects/DV NTSC codec rendering problem". Moving up to QT 4.1.2 and FCP 1.2.5 will eliminate these problems. There are also work-arounds available on the www.2-pop.com website for folks who either can't or wonŐt upgrade. Go there for more information.
#6 Go to 2-pop's site on a regular basis anyway. Along with the FCP WWUG (www.wwug.com), its by far the best, most up-to-the-minute resource on FCP. Where do you think all this info came from, aside from my own blood, sweat and tears?
#7 Do routine weekly maintenance. Rebuild your desktop regularly (start up the Mac and hold down the command and option keys until it asks if you want to rebuild, then select OK). If you don't do this, your machine may start crashing or losing files. If you are new to the Macintosh system, go ahead and drop the dough on a book about the Mac OS. It is not a PC and you should find out how it likes its tummy scratched.
Thanks Without Whom etc. (and hearty tribute) to Apple, Ralph F., Lisa B., Philip H., Ken S., Telly, Randall D. and the rest of the faceless but amazingly helpful and resourceful regulars on the 2-pop forum. All screen captures and textual references are the property and trademark of their creators/owners/publishers.
Copyright Charles Roberts, 2000.
Charles Roberts AKA Chawla teaches Digital Video and Audio Production at Fitchburg State College in Fitchburg, MA. He uses his long tedious rendering times to generate content and tackle hard hitting issues on the discussion boards of 2-pop.