
How to Install FCP 3 on OS 9.2.2 January 18, 2002
Final Cut Pro v.3.0 for Mac
OS 9.2.2, an ambitious beginning...
By Charles RobertsFinal Cut Pro 3 adds a great many new features that will be very useful to FCP DV editors across the board. But luckily for us, the most important part of the application's interface really hasn't altered all that much. The approach to setting up preferences and scratch disks and saving projects in a safe manner is very much the same, if a little more flexible.
One of the biggest changes is that FCP is now able to run inside Mac OS X. The differences between OS 9.2.2 and OS X are pretty profound, so it is important that project set up follow some specific guidelines. If you intend to run FCP in OS X, please move to the Ambitious Beginnings article dedicated to set up under that OS. The information in this article will be specific to setup under the OS 9.2.2 interface, which in some instances performs very differently and requires a different attitude and approach.
This article is a suggested method of project setup for an NTSC Firewire FCP editing station under 9.2.2. It was developed in a busy multi-user college editing lab. It is a system for ensuring that individual projects are properly configured and that each editor's work is safe and secure in a lab where many hands pass over one FCP station everyday. Many of the exhortations included are specifically there to ensure that while you work, you are not demolishing another editor's work. As such, if you are the only one utilizing your station, some of the material may seem a little, well, paranoid or irrelevant. Rest assured that such techniques will not HARM the single user, although some concerns may be overstated for the single user. You may find that even in the single user setting, the processes below are useful and serve to keep you organized and healthy.
The set-up included here is specifically for those using NTSC Firewire capture and output. While it does not attempt to give info on PAL systems, the setup for PAL Firewire DV is essentially the same. Simply choose PAL numbers where there is a choice for PAL or NTSC. This document is not the correct setup information for Analog capture cards, any Realtime solutions like Matrox or the new Offline RT or even basic editing information. The purpose is only to get a project started with preferences set for DV Firewire capture and to minimize the chances of running into dropped frames or losing media/project files.
This article mirrors a particular chapter in my recently published book "Final Cut Pro 2 for Firewire DV Editing" (Focal Press, 2001). If you like the style of delivery here, you might want to check the book out. In it you will find very thorough explanations and more in-depth setup and editing processes than are possible to fit into a short web article. But if you like the language and delivery here, you'll dig the whole book.
Do not be too concerned about the 2 in "Final Cut Pro 2..." with regard to my book, or a few of the other FCP-dedicated books out there today. The vast bulk of the 3.0 upgrade features are advanced ones that are beyond the scope of my book. I concentrate there on the proper setup of the FCP editing station for Firewire DV and the basic tasks of logging, capturing, editing, special effects work and output to tape and web. None of these processes in FCP 3 have been drastically altered from previous versions where most new editors are concerned, and so the book is still a very good introductory tool for new users of FCP. Once you master the initial bedrock FCP interface through my book, you'll be able to integrate the new features in FCP 3 and beyond in the blink of an eye, understanding what they mean and how they can help you in your workflow.
On to the fun...
Before you begin ripping away at Final Cut, there are a few preparatory things you should take care of:
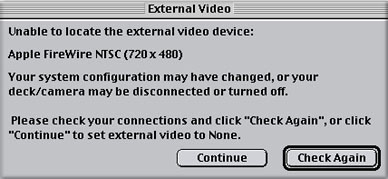
1. Make sure DV Deck/Camera is powered on. If not used for a while, some DV devices may power down into a sleep mode. When you start up FCP, you may get this message. If you do, chances are that the deck is not powered on. To see what you are doing in FCP, you need this deck/camera and an NTSC monitor (connected to your deck/camera using the analog outputs (RCA or y/c cables) switched on. This is also how you will be outputting other tape formats (VHS, HI8, SVHS, even Beta), should you wish to do so. Simply connect the a VHS deck between the DV deck/camera and the NTSC monitor.
2. To monitor audio, simply connect the audio out of your deck/camera to the NTSC monitor. At some times you may also get audio from the Mac speakers. If it bothers you, you can disable it in preferences (later). If not, ignore it. If you are sending video out to the Firewire connection to preview, the audio goes out to Firewire as well. In a Firewire DV set up, audio always follows video out to the Firewire deck. Thus the only way to use your Mac speakers is to either connect them to the Firewire deck/camera (not likely with the new USB speakers) or to disable sending video out to Firewire for preview. If you disable video out to preview, you will be editing entirely by watching playback on your computer monitor, and you will hear the audio through speakers hooked up to your Mac.3. Even if you are new to editing, I have one piece of advice for you above all other. Log your tapes. Make a VHS copy with a time code burned in (displayed in a little box on the video screen by your DV deck/camera) and log that bad boy in the privacy of your home and in the comfort of your quilted bathrobe. Even a small 10 gig drive can hold 40 minutes of DV, which is more than enough for smaller projects. You just can't capture two hours of stuff that you won't be using. Watch your Timecode window burn tape, write down the time code numbers of only the footage you want to use, and then use Batch Capturing to simply type the numbers in and have FCP go get the footage while you eat a sandwich. See my book for a thorough walkthrough of the log and capture process. This is more important than you think.
A note on configuring drives:
It's really much less complicated than folks tend to think. The video footage on your DV tape isn't like VHS video. It's a digital file. So when you capture it, you're just transferring the file from the tape to the drive. That's why we call it LOSSLESS, because it's an exact copy of the file on the tape. Why is this important? Because when you play a clip in the FCP timeline (more later), the video file has to be read from a hard drive quickly, unlike the physical DV tape that crosses a tape head at real-time.Now for common FCP usage, there are two kinds of DV files; the files you captured using Firewire from the deck/camera and the files you create every time you render anything, i.e. transitions, filters, etc. The former are called (and go into) "Capture" and the latter are called (and go into) "Render". Audio and Video captured from Firewire are considered one file. Anything rendered is also a file, even though it is saved in a different place by FCP.
I recommend that your machine have at least 2 separate physical hard drives (ATA or SCSI makes no difference, FCP just sees drives, not flavors.). The first one, your start up drive, needn't be enormous. It will contain only your system folder and various applications (including FCP). A 40 gig drive that is more than fast enough can be found for around 75 bucks these days, so not adding the recommended second drive to your system is really inexcusable, in view of the amount of trouble it will save you down the road.
The second drive, where your capture and render files will end up, or the MEDIA drive, should be as large as possible. The cheapest way to put a system together is to use this configuration. The native ATA bus on your Macintosh (the start up drive that likely came with your machine is on this bus) can hold at most 2 drives. Your start up disk counts as one, so you can add one more.
You'll want to make this as large as possible (60+ gig ATA drives are available) because after that, you will have to add either an ATA or SCSI expansion card in the PCI slots of your Mac in order to add more drives. Remember that DV data rates are about 5 minutes to the gig, so a sixty gig+ hard drive yields QUITE a bit of storage, time-wise. You may never need another drive in the life of your system. To sum up, you want to have one smaller hard drive that holds the System Folder and applications like FCP, and then you want another totally separate hard drive that is very large exclusively for the DV you will be capturing from Firewire into FCP.
It should be noted that the Macintosh actually ships with not 1 but 2 ATA buses, each of which can hold 2 devices. The bus referred to above is Bus 1 and can hold one more drive in addition to the drive that ships with the Mac. The other bus, Bus 0, is the ATA bus that your CD/DVDROM drive and Zip Drive utilize (if you have one there) (take a look at Apple Menu>Apple System Profiler>Devices&Volumes you'll see what I mean). Now if you don't have one of these devices internal in your system (many don't buy the Zip, myself included), you can put another ATA drive in that slot, making 3 drives possible in your native system. Whether or not you choose to do this is a personal matter. I really don't recommend running a machine in the 21st century without a CD/DVDROM drive. Also, the slot dedicated to the Zip Drive is narrow in the extreme and it can be pretty tough getting that drive to fit. I don't recommend it unless you know what you are doing.
The sharp reader has noticed that I have not mentioned partitioning. That is because partitioning, while appearing to create more than one drive, is really just divvying up slices of the same pie, so to speak. You will still be using one drive to read the separate partitions. Partitioning your drives is fine, but it is highly recommended that you use a separate physical drive each for media and the system folder/FCP application itself. Partitioning your Start up drive is a great idea if you are using your Mac for other tasks such as Internet, word processing, gaming or anything else with weird extension sets but it is best not to partition for the use of capture and/or render. Information and details about doing so may be found elsewhere on 2 Pop. Use your own judgement. It's your machine. Just think logically. Just because it can work doesn't mean it always works, and those clutch moments are the ones you'll wish you chose to use the safe route.
Why is all this configuring necessary? As specified above, these files must be accessed quickly. As such, your media drive needs to be kept clean, fragmentation-free and available for FCP's nefarious uses instantly. Keeping your start up drive physically separate from your media drive will vastly improve performance in this regard. If you experience dropped frame warnings that you can ascertain are definitely not settings issues, it may be the result of fragmentation due to your system trying to read media files and system or application files simultaneously. This is usually pretty easy to test and eliminate in any of a number of ways. If you should encounter serious dropped frame trouble and you ascertain that the settings are correct, do a little research and try the following:
1 . If you have the drive space available, export a single file QuickTime movie version of your sequence and then re-import it into your project. If the QuickTime movie doesn't drop frames, then the problem is probably the result of the inability to access the original files because of fragmentation.2 . Another way is to use the Render Manager, delete the project's render files and then re-render. The resulting re-write of render files may eliminate the fragmentation. Obviously, this is more drastic and wouldn't be a good idea if you had three hours of rendered material, but if you determine you have unacceptable fragging, this might clear it up.
3. Select the clip you got Dropped Frames on capturing and go to Tools>Analyze>Clip. If you see one frame described as being more than one frame long, there is likely no trouble, only a known rare TC issue with DV. If you see many frames described with odd lengths and you have done your settings correctly, you may need to look into de-fragging your drives. Once again, see 2 Pop about ways for doing this.
There are a couple of things you can do to optimize your drives and avoid fragmentation or corruption. The first and most simple is to always use a storage buffer of 10% of the drive's size. Giving the drive a buffer will eliminate crowding on the drive which can slow down performance enormously (there are directions for setting this later in the document).
Secondly, wipe your drives clean at the end of each project. Simply trashing the media files isn't as thorough. Do so by selecting the drive at the desktop level and choosing Special>Erase Disk. Careful, this is irreversible. Optimizing applications, such as Norton, are available, but will never be necessary if you take care of your drives, back up your project and use Timecode for re-capture. Other options are available if these don't do the trick, but can produce unpredictable results depending on your own particular configuration. Consult a professional 2 Pop-style.
That said:
Start up the whole system1 . When the Mac is finished booting, you will be looking at the desktop. To start FCP, double click on the Final Cut Pro Icon.

When you start FCP, it will always open the last project that was open on the machine, or an untitled project if this is your first time or you have thrown out the preferences. Chances are when FCP is finished loading, there will be a project open and it may not be the project you want to work on. If not, just go the File Menu and select Close Project. You can really screw up your life by not keeping your eye on the ball, because if you just begin working and save, you may change someone else's work. Also remember that more than one project can be open at a time. If you don't want to work with a project that opens at start up, close it or you may accidentally change and save it later.
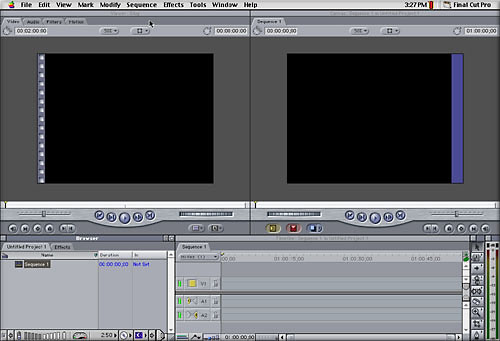
2. When FCP is completely loaded, several windows should open up. More than likely, a previous project will be open up as well, so immediately close any other project that may have opened, by going to the File menu and selecting Close Project. When there is no longer any project showing in the browser window (only the effects tab), you must set your Preferences. Unlike many applications, where you can happily work without ever altering the default preferences, FCP needs you to set the preferences correctly in order to work. FCP also has the annoying (or convenient, depending on your workstation needs) tendency to retain the preferences from the last project that was opened. This means that even if you have the right project open, FCP could do the wrong things to it. Although FCP 2.0 included some enhancements that make preferences and A/V settings easier, you must still make the correct settings or FCP will not work right.
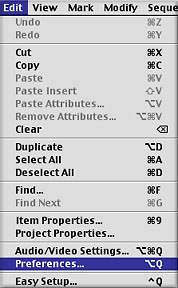
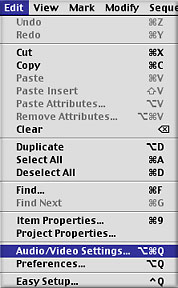
EVERYTIME you start to work, go to Audio/Video Settings and Preferences and check to make sure that they are set the way that you want them. To do this, first go to Preferences in the Edit menu.
A window will come up that is divided into 5 tabs along the top. These are your Application Preferences. You must visit each of them, although it is conceivable that you may never have to change any of them. Just do it to make sure until you have it down cold, OK ? 99% of FCP problems are settings-related.
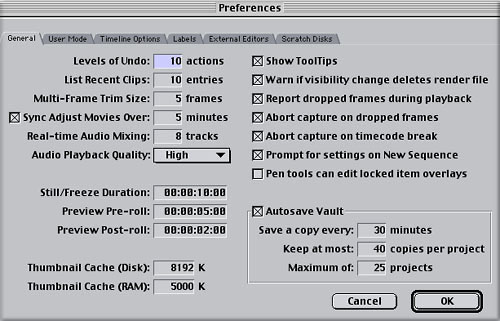
The first tab is for General Settings.Sync adjust Movies should generally be kept on all the time. Without going too far into how it works, suffice it to say that the way that Firewire DV maintains sync between Video and Audio you capture depends on FCP calculating the exact length of a captured video and audio clip. In a long clip over five minutes, FCP needs to do this manually. Enabling Sync Adjust Movies allows it to do so. In the past it was believed that only certain cameras required this, but it is now specified that it might be a good idea for all decks and cameras and that it can't hurt you in any event.
There is only one exception to this rule. If you are capturing over a Timecode break in your DV tape, enabling Sync Adjust Movies can result in total miscalculation of sync. IMPORTANT: DO NOT ENABLE THE SYNC ADJUST MOVIES IF YOU BELIEVE THERE ARE TIMECODE BREAKS ON YOUR DV TAPES OR IF YOU ARE CAPTURING PAST THE END OF FOOTAGE ON A TAPE. If such is the case, disable the checkbox until that capture is complete, and then turn it back on.
Leave "Report Playback Drops" and "Abort Capture Drops" and "Abort Capture on Timecode Breaks" enabled. This will be the only way you know you are dropping frames. If your system is dropping frames, you need to know this so that you can fix the problem. DROPPED FRAMES ARE NOT ACCEPTABLE!!! Disabling them is like taking the batteries out of a smoke alarm.
With 3.0, the FCP team has included really great archival backups in Autosave on par with the other app out there we won't name. The Autosave Vault is a really valuable tool for incrementally archiving your project and allowing you to back up any number of steps in your editing process. We have also been given way more flexibility in terms of when it saves and how many different archived backup copies it makes before it begins cleaning house and throwing away old copies.
Although using Autosave Vault should not supplant your own system of backing up project files to another disk (a process you will be shown later in the article), it might save you some heartache one day. Enable this with the default settings and delve into the manual for more interesting ways to make it work for you.
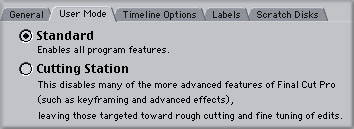
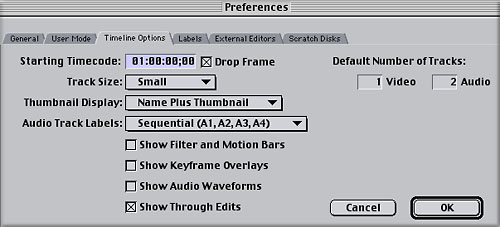
The second tab is for User Mode. The User Modes limits some of the features available to the project and leave a workstation that is easier to use for the simpler tasks of field logging and rough cutting. For the time being, select Standard. It is also a good way to keep from adding edits to a sequence that will not translate into an EDL, if you know what that means. If you change the User Mode, you have to restart FCP for it to take effect.The third tab is for Timeline Settings. This preference allows you to customize certain features of the sequence timeline. You also have the option of having the timeline start with a time value other than 01:00:00:00, which can be a useful function in certain circumstances when using the Edit to Tape function.
The fourth tab, Labels, is for assigning color values for status indicators in the timeline. This is less critical, but you can customize these when it becomes necessary.
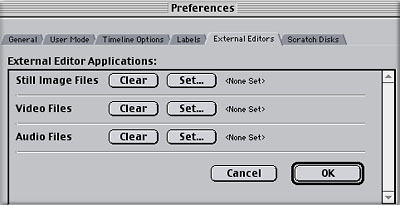
The fifth tab, External Editors, is for specifying an external application for use from inside FCP. Check the manual for excellent strategies in using this feature.
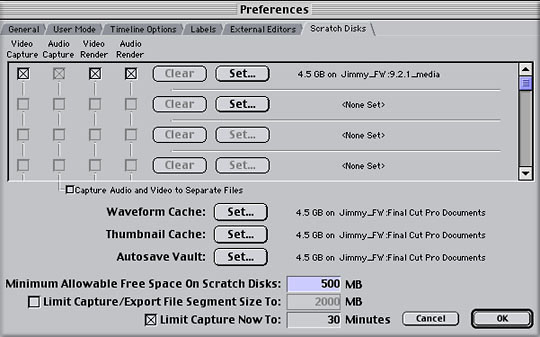
The sixth tab is absolutely critical. It is called the Scratch Disk settings and it is where you tell FCP where you want to save those enormous Capture and Render Files we were just discussing above. No matter how streamlined FCP makes the process of starting a project, this Scratch Disk Preference will always remain a critical responsibility of the user. You will not take it seriously until you lose a lot of files one day and have to completely redo a finished project.
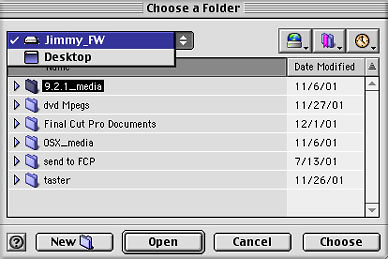
To correctly set your Scratch Disk Preferences:Click Set on the topmost of the Clear/Set combination lines. You will receive a dialog box asking you to select the appropriate folder/drive. Navigate the dialog box until you are looking at the desktop, then double click your Capture/Render drive.
When you are inside your target capture/render drive, select "new folder". Enter whatever you wish to name your destination followed by "_media ".
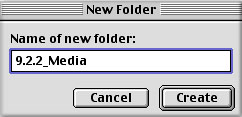
Hit Create, then while that newly created folder is still selected, hit "Choose".
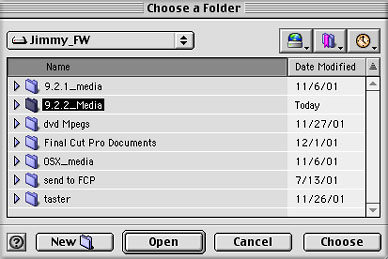
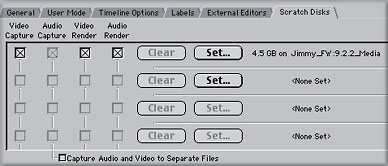
After you hit "Choose", you'll return to the Preferences. Look at the information next to the Set button. Make sure that you named everything in this capture/render directory with distinctly different names, using the underscore if necessary (the directory is the exact path to the capture and render folders starting at the desktop level, the "2ATApart:newfor3_media" following "2.5 GB on..." in the below picture.)
FCP can confuse folder and drive names quite easily, so use a naming convention that makes sense to you but which is easy for FCP to keep organized. For instance, the drive or folder names "Video 1" and "video 2" are lousy choices; the difference between them can escape FCP. "Fred" and "Sam" would be better choices; develope a drive naming system that makes sense and stick with it.
Click in the check boxes for Video, Video Render, Audio and Audio Render. If you have other drives you wish to dedicate as Capture/Render drives, follow the same process for each, making sure to leave the start-up drive unallocated. FCP 3 now allows you to specify up to 12 Scratch Disks, a welcome change for those of use with lots of storage options.
You may be asking yourself right now, "Why does Chawla want me to create a media folder for the project? FCP will create a "Capture folder" on the drive I select, so why bother with further delegating it into a specific folder within that drive?" The answer is Media Management, my friend. The secret to a happy Media Drive is keeping it organized and tidy. If you simply select the Media Drive as the assigned Scratch Disk, FCP will create three folders on that drive, the Capture, Render and Audio Render folders. Then, every time you create a project, it will create a project-specific folder in each of these folders.
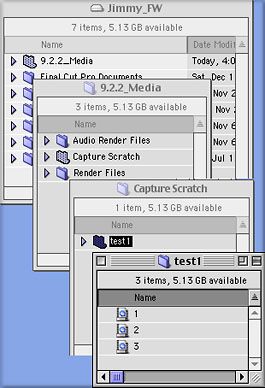
Of course there is intrinsically nothing wrong with that. That's what FCP was designed to do, and it is a vastly improved system compared to the previous version's handling of media. However, there is a potential danger for people who tend to be sloppy with drives. Pretty soon, you may find yourself with generic Capture and Render folders on every drive on your system. And inside every one of these generic folders will be project media folders with different media from different sessions OF THE SAME PROJECT! Tidiness is important. Although the new Media Management tools will allow you to correct this situation easily enough from inside FCP, the best idea is to avoid such a situation in the first place.
So every time you begin work with FCP, go to the Scratch Disk preferences and make sure that the folder originally you created for your project's media on the Media drive is selected. Doing this will keep your Capture, Render and Audio Render folders grouped together in one location and also ensure that in each, the single correct media folder for each of your projects is in place.
Version 3.0 of Final Cut Pro contains even stronger Media Management tools than previous versions, but the need to understand and control your media files is just as necessary as ever. Now FCP will let you eliminate media from your drives to make room should you need it. Your capabilities in MID-project are fantastic, but the ability to juggle multiple projects on the same drive and clean up the system after you are finished depends on how carefully you construct your projects at the beginning.
Take responsibility for your own Media Management. Never ask a desktop computer to do a job you can do better with very little effort.
Make certain to disable Capture Audio and Video to Separate Files. Once again, if you are not using Firewire to capture, this may not be correct for you. A/V should be separated when using much higher data rates, for example Targa, Igniter and other Analog capture cards. If you are using such hardware, the info on these preferences probably not only doesn't apply to you but could screw you up. This info is for DV Firewire capture ONLY. For particulars as to why, ask me or wait for the stimulating lecture.
Another important setting for this preference menu is the "Minimum Allowable Free Space". This is the 10% buffer to which we referred earlier in the article. "Minimum" should be set to avoid getting poor drive performance and possibly dropped frames as a result of drive fragmentation. Drive performance degrades dramatically past a certain point of drive capacity. In the old days, 85% capacity of a drive was generally considered the limit. This meant that on a ten gig drive, you could expect massive drive slow down after writing 8.5 gigs to it. Some really neurotic people (like me!!!) used 75%.
This is not a written-in-stone policy and there are a jillion variables that affect whether or not a drive becomes massively fragmented after a certain capacity. I generally set mine at 1 gig (or 1000mb). A 1 gig buffer leaves plenty of space to avoid fragmentation and is realistically only burning about 5 minutes of capture time. Not too bad. I would recommend that you choose a number that is either 10% of the total drive size or 1 gig, whichever is less. That should keep it happy.
"Maximum Size for Capture/Export" should be left unchecked unless you are attempting something in particular that requires specific limitations on file sizes and/or you know what you are doing. This will not affect your system's performance under generic capture and playback situations. If you are going to use Capture Now (and not the preferable method of logging your clips), you can also enter a maximum limit to the length of the capture. Hit OK in the bottom right hand corner.
If that weren't enough:
Next you need to set the Audio/Video Settings. You can actually do what is called an Easy Setup to speed up your process in future projects. But you need to do an initial check to make sure your system is set up correctly. Then you can assign this as your Easy Setup, using it every time you work and easily adapting your system when your hardware or media situation changes. To get to the Audio/Video Settings, go to Edit>Audio/Video Settings.
This will bring up the A/V Settings
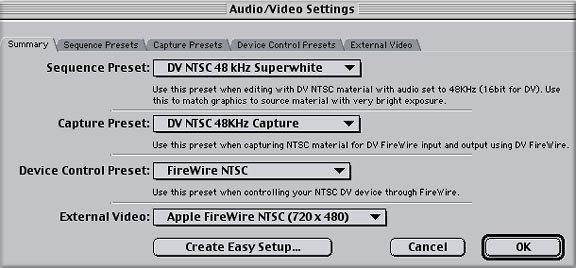
The first tab displays the settings currently active in the other four tabs and lets you set up Easy Setup settings. We'll come back to this tab after configuring the other four tabs. Click on the Sequence Presets Tab
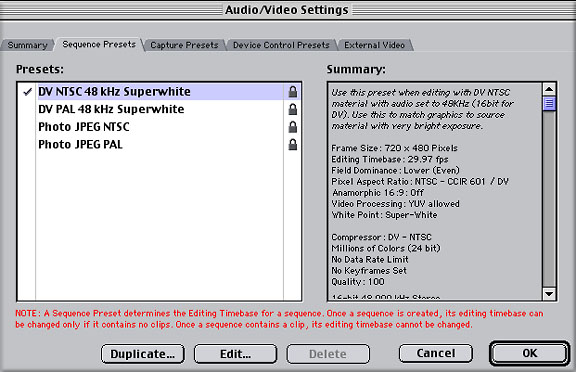
You will want to set up this preset depending on what your own needs are. FCP requires that your settings for Sequences and Capture match, and that both match the actual DV media you capture from tape. For Firewire, the DV NTSC 48K Superwhite preset should be fine here. But most DV cameras allow you to record Audio in your camera at either 32K or 48K. It is IMPERATIVE that you know which you have used, and that you set it correctly here.
A note on audio sample rates
As much as we'd like it to be intuitive and human, FCP really is kind of a stupid machine. It can only do exactly what we tell it. It does not evaluate the data we give it, it simply re-produces that data according to how we have told it the data should be evaluated. If you tell FCP that the audio on your DV tape was recorded at 48k, when it was really recorded at 32k, it will process the audio at the wrong rate. Incorrect audio settings are the main source of out-of-sync audio and video on the timeline.
If your audio goes slowly out of sync as the playhead moves down the timeline, your settings were probably wrong at some point. It is important that you inform FCP what rate the audio was recorded at and that you keep the rates consistent across the application. This means that 48k audio should be set at 48k in the capture settings and sequence settings. Not all cameras record at 48k; the venerable Sony VX1000 only records at 32k, for instance. If using this camera, you must set up your project accordingly.
If you need a different preset from those provided, simply Duplicate the DV NTSC 48K Superwhite preset, select the copy, hit edit and change whatever you need to. Be sure to name it something other than Copy, since it no longer IS a copy. Consult the FCP User Manual for more details on what the rest of the settings imply.
Click the next tab to set the Capture Presets
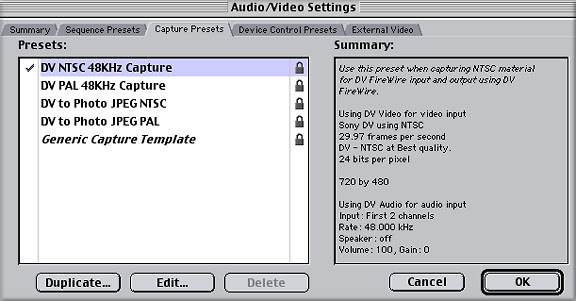
As stated above, this Tab needs to accurately reflect the media you will capture through Firewire. The DV preset should be mostly correct, but you may want to Duplicate it and then hit Edit on the copy correctly configure it for your system. Remember that you will need to correctly set the Audio Sample Rate here as well.
With respect to Sequence and Capture settings, be advised that you will be miserable if you do not nail this down. If you capture media and then see the red render line when you place it in the timeline, chances are you didn't get these settings correct.
The next Tab you need to address is the Device Control Tab
Device Control allows you to control, or not control, a Device like a camera or deck. Since you will be using Firewire, whether you are using a deck/camera or a DV converter, you need to check this tab. If you are using a DV converter, you need to select the Non-Controllable Device. If you do not, FCP will try and receive Timecode Data from the Firewire stream that is not there, resulting in failed captures. If you are using a deck or camera, you need to decide between Apple Firewire or Firewire Basic for Protocol (consult Apple's website to see which is appropriate). It is suggested that you set the deck Pre-Roll to 5 seconds and the handles to at least 2 seconds. Consult the Manual for the reasoning behind these settings. 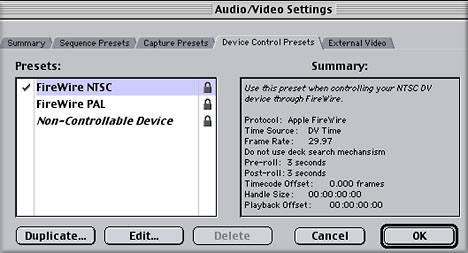
Finally, you need to check the last tab for External Video
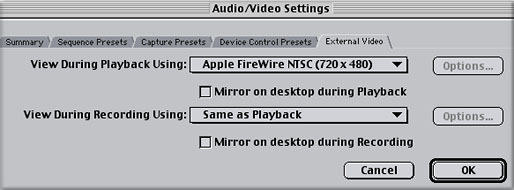
This tab lets you decide how you will monitor the video as you edit. You can decide to watch playback through the Firewire to a video monitor or set it to None for just viewing on-screen (remember that this also determines whether your audio comes through the Mac speakers or the video monitor). You also tell FCP whether or not to view on your computer monitor while playing back out to Firewire or recording to tape, called mirroring. Audio will follow video out to Firewire even if you Mirror to Desktop. Until you have gotten acceptable performance with your system, leave �mirroring' off. Older systems or systems which are not optimally configured may drop frames if forced to display the video in both places.
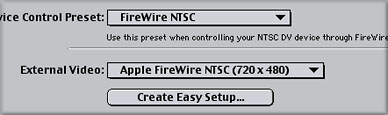
Creating an Easy Setup
Once you have completed the four tabs, return to the first tab, Summary, and hit the Create Easy Setup button.
Now you will take your optimized settings and save them under a preset name.

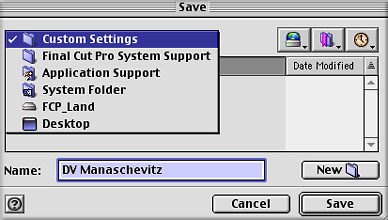
Give the Easy Setup a name, and give it a description. Click Create and save the preset in the Custom Settings folder
Now when the time comes to check or change you're A/V Settings, you can simply choose the preset (using the Control-Q keyboard shortcut) instead of going through all the tabs individually.
Save Early, Save Often
Finally, its time to name your project and save it appropriately. Remember that the Preferences are not saved with the project file, so you will have to recheck them when you start back up. Go to the File menu and select New Project (unless of course you already have a project you are working on, in which case you would merely open that project by double-clicking on it).
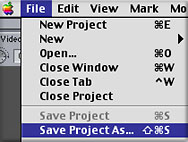
Any new Project opened will have the name Untitled assigned to it by FCP. That name is unacceptable. Do not let me catch you with Untitled anything. Name your files according to what they are. To name your project, select Save Project As from the File menu.
A dialog box will immediately pop up asking you to name the thing. FOLLOW THE FOLLOWING METHOD EXACTLY !!! If you do not save your files in the appropriate locations, you will lose everything, hours and hours of work. Save your project files on the desktop and AT LEAST one MAC FORMATTED zip disk. This is REALLY important, Follow the order of these steps exactly...
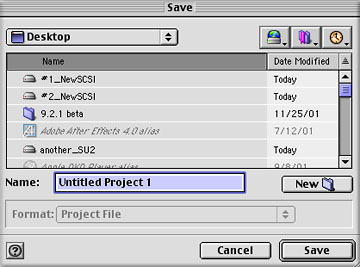
When the Save as... Dialog Box appears, do not name your project first. First, hit the Desktop button so that you will be saving it to your Start Up Drive, then select the New Folder button. It is very important that you not save your project to the same drive that your media is saved to and instead save it to the same drive that your System folder and Applications live on. You will be asked to name the new folder. Name it with your project's name and the word "folder". Remember, unrecognizable stuff is WAY more likely to disappear.
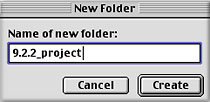
Hit Create and you will return to the Save Project dialog box. Change Untitled to something relevant and then hit OK.
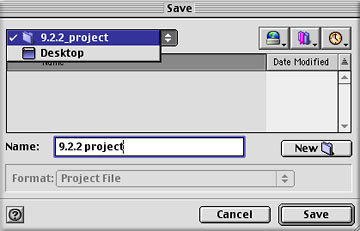
Your project file will now be saved in YOUR folder on the desktop.
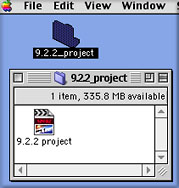
Backing up your project periodically is an important step that you should be doing. You are investing incredible amounts of time and effort and it all boils down to one fragile project file. If that project file goes belly up, your work could be gone for good. That will not be as catastrophic if you are regularly backing up and archiving your project files to another location. I suggest two locations. Have a copy of the project file stored in a separate folder on your hard drive and also copy it out to your zip disk.
To copy them to your zip disks periodically, simply pop in your zip and drag the project folder you just created onto it. Then re-name the copied folder on the zip with the date and time. This process is called sequential back up, because each time you back up your project files to the zip disk (or other folder on your drive), you are creating a version of the project up to the time you copied it. If you ever decide you went a wrong direction with your editing several days back, you can easily return to your previous version. As you copy these project folders from your desktop to the zip disk, you will rename the folder with the date or a number identifying that the project in that folder was current on that date. Sequential Backup is standard in an industry that can not be subject to the whims of a single corruptible project file.
(note-Remember never to run a FCP project from a zip disk. ALWAYS REMOVE YOUR ZIP FROM THE MAC BEFORE WORKING IN FCP.)
Ok, now the last setting and you're home free. Go to the Sequence drop down menu and select Render Quality, then Edit Render Qualities. The following box will open.
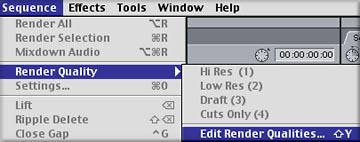
Adjust the settings exactly as shown. The time will come when you can adjust these to benefit and streamline your process, but for now they will keep you from dropping frames.
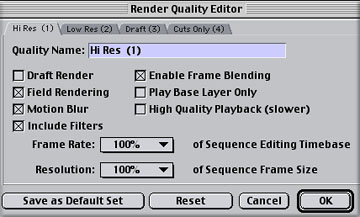
Hit OK to close the Render Quality Editor window and you have finished your settings. Now you can work reasonably assured that you are not going to drop frames.
A Few Last Words
Remember, this is only a QuickStart guide for preparing a generic project from and to Firewire. Your own editing needs as well as your materials and configured system will determine how you should vary from this tried and true path. If, for instance, you attempt to do the Apple Manual Tutorial with these settings, you will quickly discover that they are not right. Settings depend on what you are using and what you intend to accomplish. This is why much literature on FCP seems vague about settings. The possibilities are just too numerous. However if you are using Firewire in/out with "nothing weird" as they say, this should be just fine.
More Tips:
#1 Read the User Manual for Final Cut Pro. The version 2.0 and 3.0 User Manual is a fantastic resource. If you have trouble understanding it, that means you need to do a little more research, not that the information isn't important.#2 Shoot and edit little things first, don't start out with Moby Dick. By the time you do a couple of small things, you'll realize that you know what you're doing and can tackle the big ones. Trying to do a monster project before you're ready is just going to give you big headaches. Patience, grasshopper.
#3 Read my book (or somebody's but at least read one) about video. Learn what time code is and how to work with it.
#4 Boost the RAM allocation as high as possible for FCP without choking your System. Unlike previous versions, FCP now apparently does take advantage of more RAM. RAM is very cheap these days; consider purchasing more. FCP running the minimum RAM allocation will crash if you try anything interesting. To figure out the correct RAM allocation, subtract around 75 mbs from your actual physical RAM (look in About This Computer for this number). Then select (but not double click) the FCP application icon and hit command-I (Get Info in the File drop down menu in the Finder). In the window that opens up, click the drop down and select Memory and you will see the place to enter the same value for both preferred and minimum values. Remember that this means you can not run anything else while FCP is running if you do this. If you get a lot of Type 2 errors, pull the RAM allocation back and see if that corrects the problem.
#5 Go to 2-pop's site on a regular basis anyway. It's by far the best, most up-to-the-minute resource on FCP. Where do you think all this info came from, aside from my own blood, sweat and tears?
#6 Do routine weekly maintenance. Rebuild your desktop regularly (start up the Mac and hold down the command and option keys until it asks if you want to rebuild, then select OK). If you don't do this, your machine may start crashing or losing files. If you are new to the Macintosh system, go ahead and drop the dough on a book about the Mac OS. It is not a PC and you should find out how it likes its tummy scratched.
Thanks Without Whom etc. (and hearty tribute) to Apple, Ralph F., Mike H., Ken S. and the rest of the faceless but amazingly helpful and resourceful regulars on the 2-pop forum. All screen captures and textual references are the property and trademark of their creators/owners/publishers.
copyright © Charles Roberts, 2002Charles Roberts AKA Chawla teaches Digital Video and Audio Production at Fitchburg State College in Fitchburg, MA. He uses his long tedious rendering times to generate content and tackle hard hitting issues on the discussion boards of 2-pop.
All screen captures, images, and textual references are the property and trademark of their creators/owners/publishers.