
How to Install FCP 4 on OS X June 23, 2003
Final Cut Pro v.4.0 for Mac OS X
an ambitious beginning...
by Charles Roberts AKA Chawla
Copyright Charles Roberts, 2003.
Final Cut Pro 4 adds a great many new features that will be very useful to FCP editors across the board. Some of the more significant changes are the subject of this article, the correct setting of preferences, system settings and scratch disks. These settings have been made far more flexible and intuitive. At the same time, there are more of them to visit! You can't beat Final Cut Pro for flexibility and configurability, but you have to accept the responsibility that flexibility imparts. Still, the Easy Setup tool from version three has been further enhanced, so when you get the your preferences set for your particular hardware situation, a quick visit to the Easy Setup window and the Scratch Disk Prefs is likely all you'll ever need to deal with.This article is a suggested method of project setup for an NTSC Firewire FCP editing station. It was developed in a busy multi-user college editing lab. It is a system for ensuring that individual projects are properly configured and that each editor's work is safe and secure in a lab where many hands pass over one FCP station every day. Many of the exhortations included are specifically there to ensure that while you work, you are not demolishing another editor's work. As such, if you are the only one utilizing your station, some of the material may seem a little, well, paranoid or irrelevant. Rest assured that such techniques will not HARM your station, although some concerns may be overstated for the single user. You may find that even in the single user setting, the processes below are useful and serve to keep you organized and healthy.
Multi-Users vs. multiple users
"one happy crowd" vs. "Good fences make good neighbors"Running FCP under Mac OSX for multiple user stations can be set up in two different ways. There are the "one happy crowd" and the "good fences make good neighbors" methods. Which of these methods you choose should depend on whether you have an individual in charge of the station as an administrator. An administrator is ideally someone who will be around in case things need to be changed in the system, which might be pretty regularly if you have a lot of sloppy users (students tend to lose passwords and try to access things they can't or shouldn't). In either case, you want to make this decision early and stick with it, because going back and changing to the other setup can involve a lot of organizational hassle.
"One happy crowd" implies that there is one user login setup for the entire workstation. This is the Admin. Under this system, everyone who uses the station logs in at the beginning as the Admin, or you can forego the log in entirely by setting the Login to automatically login as Admin at start up.
The benefits with "one happy crowd" are that nobody loses passwords and everybody can access everything. The upkeep for this setup is very simple, since if you need to change or access something, you usually can, without hunting down an administrator or having to do contortions to reset a password.
The con is that this means that everyone who uses the computer has the same prefs, scratch disks and save locations as the previous user, unless they change them (using the processes described in this document). This can be disastrous if people don't address the essential settings every time. And that is pretty much the way FCP was always run before OSX, because in OS9, multi-user was really sketchy. Still, the "one happy crowd" is a good system, as long as users are given clear understanding of how to set up projects safely. Frankly, that is important knowledge anyway and not just for FCP. Sloppiness is not something you fix best by eliminating access, at least in my experience.
"Good fences make good neighbors" on the other hand, implies that each potential user has a specific login set up for them. This means that there will be as many different user logins (with passwords) as there are users. Users cannot access any file or folder that they don't have permission for (other user's stuff) and the prefs they set for themselves stick from when they log out to the next time they login. Other users coming after them will not accidentally use their settings and will have to specify their own.
The benefits are that each user is limited to their own materials and prefs. They cannot affect the work of their colleagues unless their colleagues put work in a shared area, such as the shared folder or shared media drives. Once they set up their project correctly the first time, they only need to visit a second time when their situation changes, rather than every time as the "One happy crowd" requires. The cons are that if the users are sloppy, the results can be MORE disastrous. If they change their password and lose it, it will take an administrator's password to set things straight; until the password is reset by the admin, no one will have access to that users directories. Also, if system prefs need to be adapted for different hardware, the individual user must find an admin, a situation that can be very frustrating for editors on deadlines when lunchtime rolls around.
If you aren't sure that an administrator will be supervising non-stop and keeping VERY good records, I recommend using the "one happy crowd" system and make sure that everyone follows the same rules for project setup detailed below. Even if you are setting up for the "good fences make good neighbors" method, the user should STILL follow the guideline below on the initial project setup, after which they can relax somewhat. For example, the default scratch disk prefs at installation are for the start up disk, a no-no if ever there was one!
The set-up included here is specifically for those using NTSC Firewire capture and output. While it does not attempt to give info on PAL systems, the setup for PAL Firewire DV is essentially the same. Simply choose PAL numbers where there is a choice for PAL or NTSC. This document is not for Analog capture cards, any Realtime solutions like Matrox or the new Offline RT or even basic editing information. The goal here is to set up a project with the correct preferences for DV Firewire capture and to minimize the chances of running into dropped frames or losing media/project files.
Before you begin with the preferences and settings in Final Cut, there are a few preparatory things you should take care of:
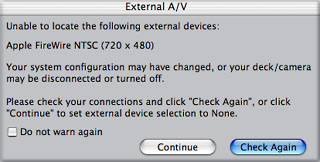
1. Make sure DV Deck/Camera is powered on and connected to the Mac with the Firewire cable and with the camera set to VTR. If not used for a while, some DV devices may power down into a sleep mode. When you start up FCP, you may get the message below. If you do, chances are that the deck is not powered on. You can actually disable this message now, both in the prefs as well as from the message box itself. Use your brain to know whether it should be enabled. If you are using a PowerBook and you rarely connect to a deck, then disable it to avoid the annoying message. If you are on a workstation and the deck is constantly in use with FCP, leave it enabled so that you will know if it was not initialized by being powered up when you started FCP.
2. To see your video output in FCP, you need the DV deck/camera and an NTSC monitor (connected to your deck/camera using the analog outputs using RCA or y/c cables) switched on. This is also how you will be outputting other tape formats (VHS, HI8, SVHS, even Beta), should you wish to do so. Simply connect the analog deck between the DV deck/camera and the NTSC monitor.
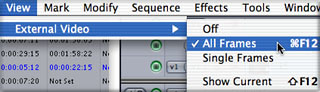
3. To hear audio while you edit, simply connect the audio out of your deck/camera to the NTSC monitor. If you are sending video out to the Firewire connection to preview, the audio goes out to Firewire as well. In a Firewire DV set up, audio follows video out to the Firewire deck. Thus the only way to use your Mac's computer speakers is to either connect them to the Firewire deck/camera (not likely with the new USB speakers) or to disable sending video out to Firewire for preview. If you disable video out to preview (View>External Video>Off), you will be watching video playback on your computer monitor, and you will hear the audio through the internal speakers or speakers hooked up to your Mac. In the A/V Settings to be encountered below, you will find a way to route audio and video to different outputs, such as using the Firewire for video but the computer speakers for audio. Unfortunately, this leads to audio and video sync problems as well. The easiest way to get rock-solid A/V sync is to monitor your audio and video both out to Firewire and an NTSC monitor.
4. Even if you are new to editing, I have one piece of advice for you above all other. Paper Log your tapes. Make a VHS copy with a time code burned in (displayed in a little box on the video screen by your DV deck/camera) and log that bad boy in the privacy of your home and in the comfort of your quilted bathrobe. Even a small 10 gig drive can hold 40 minutes of DV, which is more than enough for smaller projects. You just can't capture two hours of stuff that you won't be using. Watch your Timecode window burn tape, write down the time code numbers of only the footage you want to use, and then use Batch Capturing to simply type the numbers in and have FCP go get the footage while you eat a sandwich. This is more important than you think.
Some notes on configuring drives:
It's really much less complicated than folks tend to think. The video footage on your DV tape isn't like VHS video. It's a digital file. So when you capture it, you're just transferring the file from the tape to the drive. That's why we call it LOSSLESS, because it's an exact copy of the file on the tape. Why is this important? Because when you play a clip in the FCP timeline (more later), the video file has to be read from a hard drive quickly, unlike the physical DV tape that crosses a tape head at real-time.I (and Apple) recommend that your machine have at least 2 separate physical hard drives (ATA or UltraWide SCSI makes no difference, FCP just sees drives, not flavors.). The first one, your start up drive, needn't be enormous although thirty gigs should really be the smallest size you use for a start up drive (for reasons to be addressed towards the end of the article in the discussion about RAM). It will contain only your Mac OSX system and various applications (including FCP). If you install FCP in the default manner, FCP alone takes up 16 gigs (including all the LiveType and Soundtrack media, although it should be noted that you are given the option of installing those on other drives if you wish).
The second drive is your MEDIA drive, where your capture files will end up; it should be as large as possible. A 120 gig drive that is more than fast enough can be found for less than 100 bucks these days, so not adding the recommended second drive to your system is really inexcusable, in view of the amount of trouble it will save you down the road. The native ATA bus (the start up drive that likely came with your machine is on this bus) on older Macintoshes can hold at most 2 drives, and newer Mirror Drive Door models can actually hold even more on additionally included ATA buses. DV data rates are about 5 minutes to the gig, so a sixty gig+ hard drive yields QUITE a bit of storage, time-wise. You may never need another drive in the life of your system. To sum up, you want to have one smaller hard drive that holds the Mac OS and applications like FCP, and then you want another totally separate, very large hard drive that is exclusively for the DV footage you will be capturing from Firewire into FCP.
The sharp reader has noticed that I have not mentioned partitioning. That is because partitioning, while appearing to create more than one drive, is really just divvying up slices of the same pie, so to speak. You will still be using one drive to read the separate partitions. Partitioning your drives is fine, but it is highly recommended that you use a separate physical drive each for media and the system folder/FCP application itself. Use your own judgement. It's your machine. Just think logically. Just because it can work doesn't mean it always works, and those clutch moments are the ones you'll wish you chose to use the safe route. Information and details about partitioning drives may be found elsewhere on the Ken Stone site.
Why is all this configuring necessary? As specified above, these media files must be accessed quickly. As such, your media drive needs to be kept clean, fragmentation-free and available for FCP's nefarious uses instantly. Keeping your start up drive physically separate from your media drive will vastly improve performance in this regard. If you experience dropped frame warnings that you can ascertain are definitely not settings issues, it may be the result of fragmentation due to your system trying to read media files and system or application files simultaneously. This is usually pretty easy to test and eliminate in any of a number of ways. If you should encounter serious dropped frame trouble and you ascertain that the settings are correct, do a little research and try the following:
1. If you have the drive space available, export a single file QuickTime movie version of your offending sequence and then re-import it into your project. If the QuickTime movie doesn't drop frames, then the problem is probably the result of degraded drive performance and the inability to access the original files because of fragmentation.
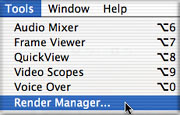
2. Another way is, 2) Using the Render Manager in the Tools menu, delete the project's render files and then re-render. The resulting re-write of render files may eliminate the fragmentation. Obviously, this is more drastic and wouldn't be a good idea if you had three hours of rendered material, but if you determine you have unacceptable fragging, this might clear it up.
3. Select the clip you got Dropped Frames on capturing and go to Tools>Analyze>Clip. If you see one frame described as being more than one frame long, there is likely no trouble, only a known rare TC issue with DV. If you see many frames described with odd lengths and you have done your settings correctly, you may need to look into de-fragging your drives. Once again, see Ken Stone's other articles about ways for doing this.

There are a couple of things you can do to optimize your drives and avoid fragmentation or corruption. The first and most simple is to always use a storage buffer of 10% of the drive's size. Giving the drive a buffer will eliminate crowding on the drive which can slow down performance enormously (there are directions for setting this later in the document).
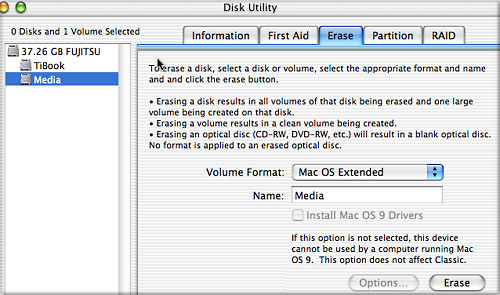
Secondly, wipe your drives clean at the end of each project using Disk Utility. Simply trashing the media files isn't as thorough. Do so by selecting the drive in the Disk Utility application in your Utilities folder of the Mac OS X Applications folder and using the options on either the Erase tab or Partition tab to wiupe it clean. Be careful, erasing and/or partitioning eliminates all data from the drive and is irreversible. Optimizing applications are available, but will never be necessary if you take care of your drives, back up your project and use Timecode for re-capture. Other options are available if these don't do the trick, but can produce unpredictable results depending on your own particular configuration.
That said:
Start up the whole system1. When you are logged in, you will be looking at the desktop. To start FCP, locate and double click on the Final Cut Pro Icon, which your Admin should have located on the dock or desktop for you. If not, look in the start up drive in the Applications folder. If you use FCP really frequently, drag the FCP application icon to the Dock to create an icon there or use the time-honored Mac way of Control-clicking the application to create an alias and leaving it on the desktop.

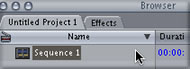
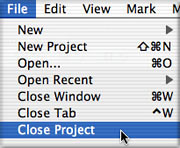
2. When you start FCP, it will always open the last project that was open, or an untitled project if this is your first time or you have thrown out the preferences. Chances are when FCP is finished loading, there will be a project open and it may not be the project you want to work on. If not, just go the File Menu and select Close Project. You can really screw up your life by not keeping your eye on the ball, because if you just begin working and save, you may change someone else's work. Also remember that more than one project can be open at a time. If you don't want to work with a project that opens at start up, close it or you may accidentally change and save it later.
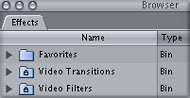
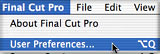
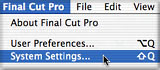
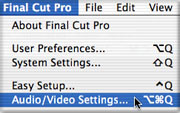
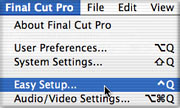
3. When FCP is completely loaded, several windows should open up. When there is no longer any project showing in the browser window (only the Effects tab), you must set your Preferences. Unlike many applications, where you can happily work without ever altering the default preferences, FCP needs you to set the preferences correctly in order to work. FCP also has the annoying (or convenient, depending on your workstation needs) tendency to retain the preferences from the last time it was open. This means that even if you have the right project open, FCP could do the wrong things to it. EVERYTIME you start to work, go to the Preferences and Audio/Video Settings and check to make sure that they are set the way that you want them. To do this, first go to User Preferences in the Final Cut Pro drop down menu.
A window will come up that is divided into 5 tabs along the top. These are your User Preferences. Although most User Preferences are not performance-critical, there are a few that you really should visit.
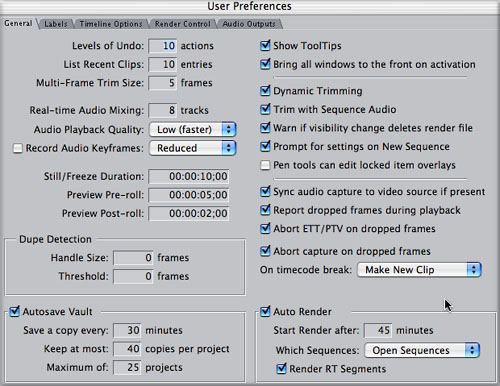
The User Preferences
The essential preferences for proper performance are on the General tab. Set Audio Playback Quality to Low. In some situations, this will allow you to avoid having to render your audio tracks if you go over the limit that FCP can play on the fly. Actually this should never be an issue if you follow wise advice and never mix audio sample rates on the sequence Timeline.
Leave "Report Dropped Frames During Playback ", "Abort Capture On Dropped Frames", and "Abort ETT/PTV On Dropped Frames" enabled. This will be the only way you know you are dropping frames. If your system is dropping frames, you need to know this so that you can fix the problem. DROPPED FRAMES ARE NOT ACCEPTABLE!!! Disabling them is like taking the batteries out of a smoke alarm. If you are receiving DFs on capture, use the Analyze Clip method to determine if you have a real problem. If so, fix it, don't just turn the alarm off because it bugs you!
In addition, select "Make New Clip" from the "on time code break" selection bar. This is another cool new feature in FCP4. When you hit a timecode break in mid-capture, FCP can tie off the presently capturing clip and start capturing a new clip after the timecode break. This means no more wasted capture attempts on hitting broken timecode you didn't even know you had!
With FCP3, the FCP team included really great archival backups in Autosave on par with the other app out there we won't name. The Autosave Vault is a really valuable tool for incrementally archiving your project and allowing you to back up any number of steps in your editing process. We have also been given way more flexibility in terms of when it saves and how many different archived backup copies it makes before it begins cleaning house and throwing away old copies. Although using Autosave Vault should not supplant your own system of backing up project files to another disk (a process you will be shown later in the article), it might save you some heartache one day. Enable this with the default settings and delve into the manual for more interesting ways to make it work for you.
The rest of the User Preferences are not critical for system performance.
The next settings window is absolutely critical. Go back to the Final Cut Pro Menu and select System Settings. The first tab on this window is probably the most critical setting you must address in FCP. It is called the Scratch Disk settings and it is where you tell FCP where you want to save those enormous Capture and Render Files. No matter how streamlined FCP makes the process of starting a project, this Scratch Disk Preference will always remain a critical responsibility of the user. You will not take it seriously until you lose a lot of files one day and have to completely redo a finished project.

To correctly set your Scratch Disk Preferences:
Click Set on the topmost of the Clear/Set combination lines. You will receive a dialog box asking you to select the appropriate folder/drive. Navigate the dialog box until you are looking at the root directory, then click your Media drive. If you are starting a new project, hit the "new folder" button, enter a name followed by "_media ". Hit Create, and while that newly created folder is still selected, hit "Choose".

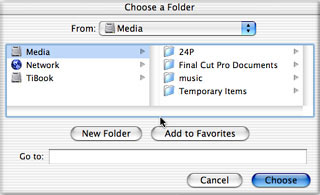
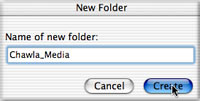
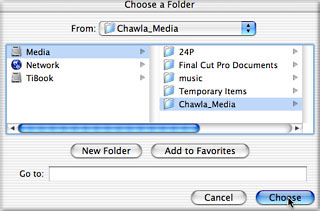
After you hit "Choose", you'll return to the Preferences. Look at the information next to the Set button. Make sure that you named everything in this capture/render directory with distinctly different names, using the underscore if necessary (the directory is the exact path to the capture and render folders starting at the desktop level, the "Media:Chawla_Media" following "4.3 GB on..." in the below picture.) Also make sure not to include any "/" or "\" characters in the name of the Scratch Disk Folders, since this can lead to error messages.

FCP can confuse folder and drive names quite easily, so use a naming convention that makes sense to you but which is easy for FCP to keep organized. For instance, the drive or folder names "Video 1" and "video 2" are lousy choices; the difference between them can escape FCP. "Fred" and "Sam" would be better choices; develop a drive naming system that makes sense and stick with it.
Click in the check boxes for Video, Video Render, Audio and Audio Render. If you have other drives you wish to dedicate as Capture/Render drives, follow the same process for each, making sure to leave the start-up drive unallocated and giving a distinctly different name for each folder to keep FCP unconfused. FCP allows you to specify up to 12 Scratch Disks, a welcome change for those of use with lots of storage options. One thing that has changed with FCP4 is that if you have more than two Scratch Disk assignments and one fills up, FCP switches to the Disk with the largest free capacity, rather than the next Disk in the list.
You may be asking yourself right now, "Why does Chawla want me to create a media folder for the project? FCP will create a "Capture folder" on the drive I select, so why bother with further delegating it into a specific folder within that drive?" The answer is Media Management, my friend. The secret to a happy Media Drive is keeping it organized and tidy. If you simply select the Media Drive as the assigned Scratch Disk, FCP will create three folders on that drive, the Capture, Render and Audio Render folders. Then, every time you create a project, it will create a project-specific folder in each of these folders.
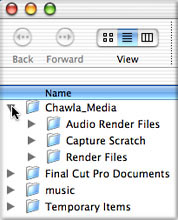
There is intrinsically nothing wrong with that. That's what FCP was designed to do, and it is a vastly improved system compared to the previous method of handling media. However, there is a potential danger for people who tend to be sloppy with drives. Pretty soon, you may find yourself with generic Capture and Render folders on every drive on your system. And inside every one of these generic folders will be project media folders with different media from different sessions OF THE SAME PROJECT! Tidiness is important. Although the new Media Management tools will allow you to correct this situation easily enough from inside FCP, the best idea is to avoid such a situation in the first place.

So every time you begin work with FCP, go to the Scratch Disk preferences and make sure that the folder you originally created for your project's media on the Media drive is selected. Doing this will keep your Capture, Render and Audio Render folders grouped together in one location and also ensure that in each, the single correct media folder for each of your projects is in one place. Take responsibility for your own Media Management. Never ask a desktop computer to do a job you can do better with very little effort.
Make certain to disable Capture Audio and Video to Separate Files. Once again, if you are not using Firewire to capture, this may not be correct for you. A/V should be separated when using much higher data rates, for example AJA, Decklink, Aurora and other analog and SDI capture cards. If you are using such hardware, the info on these preferences probably not only doesn't apply to you but could screw you up. This info is for DV Firewire capture ONLY. For particulars as to why, ask me or wait for the stimulating lecture.
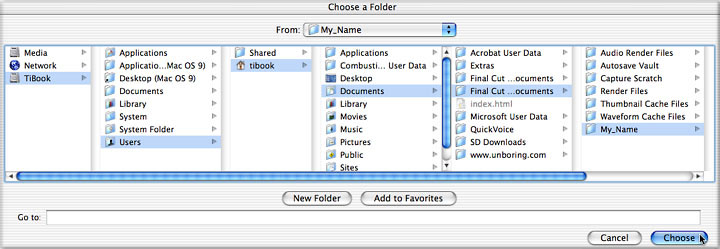
Next, click the "Set" button for the Auto-Save Vault. This is the archive we mentioned early in this document. As we will see in the next section on saving your project, projects should be run only from the start up drive and never from the media drive. But when you use the Auto-Save archive Vault, it chooses the same default drive for your Vault as it did for the Scratch Disk. You need to set this so that your archive folder is created and backed up on the start up drive. When you click the Set button, navigate to the drives again and select your start up drive. In the next pane (the next level to the right), select the Users folder. In the Users folder, select the user. In the next pane choose the Documents folder, then select "New Folder" button. Name this folder "MYNAME_archive", hit Create, then Choose. Now all your archived autosaves will stream to this folder and if you need to access them, they will run from the start up disk rather than the Media drive.
Another important setting for this preference menu is the "Minimum Allowable Free Space". This is the 10% buffer to which we referred earlier in the article. "Minimum" should be set to avoid getting poor drive performance and possibly dropped frames as a result of drive fragmentation. Drive performance degrades dramatically past a certain point of drive capacity. In the old days, 85% capacity of a drive was generally considered the limit. This meant that on a ten gig drive, you could expect massive drive slow down after writing 8.5 gigs to it. Some really neurotic people (like me!!!) used 75%.
This is not a written-in-stone policy and there are a jillion variables that affect whether or not a drive becomes massively fragmented after a certain capacity. I would recommend that you choose a number that is either 10% of the total drive size. That should keep it happy. Obviously though, the larger the drive, the larger the buffer should be.
"Maximum Size for Capture/Export" should be left unchecked unless you are attempting something in particular that requires specific limitations on file sizes and/or you know what you are doing. This will not affect your system's performance under generic capture and playback situations. If you are going to use Capture Now (and not the preferable method of logging your clips), you can also enter a maximum limit to the length of the capture. Hit OK in the bottom right hand corner.
The rest of the System Settings are very dependent on your particular hardware, i.e. how much RAM you have, what processor speed you Mac is, etc. In general the default settings will be suitable.
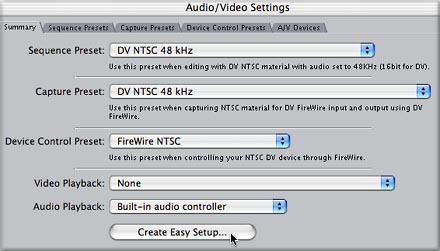
Next you need to set the Audio/Video Settings. You can actually do what is called an Easy Setup to speed up your process in future projects. But you need to do an initial check to make sure your system is set up correctly. Then you can assign this as your Easy Setup, making a one-click selection of all the presets we are about to go through in the A/V Settings. To get to the Audio/Video Settings, go to Final Cut Pro>Audio/Video Settings.
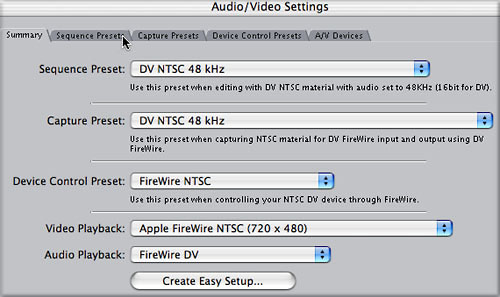
The first tab displays the settings currently active in the other four tabs and lets you set up Easy Setup settings. We'll come back to this tab after configuring the other four tabs. Click on the Sequence Presets Tab
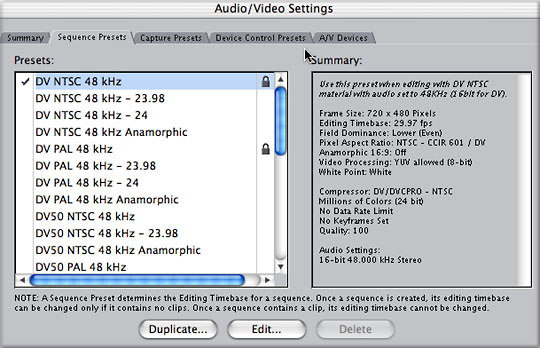
You will want to set up this preset depending on what your own needs are. FCP requires that your settings for Sequences and Capture match, and that both match the actual DV media you capture from tape. For Firewire, the DV NTSC 48K Superwhite preset should be fine here. But most DV cameras allow you to record Audio in your camera at either 32K or 48K. It is IMPERATIVE that you know which you have used, and that you set it correctly here.
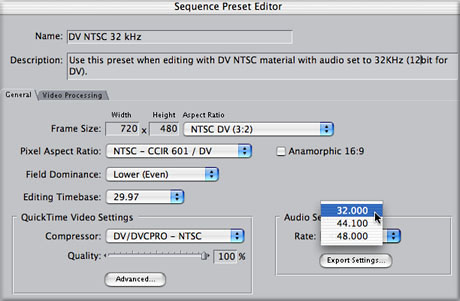
A note on audio sample rates
As much as we'd like it to be intuitive and human, FCP really is kind of a stupid machine. It can only do exactly what we tell it. It does not evaluate the data we give it, it simply re-produces that data according to how we have told it the data should be evaluated. If you tell FCP that the audio on your DV tape was recorded at 48k, when it was really recorded at 32k, it will process the audio at the wrong rate. Incorrect audio settings are the main source of out-of-sync audio and video on the timeline.
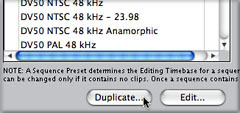
If your audio goes slowly out of sync with the picture as the playhead moves down the timeline, your settings were probably wrong at some point. It is important that you inform FCP at what rate the audio was recorded and that you keep these sample rates consistent across the application. This means that 48k audio recorded on your DV tape should be set at 48k in the capture settings and sequence settings. Not all cameras record at 48k; the venerable Sony VX1000 only records at 32k, for instance. If using this camera, you must set up your project accordingly. If you need a different preset from those provided, simply Duplicate the DV NTSC 48K Superwhite preset, select the copy, hit edit and change whatever you need to. Be sure to name it something other than Copy, since it no longer IS a copy. Consult the FCP User Manual for more details on what the rest of the settings imply.
Click the next tab to set the Capture Presets
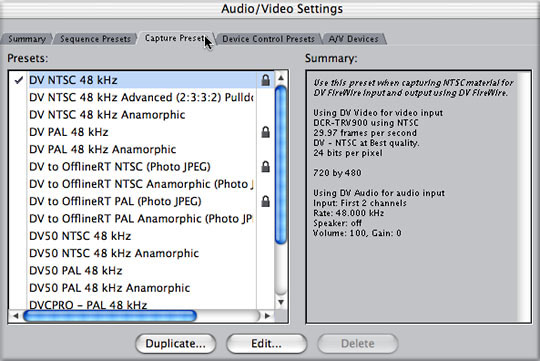
As stated above, this Tab needs to accurately reflect the media you will capture through Firewire. The DV NTSC 48K preset should be mostly correct, but you may want to Duplicate it and then hit Edit on the copy correctly configure it for your system. Remember that you will need to correctly set the Audio Sample Rate here as well.
With respect to Sequence and Capture settings, be advised that you will be miserable if you do not nail this down. If you capture media and then see the red render line when you place it in the timeline, chances are you didn't get these settings correct. The next Tab you need to address is the Device Control Tab
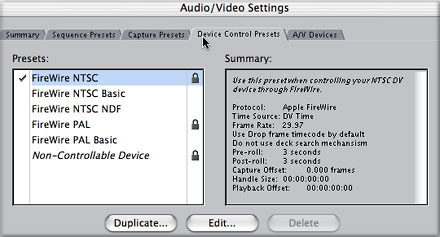
Device Control allows you to control (or not to control!), a Device like a camera or deck. Since you will be using Firewire, whether you are using a deck/camera or a DV converter, you need to regard this tab. If you are using a DV converter, you need to select the Non-Controllable Device. If you do not, FCP will try and receive Timecode Data that does not exist from the Firewire stream, resulting in failed captures. If you are using a deck or camera, you need to decide between Apple Firewire or Firewire Basic for Protocol (consult Apple's website to see which is appropriate). It is suggested that you set the deck Pre-Roll to 5 seconds and the handles to at least 2 seconds. Consult the Manual for the reasoning behind these settings.
Finally, you need to check the last tab for A/V Devices
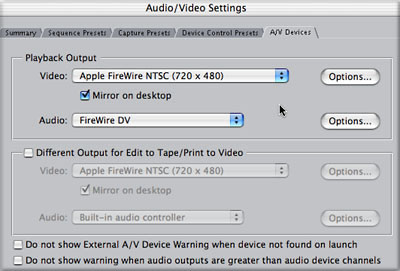
This tab lets you decide how you will monitor the video and audio as you edit. You can decide to watch playback through the Firewire to a video monitor or set it to None for just viewing on-screen. You also tell FCP whether or not to view on your computer monitor while playing back out to Firewire or recording to tape, called mirroring. Until you have gotten acceptable performance with your system, leave 'mirroring' off. Older systems or systems which are not optimally configured may drop frames if forced to display the video in both places.
A new feature of FCP4 is that you can specify where the video and audio are sent on playback. For instance, you could now assign video playback to the Firewire outputs, while setting the audio output to the built-in sound card on your Macintosh to come through your computer speakers although you will likely encounter a healthy latency effect (or out-of-sync delay between the audio and video) that makes it difficult or impossible to edit. When Video and Audio are sent to the same destination, say both to Firewire or video to None and audio to Built-in Sound Card, there should always be rock-solid sync.

You can also disable the "External Device Missing�" message that occurs at start up if your deck or camera is missing, as well as choose another deck or camera for use with Edit to Tape or Print to Video actions if those differ from your ordinary editing configuration.
Creating an Easy Setup
Once you have completed the four tabs, return to the first tab, Summary, and hit the Create Easy Setup button.
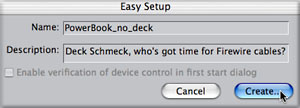
Now you will take your optimized settings and save them under a preset name. Give the Easy Setup a name, and give it a description. Click Create and save the preset in the Custom Settings folder.
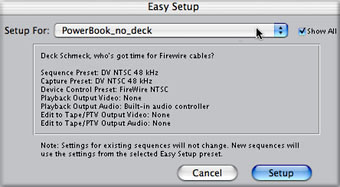
It may be that your Firewire DV editing configuration requires no special variations from the Easy Setups that are already available when you install FCP. If you are using 48K audio on your DV tapes, the DV NTSC Easy Setup will probably satisfy all your needs. For Firewire DV editing, you generally only need to create a new Easy Setup for instances where you are capturing or editing 32K audio.
If you need things like 24P settings for the Panasonic AGDVX100 24P camera or you want to use OfflineRT features, you can choose those Easy Setups as well. To choose from any of the Easy Setups available (including any that you create using the above method in the Audio/Video Settings window), go to the Final Cut Pro drop down and choose the Easy Setup option. To see more than the default four Setups, check the "Show All" box in the upper right hand corner of the window.
Save Early, Save Often
Finally, its time to name your project and save it appropriately. Go to the File menu and select New Project (unless of course you already have a project you are working on, in which case you would merely open that project by double-clicking on it).
Any new Project opened will have the name Untitled assigned to it by FCP. That name is unacceptable. Do not let me catch you with Untitled anything. Name your files according to what they are. To name your project, select Save Project As from the File menu.
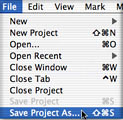
A dialog box will immediately pop up asking you to name the thing. USE THE FOLLOWING METHOD EXACTLY !!! If you do not save your files in the appropriate locations, you will lose everything, hours and hours of work. Save your project files on the desktop and then back them up to some form of removable disk, such as a zip disk or CD-R. This is REALLY important!
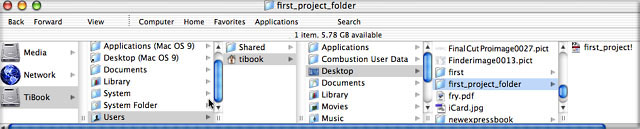
When the "Save as..." Dialog Box appears, do not name it yet. First, negotiate the dialog box to your start up drive and find the Users Folder. When you click on the User's Folder you will see its contents in the next pane. Choose the Desktop, and then hit the New Folder Button. Name the new folder whatever you like, preferably the name of your project followed by "_Folder" It is very important that you not save your project to the same drive that your captured media is saved to and instead save it to the same drive that your System folder and Applications live on.
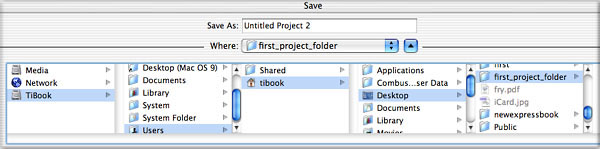
After clicking Create, change the "Untitled" in the "Save Project As..." field to something relevant and then hit OK. Your project file will now be saved in YOUR folder on YOUR Desktop in YOUR User Folder on the Start up Drive.
Backing up your project periodically is an important step that you should be doing. You are investing incredible amounts of time and effort and it all boils down to one fragile project file. If that project file goes belly up, your work could be gone for good. That will not be as catastrophic if you are regularly backing up and archiving your project files to another location. I suggest two locations. Have a copy of the project file stored in the archive folder on your hard drive and also copy it out to a disk of some kind. Now that Macs all ship with CD burners, and in view of how cheap blank CD's are, there's no reason at all for not creating resilient backups whenever you want. Apple's free Disk Copy now allows for multi-session CD burning, so you can potentially fit 600+ project folders on one CD. Just make sure that you are backing up your project files regularly to a removable disk of some kind.
Using this method in conjunction with the Archival tools built in to FCP and you will have a bulletproof backup system. (note-Remember never to run a FCP project from a zip disk or CD-R. ALWAYS REMOVE YOUR ZIP or CD FROM THE MAC BEFORE WORKING IN FCP.)
A Few Last Words Remember, this is only a Quickstart guide for preparing a generic project from and to Firewire. Your own editing needs as well as your materials and configured system will determine how you should vary from this tried and true path. If, for instance, you attempt to do the Apple Manual Tutorial with these settings, you will quickly discover that they are not right. Settings depend on what you are using and what you intend to accomplish. This is why much literature on FCP seems vague about settings. The possibilities are just too numerous. However if you are using Firewire in/out with "nothing weird" as they say, this should be just fine.
More Tips:
#1 Read the User Manual for Final Cut Pro. The version 4.0 User Manual is a fantastic resource. If you have trouble understanding it, that means you need to do a little more research, not that the information isn't important.
#2 Shoot and edit little things first, don't start out with Moby Dick. By the time you do a couple of small things, you'll realize that you know what you're doing and can tackle the big ones. Trying to do a monster project before you're ready is just going to give you big headaches. Patience, grasshopper.
#3 Learn what timecode is and how to work with it.
#4 Under OSX, you can no longer manually set the RAM allocation, nor can you turn off Virtual Memory. Believe it or not, this is a good thing. You will find that if you have enough RAM for FCP and the system, the Mac OS will crash less and perform snappier than you remember it ever having done. How much is enough? Well, your system should have at least 150 MBs and FCP wants over 200 MBs for general use and will work better with more. The short answer is get more. The long answer is at LEAST start with 384, but plan on having at least 512 if not 768 MBs in the near future. Trust me, you'll have a smoother ride if you do.
The only drawback to the new Virtual Memory is that you cannot tell it which drive to use for Virtual Memory (it can be done if you know the programming language or the right shareware). In most cases this will be a moot point, but if your start up drive is very small, has very little free space or is exceedingly fragmented, you may notice it taking a performance hit, resulting in Dropped Frames, sluggish performance or both. The solution is to make sure that you have at least 5 gigs of free space on that start up drive, and more would be better. The typical OSX start up drive weighs in at about 4 gigs, with applications and everything, and Sound Track and LiveType install quite a few gigs of resources, but a 20 gig drive should still be OK. But if you have no free space on your start up drive and you are pushing it with 256 MBs of installed RAM, you might get DFs or sluggish performance. Better way? Just drop 100 bucks and get more real RAM.
#5 Go to Ken Stone's, LAFCPUG's and 2-pop's websites on a regular basis anyway. They are by far the best, most up-to-the-minute resources on FCP.
#6 If you are new to the Macintosh system, go ahead and drop the dough on a book about the Mac OS. It is not a PC and you should find out how it likes its tummy scratched.
Copyright Charles Roberts, 2003.
Charles Roberts teaches Video and Digital Media in the Communications Media Department at Fitchburg State College in Fitchburg, MA, and is the author of "Final Cut Pro 2 for Firewire DV Editing", published by Focal Press. He spends what little free time he has coming up with ways to eliminate the little free time he has left.