
White Paper - Animation and 24p June 17, 2002
White Paper - Animation and 24p June 17, 2002
A little
animated about 24p?
Producing,
editing and delivering animated content
at 24p with Aurora Igniter Film
Article, photos and images by Marco Solorio
For those of us that are still "young at
heart" and watch cartoons on TV, you'll notice that even
today many animations are still hand drawn at 24 Frames Per Second
(FPS) or 24 "fips" as it's sometimes referred. This
article explains why this time old honored technique can still
be used today for maximizing your production time and most importantly,
the look and feel of your animations.
This article is based around the Aurora Igniter and the Aurora Film card option. This is basically a daughter card that sits atop Igniter's main PCI card. The Film card enables the following RT capabilities in Standard Definition:
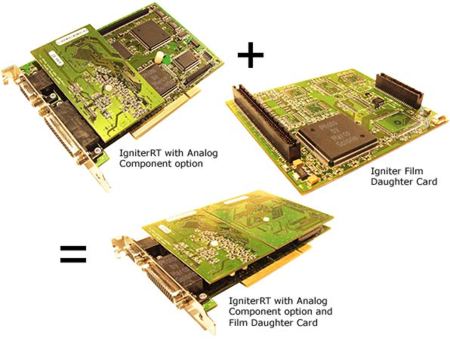
Although the Aurora Film card is mostly geared towards people editing film, capturing telecined footage from tape with RT inverse telecine and outputting with a Cinema Tools cut list, we will focus on how this card can function as a tool for animators and their production workflow.
A little history...
 Cartoons have been
traditionally shot at 24 FPS, which is the same frame-rate motion
pictures are shot (not taking into account under or over
cranking of course). Even traditional "Dope Sheets"
(or "X-Sheets") in which animations are timed to are
grouped nicely into 8-row segments (each single row represents
a frame of film). Three segments (24 rows) equal 1 second of
animation time. Coincidently, two segments (16 rows) equal one
foot of 35mm film, but I digress. When the painted animation
cels are completed, the animation photographer shoots one cel
at a time in strict accordance with the dope sheet. When the
photographer completes 24 shots, he or she has completed one
second of finished media.
Cartoons have been
traditionally shot at 24 FPS, which is the same frame-rate motion
pictures are shot (not taking into account under or over
cranking of course). Even traditional "Dope Sheets"
(or "X-Sheets") in which animations are timed to are
grouped nicely into 8-row segments (each single row represents
a frame of film). Three segments (24 rows) equal 1 second of
animation time. Coincidently, two segments (16 rows) equal one
foot of 35mm film, but I digress. When the painted animation
cels are completed, the animation photographer shoots one cel
at a time in strict accordance with the dope sheet. When the
photographer completes 24 shots, he or she has completed one
second of finished media.
So how does this translate into digital animation? Believe it or not, 24 FPS production not only looks cool, but can also save you tons of production time whether you're doing 2D or 3D animation.
Interlaced fields and progressive
frames
When we work with video at 29.97
FPS, we always work with interlaced fields. For every frame of
video, there are two sets of interlaced fields: an "odd"
or "upper" field and an "even" or "lower"
field. These fields change 60 times per second. It's this interlacing
that causes video to have a clean, smooth and sharp look to it.
Some may say video looks "sterile". If you pause a
frame of video with motion in it, you'll notice horizontal lines
1-pixel in height. These lines will also flicker (when paused
with both frames active) on your NTSC monitor. Upon playback,
all is smooth.
When you see a system that incorporates 24p editing, this means it can edit at 24 FPS in progressive frame mode. Progressive frames mean there is no interlacing in the frame, thus producing a full vertical frame of information.
So the goal is to create 24p media and use it in our standard interlaced video world at 29.97 FPS.
Let's look at the production process
Whether it's an application like
Newtek Lightwave 3D or Adobe After Effects, you work in a linear
timeline and that timeline needs to get previewed from time to
time to see how the animation looks after each change or addition.
With a 24 FPS timeline, you've already knocked out 6 frames per
second of processing time. Your animations will load up quicker
for things like RAM previewing in After Effects and this is only
the beginning.
Okay, so you're finished with your animation and you're ready to render your Oscar™ winning masterpiece. Typically you would render to 29.97 FPS, with either upper or lower field first. Did traditional animation use interlacing? Heck no! It was all shot in full progressive film frames! So obviously we want to follow that pattern. To do this, render your animation with NO interlaced fields at 24 FPS.
When your project is finished rendering, you'll notice something new... it rendered much, much faster! This is because: (1.) you are cutting out 6 frames per second and (2.) you are not rendering fields. When you do render with fields, you are actually rendering 60 "half" frames per second in most cases. So for every frame of video, the computer must recalculate data twice... for the upper field AND the lower field. Ah but with full progressive 24 FPS frames, we are only rendering 24 frames for every second of animation. In some cases, your render times could be cut by more than half. Do you like this idea so far? Read on, there's more!
Let's get vertical dude!
 So how
about a letterbox effect? Although this doesn't have anything
to do with 24p rendering or editing, it can make your animation
look cool and it WILL save you on render times too. Instead of
simply adding a letterbox mask to create black bars on the top
and bottom of the screen, simply change your frame size to the
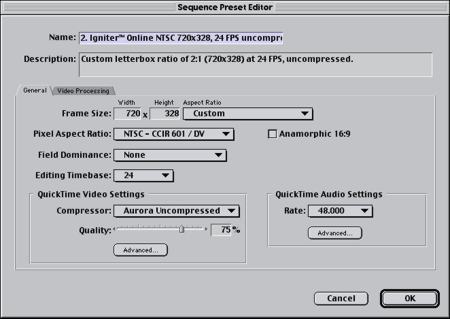
proper aspect ratio. For instance, let's say you want to create
an animation with a 2:1 aspect ratio. Instead of rendering an
animation at 720x486 (the D1 spec) with a letterbox mask, simply
render your animation at 720x328, non-square pixels (or 720x364
square pixels) without a mask. By doing so, you've potentially
reduced your render time because there is less data to render
in a 328-high frame than a 486-high frame.
So how
about a letterbox effect? Although this doesn't have anything
to do with 24p rendering or editing, it can make your animation
look cool and it WILL save you on render times too. Instead of
simply adding a letterbox mask to create black bars on the top
and bottom of the screen, simply change your frame size to the
proper aspect ratio. For instance, let's say you want to create
an animation with a 2:1 aspect ratio. Instead of rendering an
animation at 720x486 (the D1 spec) with a letterbox mask, simply
render your animation at 720x328, non-square pixels (or 720x364
square pixels) without a mask. By doing so, you've potentially
reduced your render time because there is less data to render
in a 328-high frame than a 486-high frame.
With smaller file sizes due to 24 FPS and a vertically smaller frame, there will be less bandwidth overhead on the system as well. This is especially helpful for people using the uncompressed Aurora codec. This is a prime example of a win-win-win situation!
Disk saving space using the Aurora Uncompressed codec on a 5-second clip:
| 720 x 486 @ 29.97FPS | 100.1 MB | (20 MB/s) |
| 720 x 328 @ 24 FPS | 54 MB | (10.8 MB/s) |
It's worthy to note also that all these functions, be it 24 FPS playback, RT 3:2 pull-down, letterbox masking, etc., can all function outside of Final Cut Pro. If you render a 24p file out of After Effects, you can quickly open it up in QuickTime Movie Player (or any application that plays QuickTime files) and view it with 3:2 pull-down, letterboxing, the works... all on your NTSC video monitor. Don't like the render? Go back to After Effects, fix and re-render. No need to open up Final Cut Pro, import and playback (not to mention having to delete the file in Final Cut Pro if you don't like the render).
Editing 24p in Final Cut Pro with
Igniter Film
When you bring the 720x328, 24
FPS progressive QuickTime file into FCP, make sure your FCP timeline
settings are matched to the clip's resolution. One key item that
can easily get overlooked is to make sure the clip's settings
are set to non-square pixels in the FCP Browser. Last thing to
do is make sure you have 24 FPS (or 23.976) checked in your Ignition
Control Panel. If you rendered to the Aurora codec and all your
settings are correct, the 720x328, 24 FPS file will plop right
into the FCP timeline with NO import rendering or transcoding
required. All Igniter RT capabilities will also function properly.
You'll also notice that Igniter has automatically added black
to the top and bottom of the screen for a perfect letterbox.
How slick!
One thing I personally like to add is the Igniter Film card's RT letterbox mask. This way it cuts 1 pixel off the top and bottom of the rendered 720x328 file (if set to 2:1 aspect ratio) upon playback. Just in case there's a straying pixel in the render or there's a soft edge or whatever, the mask will take care of it. This is entirely not necessary, but I like to use it since the option is there and doesn't suck any overhead from the system. The real purpose of the RT letterbox mask is to cover up the film's key-codes from a telecined source. It's also nice for stuff shot on video with a specific letterbox ratio in mind. No need to suck up bandwidth power from Final Cut Pro's Letterbox Mask effect.
You'll notice that when you play an animation back in a 24p timeline, the Igniter Film card is adding 3:2 pull-down in real time to your NTSC monitor and VTR deck. This gives it that cool motion film look 24p is so famous for... that kind of dreamy, surreal, strobe-like appearance. Best part is that it's all real-time... no rendering at all! Your animation will now resemble the long process of traditionally photographed cels.
To p or not to p, that is the question!
One thing you don't want to do
is mix 24p animations (with 3:2 pull-down for 29.97 FPS video)
with natural 29.97 interlaced clips (like shot video). The animations
will have the strobe-like quality, and the rest of the video
will be crisp and clean. This could potentially make the animation
appear it has been incorrectly rendered even though it truly
has not. Likewise, you don't want to mix a 29.97 FPS interlaced
animation with clips that were shot on film that keep their 24p
dynamics with 3:2 pull-down. This can make the animation appear
to look "cheap" since the animation doesn't reflect
the high-end look of the 24p film it's trying to match. For the
most polished results, try to stay away from mixing the frame
rates of animation and shot video/film.
The only time mixing 24p and 29.97 FPS interlaced media seems to work is when the production is shot on 24p (film) and the ending credit crawl (rendered at 29.97 with interlacing) move upward. Since video is naturally interlaced at 29.97 FPS, it's wise to take advantage of this in credit crawls. The text will be easier to read with the slow upward motion.
Additionally, one should be careful how they move or animate objects in a 24p world. At just the right velocity, an object or character can appear VERY flickery, whether viewed on a progressive monitor (HD and computer monitors) or a standard video monitor with 3:2 pull-down. For instance, I once saw a nation-wide commercial on a major network during prime time from a major product company. Everything was shot on film and you could tell there was big budget on this one. They had product boxes (packaging) move from left to right and right to left. The flickering was so bad that you couldn't read the text on the product packaging! I only saw the commercial air once and figured the producer got fired. This is an area you must be aware of when storyboarding your animation for 24p. Pan just a bit too slow or a bit too fast and your motion will look like hell. Adding motion blur wont do much for curing the flicker either.
For the Web or CD-ROM
There's another fringe benefit
to all this 24p stuff. By creating clips that are 24p, you can
down-convert to a web or CD-ROM format with better results and
playback performance. Since there are no interlaced fields in
the video, converting the clip to a smaller format (like QuickTime
Sorenson) wont have to blend or interpolate fields together.
This could result in a cleaner and sometimes sharper image, depending
on how little compression is involved in the final video file.
Also, since the video is running at 24 FPS, you can either keep
this frame rate which will produce a smaller web file than a
29.97 FPS web file, or you could cut it in half (12 FPS) without
interpolation (thus maintaining image quality) and resulting
in an even smaller video file with less bandwidth overhead. The
benefits of 24p just keep stacking up!
Likewise, if you work in a vertically smaller frame size, you wont necessarily want a letterboxed video on your website or CD-ROM. Typically a properly squeezed frame size without the letterbox looks best. You can then compress the video to your web or CD standards without cropping and achieve a smaller file size with a less load on bandwidth.
Conclusion
There are some newer cartoons
that are produced in standard D1 running at 29.97 FPS with interlacing,
but in my opinion they don't look as good as traditional 24p.
Although it may be a great cartoon, I think there's a certain
subconscious feeling one gets when it's done in the surreal 24p
fashion, which adds to the fullness of the animation.
Combining 24 FPS, no interlaced fields and a vertically shorter frame size for letterbox will all save huge amounts of production time, render time, file sizes and bandwidth overhead. Of course this is all possible without an Aurora Igniter Film system, but you'll need to do a lot of rendering with less flexibility in the end.
Your 24p animated production with 3:2 pull-down will look cinema perfect at project's end. With all the pluses of this card, I couldn't recommend the Aurora Film option enough. Watch out Hanna-Barbera, Aurora Igniter Film users are on the cutting edge!
The Aurora Igniter Film card option lists for $3,999.00 as of June, 2002.
copyright©2002 Marco Solorio
Marco Solorio is a multi-award winning digital media producer in the San Francisco bay area. He owns and operates OneRiver Media, which focuses on producing animated content for broadcast, as well as serving production needs for content developers. The new OneRiver Media Demo Reel is being edited (and created) entirely in 24p at 720x328. And of course, Dexter's Laboratory is his most favorite cartoon in the world.
This article was originally published at LAFCPUG and is reprinted here with permission.
All screen captures, images, and textual references are the property and trademark of their creators/owners/publishers.