October 12, 2009
Making Your Editing Life Easier
Lightning & Clouds HD $1099 (now sold as only one title with 24 clips)
Tropical Hawaii $599
Timelapse Landscapes 4 HD $1099 (now sold as only one title with 24 clips)
Lightning Storms HD $1099 (now sold as only one title with 28 clips)
Ultra Natural Water HD $1099
Review by Steve Douglas


Last year my good friend and weather photographer, Randy Siegel, asked whether I wanted to go storm chasing to get some good footage and photographs of the tornados, lightning storms and whatever else the mid-west had to throw at us. Me? I was just crazy enough to go for it, but then Randy's sense of adventure dissipated with the realization of all the driving and expense that that would entail. Actually, it was probably good common sense on his part as my back is no longer a friend of this old body.
No problem, for it seems that if there is ever a genre of footage that I might need for myself or a client, if I can't shoot it myself, Artbeats usually has a collection of clips that fit the bill just perfectly. While I have reviewed several Artbeats collections in the past, for this review I thought I would go in another direction with some different footage so I focused on some of the clips that Randy and I might have gotten, if we were lucky, very lucky and extraordinarily lucky. However, with the Artbeats collections, luck has nothing to do with it. No matter which collection I viewed, even the one lone Standard Definition collection of Tropical Hawaii, the images are sharp with deeply saturated color and are just beautiful to look at.
If any reader has followed my reviews over the years, especially when reviewing software, they have noted that I always make mention of the presence, or lack there of, helpful tutorials designed to ameliorate the new user's learning curve. The Artbeats collections of footage is not software that one needs to learn to use, but how footage can be used in a milieu of ways can often be an enlightening occasion. The Artbeats site is an excellent source of video tutorials utilizing the skills of many editors and, of course, using sample clips from the various Artbeats collections. Each tutorial focuses on creating various effects, presentations and possible uses for any of the Artbeats collections, and in doing so, you are called upon to utilize or learn skills and software functions that you might not have known were there or how to utilize.
The cost of DVD tutorials has risen greatly in the last couple of years and while most that I have seen have been really quite good, here we have the Artbeats website that provides an extensive resource of a variety of video tutorials ranging from 10 minutes to as long as 45 minutes and all for free. Coming from a diversity of editors, not only do you get additional perspectives on how you can utilize any of the Artbeats footage collections, as well as footage you may have shot yourself, but you gain the additional skills that editors always try to assimilate within their editing repertoire.
Of the many tutorials, both written and video, I chose to follow along with a tutorial by Eran Stern entitled 'Doom Island'. This tutorial clocks in at 33.56 minutes and is created within Adobe After Effects utilizing at least one of the clips from each of the Artbeats HD and SD collections featured here. As with all the Artbeats video tutorials, you can watch a final preview of the end result before you ever get started, and with this tutorial, you can also download project files for compare/contrast to your own efforts.
Before we begin, it should be noted that any of the clips in any of the Artbeats collections may be purchased and downloaded as individual clips or delivered on disc if getting the entire collection is not a necessity to you. Artbeats clips are provided as QuickTime files with mild photo-JPEG compression and are all delivered as 29. 97 fps with PAL versions delivered at 25fps. Each disc also includes low res 320 x240 versions for easy scanning while looking for just the right clip for your project with the HD versions at full 1920 x 1080 and PAL versions at 720 x576.
The 'Doom Island' is a spooky opening for any number of projects, especially now that Halloween is around the corner. The key is that it is wonderful and fun way to use clips from these Artbeats collections, and adjust them to your specific needs.
I must emphasize that this article does not supply you with all the steps of the tutorial but briefly summarizes some of the things I was able to do with the Artbeats collection clips when following along with Eran Stern's excellent tutorial. The complete video tutorial, along with Eran's project files can be found at: http://www.artbeats.com/assets/video_tutorials/movies/doom_island.mov.
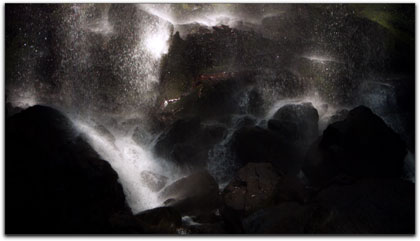
The project starts by using a clip from the Ultra Natural Water HD collection that appears spooky in and by itself. It is the lower portion of a waterfall, awash in dark coloration. Water is raining down though you do not see the top of the waterfall. After converting it to a 3D layer in After Effects and adjusting the Z space, you duplicate the layer and create a mask using the pen tool.


 Steve Douglas is a certified Apple Pro for Final Cut Pro 6 and underwater videographer. A winner of the 1999 Pacific Coast Underwater Film Competition, 2003 IVIE competition, 2004 Los Angeles Underwater Photographic competition, and the prestigious 2005 International Beneath the Sea Film Competition, where he also won the Stan Waterman Award for Excellence in Underwater Videography and 'Diver of the Year', Steve was a safety diver on the feature film "The Deep Blue Sea", contributed footage to the Seaworld Park's Atlantis production, and productions for National Geographic and the History channels. Steve is also feature writer for Asian Diver Magazine and is one of the founding organizers of the San Diego UnderSea Film Exhibition. He is available for both private and group seminars for Final Cut Pro and leads underwater filming expeditions and African safaris with upcoming excursions to the Red Sea and Egypt for Nov.2009, Feel free to contact him if you are interested in joining Steve on any of these exciting trips.