
The Basics - Final Cut Pro's Audio Filters September 23, 2002
A Beginner's Guide to Final Cut Pro's Audio Filters
The Basics - Final Cut Pro's Audio Filters September 23, 2002
A Beginner's Guide to Final Cut Pro's Audio Filters
This article is a hands-on tutorial and includes 'before' and
'after' examples that you can download and place directly into your FCP
timeline. The two examples for each audio 'issue' are 48KHz, 16 bit .aiff
files and are located beneath the title for each audio 'issue'. Your system
must have Alladin Systems Stuffit to unstuff the files. If you don't have FCP
on the system you are on, these files can also be listened to using Quicktime
player.
By Dan Brockett
As you log and capture the footage, you realize that something doesn't sound so good. "Oh yeah", you think to yourself, "we did get some nasty hum when we ran out of batteries and had to switch to AC power. Wish I had been able to fix that while we were shooting but I figured we could deal with that when we edited".
As you continue to log and capture your footage into FCP, you come across the footage that you shot before you decided to spring for the new shotgun and the boom pole. "Oh man, why did we use the camera mic on this scene? Now I remember, we thought that these shots would just be used as b-roll. I wish I would have known that I WAS going to have to use this audio. Now I am stuck using this audio because we couldn't get that talent back for the re-shoot"
Perhaps the scenario above describes your situation pretty well. Perhaps not, but I am willing to go out on a limb and assume that you wouldn't be reading this tutorial if you didn't have audio "issues" to deal with on your projects. We all have audio "issues" even when we use a professional location sound mixer. Perhaps the talent has a slightly dry mouth and made clicking sounds all through their scenes? Maybe there was a dog barking in the distance that just wasn't noticed during the shoot? Whatever the case may be, it can be safely assumed that we all would like to end up with better quality audio on our projects.
Reality Check
Before we get really deep into this, I want to make a few disclaimers about sound for picture and Final Cut Pro.
#1. It's a video-editing program.
#3. Doing "no budget" DV
#4. "I thought FCP did everything well"
Perception Is Reality
For those of you with an "audio disaster" on your hands, I'll cut to the chase: with FCPs audio filters, you might be able to make a clip that is unusable into one that is barely usable. It will still be bad. You will never be able to use FCP's audio filters to take something that is already recorded badly, perhaps with digital distortion and clipping, for instance, and make it decent. In order to fix problems like that, you need to apply the "re-shoot" filter. Sad but true, if you record bad audio, your project is probably destined to suffer with a lousy soundtrack, unless you can afford to do ADR (automated dialogue replacement) or a re-shoot. It's a painful lesson that most of us have to learn the hard way.
The Sound is the Thing...
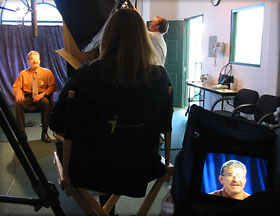
So you finally did it, you went out and put down the bucks for a new Final Cut Pro system. New G4, hard drives, camcorder, deck, monitor, editing desk, the works. You feverishly log and capture the footage for your first paying project into your new system and begin cutting away. Hopefully you were smart enough to invest in a decent pair of audio monitors so you can hear what you really have to work with as far as audio, right? Everything you had learned and read up on before diving into this video production thing stressed the importance of high quality audio. So you paid careful attention to your audio as you shot your first "real" project. You did notice that the shotgun mic and lavaliere that you were using during the shoot were both really sensitive and although most of the time the talent sounded good, you did notice some noise in the background.
If you have had some of the types of audio problems that are discussed above, you should know that FCP's audio filters are mainly designed to enhance the clarity and intelligibility of correctly recorded dialogue. FCP's audio filters cannot repair major audio problems. Read that again if you didn't get it. If you have excess background sound, close the doors and windows, reposition your mics, put up sound blankets, switch shoot locations or do anything else possible because no audio process or filter is really going to do a great job at "fixing" that issue. If you encounter hum while setting up for the next shot, track it down and fix it before shooting. You used an on-camera mic and the dialogue is low level and full of echo? Sorry, you should have shot it correctly. There isn't an audio filter or box in the world that will turn that audio into something high quality.
Final Cut Pro is a non-linear video-editing program. Notice that nowhere in this statement do you see the words "audio, audio-editing, sound, etc."? That's right, to be honest FCP is quite "audio challenged", even when compared to other editing systems from AVID, Adobe and others. Rubber band audio level controls, no mixer, no real time audio filters, yes, FCP needs some help in the audio department. I would classify FCP's audio capabilities as "just good enough to prep for audio post", nothing greater. Perhaps in upcoming versions of FCP, Apple will add some better tools and audio workflow. As of right now, I highly recommend spending some money on a capable audio post tool like Deck from Bias Inc., Pro Tools or perhaps something like Digital Performer.
 #2. Audio is a lot more than just button pressing.
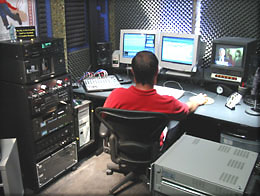
Audio engineering and sound design are quite specialized areas of expertise. Most professional projects have their soundtrack assembled and tweaked by a professional sound editor using a digital audio workstation and accurate audio monitors in a sound treated environment. Sound for picture is not extremely difficult to do but you must have a deeper understanding of the basics of audio and how all of the various audio tools function in order to do successful sound work. Almost anyone can now edit video (albeit not necessarily at a very high quality level) since the tools to edit video have become almost commonplace on newer PCs and Macs. Unlike video editing software, audio editing software and the audio post process generally require more knowledge about what the specific tools do and how they interact with each other than in the video editing process. Video is generally logging, rough cut and final assembly. Audio, on the other hand, is generally broken down into doing dialogue editing, voiceover, music, ambient and sound effects separately, then combining all of these disparate elements to work together synergistically during the final mix. In my opinion, sound is generally a more involved process than video editing as far as the number of categories that work must be done in to complete the job. Ironically, most of the best video editors seem to be more story driven, whereas many of the best sound artists seem to be a bit more technically inclined, although all of their work must still, of course, support and move the story forward.
Let's be realistic, many of you do not have access to a sound designer and are of the "do it yourself" mindset. This article is geared toward audio beginners and new FCP users. To explain all of the basics of sound for picture is beyond the scope of this article so we will focus on what I feel are a few commonly used Final Cut Pro audio filters and the situations that you might use them in. Except for the additions of audio meters and OMF export, the audio tools in Final Cut Pro have not changed very much since version 1.0 of the software was introduced so this article should be applicable to all versions of FCP to date.
Even though there is a small section labeled "noise reduction" in the owners manual, Final Cut Pro does not really do very much in the area of noise reduction. Probably the number one most requested "magic" audio filter is a sampling, phase cancellation noise reduction filter. For some reason, many users think that there is a "magic" filter or set of filters in Final Cut Pro that miraculously banishes all external and extraneous sound from their badly recorded soundtracks. This "magic" filter does not exist in Final Cut Pro, although there are some other programs available that can do some noise reduction, with varying levels of success. These external tools are definitely not a "miracle cure" for poorly recorded sound, but there are applications like the Waves Restoration Bundle and Ionizer that actually can get rid of some types of extraneous noise. Most of these types of software packages cost almost as much or even more than Final Cut Pro. Final Cut doesn't do this level of noise reduction. Never has. The "noise reduction" filters that FCP does feature are much more specialized and are DC Notch, Hum Remover, Vocal DeEsser and Vocal DePopper. You will notice that none of these are the same "magic" filter that everyone seems to want to selectively screen out all of the traffic or background noise from their tender dialogue scenes. Think of FCP's audio filters as basic tools that can only block, reduce or increase defined portions of the sound spectrum. The more expensive software discussed earlier can actually sample a sound and adapt it's filtration and output to give a phase inverted version that sampled sound, a very neat trick that really does work. there is a huge difference in how FCP's audio filters and these other much more sophisticated tools work. Think of the difference as if FCP's filters are "passive" while the Ionizer and Waves tools are "active".
As in many areas of life, how your audience perceives your project is how the project will be labeled and known. If your project is being produced for a paying client or if you hope to market and distribute your project, the success of your project will be largely determined by the quality of the soundtrack. Your viewers absorb audio cues even subconsciously and if the ambient levels do not smoothly dissolve to each other as scenes change or if the dialog is unintelligible, your work is instantly perceived as amateurish. If your project does not have a high quality soundtrack, the artistic and intrinsic value of your project is highly diminished. Unlike storylines and camera work, audiences have a low tolerance level for audio that is not clear, understandable and well mixed. Video and film have been described as "radio with pictures". Think about if the sound of a radio program was not clear, understandable or well mixed. How would listeners perceive the radio program? Film and video are really not much different. Most of a project's emotional impact is very dependent on how well the soundtrack works. Unless you want to make boring, unintelligible projects that fail to engage your audience, you must be sure that the project's soundtrack is of the highest quality possible.
Why Use FCP's Audio Filters?
Here is a new way of thinking for you to try. FCP's filters can do a much better job in enhancing audio if the sounds that you are trying to minimize or enhance are of a fairly constant frequency and or amplitude. Remember how sound behaves? It's "messy". If you have a fairly constant low frequency issue like traffic noise from outside of the building you are shooting in or air conditioning or HVAC rumble, these types of sounds are much easier to correct than a sound like wind buffeting. Any sound that is changing in amplitude or frequency is much more difficult to correct. Some common sound issues that would possibly benefit from FCP's audio filters:
OKay, So Let's Dig Into It - Using FCP's Audio Filters
Before we get into the specifics of what kinds of audio "issues" each filter is used for and how each filter's controls function, let's talk about how the audio filters are applied in Final Cut. Filters can be added to any audio clip in a project. You can add one filter or multiple filters in groups. Just like video filters and generators, when you add an audio filter to a clip, the controls for the filter appear on a "Filters" tab in the Viewer. If the audio in the Viewer is a stereo pair, only one set of the controls will be visible. If the audio in the Viewer in not a stereo pair, each channel of audio will have it's own individual controls.
Filter Controls
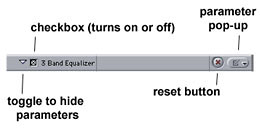
Besides unique parameter settings, each filter will have a universal set of controls that all filters share:
Parameter disclosure triangle - shows or hides the filter's parameters Checkbox - functions as an 'on-off" switch so that you can disable a filter without taking the filter out of the viewer
Reset button - resets a filters parameters to default
Parameter pop-up - allows quick access to specific filter settings
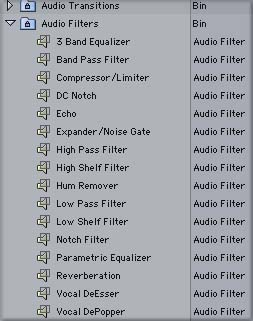
There are four basic categories of FCP audio filters - EQs, compression, noise reduction (remember, not what most people think of as really being able to sample and remove noise) and effects.
The great thing about FCP's audio filters are that once you figure out how a few of them function, you will begin to understand how some of the complimentary filters in the same category function. Each individual parameter of FCP's audio filters can be key framed in the exact same way that FCP's video filters are key framed. This feature is very useful for smoothly ramping in and out of specific filter effects and for fixing pops and clicks.
Remember, FCP's filters are mainly designed to enhance the clarity and intelligibility of dialogue. If you are looking for filters to add wild, over the top effects like flanging, multiple delays, ring modulation, etc., there are plenty of other audio programs and plug-ins that are much more suited to "creative" sound effects design than FCP's effects. One of FCP's major limitations with its audio filters is that there is no true real time preview. Each time you adjust a filter parameter, the change must be rendered to hear the difference that your change made. This workflow does not encourage experimentation with the filters, which is exactly what you need to do in order to compare the sound from before the filter was applied or parameter changed to after. But with some patience and creativity, you can get usable improvements from FCP's audio filters.
Some Common Audio "Issues" and FCP Audio Filters That Can Help
A few common sound issues are listed below with screen shots of the filter or filter(s) suggested for improving or enhancing the sound along with detail of the control parameter settings. I have also included 48KHz .AIFF files of each individual sound clip, both before being affected by the filter and after. In most cases, each shows a marked improvement although the level of improvement may you may hear will depend on the quality and accuracy of your audio monitors. These samples were mixed and adjusted monitoring from a pair of Genelec 1029A nearfield monitors with a Genelec 1091B subwoofer attached. These monitors are quite accurate and you will obviously hear a different result on less accurate monitors or perhaps very little change on cheap PC speakers.
You will only learn from these tutorials if YOU do them so I would encourage you to download all of the files, then as you go through each mini-tutorial, load the unaffected sound file and follow the parameter settings that I suggest. Render, and then listen to the final product. These mini-tutorials will be a lot more effective if you have accurate audio monitors but you should be able to hear most of the differences even on cheap computer speakers. I have included the affected clips as well for you to compare your tutorial clip to.
Once you have applied the suggested filter settings and rendered, your clip should sound exactly the same as the finished clips I have included here as a reference, but if you are having problems hearing differences between the clip you have applied the filter to and affected, you can always just load both of my clips onto your TL and play them one after the other and easily hear the difference. But remember, we learn by doing in this business.
I also encourage you to experiment with the unaffected clips. Once you are able to apply the filters and set the parameters to make your clip sound the same as the finished clips, experiment with the parameter settings, key framing and stacking different multiple audio filters on each sample. The whole idea of this exercise is to help you become familiar with what the filters do and how the parameter settings affect the sound. I am often asked for specific filter settings so that users can just apply them to their audio and then hope that the filter improved the sound. This is an unrealistic approach. Every sound issue that you encounter will require somewhat different settings and you must become comfortable in using and experimenting with the filters in order to realize any benefit from using them. You will begin to see how some of the filters interact with each other and you will generally become more proficient in knowing where to begin when faced with an audio "issue" in the future.
Issue #1 - "Excessive Hiss - Use 3 Band EQ's"
48 kHz mono before and after tutorial audio, 724 k dnl'
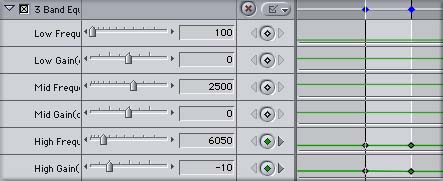
FCP's EQ filters let you adjust various portions of the audio spectrum separately. The 3 band graphic EQ filter breaks the sound spectrum into the frequency range that the human ear can theoretically perceive, roughly 20 Hz to 20KHz, three different areas, low frequencies (roughly 80 Hz to 2,000 Hz), mid-range (roughly 400 Hz to 8,000 Hz) and high frequencies (roughly 5,000 Hz to 20,000 Hz). The three overlapping frequency ranges can be independently adjusted so that you can change the sound quality of just one portion of the sound you are editing.
If your footage has too much hiss, whether this is a result of a camcorder that records everything with hiss or just a hiss filled mic or mixer, this is one of the most common problems that consumer DV users encounter. The example included is a 7 second clip of ambient sound recorded outdoor as a band was setting up to play. The shot was recorded on a Sony TRV-900 DV camcorder in combination with a Beachtek DX-A4 XLR adaptor. There was no audio mixer used, the two mics were ran directly into the Beachtek. The hiss you hear is common to most Sony consumer camcorders and is mostly caused by the camcorder, not the mics. On accurate monitors or headphones, you will hear quite a lot of hiss.
I choose to use the 3 band EQ on this example because in audio, simpler is usually (but not always) better. The tough concept to grasp about using FCP's audio filters is that there are usually several filters or combinations of filters, which can accomplish the same or similar results. Applying and using the filters is a very inexact science because with some adjustment, many of FCP's EQ filters can have the same result. Apply the 3 band EQ filter to the hiss.aiff sample and adjust the parameters to where I have them set in the screen grab and you'll hear a noticeable reduction in the hiss in the example. Many of you are probably wondering how I determined at which frequency to adjust the sound to reduce the hiss. It's simple. It's all about trial, error and experimentation. Using FCP's audio filters will require you to be patient and try out a lot of different combinations to find the optimum one. None of FCP's audio filters work very well if you just apply them and randomly tweak the parameters. You must approach using them in a methodical, logical manner or you will not obtain good results.
You can probably guess that hiss is usually in the high frequency range and that rumble is usually in the low frequency range. I wanted to reduce some of the hiss in this example but still retain the clarity of the children's voices and the roadie setting a mic level on the group's snare drum. In the viewer, I set up the clip, applied the 3 Band EQ filter, and then set a keyframe at the beginning of the clip. To set the first keyframe, position the playhead in the filter settings in the viewer to the beginning of the clip, then click on the small button to the right of the frequency readout on the High Frequency. You will see a small black diamond appear in the filter timeline, signifying that a keyframe has been placed. I then put the playhead to the opposite end of the clip and ramped the High Frequency filter settings to a drastically different setting, and then I set the keyframe at the end of the clip. You will see small line in the High Frequency timeline curve either up or down, depending on if you are sweeping from high frequency to lower, or vice-versa. I then rendered a sample and listened. As the clip played through, I was able to listen and determine roughly where I heard the best reduction of hiss. By hitting stop, I could then look at the filters keyframe position within the viewer. I was able to guess roughly by the playhead's position within the filter timeline, that I liked the hiss reduction best at around 6,000 to 7,000 Hz.
I then went through the same process, setting keyframes for a reduction from -3dB to -20dB on the filters High Gain slider. This process is sometimes referred to as "sweeping" a frequency or parameter setting. It is the digital equivalent of physically turning a high frequency EQ potentiometer on an analog mixer. Or in the case of gain on the High Gain setting on the 3 band EQ filter, it is the digital equivalent of pushing or pulling a master output level fader up or down on an analog mixer. After settling on reducing the hiss at 6,050 Hz, I "swept" the gain and decided that a -10dB High Gain reduction sounded best. Remember this "sweeping" technique because it will save you a lot of time in experimenting and trying different settings. You can effectively use this same technique on almost all of FCP's audio filters. It is a more efficient way of auditioning the effect of a particular filter. You could also experiment with the parametric EQ, high shelf or low pass filters, alone or in conjunction to solve this same issue.
Issue #2 - "VO, dialogue or live music is too dynamic - use compression filter"
48 kHz mono before and after tutorial audio, 668 k dnl'
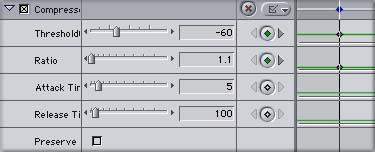
FCP's compression filter is a tool that will reduce the dynamic range of a clip that it is applied to. It will not fix distorted levels so in order to apply and use the filter successfully, the signal on the tape must not have been recorded with clipping or distortion. Dynamic range is basically the area between the softest sound to the loudest sound. Too much dynamic range means that you will have difficulties doing a smooth sounding final mix because the sound has too much range. If a viewer watches a project with too much dynamic range, they may have to turn up their audio signal in order to hear quiet passages, yet they may then be blasted back into their chair by louder passages. Many home stereo receivers with Dolby 5.1 surround sound include a "night" mode, which effectively compresses the dynamic range of your favorite DVD with the intention being that you can still watch "Terminator 2" late at night without waking up everyone else in the whole house. Compression is the same idea. When you shoot a live musical performance, people laughing, yelling or screaming, or gunshots, explosions or other mayhem, any of these could have excessive dynamic range that you might want to compress to even out the levels. Compression, when correctly applied, can "even out" a mix and make it easier and smoother to listen to. Incorrectly applied, it can make things sound a lot worse.
The VO sample that I used here has dynamic peaks of -10dB, not really too hot, but let's imagine that you want to end up with your project at a lower level overall, say with your highest peak being no hotter than -12dB and you want to have less dynamic range. I applied FCP's compression filter to the clip and adjusted the threshold to -60. I arrived at this conclusion by, once again, setting key frames, sweeping the threshold and listening.
I set the compression ratio to 1.1 the same way, guessing and experimenting, although you should know that the effect from changing the ratio setting is very drastic so this setting is probably a better candidate for NOT sweeping, just try 1:1, then 2:1 and listen. The Compression Filters ratio setting is very sensitive so a little goes a long way. The default is 1:1. You would most commonly use somewhere between 1.1:1 and 2:1 unless you have a really dynamic project that needs more compression. I left the other two parameter settings, attack time and release time at their default settings. You might adjust these depending on how dynamic your material is and how you are going to address the ambient sound issues present in the clip. A longer attack means that it takes more time for the compression effect to kick in and a longer release time means that it takes longer for the compression effect to turn off or "let go" of a sound. It's usually best to keep most of FCP's filter parameters at default levels until you know what they do, then adjust them very sparingly so that you can hear what effect changing them has on a sound. Many of the parameter settings, if you change them drastically, will make your sound disappear. For instance, if you set the ratio on the Compression Filter to 10:1, chances are that the filter will apply so much compression that you won't hear any signal. Remember, with most of FCP's audio filter parameters, a little goes a long way in most cases.
Clicking on the "preserve" checkbox keeps the overall volume levels similar to the original unaffected clip. Since we were going for a reduction in overall level in this example, I didn't check it, but in some cases, you don't want to change the overall level, you might just want to compress the sound a little to add warmth or even things out.
The clip now sounds basically the same but the peaks that were reading at -10dB now are reading a more comfortable -15dB so the compressor actually raised the lower levels in the clip and reduced the dynamic peaks, giving a slightly warmer sound and reducing the dynamic range. Experimentation is the key to compression, try out several settings after you try the parameters used here and you'll get an idea about what the compression filter does. It's handy to take a short clip like this one and apply the filter to it several times, putting a newly compressed clip on the timeline and rendering. By doing this, you can hear what changing the parameters does as you listen to each clip in a row.
Issue #3 - "How do I match my lavaliere's sound to my shotgun mic's sound? - Use reverb and (optionally) add cleaner room tone.
48 kHz mono before and after tutorial audio, 656 k dnl'
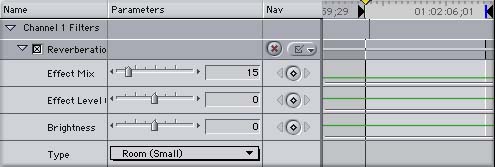
The Reverberation filter in FCP adds a short room reflection or natural ambience that occurs when sound is recorded within a physical acoustic space. This is different than "echo" which is a series of repeats of the signal or a portion of the signal.
There may be times that you need to make a lavaliere mic, which typically records a very close mic'd, sterile sound, to sound more like the open, reverberant sound of your shotgun mic. Or perhaps you want ADR tracks that were recorded in a studio to more closely match audio that was recorded in the field. The sample here is a track taken from a lavaliere mic from a talent who was doing a "to camera" standup in a small room. I wanted to make the sterile sounding lavaliere a little fuller to more closely match what a shotgun mic would have sounded like. Using a shotgun mic is usually preferable because it will pick up more bass and some of the room reverberations or "tone". Sometimes a shotgun might pickup too much background sound or too much echo so then, (assuming you did things the correct way when you shot and had the talent double mic'd with both a shotgun and a lavaliere) you would switch to the lavaliere mic's sound. By adding a mild reverb alone as we did in this example, I am not sold that I am hearing a shotgun mic but at least it sounds warmer and fuller than just a lavaliere. To complete the effect, I would also add some EQ to this to further warm up the example, and possibly some room tone but to keep this example simple, I just am showing the reverb filter here.
I blended the reverb effect mix from the default 50% (the signal is half unaffected mixed with the other half affected) down to 15% because I felt that the default 50% was too heavy handed. FCP's reverberation filter (as do most inexpensive reverb plug-ins and hardware) sounds quite "metallic" to my ear so when I use it, I use it in very small amounts. Since the scene we are hearing was actually recorded in a fairly small room, I switched the room type to "Room (Small)". If the effect is too thin or harsh, you can also use the "Brightness" control to reduce it. Once again, the key to this filter is experimentation. The reverb filter also works nicely with the compression and almost all of the EQ, pass and shelf filters. The "Echo" filter is typically used more for a "person yelling into an empty canyon" or "calling down an empty street" and is a less realistic and more stylized filter than reverberation.
Issue #4 - "Beachtek XLR adaptor while using AC power. How can I minimize the hum? - Use the High Shelf, Low Pass and 3 Band EQ filters"
48 kHz mono before and after tutorial audio, 732 k dnl'
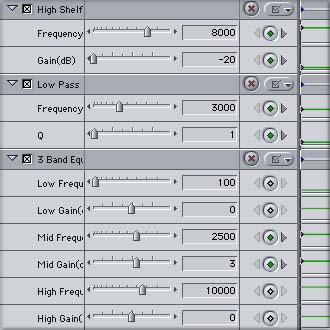
FCP's shelf filters give a similar effect to the pass filters, except that the shelf filters cut off either the low or high frequencies, leaving the desired sound alone. Just so you remember, the name says it all, high shelf cuts off high frequencies and the low shelf cuts off low frequencies. Since the hum in this sample is obviously in the high frequency range, I first tried the high shelf filter. I did the same frequency "sweep" that was discussed in the first example. The high shelf was effectively reducing some of the hum with a frequency setting of around 8,000 Hz and -20dB of gain, a lot of gain reduction. But I was still hearing a lot of overtones of the hum plus still I was hearing a little hiss.
FCP's Band Pass Filters allow you to modify a single frequency bandwidth. By choosing the center frequency, you can modify the boost or cut level. Changing the "Q" level on the EQ filter narrows or widens the frequency range heard along with the level that is boosted at the center of the band.
Besides the high shelf, I then applied a low pass filter. Once again, experimenting with the frequency and "Q" settings, settling on a "Q" of 1 at 3,000 Hz was what did the trick. I used the same "sweeping" technique to determine the frequency. Because the low pass filter has a fairly dramatic effect, it was muffling the voice to the point of being unusable although it did result in a nice reduction of the hum and hiss.
We have already covered the 3 band EQ in our first hiss example so I won't cover that ground again. I needed to bring the voice back up into a usable range but I didn't want to bring the hum back in so I applied the 3 Band EQ filter. By using the "sweeping" technique, I was able to determine that I could get a decent result with a mid frequency boost at 2,500 Hz, adding 3dB of gain level. The human voice is primarily mid-range as are piano and guitar so began my quest to bring the voice back by adjusting the mid range frequencies. There is no magic or mystery to these numbers and I feel that with some more time and experimentation, I could get a better result, but as you know, time is valuable. Sound behaves in unexpected ways and this example provides a good situation where when I first heard the hum, I though it was mainly just high frequency. After "sweeping" the sample with several filters though, it turned out that the sound had undertones and some hiss that were not very noticeable on first listen.
Hum can be caused by a variety of problems. This sample was shot, also with a Sony TRV-900, with a Beachtek DX-A4 XLR adaptor being fed the output of a field mixer. The camera ran out of batteries during the middle of the shoot. When the camera was switched to AC power, the lovely high-pitched hum you hear in the Hum .aiff developed. We fixed the problem by obtaining a new battery but I wanted to record some of the hum so that I had a record of what it sounded like. This hum was most likely caused by some kind of AC ground loop.
As a side note, I was able to take this .aiff into the Noise Reduction plug-in from Sound Forge on a PC and into Ionizer, a high end noise reduction program for the Mac and easily totally eliminate this hum in about two minutes but the best I could get with FCP's filters after about 30 minutes of tweaking were what you hear in this example. The use of FCP's filters probably takes this clip from totally unusable to barely usable, a good example of FCP's limitations. Then again, perhaps one of you can uncover some combination with FCP's filters that would totally eliminate the hum while retaining more clarity on the mid range sounds of the talent's voice? For me, time is money and when I can go into another program and do a better job in about 1/6th of the time, the additional software program is worth the extra money. It's all about experimentation, your budget and how good you want the end result to be.
Issue #5 - "I am having a hard time matching ambient levels" - Use the expander/noise gate filter - add clean room tone"
48 kHz mono before and after tutorial audio, 472 k dnl'
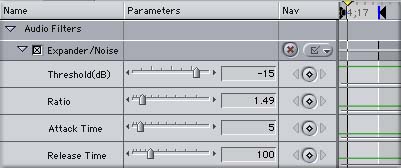
FCP's Noise Gate filter acts as an "automatic" volume level controller, meaning that the filter will reduce the audio level at predetermined minimum levels. This is an important concept to grasp. In order to fix noisy audio, you try to remove the noise but when you do, you must add back some noise or the end result will sound completely unnatural. One of the easiest ways to enhance scenes with noisy ambient background is with the use of a noise gate. The noise gate acts as an automatic volume control, lowering the volume when the signal level drops to a predetermined level, usually called a threshold.
In the example given here, we have a scene with the talent giving her phone number to a clerk as she orders. Notice the ambient (background) sound in the store is quite high? Notice how there is a lot of excessive noise when she is not speaking? Let's improve that with some deft use of FCP's noise gate filter. Once you have gated the noise down in between her statements, you could insert some cleaner room tone that you hopefully recorded in this setup. You could ramp the volume level of the inserted room tone down as her statements came up, then ramp the volume level of the room tone up to match the levels when she speaks while she is not speaking. In order to keep this tutorial simple, I did not apply clean room tone to this sample because I want you to be able to hear exactly what the noise gate filter did but you get the idea. Take out the undesirable background noise and replace with cleaner background ambient (room tone)
I tried the threshold setting at the filters default -40 dB and realized that this setting was too drastic for this scene. After doing "the sweep", I was able to hear the effect trigger nicely at -15 dB so I set the "Threshold" to -15 dB. I then experimented with setting the ratio. This ratio setting is very similar to the ratio setting in the compression filter so it is very sensitive. After experimenting at settings between 1:1 and 2:1, I decided that I was getting a good result at a ratio of 1.49. As in the compressor example, the default attack and release times were adequate and I didn't change them. Think of the expander/noise gate filter as the 180-degree opposite of the compression filter because that's essentially what it is.
FCP's Filters are Starting Point
Hopefully this article has given you at least a rudimentary knowledge of what FCP's audio filters are intended to do, how they work and what kinds of results you can expect from them. Remember, FCP is primarily a video-editing application, but with its included audio filters, you can at least provide some basic sound enhancement for projects that must be finished in FCP.
I prefer to think about FCP's audio filters not as a means to an end but as a good primer on how to begin really improving your audio. If most of your projects will be finished strictly on your FCP system and will not be sent out for audio post, there are several excellent multi-track audio programs that can supplement and enhance FCP in helping you build, edit, mix and design more polished and sophisticated soundtracks. Just as in writing, directing, cinematography, video editing and motion graphics creation, audio post is a craft that takes many years and a good amount of practice, hard work and dues paying to learn how to do well. Hopefully, using FCP's sound filters will be a good introduction for you into what the audio post process is all about.
By Dan Brockett
Big Little Films, Inc.
2955 E. Hillcrest Drive, Suite 121 Thousand Oaks, Ca. 91362 USA
Office (805) 496 8130 Fax (805) 496 4027 E-Mail: dan@biglittlefilms.com
copyright © kenstone.net 2002