

FCP Countdown September 17, 2001
Creating Your Own FCP Countdown
FCP Countdown September 17, 2001
Creating Your Own FCP Countdown
Creating one's own color bars and countdown in front of one's project is a 'one time' job which can be customized in any one of a number of ways to individual tastes and flavors.
To begin, open a new project and call it 'countdown' or other similar name. The finished project will be saved on your hard drive, so give it whatever name you like. As long as you can find it when you need it.
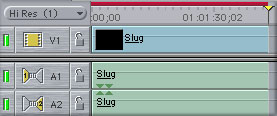
In your browser, open the effects tab and scroll down to the 'video generators' folder. When opened, double click on the 'slug'. It will jump up into the viewer window. Set the in and out points to a duration of 2 minutes. This is usually the default anyway.

Then drag this either to the time line or to 'overwrite' at the right of the canvas window. It will drop nicely onto the first 2 minutes of the time line. Don't render it just yet. We have quite a few more operations to carry out and may as well do all the rendering in one go.
Back to your browser. You will see 'bars and tone NTSC' and 'bars and tone PAL'.
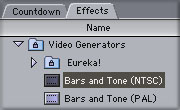
If you are working in NTSC, double click the little guy and once again it will pop up in the viewer window. Likewise, if you are working in PAL.
There is different opinions on the length of bars and tone to use in your project. I always make mine a full one minute. So set your in and out points in the viewer window to the desired length.
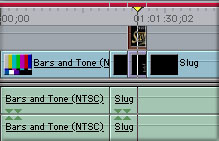
Using the 'up' arrow, place your playhead at the beginning of the time line, drag your color bars to 'overwrite' in the canvas. You will now have bars and tone in the first 60 seconds of your time line.
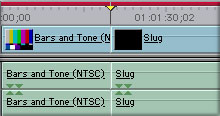
By hitting the down arrow on your keyboard, your playhead will jump to the end of the color bars. The counter at the right hand top of your canvas window should read 00.01.00.00, showing that you are exactly 1 minute into the time line, right? So far, so good.
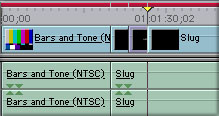
Move your playhead over 10 seconds to a reading of 00.01.10.00. This will leave 10 seconds of the black slug at the end of your color bars. We are now ready to construct your customized slate. This is where you are allowed to be super creative.

Drag the 'text' generator to the overwrite box in the canvas window and it will drop into the time line at the location of the playhead. Your counter reading should be 00.01.20.00. Good. Now it's time to set the text.
Move your playhead back over the text clip. Double click on the text clip in the time line and it will open into the viewer window with the words 'sample text' showing. At the top of the viewer window, there are four tabs. One of them is called 'Controls'. Click this one and highlight the words 'sample text' in the large box.
You can now type in your own personal message. I'll put in the name of the production, the time span and produced by Ian Sutherland. You can use my name if you want, but it will probably be better if you put your own name in here. (g)
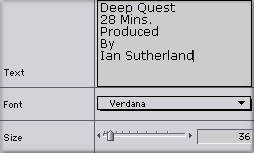
You have the option in the 'controls' tab of positioning your text wherever you desire on the NTSC monitor. I like mine near the top. Your choice. You also have your choice of fonts. I'd stay with a bold font as it shows up better on the black background.
Back to the job in hand. This area of the custom count down can also house your personal logo or insignia of your company. By importing in a jpeg or whatever your heart desires, the graphic can be positioned below your personal text.
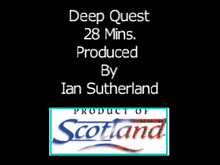
This of course means opening up a second video layer in the time line. Dropping your graphic on V2 and choosing 'wire frame' mode from the drop down menu will allow you to size and position your graphic below or above your text.
Having completed this part, move your playhead another 10 seconds down the time line to 00.01.30.00. You will now have another ten seconds of black slug. Now, (drum roll), it's time to create the countdown.
Back to your 'text generator' in the browser. This time, we will do things a little differently. Double click on the text generator and open it in the viewer window. We are going to alter that default setting somewhat. We want our in and out points exactly 1 second apart. The reason will become obvious as we move along. Just humor me for the time being.
If you have the Eureka plug in 'Romantic Text', this works very well. Another plus using this plug in is that the default is already one second.
Be sure to move your playhead back to the end of the clip. Make sure that you have made V1 active on the time line, drag it to 'overwrite' in the browser and a one second text clip will appear on the TL. Double click on the clip and open it in the viewer window, again with 'sample text' showing.
Highlight the words and change them to the number '10'. Using the wire frame mode in the canvas window, position the '10' dead center in the NTSC monitor. Size as required. I usually like the number approximately 3 or 4 inches high. The important thing to remember is to do all the adjustments needed to this first character until it is exactly what you require.

Once you are happy with the look, reposition your playhead on the last frame of the '10'. You may have to stretch out your timeline. Turning Snapping on is a must. From here on in, we are working with one second clips so positioning the pointer for selection could become tricky if your time line is too small.
Select the '10' clip in the timeline. Now from your drop down menu, select copy and paste. This will result in having two '10's' back to back. Double click on the second one and when it opens in the viewer, change the text to the number '9'. No repositioning is necessary as the attributes will be the same.
Move the playhead to the end of the number '9'. The counter will be 00.01.32.00. Paste again. Another ten appears. Repeat the last few steps, each time changing the number to the lower value, until you complete the number '3'.

Now we have to construct the last number, which of course is '2'. A slight variation is employed for this important number in the countdown.
We must recreate the number '2' from scratch, so double click on your text generator one last time.
Once opened in the viewer, first set your 'in' and 'out' points to one frame apart. Then under the control tab, change the text to number '2'. It will look different than all your other numbers as the attributes have not been set. Don't worry, we will fix it in a moment.
Making sure your playhead is on the last frame of the '3', drag your one frame clip from the viewer to the overwrite box and it will appear on the time line. If you are having difficulty seeing it, enlarge your timeline even more by dragging the bottom sliders.
All that remains is to duplicate all of the settings. If FCP's text generator was used, this can be done by copying the attributes from '3' to '2'. If romantic text was used as in the examples, it has to be done the old fashioned way. One step at a time.
Standard in the industry is 2 seconds of black before your production begins, so you will be right on the money.
Now you need to construct the 'pop' part. I know I'm going to have all kinds of techie people out there come up with alternatives to my methods but remember. I like to build things from the ground up and get creative.
My doorbell was pressed into service for this part of the process. With microphone positioned, I recorded the 'boing' and captured the clip audio only.
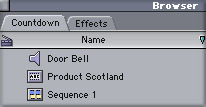
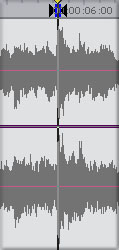
Once opened in the viewer, I picked the highest peak in the waveform, then set my in and out points one frame apart, for a tone duration of one frame. With playhead positioned on the number '2' frame, drag the clip to overwrite and it lands exactly where I want it. You now have a nice 'pop'. Adjust the Db to taste. If you don't like it, try again in a different part of the waveform or buy another doorbell.
You can now do a 'render all' and save your masterpiece to your hard drive. At the beginning of a new project, open your custom time line, do a 'save as' giving it the name of the new project and you still have the original for the future. All you have to change is your custom slate information.
This whole operation may take an hour of your time, but makes your next print to video and every other one thereafter as easy as hitting the space bar. As a bonus, I feel more satisfaction knowing it is my own creation rather than an anesthetic conception dreamed up by the software manufacturer.
But then again, I'm an un-anesthetic kind of guy.
For those of you who are not handy with hammer and nails I have a 'prebuilt' Countdown for you. It is a 10 second FCP self contained movie. NTSC, 720 x 480, audio at 48k. Just drop it on your TL. The movie is 'stuffed' and is 1.8 megs in size. It features the same art used as examples in this article, 'Romantic Text'.
Ian Sutherland
Gaelic Digital Video Productions
Winnipeg, Manitoba
Canada.
copyright © www.kenstone.net 2001