

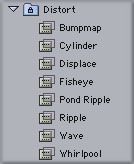
The Basics - Distortion October 8, 2001
Distortion Filters in FCP
The Basics - Distortion October 8, 2001
Distortion Filters in FCP
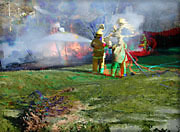
Welcome to the Distorted world of FCP. In the FCP Effects Browser is the Distortion bin. Inside are eight filters. Two of these filters are almost identical and two are probably misnamed but, all can be put to good use. Distortion effects are a key element in 'Motion Graphics' and used for just a few frames add visual nuisances to your effects. All of these filters and their attributes are Keyframeable.
Cylinder
If you are looking to create a cylinder with your video image this filter will disappoint. There is nothing cylindrical about it. This filter distorts by stretching out parts of the video and 'smearing' pixels in the stretched areas. 'Radius' controls the width of the distorted area. The higher the setting the larger the area of distortion. This filter defaults to a horizontal direction of distortion.
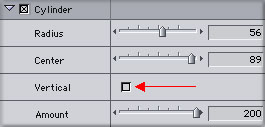
The 'Center' control allows you to set the placement of the distorted area. There is a 'Vertical' check box that will allow you to change the direction of the distortion from horizontal to vertical. The 'Amount' control set at zero will produce no distortion, 200 will produce maximum distortion. This filter stretches out or elongates parts of your image.
No Effect applied |
Cylinder - Horizontal Effect |
Cylinder - Vertical Effect |
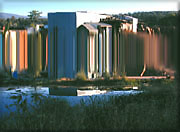
Bumpmap and Displace
I am going over both 'Bumpmap' and 'Displace' together because for all intents and purposes they are the same. These filters create distortion based on the luminosity of the image that is in the 'Image Well' (Red arrows). The lighter the image the more distortion will be applied. Those parts of the image in the Well that are dark will produce less or no distortion.
The first two controls for both filters are the same; an 'Image Well' and 'Luma Slider' . Video or an image in the Image Well is composited with the video clip on the Timeline to create distortion. 'Luma Scale' has a slider control. Moving the setting higher causes the Well image to have greater influence on the amount of distortion in the composite.
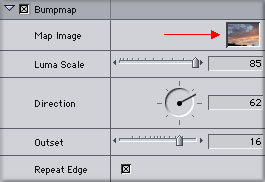
The next two controls for both filters, Direction/Outset for 'Bumpmap' and Horizontal/ Vertical for 'Displace' look different but they do the same thing. These controls have a strong influence on the distortion by moving or shifting the video image that is on the TL in relationship to the image that is in the Well.
Bumpmap - No Effect |
Bumpmap - Effect applied |
Fisheye
I'm a still photographer so when it came time to check out 'Fisheye' I figured that this would be fun. Well, they call it 'Fisheye' but it's not. This filter is more like a 'Bulge' filter because that's what it does. The 'Radius' control sets the diameter of the bulge. The higher the setting the larger the width of the bulge. The 'Amount' control determines how much bulge is applied.
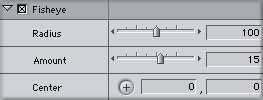
I found that the best way to get interesting effects with this filter is to first set the 'Center' by clicking on the 'Center' button then clicking in the Canvas to set. Changing the Center point gives completely different perspectives. How about Keyframing several 'Center' points. Call it from bulge to bulge.
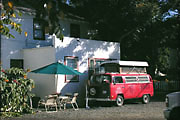
No Effect |
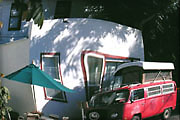
'Center' middle of picture |
'Center' on umbrella |
Pond Ripple
This filter ripples your video in a circular fashion. The first control 'Center' allows you to set the Ripple center point in your video by clicking on the 'Center' button and then clicking in the Canvas window for placement. The Radius setting controls the size of each ring of the Ripple. As you move this setting to higher numbers the width of each ring spreads out, getting larger, involving more of your video image. The Ripple slider controls the number of rings in the effect. The Amplitude setting controls the visual strength of the effect. The higher the setting the more obvious the effect.
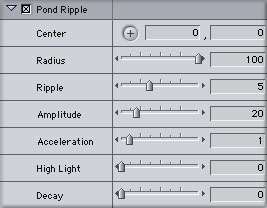
The 'Pond Ripple' filter really only works well when Keyframing is used. Starting with normal video, then producing a growing ripple effect over time. I dropped the Pond Ripple filter onto a black slug, then using the 'High Light' control produced the image lower right. Bet you've seen this before.

No Effect |

Effect centered on sun |
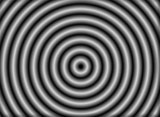
Pond Ripple on black slug |
Ripple
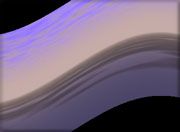
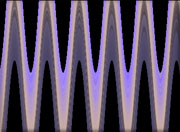
The 'Ripple' filter creates waves in the image both horizontally and vertically. Both horizontal and vertical waves are tied to the same controls. Change one and the other changes equally. The 'Amplitude' settings controls the height of the Wave. 'Wave Length' actually controls the number of waves. The lower the 'Wave Length' setting the more waves in the effect.
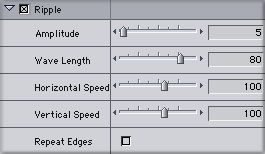
'Repeat Edges' expands the image to fill in those areas left black by the shaping of the video, bottom two images.

No Effect |
Default setting |
Amplitude 5 - Wave Length 47 |
Amplitude 20 - Wave Length 100 |
Wave
The Wave filter is similar to the Ripple filter except that it only works in one direction at a time, either horizontal (default) or vertical. With the default settings and the 'Vertical' box checked the video will take on an undulating shape. The 'Amplitude' settings controls the height of the Wave. 'Wave Length controls the number of waves. The lower the 'Wave Length' setting the more waves in the effect.
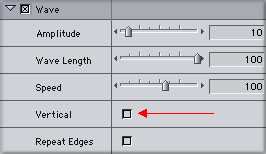
The 'Speed' setting seems to only move the entire image either left or right.

No Effect |
Default with Vertical checked |

Amplitude 20 - Wave Length 9 |
Amplitude 5 - Wave Length 45 |
Whirlpool
Whirlpool is an interesting effect. It looks like water whirling around in a circle as it goes down the drain. The 'Amount' setting controls the tightness of the Whirlpool. With low settings the image looks like a wave. As the 'Amount' value is increase the spiral gets tighter. In the Whirlpool control panel is a 'Center' button. This is an important feature. Clicking on the 'Center' button then clicking in the Canvas will set the center point for the Whirlpool. The part of the image that is closest to the 'Center' point will show the least amount of distortion. The further away from the 'Center' point you move the more the Whirlpool effect is applied.
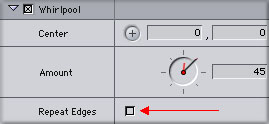
There is also a 'Repeat Edges' box (Red arrow). When Whirlpool is used the video image is converted into a circle shape which will leave areas of the screen with no image. If you are dealing with just one video clip the areas with no image will default to black but it is really an Alpha channel, it's transparent, bottom image left. If you have a clip beneath the clip with Whirlpool applied then the Black area will be transparent and the clip below will show through. With the 'Repeat Edges' box checked then FCP will fill the empty spaces created by the Whirlpool circle with image, bottom image right.
No Effect |

Amount of 20 |
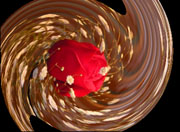
Amount 100 - no Repeat Edges |
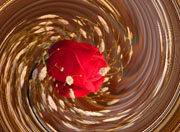
Amount of 130 Repeat Edges |
Conclusion
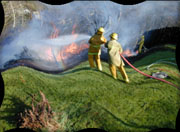
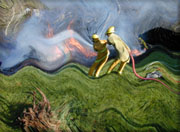
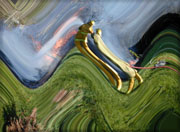
The 'Wave' filter is one of my favorites. Using a graphic landscape I matted out three different zones; water, land and sky with some 'Mask Feather' applied to each Matte. I then applied a 'Wave' filter to each one. Each Wave filter had different settings. Things were waving all over the place.
There is a caveat. You will need to keep an eye on your NTSC or PAL monitor as some of these filters, particularly with higher settings, produce a lot of video artifacts which can be very distracting.
Go ahead, try some of them out. Keyframe them, stack them on the TL, composite them with other images. Some of these Distortion filter can produces some very exciting Motion Graphics.
Enjoy,
--ken
copyright © Ken Stone 2001