March 28, 2011
(and extracting video from it.)
By Brad Wright
For the last seven years, I've been writing a software program called DVDxDV that extracts video from a DVD, so it can be used in Final Cut Pro, Avid, and other editing systems. In those seven years, DVDxDV, has been adopted by every major television network in the U.S. and most of the major film studios. Over the years, my customers have asked a lot of questions about the DVD format. This article covers the top ten most misunderstood things about the DVD format and extracting video from it.
Don’t Convert Your DVDs to H.264 for Editing
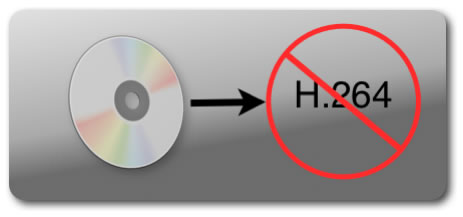
Most freeware and commercial DVD converter programs only export DVDs to H.264 encoded video. H.264 is a complex video codec that makes it difficult for the computer to decode individual frames. In Final Cut Pro and other editing systems, H.264 can be painfully slow to work with.
H.264 conversion can destroy interlaced video. Even though the H.264 standard supports interlaced video encoding, most of these conversion programs just remove the interlacing from the video. This process destroys the quality of the video.
Converting your DVD to H.264, will cause the video to look worse than the original DVD and slow down your editing system. Use a high quality codec, such as ProRes or 8 Bit Uncompressed for faster editing and better video quality.
The Highest Quality Codec to Use For Extracting Video From a DVD
There is no better codec than 8 Bit Uncompressed as it contains no compression. It’s not visually lossless or mathematically lossless but completely lossless. When DVDxDV converts a DVD to this codec, every pixel is preserved. The video produced is identical to the original DVD. However, the 8 Bit Uncompressed codec can create very large video files. If hard drive space is a concern, there are several excellent alternatives to this codec, such as the Apple ProRes series, the Apple Intermediate Codec, and DVCPro.
Don’t Just Backup Your VOB Files
Many people think that video can be extracted straight from the VOB files on a DVD. When making a backup of a DVD, some people just save the VOB files instead of the entire DVD. This is a very bad idea and here is why.
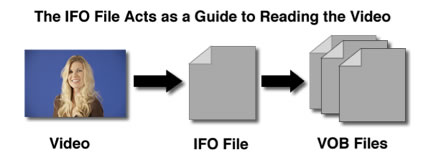
Inside a folder labeled “VIDEO_TS” on a DVD, there are files that have a “.VOB” extension. These files might be named “VTS_1_1.VOB”, “VTS_1_2.VOB”, or “VTS_1_3.VOB”. Inside these files are both audio and video tracks. Each “.VOB” file is limited to a maximum of two gigabytes in size. Videos longer than 20 minutes are usually spread across multiple VOB files to form a group of VOB files. Each VOB file in the group contains just a segment of the video. For each group of VOB files that make up a video clip there is a file with a “.IFO” extension which acts as a guide to reading the group. In some cases, the video stored in a group of VOB files is out of order. The video might jump around between the VOB files in an unpredictable way. Without the navigation information contained in the IFO file, there would be no way to properly read the video. This is why all the files in the “VIDEO_TS” folder should be backed up and not just the VOB files.
There’s No Such Thing as True Widescreen Video on a DVD

DVD video cannot be any wider than 720 pixels across for both Widscreen and Fullscreen content. DVD was designed for display on Standard Definition television monitors. This limited the video to 720 pixels wide. Widescreen video is optically squeezed from 854 pixels into 720 pixels horizontally. DVD players resize the video so that it has the correct aspect ratio on playback.
Those Ugly Horizontal Lines in DVD Video
People that are new to digital video complain about seeing horizontal lines around moving objects. They often think the DVD extraction software is adding these horizontal lines. However, these horizontal lines are a normal part of interlaced video.
Interlaced video combines two different images in time to form a single frame. Standard definition interlaced video contains 60 half or 50 half images a second depending on your television standard. These two frame rates of interlaced video are called 60i and 50i respectively. The half frames are called Fields.
Two half frames or Fields are weaved together horizontally to form a single frame. The very top pixel row of the frame will display the top row from Field number one. The second row on the frame will display the top row from Field two. Frame row three will contain the second row from Field one, and frame row four will display the second row from Field two. This alternating row pattern is repeated all the way from the top to the bottom of the frame.
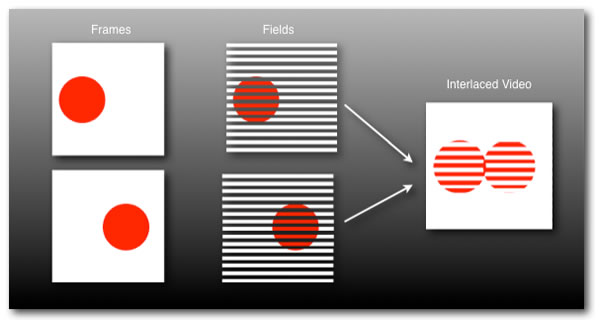
The horizontal lines appear around a moving object because a single frame represents two different moments in time. For example, imagine a video camera pointed at a red ball rolling across a white background. To create a single frame of video, first the camera records only one half of the frame. A fraction of a second later, the camera records the second half. In between those two separate images, the ball moved slightly. Because of the way the two half frames or Fields are weaved together, the ball will have red and white horizontal stripes. These horizontal stripes won’t show up on a television because it’s designed to display interlaced video while a computer monitor isn’t capable of displaying this type of video.
24p Film on DVD isn’t Always 24p
Understanding how film is transferred to a DVD can be extremely confusing. As I explained earlier, DVDs were designed for Standard Definition monitors. Standard Definition video runs at 50i (25 frame per second) or 60i (30 frames per second approximately) while film runs at exactly 24 frames per second (24p). To make up for the difference between the frame rates, the DVD encoder must compensate. It splits up the individual frames of film into half frames or Fields and then repeats a few halves at a regular interval. The half frames of film are combined to create interlaced video frames. This process is called pull-down, and there are several methods of pull-down that can be used on a DVD, such as, 3:2, 2:2, and 24p Advance.
![]()
Sometimes when a film is transferred to DVD, the master video already contains a pull-down method. Frequently, this is the case when HDCAM video tape is sent to a DVD authoring company. Since the tape has an interlaced video frame rate with a particular pull-down method, the DVD encoder will attempt to look for it. During the encoding process, the encoder may switch back and forth between an interlaced frame rate and a progressive frame rate. Although the video would seem completely fine otherwise, it will randomly jump between progressive and interlaced frame rates because the encoder couldn’t decide which one to use. Therefore, even when a DVD video should have a single frame rate, it might be a mixture of frame rates.
My DVD Video Looks Horrible on my Computer
A computer’s monitor was never designed to display video. Televisions and computer monitors aren’t interchangeable devices. Computer monitors are optimized to display text, and television monitors are optimized to display video. A computer monitor makes everything look excessively sharp and crisp while a television monitor tries to smooth out hard transitions. This is why a computer monitor will create false visual defects that aren’t actually present in the video. At some distant time in the future, it may be possible to design a monitor that can do both things well. For now, the best way to preview your digital video is through a separate television monitor attached to your computer.
DVD Video Looks Darker on a Computer Monitor Than on a Television
If your computer monitor was as bright as your television, you might need sunglasses to read this. An image that is pure white at 100% luminance on your television would hurt your eyes to stare at it all day. The brightest white your computer monitor can produce is usually much dimmer than the brightest white produced by your television. If your computer monitor was as bright as your television, it would be painful to use. Therefore, when you display video on your computer, it automatically seems darker because your computer monitor isn’t as bright.
iMovie Doesn’t Support Interlaced Video
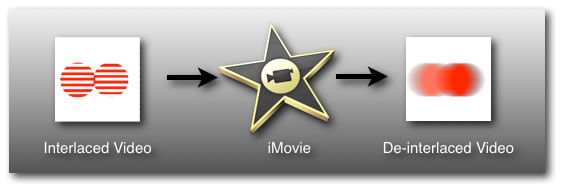
iMovie versions 1 through 6 could import and export interlaced video. After iMovie 6, Apple changed the design and the newer versions can no longer work properly with interlaced video. Any interlaced video imported into iMovie now get de-interlaced on export. De-interlacing video always reduces video quality. To avoid this problem, use Final Cut Pro or Final Cut Express instead of iMovie when editing interlaced video.
How Standalone DVD Recorder Compress Two Hours of Video on to a Single DVD
Many people who have VHS tapes or 8 mm tapes transferred to a single DVD don’t realize how the DVD recorder does this. DVD recorders squeeze the video horizontally to half it’s origninal size when recording two hours of video on a single DVD. This effect isn’t seen on the television, as the DVD player resizes the video on playback. However, half the horizontal pixels have been removed. For the best video quality, only put one hour of video on a DVD.
[Top]
copyright © Brad Wright 2011
© 2000 -2011 Ken Stone. All rights reserved. Apple, the Apple logo, Final
Cut Pro, Macintosh and Power Mac
are either registered trademarks or trademarks of Apple. Other
company and product names may be trademarks of their respective
owners.
All screen captures, images, and textual references are the property and trademark of their creators/owners/publishers.