
The Basics - Final Cut Express - Keyframing January 27, 2003
Basic Keyframing in Final Cut Express V. 1.0.1
By Ken Stone
The Basics - Final Cut Express - Keyframing January 27, 2003
Basic Keyframing in Final Cut Express V. 1.0.1
By Ken Stone
As the movie starts, the screen is black and all is quiet. Then, slowly, both the picture and background music begin to fade in. A television news broadcast tells a story and at a certain point a small picture depicting elements of the news story appears on screen in a small window, then disappears. In a crazy dream sequence images dance their way across the screen, spinning and changing size and position as they go. At the end of the movie the credits scroll up the screen. All of these effects are created using Keyframes. Keyframing gives us the ability to change the appearance of our video over time and to make things move.
In Final Cut Express we have the ability to change elements of our video as it plays on the screen. We can fade a clip in and out, fade the audio up or down as well as lower or raise the volume of the clip in different places. We can change the size of our clips, move them around the screen as in 'Picture in Picture', rotate, crop or distort them. We can animate our video over time. To do this we use 'Keyframes'. When we set a keyframe in Final Cut Express, we pick an exact frame that we want our change to begin and mark that video frame with a keyframe. Further down the Timeline, where we want the change to be completed we mark that frame with a second keyframe.
Thus these changes will occur over time. Final Cut Express will interpolate or generate all the frames needed between the Keyframes so that the change will happen smoothly, over time. This is the heart of video animation and special effects. In Final Cut Express we can do our keyframing work in two places in the interface, the Timeline and the Canvas window.
I have a clip in the Timeline, I want to fade in both the audio and the picture. At the end of the clip I want both to fade out.
Before we start to set Keyframes let's look at these level overlay lines. If you place your cursor on a level overlay line it will turn into a 'up and down' arrow. Click and drag down. As you drag the overlay line downward, a yellow box will pop up showing the amount of change. In the center picture below, I have lowered the opacity to 45%. In the picture on the right I have lowered the volume of the audio by 6 dBs. To reset opacity or audio simply drag back up to 0.
What is a Keyframe and what does it do?
Keyframing on the Timeline
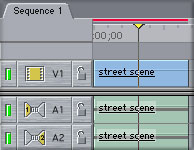
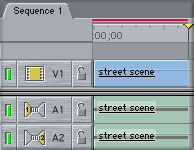
 From the lower left hand side of the TL, enlarge the TL so that you have some room to work (blue arrow right). Turn on 'clip overlays' (pink arrow at right). You will now have horizontal lines running the length of your clip. In the video track, a black line and in the audio tracks, pink lines. These 'clip overlays' are what we will work on to achieve the desired results.
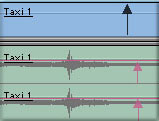
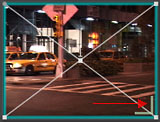
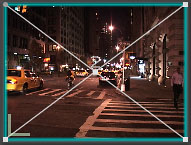
Overlay lines shown at default |
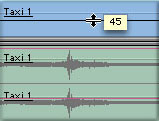
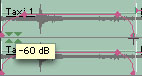
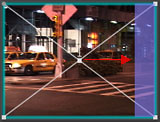
Opacity overlay at 45% |
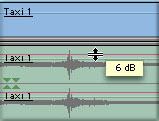
Audio overlay at 6 dB |
As you can see, pulling down the overlay line pulls down the line for the entire clip. This is fine for overall adjustments like matching the volume of one clip to the next but this change is constant for the entire clip. What we are looking for is a way to vary the opacity or volume up or down as the clip plays. This is where Keyframing comes in.
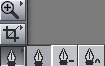 To Keyframe the opacity of a clip first select the 'pen' tool from the tool palette or hit 'p' on the keyboard.
|
1 |
2 |
3 |
4 |
5 |
6 |
What we have done here is placed a Keyframe on the very first frame of the clip and set the opacity to 0%. Then further on we have set a second Keyframe with the opacity set to 100%. As the clip is played from the first frame, the opacity of the clip ramps up from 0% opacity to 100% opacity at the point of the second Keyframe. It will continue to play at 100% until it encounters another keyframe that would change the opacity once again. We have faded in the clip. If you want to fade out the clip at the end simply add two more keyframes with the last one pulled back down to zero. This process is often referred to as 'rubber banding'.
The Process for keyframing audio in the Timeline is exactly the same as keyframing opacity. Select the Pen tool to set your keyframes on the audio overlay line, then move the keyframes points up or down to effect change. An audio fade in and out is shown below. If you are not happy with the placement of a keyframe, place the Pen tool on top of the keyframe, it will turn into a '+'. Now you can drag the keyframe left or right to reposition it (as well as up or down). As you drag a small yellow box will pop up showing the amount of the change in frames. You can add addition keyframes along the overlay line by simply clicking on the overlay line with the Pen tool. You can remove a keyframe by placing the Pen tool on the keyframe, then hold down the option key (the Pen tool cursor will show a 'minus' sign) and click. You can also Control click on a keyframe and select 'clear'.
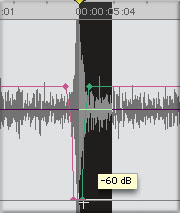
Keyframing audio in the Timeline can do more than simple fade in and outs. Keyframing can be used to fix audio problems, changing the volume up or down in just certain places to match the rest of the audio in the clip. Keyframing can also be used to remove unwanted sounds like a door slam,( example below). Before we can Keyframe audio in the Timeline we have to turn on Waveforms which are graphic representations of the audio volume and frequencies. You can turn on Waveforms from the Sequence Menu > Settings > Show Audio Waveforms, but the easiest way to turn on and off waveforms is from the keyboard, 'Option + Command + W' will toggle waveforms on and off, it also toggles the overlay lines on and off.
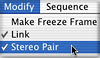 With audio we often have two audio tracks, Final Cut Express captures audio as CH 1 and CH 2 only, it will not capture audio as a Stereo pair. With CH 1 and CH 2 audio, keyframing one audio track will affect just that one audio track and not the other. If you wish to keyframe both audio tracks at the same time, in unison, then select the audio tracks on the timeline and from the Modify Menu select Stereo Pair. Now keyframing one track will keyframe the second track automatically.
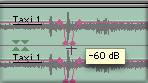
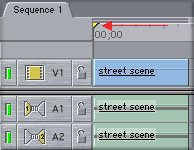
As shown in the Timeline, below left, I have Keyframed out a door slam. If you look at the Timeline you will see two sets of green triangles pointing to each other, these green triangles show that the audio is a Stereo pair. In Final Cut Express we can also keyframe audio in the Viewer Window. Double click the clip to load it into the Viewer and then select the audio tab. The advantage to keyframing in the Viewer is that the waveforms are displayed at a much larger size and this makes it possible to work with a greater degree of accuracy. If you enlarge the waveforms far enough in the Viewer you will be able to keyframe at the sub frame level. As shown below right, the black vertical band represents one frame of video.
Keyframing in the Canvas Window
In the Timeline we can change the opacity and audio volume over time, but there is much more that we can do with keyframes. To accomplish these other effects we will move from the Timeline to the Canvas window. The Canvas window is our video workspace area where we will apply motion, change the size of our clips, rotate, distort, crop and create Picture in Picture, etc.
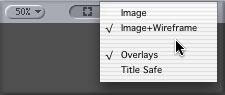
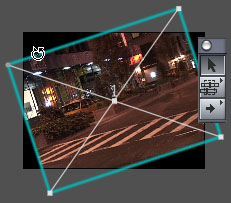
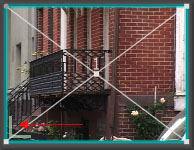
First we need to set up the Canvas window. From the drop down menu at the top of the Canvas window, select both 'Image + Wireframe' and 'Overlays'. Motion keyframing can only be done in the Image + Wireframe mode. Image + Wireframe creates the white 'X' that you see in the Canvas below. Just above the center of the 'X' is the track number of the video you are currently working on. There is a blue bounding box around the borders of the video with handles at each corner. Click once in the Canvas to activate the Wireframe.
Overlays
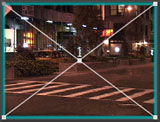
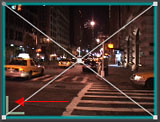
Overlays turn on visual cues that help in keyframing, these Overlays won't appear in the the video image itself, you can switch them on and off as needed. First Frame marker, red arrow below left, shows that the playhead is on the first frame of the clip. Last Frame marker, below center, the playhead is on the last frame of the clip. When the playhead is parked on the edit point there is a purple border, shown below right. When keyframing the end of a clip it is essential that the playhead be on the last frame of the clip and not on the edit point. You can use the left and right facing arrows on the keyboard to move the playhead one frame at a time.
First Frame Marker |
Last Frame Marker |
Edit point |
Move Tool |
Size Tool |
Rotate tool |
In the Tool bar there are two additional tools. The Crop tool, below left, is used to crop or create borders, vertical, horizontal or both and the Distort tool, below right.
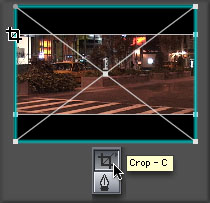
Crop Tool |
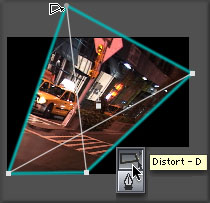
Distort Tool |
Setting Keyframes
Okay, let's set some keyframes in the Canvas window, we will Scale the size of our video. For this demonstration we want the video to start off small, 50% in size at the beginning of the clip. As the Timeline plays and reaches the halfway point the video will grow to full size. By the end of the clip the video will once again shrink back down to 50% size.
1. Playhead on the first frame of the clip |
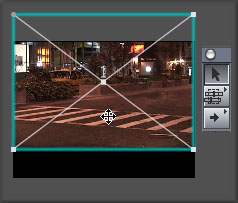
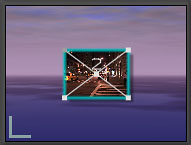
2. Video full size, Image + Wireframe, first frame marker |
First we will reduce the size of the video by clicking on any one of the four handles in the corners of the blue bounding box with the Arrow tool, then drag in to reduce the size of the video.
When the video has been sized, click on the Keyframe button, bottom of Canvas, red arrow
After clicking on the keyframe button the white Wireframe will turn green showing that a keyframe has been set and what type of keyframe. Whenever you see a green wireframe you will know that the playhead is sitting on a keyframe.
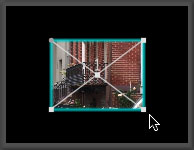
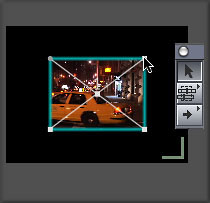
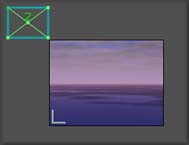
3. Size reduced |
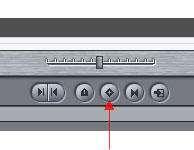
4. Keyframe button in Canvas |

5. Wireframe turns green |
6. Playhead at the center of clip |
7. FCP sets new keyframe |
Now move the playhead to the last frame of the clip. Look for the last frame marker, red arrow. Drag back in to reduce the size of the video. Once again, Final Cut Express has set a new keyframe for you.
8. Playhead at end of the clip |
9. FCP sets new keyframe |
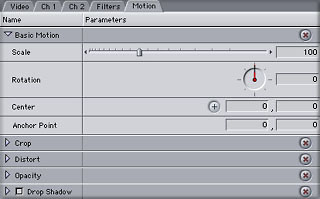
There is another element that will help with keyframing in the Canvas window. This is the Motion tab found in the Viewer window, shown below (double click the clip in the Timeline to load it into the Viewer). It is possible to enter exact numeric values, a very accurate way to create effects. When you change a setting in the Motion tab you will see the change reflected in the Canvas window.
You can use the Motion tab to set parameters for: Scale, Rotation, Center, Anchor Point, Crop and Distort. The remaining two items Opacity and Drop Shadow can not be keyframed from the Motion tab. Opacity can be keyframed on the Timeline and Drop Shadow can be turned on and adjusted in the Motion tab, but Drop Shadows will be a static effect and can not be changed over time.
To use the Motion tab, move your playhead to the position that you want to keyframe, set the parameters in the Motion tab and then click on the keyframe button in the Canvas window.
Keyframing for Motion
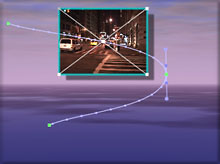
One of the most important functions of keyframing is the ability to animate or add motion to video clips, stills, artwork and titles. Motion can be use in conjunction with the other elements of keyframing that we have gone over above. Not only can we fade in and out, scale, rotate, crop, and distort but we can fly these images through space. We can have a picture be off screen at the start, fly across the screen and then disappear off screen at the end. In fact we can have any number of elements flying around at the same time, just keep adding video layers.
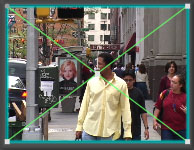
Let's keyframe for motion. We will place a background clip on V1 and a second video clip (stills or titles can be used here) on V2. We will fly this second video clip across the screen and back again superimposed over our background video.

(1) Timeline |
(2) V2 at full size |
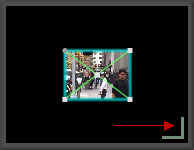
(3) Image reduced to 35% |
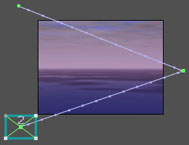
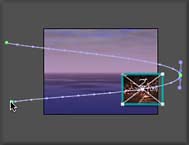
After having reduced the size of the V2 clip, position the Timeline playhead on the first frame of the V2 clip, drag the clip up and to the left and position it just outside of the video frame. Click on the keyframe button in the Canvas window to set the first keyframe.
In the Timeline position the playhead midway through the clip. Drag the V2 video across the screen to a center position just out of the video frame. When you release the mouse button Final Cut Express will set a keyframe for you. You can tell that a keyframe has been set because the white wireframe turns green.
Now in the Timeline move the playhead to the last frame of the clip and once again drag the V2 video back across the screen to the opposite side. A third keyframe will be set.
(4) First Keyframe |

(5) Second Keyframe |
(6) Third Keyframe |
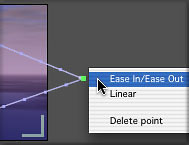
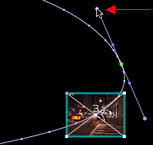
If we were to render and playback our flying clip as shown in number 6, we would see the clip fly back and forth but because of the severe angle at our second keyframe, the results of our motion would be somewhat lacking esthetically. To add a little finesse to our motion, place the cursor on the second keyframe, control click and select Ease In/Out.
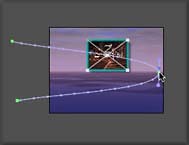
Two things have now happened because we selected Ease In/Out. First it turned the harsh angle of the motion path, at the second keyframe, into a more gentle curve and when played, and it will cause the clip to slow down and then speed back up as it passes through the turn. This will give the motion a more natural appearance. After playing the clip I discovered that I did not like the starting and ending positions for my flying clip. Keyframes in Final cut Express are extremely malleable. Place the cursor on the first keyframe and drag it down, drag the third keyframe up.
The last adjustment to be made is to move the second keyframe back in to the video frame so that the turning motion of the flying clip will happen on screen as opposed to happening off screen.
(7) Ease In/Out |
(8) Curved Motion path, 1st and 3rd keyframes moved |
(9) Second keyframe moved in |
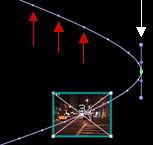
The motion path is purple in color. There are 'purple speed bumps' along the motion path that indicate the speed of the motion, red arrows below left. The short vertical purple line with purple dots at the ends, white arrows below left, is the Bezier handle. By dragging on the ends of the Bezier handle you can move the handle and alter the shape of the motion path curve, red arrow below right. There are two additional dots on the Bezier handle midway down. Dragging on these dots,up or down, will change the speed of the clip in the turn and along the motion path.
Motion Paths and The Bezier Handle is a complete article in itself and will not be covered here. I do have Motion Paths and The Bezier Handle for Final Cut Pro that covers this topic completely.
Real Time Review
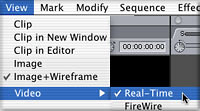
Many G4 Macs are capable of displaying these Keyframeable Motion effects in Real Time Preview mode. The availability of RT Preview depends on the processor speed of your G4. With RT Preview you will be able to preview motion effects in the Canvas window without the need to render the effects first. To enable RT Preview, from the View menu > Video, > select 'Real Time'. When running in RT Preview mode Final Cut Express cuts off the video going down FireWire to your NTSC or PAL monitor. To restore FireWire output to your NTSC or PAL monitor select 'FireWire' from the View > Video menu. All effects will need to be rendered before printing to tape. If your Mac is not RT Preview qualified, hitting the 'Option + P' keys on the keyboard will step you through your effects, one frame at a time.
Real Time Preview setting turns off NTSC or PAL monitor |
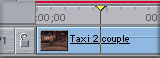
Red bar indicates that render is required |
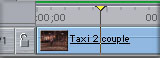
Green bar indicates RT Preview |
Conclusion
At first the process of keyframing many seem complicated but after you have done it several times you will find that there is an intuitive nature about keyframing. For the first keyframe place the playhead at a position in the Timeline. Use the tools to change attributes of the video, then click on the keyframe button in the Canvas window. From this point out simply move the playhead to a new position, change the video and Final Cut Express will set the key frame for you. After you have set several keyframes you can shuttle between the different keyframes by the keyboard. Shift K will move you to the next keyframe and Option K will move you back to the previous keyframe.
When keyframing you can change several attributes at the same time. You can move your playhead to a position on the Timeline, then move, size, crop, distort and rotate. Even after you have set a keyframe you can go back to it and change any attribute. You can add additional keyframes at any time or place on the Timeline. You can remove a keyframe by placing the cursor on the keyframe and Control clicking, select 'Delete Point'. If you want to fade a clip in or out in conjunction with other changes you will work in both the Canvas and on the Timeline using opacity.
Keyframing is a powerful feature and it is not limited to video. You can use photographs, art work and titles created in other applications as well as titles created inside Final Cut Express using one of its title generators. It should be noted that in Final Cut Express only the attributes shown above; motion, opacity, audio volume, size, rotate, crop and distort can be keyframed. Filters and generators can not be keyframed. When filters or generators are used, the effects are static and are applied to the entire length of the clip.
Enjoy,
--ken
copyright © Ken Stone 2003