
Basic - DVD Authoring 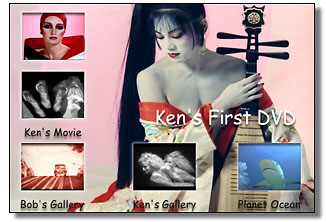
December 17, 2001
Authoring with iDVD 2 - OS 10.1
Basic - DVD Authoring December 17, 2001
Authoring with iDVD 2 - OS 10.1
System Requirements
iDVD 2 requires a Power Mac G4 with an Apple SuperDrive,
running Mac OS X version 10.1 or later.
It also requires a minimum of 256MB of RAM installed,
with 384MB recommended.
Having been interested in DVD as a delivery medium instead of VHS tape for some time now, when I purchased a new Mac with a SuperDrive, I ordered iDVD 2 from the Apple store for $19.95.
Installation
iDVD 2 will only run on OS 10.1. So with one hour of OS X experience under my belt I went to install iDVD2. I clicked on the 'install icon'. Instead of installing I got a dialog box that told me that I needed to enter the 'Administrators Password' before I could install. Nothing on this in the 'read me' or at Apple. I finally noticed a locked padlock. I clicked on it and a new dialog box opened which gave me the chance to set an 'Administrator Password'. So I gave it a password, clicked okay and the installation process began. I was informed that iDVD would need more than one gig of HD space. The installation went smoothly. I then ran the iDVD 2.0.5 updater.
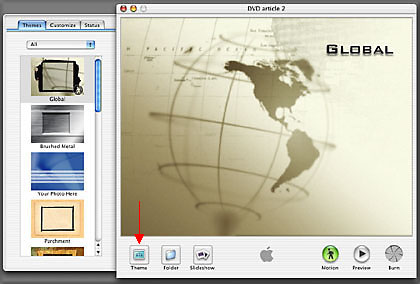
The iDVD interface
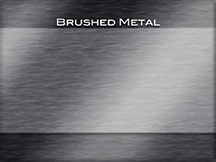
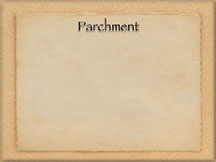
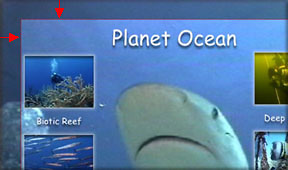
The iDVD interface opens with a 640 x 480 picture area that is playing a movie of a spinning globe, music playing in the background. In the lower left there is a 'Themes' button (Red arrow), click on it and a shelf will open to the left. Scroll down and click on the different themes for a preview. You will want to do this as quickly as possible as the music that is playing will soon drive you crazy.
|
|

|

|
The Themes are okay but there is much you can do to customize the look of your DVD.
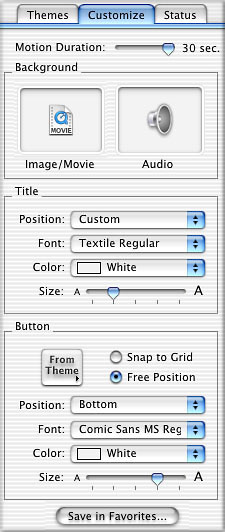
The top section of the Customize tab deals with the Background image. To set a background image or moving picture drag your image/movie and drop into the 'well' on the left. To add music drag a music file to the audio 'well' on the right. To change a background picture/movie or audio simply drag a new one to the 'well'. To remove audio, click on the audio icon in the audio 'well' and drag out. It will disappear in a puff of smoke (a new OS X feature).
The very top slider, 'Motion Duration', will enable you to set the length of your background movie up to 30 seconds. If your movie is longer than 30 seconds it will loop back to the start after 30 seconds and begin again. You can use this slider to trim back the play duration to set the end point of your movie for a more seamless loop.
When you open a Theme there will be the title of the Theme set as text. If you click on the title you will be able to type in your own text. In the Title section of the Customize tab you can choose a position for your title, or choose Custom so that you can click and drag the title anywhere you want. There are a large number of fonts available to choose from. Clicking on the Color box will provide you with a drop down menu for color selection. All type has a drop shadow.
The last element in the Title section is font size. Drag the slider to change the size of your title. It could be that you do not want a title, in this case, click on the title and delete the text. No more title.
In the Button section you can choose different style buttons in the 'From Theme' pop out menu. Select 'Free Position' and you will be able to drag the button to any location. Each button has text beneath it. You can change the font of the text from the font menu as well as the color. The last item is size. This slider changes the size of the text beneath the button but does not change the size of the button. There is no way to change the size of a button. Text settings for each page are Global. All buttons will have the same font, color and size.
If you will be using these settings again you can make a 'favorite' of your settings for future use.
 The Customize Tab


Above are five of the 14 button styles available. If you will look at the top two buttons you'll notice that the text is far below the button window. Look at the bottom two on the right. You will see that the borders are wide and the text is touching. The position of the text is fixed. With some buttons it's too far down, with others it's not down far enough, depends on the thickness of the border. Be careful not to let your buttons overlap. If your text extends beyond the borders of your button, this additional area makes up part of the space that your button uses. Slide Shows allow 'forward' and 'back' buttons. You'll need to keep these buttons clear of all other buttons as well.
I shall be refering to the iDVD image area (what the viewer of the finished DVD will be seeing on the screen) as a page. You can have any number of different pages.
To start work click on the Theme button to open the shelf. Start by picking a Theme or using your own image/movie and add sound if you wish. This background movie will fill the entire page. It loops every 30 seconds. Once you have the background of your page done you can start adding elements to the page. There are three types of elements that can be added; movies, slide shows, and folders (clicking on a folder will open a new DVD page, so a Folder is really just a link). It is important to understand that you can only have six different elements on any one page. This is why there are folders which will take you to a new page.
Movies
You can use a QuickTime movie (video and image files supported by QT, but not MPEG 1 or QT VR files) FCP Reference Movie or a FCP self-contained movie. Simply drag and drop your movie anywhere on the page. It will turn into a button with a poster frame. The poster frame will be the first frame of the movie. To change the poster frame simply click on the button to get the poster frame slider. Dragging the slider will allow you to select the frame you want to use as a poster frame. You can position your button any where on the page by dragging it.
Building a DVD
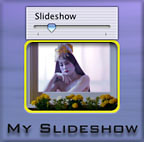
Slide Shows
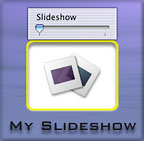
Add a Slide Show by clicking on the Slide Show button in the Tool bar. This will place a Slide Show button on your page.

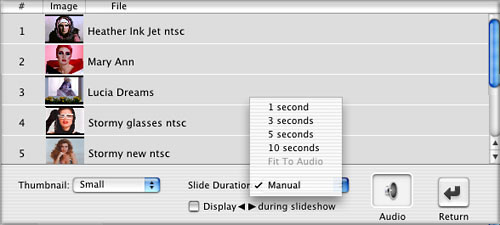
Double click on the Slide Show button to open the Slide Show dialog box, shown below. You can drag and drop up to 99 photos. You can reorder the photos by clicking and dragging a photo to a new location on the list. To delete a photo simply select the photo in the list and hit the delete key. There is a pop up menu that will allow you to set the duration that each photo will be on the screen. 1 - 3 - 5 or 10 seconds. You can also set to manual. If you use the manual settings you may want to turn on the 'display arrows during Slide Show' so that your viewer can move from one photo to the next by clicking on the on screen arrows. It is not essential that you have the 'forward' and 'back' buttons on screen, they do take up valuable space. The arrow buttons on your remote control will work with or without the on screen buttons. To the right of the Slide duration button is an audio 'well'. Drop an audio file into the 'well' for background music or a Voice Over/Narration while the Slide Show plays. There is a setting 'fit to audio' which will play all your slides over the duration of the audio. If the audio is short the slides will advance quickly. If your audio is long, each slide will be on the screen for a longer period of time. When you are done click the return arrow, lower right, to return.
As with movies, you can set a poster frame for your Slide Show.
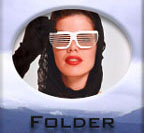
Folders
There can only be six elements, buttons, slide shows and folders, on any one page. What iDVD calls a folder is exactly like a link on a 'web' page. Click on the Folder button in the Tool bar and a new button will appear on the page, titled Folder. Like any other button you can drop a still or movie onto the button.

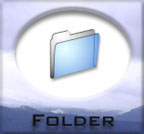
 When you click on this 'folder button' you will go to a new page. The new page will have the exact same background as the page you came from. You can change the background of the new page to a movie, a still or a Theme. The way you know that you are on a new page is that there will be a 'return arrow' in the lower left corner of the page. This return arrow will change color depending on the color of the background surrounding it.
This is a new page so once again you can put six elements on it. Any number of which can be 'Folders' which will take you to other new pages. You can go down any number of levels, each level can have six elements. The only limit is the size of the DVD.
Motion
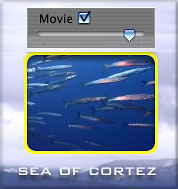
As you saw when you opened up iDVD, the background art work for the DVD page can be a movie with audio. It gets more interesting. When you drop a movie onto the page and it turns into a button with a poster frame, you have a new choice. Instead of using a poster frame on the face of the button you can have the movie playing on the face of the button (no audio). The viewer of the DVD can see a miniature version of the movie playing, if they click on the miniature playing movie, the full size movie will open on the screen and begin to play.
 This is exciting stuff. When your DVD opens up for your audience the screen can have a movie playing with music or Voice Over (it can be a still with or without audio). The buttons on the page can also have miniature movies playing, all at the same time. This really looks great (or not). If one of the elements on the page is a link (Folder) to a new page, that new page too can have a background movie playing with more buttons that have movies playing as well. To turn on Motion simply click on the Motion button in the Tool bar. To stop the motion of a movie button, click on the button and uncheck 'movie', this will turn it into a Poster Frame. Turning off the Motion button will also disable all background audio, but not the audio belonging to any of the movies. The Motion setting is Global, Motion is either on or off for the entire DVD.
Testing your DVD
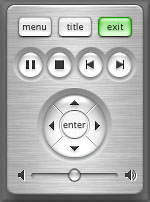
 While working in iDVD you have two states. The Composing state, with the shelf open or Preview state, where the shelf closes and you get a DVD remote Control on the screen to play and move around in your DVD to preview. To change from composing to preview click on the Preview button in the Tool bar. You will have a remote control on the screen that will work in the same manner as the remote control that comes with desktop DVD players. To leave the Preview state click on the green exit button. The remote control will close and the shelf will re open.
Creating a DVD
You will want to plan out your DVD before you start to work. The first thing to consider is your audience. If you plan for your DVD to be viewed on computers only, you can use the entire page. However, if your audience will be viewing your DVD on TV sets as well as computers then you'll need to turn on 'TV Safe Area' (Red arrows) from the Expert menu.
iDVD has one size, 640 x 480 pixels. iDVD will automatically resize any image that is not 640 x 480. If your still image or movie is smaller than 640 x 480, iDVD will enlarge the image and this can cause pixelization. If you use a FCP movie which is 720 x 480, iDVD will scale it down so that it will fit into a 640 x 480 space. As the iDVD maintains a 4:3 aspect ration, there will be black borders. These black borders do fall outside the TV Safe Area (560 x 400). When viewed on a computer the borders will be visible.
For still images to be used as backgrounds on any of your iDVD pages, you will want to create them at exactly 640 x 480. You can use any format supported by QuickTime. PhotoShop (psd), TIFF, PICT, Jpeg and others. I do not recommend using Jpegs as they are a 'lossy' compression scheme and the quality will not be as good.
When a movie is dropped onto an iDVD page it turns into a button with either a poster frame or a running movie. You can, if you wish, drop any still image onto the face of the button. Clicking on the button still brings up the full size movie.
For audio you can use MP3, AIFF or audio QT movies. I suggest that you use a 48 k audio sample rate. You will need to have the volume levels for your different audio files as close as possible. It is very disconcerting to have different volume levels from movie to movie or page to page. There is no way to modify the volume levels inside iDVD. You will need to balance the volume of your audio files before you place them into iDVD.
Any QT movie can be used with iDVD. If you are creating your movies in iMovie 2.0.3 or higher, select Export from the menu and choose 'iDVD'. With older versions of QT export as a QT movie, full quality - large. For movies created in FCP, either a FCP Reference or self-contained movie can be used.
If you do not want the small Apple logo Watermark to appear on your finish product you can turn it off from the iDVD 2 menu by choosing Preferences and then deselecting the 'Show Watermark' option.
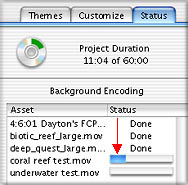
Background Encoding
As you place stills, movies and audio onto your pages, iDVD will begin the encoding process in the background. Clicking on the Status tab will display all the items in your iDVD project and show the encoding status of each one. If iDVD is in the process of encoding, a progress bar will display the progress, (Red arrow). The Status tab will also show the Project Duration and the amount of time used so far by your project. By default, the DVD length is 60 minutes of "high quality" video. If the amount of your media exceeds 60 minutes iDVD automatically resets to 90 minutes of "lower quality" video and will re encode your material at this lower quality. If you remove enough material to drop back below 60 minutes iDVD will re encode your material at higher quality.
I placed my DVD disk back in the SuperDrive, the DVD disk icon mounted, a black window opened and the remote control was displayed. The first time I clicked on the 'Play' button on the remote control I got a "Not Permitted" message. I clicked on the 'Menu' and 'Title' buttons several times and got the same message. I then clicked on the Play button several more times and the DVD finally opened up and started playing.
Once open, everything worked. My opening page has a still image for a background, background music and buttons with moving pictures on them, several Slide Shows and a Folder (link) to another page. On all my pages everything displayed properly, the links and the audio worked throughout. My Slide Show buttons had Poster Frames on their face. These Poster Frames were scaled down by iDVD from the large images inside the Slide Show. iDVD does not do a good job at scaling down images. These images looked rather soft when view in iDVD on the computer screen. They looked just awful after they were encoded and burnt to DVD. If you plan to use stills on your buttons I would recommend creating the stills at the same size as the buttons. I measured, as best I could, the size of the image area of the button (not the button itself) height = 96 width = 128 pixels.
I did find that there was a problem with the three Slide Shows on my DVD. Each slide was set to be on screen for three seconds. While playing the Slide Shows I found that, at random, some of the slides would be on screen for just a 1/4 second rather than three seconds.
The full size (640 x 480) movies that played from the DVD were quite gorgeous, the audio (at 48k) was excellent as well. I would recommend that movies and all audio, for the movies and backgrounds as well, have long fade in/fade outs. This will smooth out the on screen presentation.
The iDVD software is a little squirrely. My remote would sometimes disappear from the screen, dragging long lists of slides into the slide dialog box was a bit of a problem, they did not always want to go into the window. There are a few other oddities as well. But, all in all, iDVD works and the DVD disk plays with no problems other than the Slide Show problem. This is exciting stuff.
Burning a DVD
 Last step, burning your DVD. First make sure to save your project. Enter the Preview mode and make sure that the Motion button is on if you have any motion or background audio. To start the burn process double click the Burn button. The DVD drive door will open and you will be asked to insert a blank DVD - R. When the blank DVD has been inserted the burning process will begin. You will have a progress bar that shows time remaining to complete the burn. My first DVD used 11 minutes of the 60 minutes available, burn time was 27 minutes.

--ken
copyright © Ken Stone 2001