Don't worry. We'll fix it in post.
The Basics - Image Control September 10, 2001
Image Control Filters in FCP
Don't worry. We'll fix it in post.
The Basics - Image Control September 10, 2001
Image Control Filters in FCP
You've positioned your camera, done your white balance, set your exposure, checked your Zebra stripes. You shoot and move to the next location and go through the process again. Different camera angles, different heights, different locations shooting North and South. In doors and out. Incandescent, Fluorescent, Photoflood and Daylight balanced. Too much light, not enough light, hazy light and harsh light.
Back at your Penthouse editing suite you sit in front of FCP with your clips on the TL and well, they don't match up visually. Most are okay but some clips need correction.
Image Control Time
FCP has eight different Image Control filters in the Effects Browser. A number of these Image Control filters are the same as filters found in other graphic applications like Photoshop.
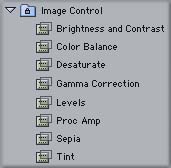
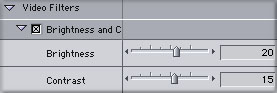
Brightness and Contrast
The Brightness and Contrast filter is a very basic but important tool. Used when the video is too light or dark, too flat or contrasty. When you are lightening an image using this filter you may find that when you have the correct lightness but your image looks washed out or flat. Adding contrast will improved both the highlight and shadow areas of your image and give it some snap. The Contrast element of this filter changes both the shadow and highlight areas equally. You can not adjust one without adjusting the other. If your whites are too hot and some image detail is lost in black, lowering contrast will pull some image back from the highlight and shadow areas of the image. While this filter does not have a lot of finesse it is useful for getting your image into the ball park where you can use other Image Control filters to fine tune the image if you need more adjustment.
Color Balance
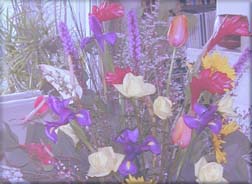
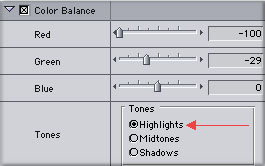
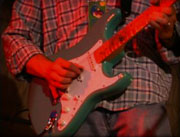
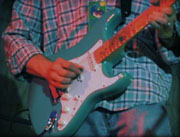
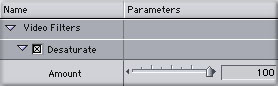
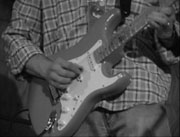
When we look at our video images we need to look at three eleements of of the image. Highlights, Midtones, and Shadows. When doing color correcting we need to first decide which of these three areas need correction. It is often true that not all three need correcting. The video of the Guitar player below left was shot on stage which was lit with red spotlights. This may be the effect you are looking for but if you want to have a more normal color balance then color correcting is needed.
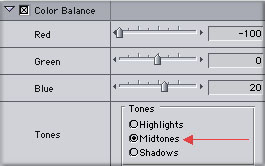
Looking first at the highlight areas, the white face plate of the guitar, we can see a stronge red cast. Select the highlight button in the controls and make your adjustments. Now we want to adjust the midtone section of the image as well but we have already used the highlight button. To work on the midtones of the image drop the Color Balance filter a second time onto your clip and double click the clip in the TL to load it into the Viewer > Filters tab. We now have two Color Balance filters and we can select the Midtones button on the second filter and make the necessary adjustments. If you need to color correct the shadow areas as well, simply drop the Color Balance filter on your clip a third time.
Desaturate
The Desaturate filters opens with the default setting at 100 which produces a Black and White image from color video. Moving the Amount slider midway to 0 will show the video uneffected by the filter. Moving the slider further to the left, negative numbers, will begin to add color saturation to the video. The Desaturate filter would most often be used to make a Black and White from color video. As this filter has only one adjustment, 'Amount', there is no way to further enhance the Black and White image. I have found that this filter almost always produces a black and white image that is flat and needs further correction. Because of this I never use this filter for converting color video to Black and White. I use the 'Sepia' filter (below) for making my Black and White images. The Sepia filter has a second control, 'Highlight', for adjusting contrast. Desaturate does work if you want to adjust the color saturation of your video.
Gamma Correction
The Gamma Correction filter works only on the midtone section of the image and does not effect either the highlights or shadow areas of the image. This filter works by either excluding or including more midtone values in the image. While the highlights add brilliance to the image and the shadow areas add depth, it is the midtone range that conveys the visual information. Changing the values of the midtone area can not only improve the image but often changes the mood and feeling of the video as well.


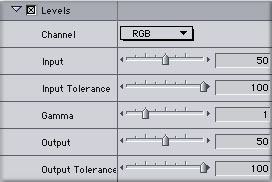
Levels
The Levels filter is supposed to be a more advanced version of the Brightness/Contrast filter, offering separate controls over highlight, midtone and shadow areas. In addition this filter offers the choice of working the image in RGB mode or any one color channel independently, Red, Green or Blue.
However this filter is poorly implemented and is clumsy at best. It has five slider controls; input, Input Tolerance are used to lighten the image. The Gamma slider controls the midtone areas and Output and Output Tolerance used to darken the image.
What makes this filter so difficult to understand and use is the fact that the filter opens with the default settings of the Input Tolerance and Output Tolerances sliders set at 100. With these two settings at 100 neither the Input Slider nor Output sliders work. It is necessary to lower either the Input or Output Tolerance sliders then start adjusting the Input or Output sliders. The real problem is that the highlight and shadow areas have two sliders each for control.
Photoshop has a Levels filter but it is a different animal. Levels in Photoshop also has a 'Histogram' which gives a graphic display of all the pixels in the image based on their brightness values. The 'Histogram' display is essential to setting levels but the Levels filter in FCP has no 'Histogram'.
To be honest the Levels filter in FCP does not work for me at all - I just don't get it. The Proc Amp filter does basically the same thing and works well. If you want to play with this filter I suggest that you set either Input or Output to a setting of 20 then start lowering the Tolerance filter down from 100. As you lower the Tolerance settings more effect will be applied. If anyone can offer any insight into this filter I would love to hear about it.
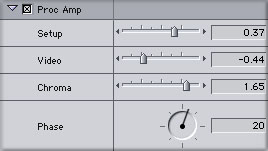
Proc Amp
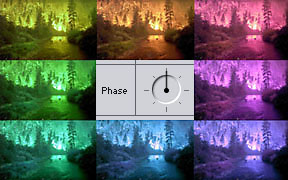
This image control filter comes from the analog tape days when a 'Processing Amplifer' was used to do image correcting. With the Proc Amp filter in FCP we can adjust Black levels, White levels, Chroma (saturation) and Phase (hue) each independently. Unlike the Brightness/Contrast filter which works on both shadow and highlight areas together, the power of this filter is the fact that you can make changes to either the shadow or highlight areas without effecting the other.
Because this filter has an analog history the names of the controls are not what we are used to. 'Setup' could be called 'Black Level' (shadow areas) as it controls the levels of black in the video, it lightens or darkens the darkest or black areas of the image. 'Video' could be called 'White Level' (highlight areas) as it effects the brightness of the whites in the video and sets how bright the whites will be. 'Chroma' could be 'Saturation', adjusts the amount or intensity of color in the video. 'Phase' controls the 'Hue' or overall color of the video. Moving the dial clockwise, positive numbers, moves the hue through red, pink, magenta, purple and blue. Moving the dial counterclockwise, negative numbers, moves the hue through, red, yellow, green, cyan and blue.
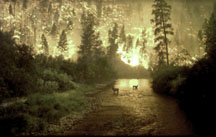
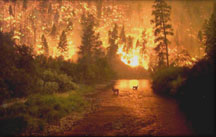
With the Forrest Fire video below all four elements need correcting. It is important to note that adjustments need to be made in the proper order. Just follow the order as the controls appear in the Proc Amp panel, from top to bottom. You can get some really spectacular looking video using the Phase control.
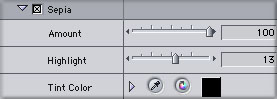
Sepia
The Sepia filter opens with a default color setting of a warm Sepia which produces Sepia toned Black and White video, the Amount default is 100. As the Amount slider is move towards the center, 50, the normal RGB colors start to appear and the Sepia tint starts to fade. Moving the slider all the way to the 0 at the left will result in no Sepia effect and normal video colors.
While this filter defaults to Sepia any color can be used. Clicking on the Sepia colored square in Controls will produce a color wheel from which you can select your color. You can also use the eyedropper to sample a color or set numeric color values.
The Sepia filter offers a nice effect but I confess to using this filter for making Black and White video. Clicking on the Sepia square I change the color to Black, leaving the Amount setting at 100. This produces a Black and White image not unlike the Desaturate filter. However the Sepia filter has one additional control. While this control is called 'Highlight' it actually behaves a bit like a contrast filter. The Highlight control defaults to 0 in the middle of the slider. Moving the slider to the right brightens the highlight areas, moving the slider to the left darkens the over all image.
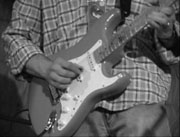
The picture, below left, shows the Sepia filter at it's default settings. The middle picture is also at default except that the color Black has been substituted for Sepia. The picture on the right has had some Highlight added. With Highlights added the Black and White image now has a sharper and cleaner look. If you look at the face of the guitar you will see that the white area now looks whiter. The Sepia filter is an excellent filter for making Black and White video from colored video as well as adding a color Tint to the video.

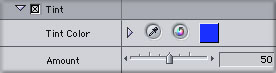
Tint
The Tint filter defaults to the color black with the Amount set to 100, producing Black and White video. Moving the Amount slider to the mid point of 50 reduces the Black tint and allows more of the existing video colors to show through. Moving the slider all the way to the left, 0, removes all Tint filter effects.
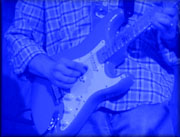
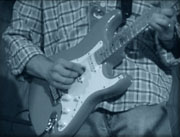
I have changed the tint color from black to dark blue. The picture, below left, shows the Tint filter with a dark blue color and an Amount setting of 100. The middle picture has an Amount setting of 50. For the picture on the far right I changed the tint color from dark blue to a very pale light blue. This filter is lacking the Highlight control of the Sepia filter and for me has little value.

Conclusion
In a perfect world we would not need Image Control filters unless we wanted to creatively change the look of our video. Image Control filters are very powerful tools for creating special looks. Alas, we do not live in a perfect world so there are going to be times when we'll need to correct; color balance, hue, brightness, darkness, gamma, and the contrast of either highlights shadows or both. Don't forget that all of these filters are keyframeable.
Don't wait until you actually need to do image correction. Take some time and go through the Image Control filters that FCP offers. Move the sliders around and try extreme settings. You will be surprised at what these filters can do with video. Really surprised!
Enjoy,
--ken
Thanks to Steve Martin for the two guitar videos used in this article.
copyright © Ken Stone 2001