
The Basics - Final Cut Pro Keyboard Shortcuts 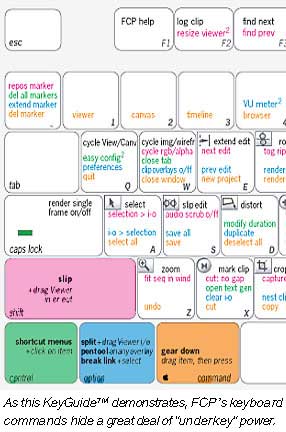
August 13, 2001
Keys to Speed
By Loren S. Miller
The Basics - Final Cut Pro Keyboard Shortcuts August 13, 2001
Keys to Speed
By Loren S. Miller
About this article:
Oscar winning editor Loren Miller
chooses his top 20 keyboard shortcuts
for use with Final Cut Pro
My body, my billfold
I had to think about this subject to share it,
because as with any experienced editor on any system, so many
Final Cut Pro key commands I've learned are "imprinted"
and have become second nature. This is also called "acquiring
the kinesthetic" or "body memory" associated with
specific editing functions. You can do almost everything
from the FCP keyboard, and faster; do more work and possibly
make more money.
Why key commands in the first place? Aren't they cold and unfriendly? Apple users especially have been highly mouse driven for over 20 years and many pros still use it because it's pleasurable. It's a direct interface, it's tactile, and on Macs, things go where you point or drag. Pointing is basic, it's a precursor to language in children-which is one reason kids acquire mousing skills so quickly.
Early interface studies at Palo Alto Research Center and at Apple leveraged a great deal of wisdom from child development in forming the Apple Human Interface Guidelines behind pointing, clicking and menu command selection. The keyboard was not a huge part of the initial schema, and its early design reflected that.
That was before the kids grew up and got Carpal Tunnel Syndrome. CTS and other repetitive stress injuries are about pain, from constant and often incorrectly-angled use of the arm and hand on the mouse, or on a badly designed mouse, or from dragging one with a ball which needs cleaning-- one reason Apple moved to optical technology.
When you find yourself using extra hand, wrist and forearm muscles just to effect a simple insert edit then your body is telling you, "Please move your skillset to the keyboard." The keyboard uses finer motor muscles in the fingers, less in the wrist and arm, and pro users have learned the keyboard as much for health as for-aha! Billable speed. With speed you get more done, you make clients happier, sooner. So the keyboard becomes a win-win tool.
I know I'm not alone. Showtime's B.J. Sears is so "into the keys," he's developed a FileMaker Pro database of every key command. He's even distilled the keyboard edit commands he uses most often to a USB control box called X-Keys, co-developed by the Contour Design folks at www.contourdesign.com, who offer their own extremely sexy ShuttlePro controller, a superb addition to any FCP workstation. With both you must "acquire the kinesthetic" for highest speed.
While I like the ShuttlePro-which looks like a galaxy-class cruiser and has a ready-to-blast-off FCP 2.0 keyset already programmed and easily remapped to your liking, B.J. prefers his programmable X-keys box, and pointed out one interesting addition which reminded me of my brief Moviola upright days-foot pedals!! Some people will go to any length to avoid CTS. What is ankle stress injury called? Lincoln Tunnel Syndrome? Any keyboard command listed below can be mapped to these devices, and if you're just using FCP for editing, it's a great idea.
My Top 20 favorite
speedkeys
I was asked to write about my top 20. Turns out I have a few more than that. These are hard choices. I do love them all.
I confess, I'm referring to my KeyGuide™. I originally encountered a crude gridlike color keychart on www.2-pop.com which contained key commands for FCP 1.0. The donor was anonymous and never updated or refined the file, so it became useless quickly as FCP grew up. The raw idea of a keychart had merit, but it needed tons of work, so I took over the updating for a while, and finally collected all the accumulated design wisdom with latest key commands for version 2.0 and developed the ideal Final Cut Pro KeyGuide™ from scratch. (For now, it's still a free PDF on my website, www.neotrondesign.com, or you can buy a shiny laminated waterproof version of the latest design from me, and either way I'd love to hear from all users.)
I still find myself referring to it for oddball commands because I still don't know them all! I think that distinction should go to Brian Meaney, Apple's FCP Video Development Lead, who has been with the product almost since its inception, and whose help in reviewing and adding to the KeyGuide-for example Control-Option-R to do a sectional audio mixdown!-- is sincerely appreciated.
I've laid out my list in such a way that you can cover up the description below each key command and quiz yourself later. So let's start tapping!
Logging
COMMAND-8
It's the Log and Capture window!
It just is. You'll always find it there.
TAB
This is so basic to so many applications
I don't even include it in the KeyGuide! To advance from one
text field to the next, simply TAB to it, then type. The field
is automatically selected and it's an easy way to replace existing
text. Press Shift and TAB to backstep. This applies to timecode
fields as well.
I and O
Assume you're now viewing your
source material, making selections. Press I. That sets your In
point. At your Out point press O. Now press
F2
Log the clip and add it to your
selected browser bin. If you've asked for a log prompt rather
than filling in the clip info fields, you'll get the Log Clip
dialog which allows you to name it and comment it. Otherwise
it goes right into your logging bin as a redline clip.
Windows and Timeline
Fast-forward: you're ready to start editing but the windows are a mess. Now, didn't you set a Custom Layout for your system the other day? You didn't? It was always a mess? Let's backstep, we're going to undo that event.
Here's some wisdom which applies to any activity in which you aren't fully confident: when you don't know what you're doing, do it neatly. They'll never be able tell. Arrange your Browser, Viewer, Canvas, Timeline, Tools and Audio palettes precisely the way you like them.
Option-Window>Arrange
While not strictly a keyboard
command it's the only way I know to store a layout. Hold down
the Option key, and use the mouse (ugh) to access the Windows>
Arrange menu. Notice two commands "Set Custom Layout 1 and
2". (Without the Option key, these show up as "Use
Custom Layout 1, 2"-it's magic!) Choose either. Repeat this
process with the other layout if needed.
Shift, Option and Control - U
The fun part comes later, after
the assistant, your SO or your cat has completely fouled your
custom window arrangements. Merely hit Shift- U to immediately
recall your preset Custom Layout 1. Option-U will immediately
recall Custom Layout 2.
Command-3
You'll need this frequently.
It activates the Timeline window. Practice it.
Shift-T
Need to enlarge your timeline
tracks vertically? This command will cycle through your four
track size settings-any of which you can customize in the Timeline
Settings dialog beforehand. This is far easier than trying to
click the little bar chart in the lower left.
Shift-Z
Need to shrink your timeline
instantly? This'll do it. If you merely double-tap the Z zoom
tool you might be clicking for a while to zoom out, and uh, oh,
that's a mousie Shift-Z fits your entire sequence into the width
of the timeline window in a flash.
Command or Option Plus or Minus
Need to zoom in to enlarge the
area around the Playhead? Look below F9 and F10. Command-Plus
or Option-Plus will bring you closer in increments. Command/Option-Minus
will back you out.
But what about Zoom To X? FCP users don't yet have an Avid-like "Focus" command which instantly delivers the area immediately surrounding the Playhead from any magnification. I think we should get it, and we should also have a preference setting for the "Zoom To X" command, allowing a time range we can type in, such as, Zoom To: 10 seconds, 5 seconds, etc. (And if Brian happens to scan this-I suggest Zoom To X go on Option-Z, which is currently free and right above the left hand.)
Personally I find the horizontal scroller and thumb a pain. Sorry, Randy, but I ditched it quickly along with most of the avoidable mousing controls. And, are you annoyed by the behavior which prevents zooming to the Playhead when a clip or transition is selected? You'll zoom to the selection instead. Note that I don't call this a bug. It is occasionally useful. But to avoid this, first perform a
Command-D
which will Deselect All timeline
selections. Zooming will now center around the Playhead.
Playback
J-K-L
Apple made life easier for users
coming from other professional systems, such as Avid Media Composer,
by implementing the popular J-K-L timeline playback key structure
common to many of these workstations. Have you used it yet or
are you still tapping the spacebar? The spacebar yields barely
one sixth the playback power available. (Okay, you can get Reverse
Play on the spacebar with the Shift key, soone third the power.)
But turn the page, J-K-L rocks!
Tap L. Forward play. Now tap it again.
Doublespeed! Again! Triple speed!
Tap K to stop.
Tap J. Tap it again. And again. Forward and reverse multiple
speeds at your fingertips.
But wait, there's more! If you act now...
Press K and keep it down. Add L. You should be hearing a nice slow scrub through your timeline. Release L.
Now press K. Add J. Reverse slow scrub!
Now you can't live without it, can you? Some editors call these their "Steenbeck keys."
Cutting
F6, F7 & F8 and
Shift
Target your tracks! Punch F6
and rapidly follow with a V-track number. It'll light the appropriate
yellow track target for editing. Likewise, F7 & F8 target
your A1 and A2 tracks, to any timeline audio layer you desire.
If you wish to suppress the Video and cut in only audio, press Shift F6 for "No Video target". Shift F7 and Shift F8 suppress audio tracks A1 and A2 respectively.
F9 & F10
The clip shooters! The most important
two keys other than J-K-L and I-O are the two splicers-- Insert
and Overwrite. They are nicely isolated at the top of the board:
F9 and F10.
Use them! Stop dragging your clips to the Canvas! (I know, I love the semitransparent display too.) Select your clip, set its I-O, Command-3 to the timeline, set your target track if it isn't already, set an In or Out-you don't need both if your clip I-O is defined-and shoot it in with F9 or 10. Insert pushes everything ahead. Overwrite doesn't. This is fast!
Notice how these five function keys line up in a row? They are the Big Five for editing. Target and then shoot your cuts. You'll be out on the boulevard rollerblading in no time.
Live Loop Trimming
This is one of my favorites and
it just gets better with faster Apple hardware. It allows you
to view and listen to an edit and trim it interactively, with
little delay between trims. It involves three keys plus the numeric
keypad. The description is long, the execute is short.
You want to trim an edit, so first you must select it. With the timeline window active, you can do that from the keyboard!
V
That's it, justV! Selects the
edit point closest to the Playhead. If that's not the edit point
you want, why then navigate to it by pressing Arrow keys-each
edit point comes up pre-selected.
U
Now tap U to cycle from center
select to left to right side select-this is equivalent to setting
up for Roll or Ripple trims. If your video and audio is linked
(as in a stereo pair) all track edits will be selected simultaneously,
and you can do synch ripple trimming. (This works especially
well if you have no other tracks spanning the region you want
to trim. To select edit points on additional tracks, you have
to click the mouse on each while holding down your Command key.
Sorry. Hope this changes and we get Multtrack Edit Select from
keyboard in the near future.)
Keypad Trim by the numbers
With desired ripple or roll edit
selection made, tap Plus or Minus on your numeric keypad, followed
by the number of frames you wish to trim ahead or back, and press
Enter. If you have no cut selected, the Playhead will merely
advance or retard the given amount so make certain your edit
is selected.
If you punch in more than two numbers FCP will assume you mean seconds and frames-i.e., if you punch in 345 it'll even calculate the number of seconds within the 45 frames and deliver you to 4:15! Colon (or semicolon for drop-frame format) separators will occur naturally after every two digits, you don't type them.
In keypad trim as in any other method, trim limits will be indicated with a "Media Limit" message in the timeline when you complete the action. Your selected cut will ripple into the future (Plus) or Past (Minus) the amount you indicated.
But wait! There's more, and you must act now! Just tap the \ That is, the "Backslash" key above your Return key. It's the Play Around Playhead" command. Now you'll loop the cut point to review it. You'll hear one iteration of the new cut. Want to hear it continuously? Good! You need to, for Live Loop Trimming.
Control L
Turns the playback looping property
on and off-a very handy toggle.
Now press \ for continuous looping around the Playhead at the cut.
And now, while it loops, punch in Plus or Minus values from the keypad. Gauge the effect. When you're happy with the result, tap the spacebar or the K key to stop looping.
Now that's live trimming! With practice, this becomes second nature. And very close to Avid Trim, in case you're looking. It's worth summarizing:
Tap V- select cutpoint
Tap U- select trim side
Plus or Minus and time value
\ Backslash to loop
Repeat Plus or Minus and time value as needed
SpaceBar.
How many times did you touch the mouse? Less than before? That's the goal.
E
I simply couldn't neglect the
elegant E key-for Extend Edit. You can make a centered cut selection,
then move the Playhead to wherever you like and press E- the
selected cutpoint loyally Rolls to your Playhead-assuming underlying
media is available. Works the same way as Avid's.
Remapping your board
When you're ready, there are utilities which allow you to remap key commands to your exact liking. My favorite utility, going back years now, is QuicKeys. At Version 5.0, it just works! You can automate and combine many of the functions I've described here to give yourself more sophisticated control. I use my own KeyGuide to help me keep track of defaults so I can rework some controls intelligently.
For instance, I've remapped my Up and Down Arrows to instantly magnify or shrink the timeline, rather like Avid Xpress, a lean and mean version of Composer I enjoy using. But remapping is strictly personal and everybody has a different key philosophy. I suggest you learn the default keys first, because although it's very rich, the keyset is also very well thought out. Believe me, I know; I just completed the Media 100i KeyGuide. We are blessed.
Loren
S. Miller is
an Oscar-winning documentary editor, independent producer and
writer. He is also a motion picture title designer, and develops
KeyGuides™ for complex Macintosh media software such as
Final Cut Pro, After Effects, Media 100i and ProTools. Reach
him anytime at NeoTron1@aol.com
copyright © Loren S. Miller 2001