
The Basics - Laying Off To Tape September 16, 2002
Laying Off To Tape in Final Cut Pro
The Basics - Laying Off To Tape September 16, 2002
Laying Off To Tape in Final Cut Pro
Okay, your masterpiece is finished (finally) and now it's time to move it from FCP to tape. There are three different ways that you can do this, each offering different conveniences. Printing from the TimeLine, sometimes called 'Timeline Playback Recording', is the simplest way. Print to Video offers more features and can be used with or without Device control. Edit to Tape, which requires Device control can allow frame accurate Assemble Edits and Insert Edits. DV decks can do Assemble Edits but do not have the ability to perform Insert Edits. This feature, Insert Edit, is available on some higher end decks that are not DV format.
The one thing that you should always do before laying off to tape, regardless of which method you choose, is to perform a 'Mixdown Audio' from the Sequence Menu. This will cause FCP to render all of your audio tracks into a 2 channel audio render file, reducing the load on the processor when it moves your Project to tape.
This is the simplest and most convenient method of laying off to tape. Before you begin you must render out all effects for your Sequence. Insert a tape in your camera/deck, hit the record button and then play the TL. You can add several mastering elements (discussed later) directly into the TL instead of using the mastering options in either Print to Video or Edit to Tape. For example: 10 seconds slug, 1 minute bars and tone, 10 seconds slug, 10 seconds slate(text clip), 10 seconds slug. Black slug and the 'bars and tone' generators are both found in the Video Generators sections of your Effects Browser. And add another black slug to the end of your project. FCP will begin playing your project based on the placement of your playhead on the TL. You can lay off just a section of your project by setting In and Out points on the TL, hit the record button on your camera/deck and then from the Mark menu > Play > In to Out. Always wait a few seconds (3 to 5) after hitting the record button before playing the TL to allow the camera/deck to get up to speed.
When you hit the record button on your camera/deck, the image that is being displayed in the active FCP window (Viewer or Canvas) will be recorded to tape. This will result in a freeze frame being recorded until you begin to play the TL. Make the TL active before you hit the record button. You will still have a freeze frame going down FW until you play the TL but if you have a black slug at the start of the TL, a black slug freeze frame will be recorded until you start playing the TL. This is also true at the end of your project. When you have reached the end off your TL, the last frame will continue to be recorded to tape, as a freeze frame, until you hit the stop button on your camera/deck. Again, if you have a black slug at the end of the project, then you will get a black freeze frame being recorded until you hit the stop button.
Aside from being fast and convenient there is an additional advantage to laying off to tape by Printing from the TL. The other two methods, Print To Video and Edit To Tape, cause FCP to prepare your project by wrapping the project in yet another sequence. Aside from the fact that this might take some time it also increases the load on the processor which, in some cases, can cause performance problems, i.e. dropped frames. If you are having problems using Print to Video or Edit to Tape, printing from the TL may be the best way to go.
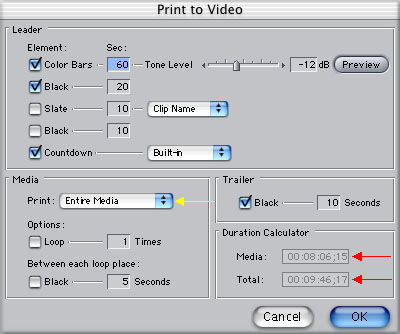
Print To Video is a more structured method of laying off to tape. This method can be used with either Device (deck) control or without Device control. If you use Print to Video without Device control you will get the a freeze frame at the start and end of your tape as you get with Printing from the TimeLine. Add black to the start and end of your Sequence to avoid problems. A number of 'Mastering' elements can be added to your outputted tape: Color Bars, Black Leader, a Slate to which you can add information, a Countdown, either the standard FCP one or a custom countdown. You can choose Loop, where your video will be repeated on tape for the number of times that you have specified.
To Print To Video, first load a tape into your camera/deck and cue to the location that you want to start recording. Make sure that your decks playhead is parked on valid Time Code and there is at least an additional 5 seconds of TC past where the decks playhead is. Brand new tapes with no TC are covered later. Then select the clip or Sequence in the Browser and open it in the TL making sure that the TL is active. From the File menu choose Print To Video. The Print To Video dialog box, shown below, will open. It is in this box that you will select those Mastering elements that you want to add to your video. You can also adjust the audio dB level of your reference tone that plays with the Color Bars. In the lower left section of the Print to Video box is the Media section. You can choose to Print 'Entire Media' or 'In to Out' (Yellow arrow) if you only want to print a section of the TL and have set In and Out points on the TL. In the lower right of the dialog box you will see the Duration Calculator, Red arrows below. The top figure, Media, shows the duration of your actual video, the Total figure calculates the total time, video plus the Mastering elements that you have added.
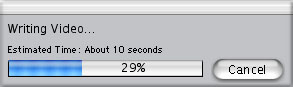
When you have finished your Mastering settings click Okay. You will get a 'Writing Video' progress box, shown below. What FCP is doing is rendering the Mastering elements, Color Bars, Black, Countdown, etc., that you have added.
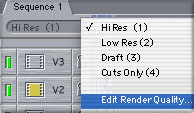
If you have any material in your clip or Sequence that has not yet been rendered, then this material will be rendered as well. FCP will render at the quality setting in the drop down menu found in the upper left of the TL, shown below or from the Sequence menu > Render Quality. Set to Hi Res.
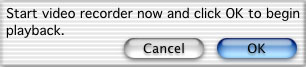
If you do not have Device control when FCP finishes 'Writing Video' (rendering) you will get the Start Recorder dialog box, shown below. Manually start your camera/deck, wait 3 to 5 seconds for it to get up to speed and then click the 'Okay' buttton, the process will begin. You will need to manually stop your camera/deck when finished.
If you do have Device control the recording process will begin as soon as 'Writing Video' (rendering) has been completed. However, you may discover that although you have a controlable device and have Device Control enabled, in Audio/Video settings, Device Control Presets Summary box, that you still get the 'Start video recorder now" box. This is because you need to enable this feature in the Device Control Presets Editor, shown below Red arrow.
Device control is required to utilize the Edit to Tape function. Edit to Tape can do frame accurate Assemble and Insert Edits, however, special decks are required to perform Insert Edits and DV deck's can not perform this function. FCP will know if your deck is capable of Insert Edits, if it is not, FCP will gray out this option, as well as the Preview Edit option, which is used for previewing (testing) an Insert Edit without actually writing to tape. One of the main reasons for using Edit to Tape is recording to a specific timecode on tape. For example when the tape needs to delivered with the program starting at hour 1. FCP's sequence timecode does not get recorded back to tape, so the way to get your program to start at a specific timecode is by using Edit to Tape and laying down to a specific timecode on tape.
Insert Edit is used to overlay new material into a section of a pre recorded tape. You set both In and Out points in the Edit to Tape window for the section of the tape in the deck that you want to change and a In point for the material that you want to insert. You can Insert either Audio only, Video only or Audio and Video. When you do an Insert Edit the existing Time Code on the tape is not altered. With Insert edit, the entire tape needs to be prestriped.
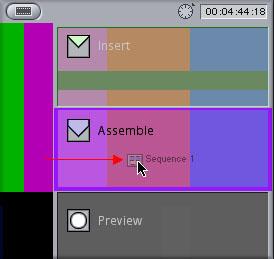
Assemble Edit is available to all DV devices as long as you have Device control. With an Assemble Edit you set an In point for the tape that is in your deck. You will record from that point onward for the length of the new material. Assemble Edit will overwrite your existing material with Audio and Video material and will overwrite the Time Code as well. With Assemble Edit it is possible to do a three point edit (similar to an Insert Edit). Set the In point or starting point for the tape that is in your deck, then drag your new material to the Assemble Edit overlay in the Edit to Tape window. The new material will be cut in at exactly the In point that you have set for the tape in your deck, however, the deck may run several frames past the end of the new material to guarantee continuous Time Code. This may not be accurate enough for you.
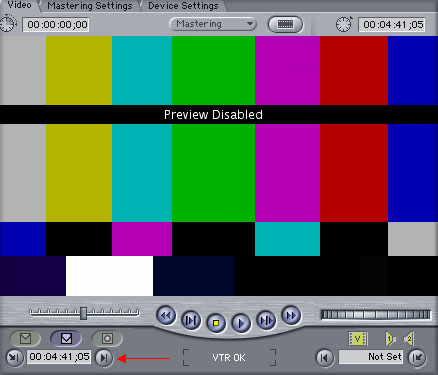
To perform an Assemble Edit load your tape into your deck and select Edit to Tape from the File menu. This will open the Assemble to Tape window with Color bars and the words 'Preview Disabled'. There are three tabs at the top. First is the Video tab shown below. The first thing to look for is 'VTR OK' bottom center of the window which confirms that FCP and the deck are communicating. This window has Device control buttons similar to the Viewer or Canvas windows. You can play the tape that is in your deck in this window. When you reach the spot that you want to start recording you can click on the 'Set In Point' button, Red arrow below. The TC field to the left of this button will show the TC that the tape has been cued to and should be the same as the TC displayed on your deck. If you know the TC that you want to start from, you can enter the TC in this field and then click on the Go to In Point' button to the left of the TC field. This will cue your deck to that TC.
Edit to Tape
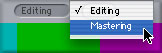
The second tab, Mastering Settings, provides the same selection of Mastering elements as the Print to Video box (shown earlier in this article): Color Bars, Black Leader, Slate, Countdown, Loop, etc. Center top of the Assemble window is the Editing/Mastering button. If you have added Mastering elements set this to 'Mastering'. If no Mastering elements have been added then set to 'Editing'.
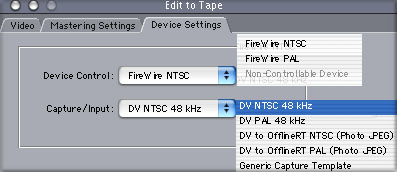
Use the third tab, Device Settings, to check that you are configured correctly for your deck.
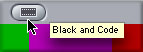
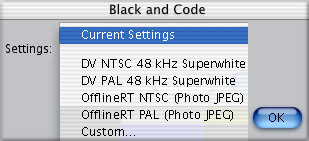
In order to perform an Edit to Tape, you must have TC on your tape. If you are using a new, blank tape, you will have to 'Black and Code' your tape before you can use it. Insert the new tape in your deck and open the Edit to Tape window from the File menu. Top center you will see a small film icon, this is the Black and Code button. Click on this button and the Black and Code settings box will open. Check your settings and click OK. FCP will start recording Black and TC to your tape. After several minutes of B & C you can hit the escape button on your keyboard to stop the process. Now you have TC at the start of your tape.
With a time coded tape in your deck and an In point set in the Edit to Tape window, the Sequence or clip rendered, Audio Mixed down, Mastering Settling if any. Drag your Sequence or clip from the Browser into the Edit to Tape window which will produce an overlay. Drop the Sequence or clip onto the Assemble pane. FCP will prepare your video doing any required rendering (Mastering settings). When ready, you will get the 'Click OK to start recording media' box. You can also load a Sequence or clip into the Viewer window, set In and Out points and then drag from the Viewer onto the Assemble pane. Click OK, FCP will cue the deck to its starting point and begin the recording process. When completed, FCP will stop the process automatically. Hit the 'escape' key at any time to stop the process.

Conclusion
FCP offers three different printing scenarios, Printing from the TimeLine, Print to Video and Edit to Tape. You can use any of these methods depending on your needs for final output.
Obviously it is very important to get a 'clean' copy of your Project onto tape and the speed of your processor and health of your media drives has a lot to do with successfully laying off to tape. There are a number of steps that can be taken to facilitate this process.
Enjoy,
--ken
copyright © Ken Stone 2001