
Using The Tools May 17, 2001
Using The Tools May 17, 2001
Media Management in Final Cut Pro 2.0
BY Andrew Balis
By Ken Stone
In order of coin toss.
Media Management is the process of managing the assets of your Project: Captured media and Project files. More specifically, how your media is handled, organized, copied, trimmed, and backed up. Finding media, determining whether media has been used or not, if it is online or offline, and removing unwanted media are all parts of Media Management.
Effective Media Management can go a long way to ensuring that the course of the project is organized and efficient. As a project progresses, hard drive space for media will become more and more limited. Good Media Management will help with the never-ending battle for recovering hard drive space to capture more material.
Some of the most powerful new features in the Final Cut Pro 2.0 upgrade include the ability to help us manage our media from within the Final Cut Pro interface. We will talk about two of these tools specifically:
Media Manager
Make Offline
Menu - Sequence - Media Manager |
Menu - Modify - Make Offline |
These two tools do not work in a vacuum, so we will use other tools of organization as well. We will discuss how to use these other tools and the most common scenarios you may face in the course of a project, and how to achieve the specific results you desire.
We can look at Media Management as having three components.
1. Trim media (consolidate)
2. Delete media
3. Copy/Move media and projects
THE MEDIA MANAGER
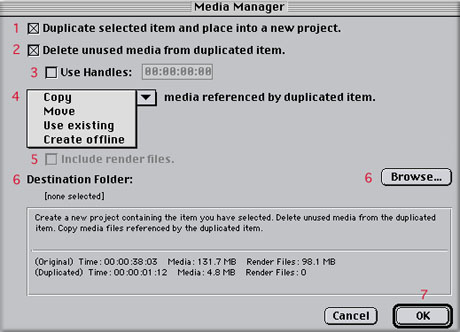
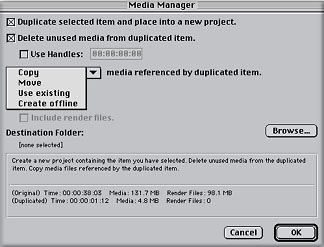
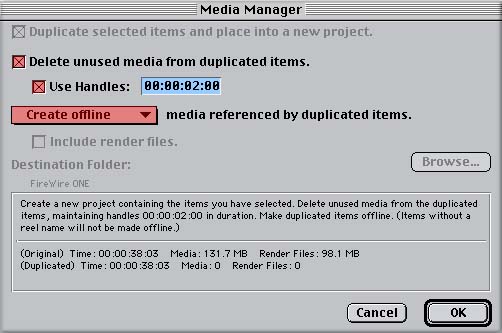
There are 6 elements to the Media Management Dialog box.
1. Duplicate selected item and place into a new project. This option creates a new Project file and places into this new Project any items that are selected in the Browser. This process does not include actual media, box # 4 will be used for media. When you click OK (#7) you will be prompted for a destination for your new Project file.
2. Delete unused media from duplicated item. This option determines weather or not media is trimmed. The actual media that bgets trimmed will be determined by the selection in box # 4.
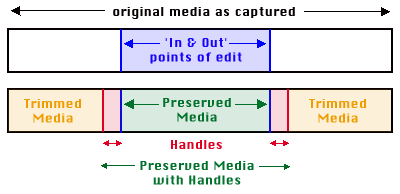
3. Use Handles. If you are trimming media (box # 2 selected) this option will allow the inclusion of extra media outside the current 'in and out' points of clips.
4. Drop Down Menu. Four choices that apply to the actual media.
5. Include Render Files. If selected this will preserve the most current rendered files of the selected Sequence.
6. Destination Folder. Use the Browse button to choose a new location for copied or moved media. This will NOT include the Project file.
7. OK. Click when you have finished, you may be prompted for a location.
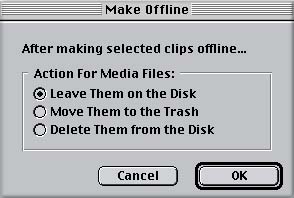
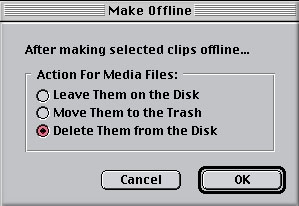
MAKE OFFLINE
In addition to breaking links between clips and media the most powerful feature of 'make offline' gives you the ability to delete media from within the FCP interface.
1. Leave them on disk. Clips in the Browser become offline but media remains untouched.
2. Move the media to the Trash. Clips in the Browser become offline and their media is moved to the Trash. The media remains on the Hard Drive and is not deleted until you empty the Trash. This gives you the ability to change your mind and restore media.
3. Delete media from disk. The clips in the Browser become offline and their media is permenently deleted from the Hard Drive. This process is NOT un doable.
Move Media for entire Project (Media Mover)
Make a copy of a Project and all associated media
Create an offline edit (lower resolution) and finish
Delete media of selected clips
Delete media of clips not used in current Sequence(s)
Trim media of current Sequence
Step One. In the Brower, select most current Sequence(s)
Step Two. Open Media Manager from the Sequence Menu, make selections in the Media Manager as shown below.
"Making clips offline breaks the link between a clip in your Project and it's source media file on disk" [from Final Cut Pro 2.0 User Manual]
So ..... what do you want to do?
Trim media of current Sequence
as an online edit (full resolution)
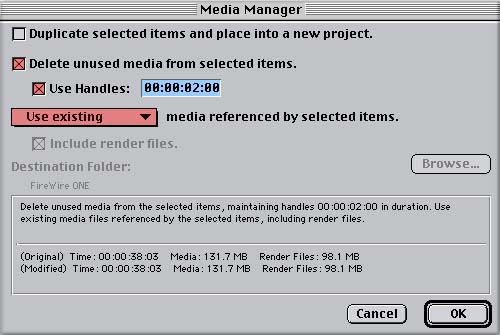
Results: Get's rid of unused media from clips used in Sequence.
usefulness: Free's up Hard Drive space.
Options: Use Handles to maintain the abilty to adjust edits. Allows flexability for changes.
Return 'what do you want to do'
Move Media for Entire Project (Media Mover)
Step One. In the Browser select all clips and Sequence(s).
Step Two. Open Media Manager from the Sequence Menu, make selections in the Media Manager as shown below.
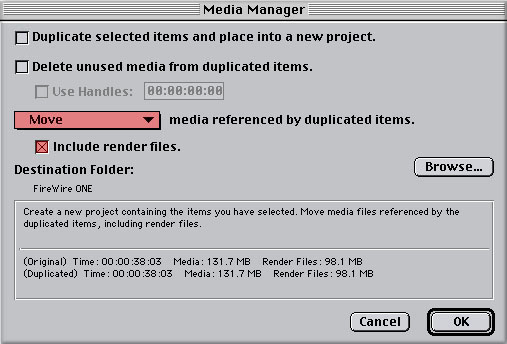
Results: This process removes media from it's original locations. All media and associated rendered files are moved to a new location. (Similar to 'Media Mover in previous versions of FCP).
usefulness: Collecting media (for a Project) that is on multiple drives and moving the media to a new location.
Options: 1. To move only the media for the most current Sequence(s), not all the media captured for the entire Project. To accomplish this select the desired Sequence(s) in the Browser.
Options: 2. Uncheck 'include render files' to conserve space at the destination Hard Drive.
Return 'what do you want to do'
Make a copy of a Project and all associated media.
Step One. In the Brower, select all Sequences and all clips.
Step Two. Open Media Manager from the Sequence Menu, make selections in the Media Manager as shown below.
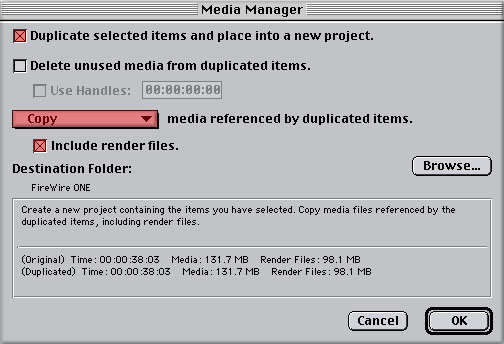
Results: This will copy the existing Project and all Media from that Project, and place everything in a new location. The original Project file and original media will remain untouched.
usefulness: Transferring an entire Project from one system to another or to a portable Hard Drive. Also can be used for backup purposes.
Options: Uncheck 'Include Render files' to conserve space at destination Hard Drive.
Return 'what do you want to do'
Make a copy of the most recent Sequence and place it into a new Project, copies only the Media used in that Sequence.
Step one: In the Browser select only current Sequence(s)
Step two: Open Media Manager from the Sequence Menu, make selections in the Media Manager as shown below.
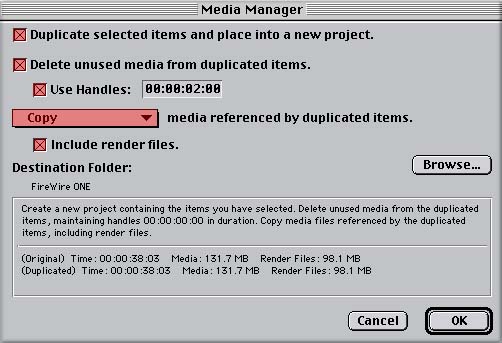
Results: Creates a brand new Project that contains only the Sequence(s) selected in the Browser. Copies only the Media that was in the selected Sequence(s).
usefulness: Transferring a streamlined Project from one system to another or to a portable Hard Drive. This new version of the Project and it's media will be consolidated to reflect the most recent version of the selected Sequence(s). This will conserve disk space at new location.
Options: Uncheck 'Include Render files' to conserve space at destination Hard Drive. Use Handles to maintain the abilty to adjust edits. Allows flexability for changes.
Return 'what do you want to do'
Create an offline edit (lower resolution) and finish as an online edit (full resolution).
Step One. Capture clips for a Project at low resolution. Capture cards (may) have the ability to capture at a lower Data rate (resolution). This conserves disk space for very large Projects.
Step Two. Create rough edit.
Step Three. Once edit is complete, select onlt the most current Sequence(s) in the Browser.
Step Four. Open Media Manager from Sequence menu, make selection as shown in the box below.
Step Five. Open the newely created Project.
Step Six. In the Browser select the Sequence(s).
Step Seven. Capture media at high resolution.
Step Eight. Fine tune edits and effects as needed. You will need to adjust effects because.......
Results: 1. Creates a new Project at full resolution.
2. Original Project file and low resolution media remain untouched.
Usefulness: 1. Ability to work with smaller media files during rough edit. Conserves disk space. This process is called an offline edt. 2. Capture only what is needed to complete the final edit. This process is called an online edit.
Return 'what do you want to do'
Delete media of selected clips
Step One. Select clip or clips in the Browser.
Step Two. Open 'Make Offline' from the Modify menu. Make selections as shown below.
Results: Leaves clips marked as offline in the Browser. Deletes media from Hard Drive. This action is NOT undoable.
Return 'what do you want to do'
Delete media of clips not used in current Sequence(s)
Step One. Select the most current Sequence(s) in the Browser.
Step Two. Select 'Find' from the edit menu. From the drop down select unused media (in selected Sequence(s)).
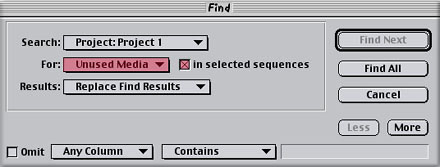
Step Three. In the 'Find Results' window that appears select all clips in that window. Any items selected in this window will also become selected in the Browser window.
Step Four. Open 'Make Offline' from the Modify menu. Make selections as shown below.
Results: Any clips not used in the Sequence(s) are deleted from the Hard Drive. In the Browser those clips will be marked offline.
Return 'what do you want to do'
Another important aspect to media management lies in the organization of all your project elements. You should be able to locate and quickly identify clips and groups of clips, and determine their future usefulness or lack of usefulness.
The following techniques can help to keep your project organized:
Scene and Take Numbers : logging scene and take numbers with clips to be able to do a numerical search by scene number
Sorting : clicking on any column header will allow you to sort alphabetically or numerically by that column
Label Column : this column is new to 2.0. Using the label column will color-code that clip and give a descriptive label. Helpful for identification. Examples: Good, No Good, Unused Clips
Log Notes Column : adding descriptive notes about a shot can help sort out differences from one take to another
There are other things you can do to help organize your Project such as; color coding and effective use of bins for sorting out different scenes or different types of material, and re-arranging the column order in the Browser to suit your needs.
Using these tools and having a good game plan before you start to edit will be your first step toward managing your media.
Andrew Balis is a director of photography and editor. After graduating from NYU's film school, he has since been in the film industry for 12 years. As a D.P., he shoots commercials, music videos, and independent films. As an editor and trainer, he has worked with Final Cut Pro since its inception. He is a 2-pop Guide, and regurly co-hosts the Q & A sessions at the LA Final Cut User's Group. As well as consulting and training production companies, he is currently teaching beginner and advanced classes in FCP at Moviola in Los Angeles.
All screen captures, images, and textual references are the property and trademark of their creators/owners/publishers.
In addition to the examples listed above, there are more combinations of choices that can be made in the Media Manager, Make Offline, Find window, and Find Results window. Use your own specific needs to determine what is right for you and your situation.
Naming : using naming conventions that will make it easy to locate clips in an alphabetical search
copyright © Ken Stone 2001
copyright © Andrew Balis 2001