

The Basics - Effects Filters October 15, 2001
A Very Mixed Bag
Additional Effects Filters in FCP
Blur, Border, Sharpen and Video.
By Ken Stone
The Basics - Effects Filters October 15, 2001
A Very Mixed Bag
Additional Effects Filters in FCP
Blur, Border, Sharpen and Video.
By Ken Stone
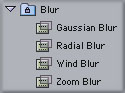
In the Effects Browser in FCP there are several Bins that provide us with special purpose and special effects tools: Blur, Border, Sharpen and Video.
BLUR FILTERS
Gaussian Blur
The Gaussian Blur filter is an effective filter and is often used. The 'Radius' control sets the amount of blur. This filter can have finesse simply by using small numeric values in the 'Radius' control box ( .3 or .5). A setting of 100 will produce a very soft image indeed. The 'Channel' drop down menu offers the ability to soften just one channel. Gaussian Blur can be used for an entirely different purpose. There will be times, after applying filters or working with type, that the image on your NTSC monitor looks awful. Little color artifacts dancing around all over the place. Apply Gaussian Blur, start with a setting of .2 then move up slowly until the dancing stops.
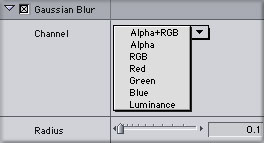
Try the 'Luminance' channel, I have gotten some very good results. Keyframe this channel from no effect to about 30 and then fade out, nice effect.

No effect |

Channel Luminance - Radius 20 |
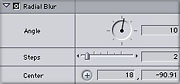
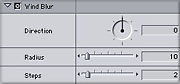
Radial Blur - Wind Blur - Zoom Blur
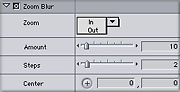
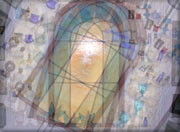
These three filters work in the same manner. The image is simply duplicated, shifted away from the original and dropped back down on the the image. 'Steps' in the control panel sets the number of copies that are duplicated. Copies are of reduced opacity so that they do not block out the original image when laid back down. Each additional copy is fainter than the one before. The Radial blur pivots the copies around a center point that you can set by clicking the 'Center' button in the control panel then clicking in the Canvas window. The Wind blur will shift the image in any direction parallel to the original image. The Zoom blur will make the copy images either larger or smaller, zoom in - zoom out, to simulate zooming motion. These three filters make for some very interesting motion graphics.
|
|
|
Radial Blur |
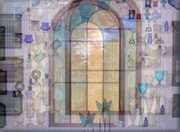
Wind Blur |

Zoom Blur |
BORDER FILTERS
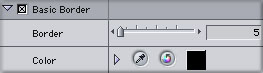
FCP offers two Border filters. The Basic Border filter has two controls; 'Border', which sets the width of the border and 'Color', which provides an eyedropper or color wheel for setting the color of your border.
|
|
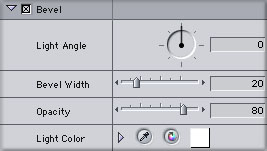
The Bevel filters offer more controls. Setting the 'Light Angle' controls the position of the light source, like a Drop Shadow. 'Bevel Width' sets the thickness of the border. 'Opacity' will lighten or darken the image in the beveled areas. 'Light Color' will tint the color of the Bevel. If you reduce the Opacity of the Bevel the bevel will look like the sides of a mirrored box reflecting the image inside, below right.

Basic Border - Width 35 |

Bevel Border - Default setting |

Bevel Border - Opacity 35 |
If you crop your image before you apply a border you will find that the border will not be applied correctly. Rather than the border starting from the edges of your image, 720 x 480, it will start from the crop line itself showing black areas of what was cropped (Below left, Red arrows). If you 'Nest' your clip after cropping by selecting the clip on the TL and then from the Sequence Menu > Nest Item(s), you can then apply the Border filter and it will work properly, below right.
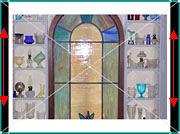
Cropped image with Basic border |
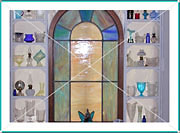
Cropped - Nested - Border |
SHARPEN FILTERS
FCP provides us with two Sharpening filters. 'Sharpen' and Unsharp Mask'. Both of these filters default with sharpening effects maxed out. It's not a pretty sight. The 'Sharpen' filter is very simple, start off with a very low setting of around 3 then move up. I don't find that the 'Luminosity' setting has any effect for either of these two filters.

|
|
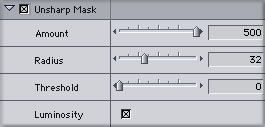
The 'Unsharp Mask' has a strange name for a sharpening filter. The name goes back to the days when Graphic artists used film. The name did not make much sense then either. The 'USM' as it is called, offers several controls and is the defacto sharpening tool for most graphics applications.
'USM' works by looking for areas in the image where light and dark pixels meet. This border between light and dark is what 'USM' works on by adding contrast to the border. It really does not sharpen an image, rather it gives the appearance of sharpening. The 'Amount' setting controls the amount of effect that is applied. 'Radius' controls the number of pixels along the border that have the effect applied, the higher the number the wider the band of contrast. The 'Threshold' setting allows you to select how much difference between light and dark pixels there must be before the effect is applied. A low 'Threshold setting ( 2 or 3) will cause almost everything to be sharpened. A higher setting, around 10, will cause 'USM' to ignore pixels who's difference in brightness is slight and will effect only areas where the difference is high, like a black telephone wire against a pale blue sky.
A word of caution. Keep your 'Amount' settings as low as possible, over sharpening an image will produce terrible results on NTSC.
VIDEO FILTERS

Blink and Strobe
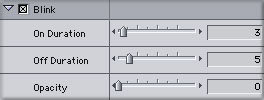
The Blink filter does just that, it blinks. The first control 'On Duration' sets the number of frames that the video is displayed. 'Off Duration' sets the number of frames that black appears. The filter loops playback between these two settings. There is an additional control, 'Opacity'. With this set to 0 the 'Off Duration' will show as black. As you move this slider up towards 100 more and more video shows, replacing the black. You can blink between 100% opacity and 50% opacity.
|
|
The Strobe filter creates the appearance of running at a much slower frame rate pausing on one frame then jumping ahead by the number of frames that you enter in the 'Strobe Duration box. The higher the number, up to 30, the longer one frame will be on the screen and the greater the jump forward in frames when the next frame is displayed.
De-interlace
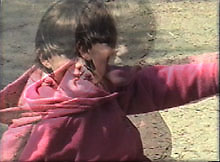
The De-interlace filter is an essential filter for making 'Freeze Frames' for re use on the Timeline or exporting stills from FCP. Video by it's very nature is comprised of two fields of video which are painted to the screen in an alternating fashion. When a 'freeze frame' or still is made only one of the two fields is used. When attempting to re use a still on the TL flickering will appear on NTSC. If you plan to use an exported still in another graphics program you will see that video interlacing lines are present giving a comb like effect to the still. This problem of flickering or 'comb' like effect is exasperated when there is motion close to the camera in the original video. The faster the motion or the closer to the camera the action is, the worse the problem. Even if you are not making a 'freeze frame' or exporting a still, fast motion near the camera can cause excessive blurring of the video. The De-interlace filter can help in such cases.

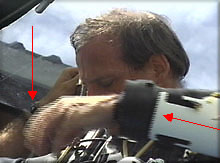
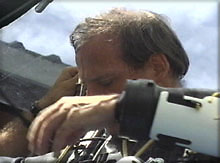
The De-interlace filter works by interpolating or making up the information that is lost when only one field is used. In the example (below left, Red arrows) you can see the problems that can occur when making a 'freeze frame' or exporting a still when there is motion in the shot that is too close to the camera. The hand and arm exhibit the blurring and comb effect. The example on the right has had the De-interlace filter applied, there is much improvement. However, whenever the De-interlace filter is used there will be a slight softening of the image.
The De-interlace filter has only one control, 'Field'. For DV 'Lower (Even)' should be selected. This filter is also an important tool when you want your video to have a film look.
Still image without De-interlace |
Still image with the De-interlace filter |
Stop Motion Blur
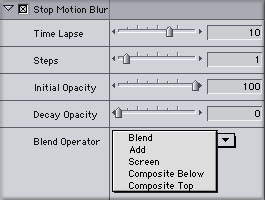
The 'Stop Motion Blur' filter sounds like a filter that would correct blurred video. Actually it is a special effects filter that causes 'split vision' not unlike someone who is seeing double after a knock on the head. It works by combining past frames or future frames with the current frame. The 'Time Lapse' slider has negative settings for past frames and positive settings for future frames. The 'Blend Operator' offers different compositing modes for adding the frames together.
|
|
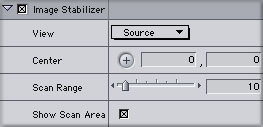
Image Stabilizer
The 'Image Stabilizer' filter does not work well at all. I might suggest that you don't bother with it.
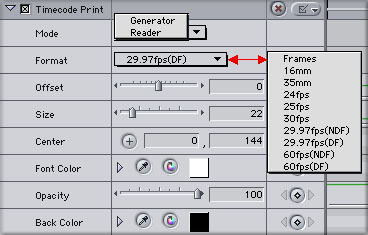
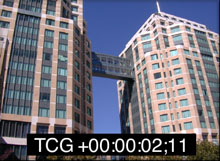
Timecode Print
This filter is used to make a 'window burn' of your Timecode on outputted tape. The TC will appear in a window on output. The Timecode burn is useful when others need TC reference on copies of your Project. This filter has two 'Modes'. 'Generator' is used to burn the Timecode of the Sequence to tape. To use 'Generator' you will need to select the clips in your Sequence and Nest them. Then apply the Timecode Print filter to the Nest. The other Mode is 'Reader' which when selected will use the source TC of each clip in the window burn. The Timecode filter takes a long time to render and uses considerable hard drive space.
|
|
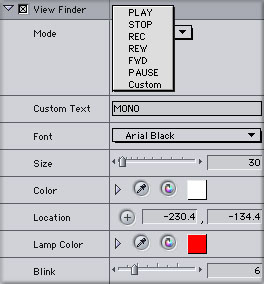
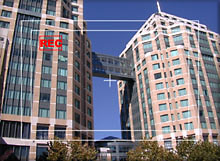
View Finder
If you want your video to be seen as through the eye of a camera's 'View Finder', this filter is for you. It has the standard white framing borders, a '+' in the center of the screen and simulated camera controls. In the 'Mode' drop down menu in the control panel you can select from a choice of camera operations. If you select 'Custom' you can create your own mode by typing it's name into the 'Custom Text' box. You can customize the font, size, color and set the location. You can also make the 'Mode' blink.
|
|
Conclusion
Border, Timecode Print and View Finder are special purpose filters. Gaussian Blur, Sharpen and De-interlace filters are used to improve the quality of video but can also be used for special effects along with Radial Blur, Wind Blur and Zoom Blur . The image below was created by first placing the same clip on V1 and V2. The clip on V1 had the Gaussian Blur filter applied, 'Luminance' channel selected and a value of 60. The clip on V2 utilized 'Mask Shape' and 'Mask Feather' to composite a clear image of the talent's face back into the video.
Enjoy,
--ken
copyright © Ken Stone 2001