
Basic - Motion Paths January 26, 2004
Back to Basics - How the Create a Motion Path
Basic - Motion Paths January 26, 2004
Back to Basics - How the Create a Motion Path
In today's popular trend to want more features and functions in the video editing and compositing software that we purchase, we often overlook or forget about the simple things that we used to do to make our edited pieces spectacular. All-in-wonder effects and simple point and click solutions have tended to remove the necessity to build things from "scratch." In the three revisions since Final Cut Pro 1, so many things have been changed or added that many times people become overwhelmed with the vast nature of this program. A "quick fix" creation solution is what many who venture into Final Cut Pro would like to have and often I am offering advice on how to do things that are very simple and have been basic functions of Final Cut Pro since its first release. The intent of this tutorial is to take us back to the basics of what Final Cut Pro is all about.
How to Create a Motion Path
1. The first step to creating a successful motion path is to ensure that you are applying it to the correct object and/or layer in your timeline. You should also have a general idea of what you would like to have happen. Let's assume that we would want to have a piece of video moving overtop of another piece of video. Both are playing back at normal speed, but one is going to move in from off screen, stop at the lower right side of our piece, and play back as a "picture in picture," before fading out.
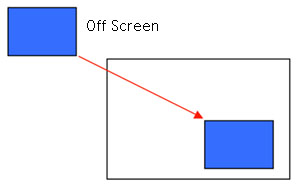
I usually find pre-visualizing what I want to have happen by drawing it out, makes my effect easier to create because I do not have to think about it during the build process in Final Cut Pro.
2. To create an additional video layer for a motion path, if you do not already have one available in your Final Cut Pro timeline, can be done in one of three ways.
i.
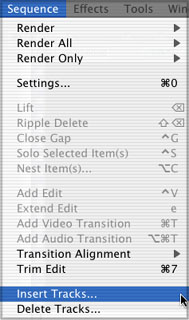
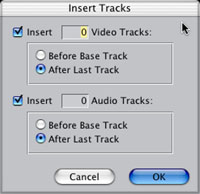
a. Go to the Sequence pull down menu and select Insert Tracks. b. The Insert Tracks menu will appear. Simply fill in the appropriate number of video tracks that you want.
Make sure that you have "After Last Track" selected so that the new track(s) are layered above the original one that you created.
ii. Go to the empty space above any video track that you have in the timeline and command click in that space with your mouse. You will notice a sub-pulldown menu. Simply choose Add Track.
iii. The last way to add an additional track is to simply click and drag a video or audio clip from the Browser or the Viewer down into the Timeline.
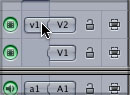
3. We have footage on V1 and do not want to change it. In my example, I am using a Color generator from the Video Generators Menu in the Effects tab. We should now target layer V2 for our new track. Simply click, hold and drag the v1 node in the patch panel, on the far left of the Timeline, and move it up to the V2 track.
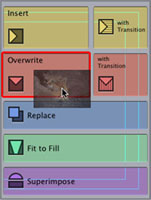 4. Making sure that your playhead, in the Timeline, is at the location that you want your video clip (or still) to be placed, select the clip that you want from the Browser (or the Viewer if you want to set a more specific duration for the clip,) click, hold and drag your clip into the Canvas window. You will see a sub-transport window showing you various edit options. Release your clip over Overwrite and it will appear on your V2 track in your Timeline. An Overwrite edit will not shift any media on the track that you are on or any other track. It literally does as it is named.
5. Move the playhead in the Timeline to the beginning of the clip that you just added to the sequence and then double click on it. This action loads the clip from the Timeline into the Viewer. Notice the "scrub" bar in the Viewer has small dots on it resembling film sprocket holes. This is an indicator that you have selected a Timeline clip and that what you modify in the Viewer will also be modified in the Timeline.
![]()
6. Select the Motion Tab in the Viewer.
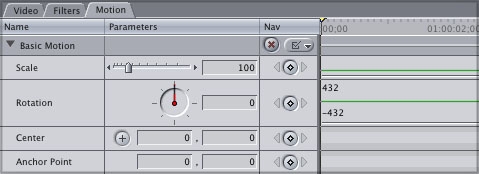
In the Motion tab, locate the Basic Motion sub menu. This is the section that you will be making the changes to create motion. Scale - adjusts size of the image layer. Rotation - adjusts the degree value of rotation of the image layer. Center - adjusts the position of the image layer based on x and y coordinates. Anchor Point - adjusts the pivot position of the image layer. This changes the rotation point.
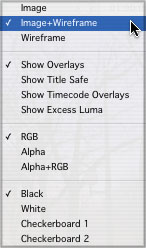
7. To help with the creation of the motion path and to give a visual reference to what you are doing, it is a good idea to set the View Image option in the Canvas window to Image + Wireframe. The easiest way to access this option is to select it directly in the Canvas window. Across the top of the Canvas window there are three pill shaped buttons. The one on the right is the Image View button. You know you have the right one because it has a square shape inside of it. Click and hold that button then pull down to Image + Wireframe. You will notice that when you do this and "x" bisects the picture and in the centre there is a number "2." This shows you that you are working on the second layer.
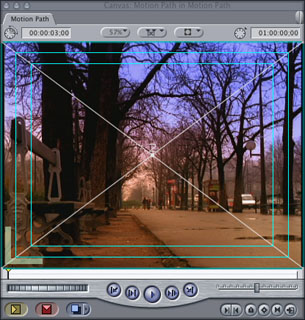
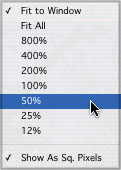
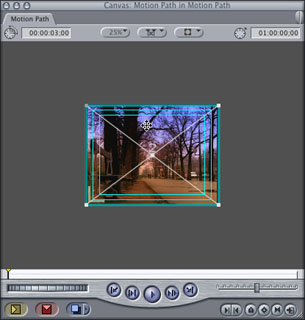
8. To further assist in the creation of the motion path, change the image size of the Canvas window. Opposite to the Image View button is the Zoom button. You will be able to recognize it as it has a percent inside of the button. Change the size to 50% or 25% of what your window size is. By changing the size, you will be able to see the entire viewing area as well as the area outside of what you can see. It will make it easier for you to move your image and conceptualize the entire effect that you are creating.
9. Go back to the Motion tab and locate the Center field in the Basic Motion section. Notice the diamond shaped button. This button allows you to create keyframes. Click on this button and create a keyframe at the beginning of the clip. Move the playhead in the Viewer window to the last frame of the clip you are affecting. (I find that using the down arrow cursor key to get me to the end of the clip and then using the left arrow cursor key to go back one frame is the fastest and easiest way to do this.) Apply a second keyframe.
Notice that beside the keyframe button a triangle pointing to the left and to the right has appeared. These arrows will allow you to jump back and forth between keyframes. Select the left triangle to take you back to the first keyframe that you created.
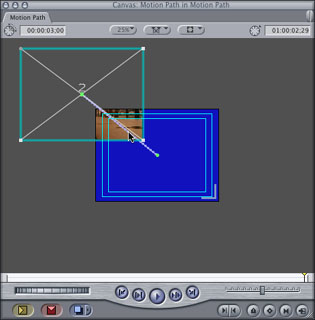 10. Go to the Canvas window. Move your mouse over the wireframed image; Layer 2. You should see the mouse change from a single arrow to a four way directional arrow. Simply click and hold the mouse and drag your image off screen. (In this exercise, lets go off to upper screen left.
11. Go back to the Motion tab in the Viewer. Go to the Scale field in the Basic Motion section of the Motion Tab. The number in this field represents a percentage of size. Let's change this from 100 to 25. We want this new size to be constant; it is not necessary to add any keyframes.
![]()
12. Select the triangle to the right of the keyframe button in the Centre field. This will take you to the second keyframe that you created. You should see Layer 2 appear back in its original position in the Canvas window. You have just created a simple motion. It is always a good practice to check the composition. Click the left triangle near the keyframe button in the Center field or press the up arrow cursor key on the keyboard to get you to the beginning of the clip. This effect should be real time if you are funning the minimum spec. system for Final Cut Pro. Simply press you spacebar to play the effect. If you have to render, you are either running a system that is not capable of real time, or your RT playback settings may be set too high.
Having started his career in the Film and Video industry eight years ago,
Darrin Sayewich has had an opportunity to experience many of it's different
facets. He started as a Chyron and graphics operator at a local sports only
television station. From there he moved to several
different production companies working on different jobs as either: P.A.,
camera assist, cable puller, grip and/or gaffer. Darrin moved into POST
production and found his niche in editing and
compositing. Presently Darrin working for an Apple reseller as the head of
their education and training department. He is an Apple certified trainer in
Final Cut Pro, DVD Studio Pro and Shake. Darrin is also actively freelancing
and recently has consulted on a feature film to be released later this year.
Darrin Sayewich lives in Toronto, Canada.
copyright © Darrin Sayewich 2004