
The Basics - PhotoShop Titles July 29, 2002
Photoshop Titles
The Basics - PhotoShop Titles July 29, 2002
Photoshop Titles
By Tom Wolsky
About this article:
The
article is adapted from the book Final
Cut Pro 3 Editing Workshop
by Tom Wolsky.
To purchase this book or for more information, click HERE.
Because the titler was so weak in earlier
versions of Final Cut, many people, myself included, took to
using Photoshop as the FCP titler. What a great titler it is,
infinitely malleable, with many additional elements, like banners
and bars and gradients, which are more difficult to construct
in FCP than in this great graphics application. Anything you
can imagine is possible. I use it often, particularly for lower
thirds, but also for working with still images that need to be
incorporated into a project.
What you should first know about working in PS is that you should only use RGB color space - no CMYK, no grayscale, no indexed color. They don't translate to video.
One problem with using PS is the issue of square versus nonsquare pixels. Because PS is a computer program, it works in square pixels exclusively, while most video uses the CCIR601 or rectangular pixel. This presents a minor problem. The important point is to understand how FCP handles still image files. It handles different sized images in different ways. Single layer files are treated one way, multilayer Photoshop files or PS files with transparency are treated another way.
1. If you're working in the DV format using CCIR601 pixels at 720x480, create your PS files at 720x534. If you're working in standard CCIR601 format, 720x486, then create your PS files at 720x540.
Preset Sizes: If you're working with Photoshop 7, there's a neat new feature that allows you to select preset custom sizes when you make a new file. Use the Preset Sizes popup and select either 720x540 Std. NTSC 601 or 720x534 Std. NTSC DV/DVD.

2. After you've made your graphic, go to Image Size and,
making sure Constrain Proportions is deselected and Bicubic
is selected, change the height of the image to 480 or 486,
as appropriate.
This squashes the image down, distorting it, changing it to a file that FCP recognizes as using CCIR601 rectangular pixels.
3. Save your file. I save out a separate PS file that has been converted to CCIR601 format and keep the original so I can correct the typos I usually make.
When you bring a PS file that's 720x480 into FCP, the editing software assumes it's been prepared for use in a DV sequence.
When placed in a DV sequence, the image will work perfectly and be treated as a nonsquare pixel image.
You're not always making a graphic that needs to fit in the video format. Sometimes you're making a graphic that is much larger, one you want to move around on to make it seem as if you're panning across the image or zooming in or out of the image. To do this, you need to make the image much greater than your video format, perhaps 2,160x1,602 pixels or more.
If you are working with a Photoshop layer image, you still should squeeze the image down to nonsquare pixels before you bring it into FCP. To do this, rather than using pixel values, use percentages and reduce the height of the image to 90% or, if you want to be anally precise about it, 89.886%. Again, you should not resize these images if they are single layer images without Photoshop transparency. FCP understands these are square pixel images brought into a CCIR601 world and will handle them appropriately.
If they are PS layered files with transparency, FCP treats these as separate sequences and does not adjust for CCIR601 pixels. The rules of the road are probably unnecessarily complex, but the bottom line is if it's a single-layer file, let FCP do the resizing; if it's a PS file, squeeze it before you import it.
The easiest way to work with Photoshop
files that you want to lay over video is to create your PS files
over transparency, PS's checkerboard background. This transparency
will be honored when you import the file into FCP. It's important
to understand that PS files come into Final Cut as separate sequences.
This means that when you bring a PS file with multiple layers,
all its layers remain intact as separate layers in a FCP sequence.
There each layer can be animated and affected separately.
The only time Photoshop files do not import as a sequence is
when they are made up of a single background layer or are saved
as flattened images or in some other file format, such as PICT
or TIFF. Note: there appears to be a problem importing large
format TIFF files into FCP3 under OS X.
Because it's simpler to work with a single-layer file, I often convert my PS files to PICT images, preserving the transparency information in an alpha channel, a simple procedure and easy enough to create a PS Action for. I retain the PS file to make changes after the following procedure.
1. Collapse the PS layers so that they merge over transparency.
2. Command-click the layer to select the contents of the layer.
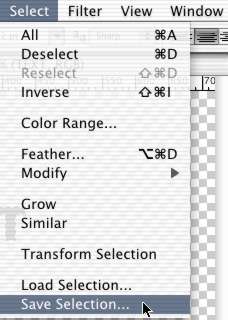
3. Go to the menu bar to Select>Save Selection (Figure 2) to bring up the Save Selection dialog box.
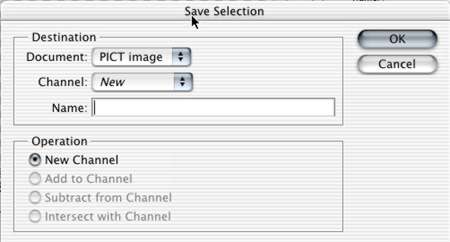
4. Save it as a new channel, as shown in Figure 3.
If you look in your Channels tab, usually behind the Layers window, you'll see that you now have four channels, the three color channels - Red, Green, and Blue - and a channel called an Alpha channel (Figure 4).
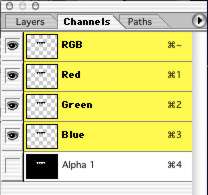
This is a grayscale representation of opacity. Whatever is white in the alpha channel will be opaque on the screen; whatever is black in the alpha channel will be transparent. Various shades of gray in between will define greater or lesser amounts of opacity.
Because video is interlaced and often produces flicker in text, I like to apply a slight amount of blur to mitigate this.
You have to select the whole layer - not just the content - or the blur won't have any effect.
1. Use Command-A to select the entire layer.
2. Then from the Filters menu select Motion Blur (Figure 5).
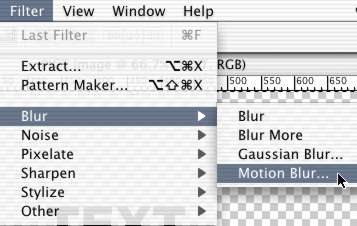
This opens up the Motion Blur dialog box (Figure 6).
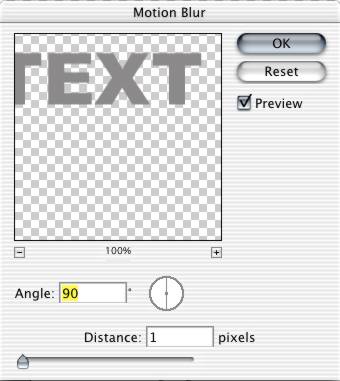
3. Set the blur to vertical and the amount
to one pixel.
This produces an ever-so-slight vertical smearing, just enough
usually to offset the jittering created by interlaced fields.
4. Put a black layer behind the content
layer.
I do this because PS collapses an image to a white background,
producing white fringing around the alpha edges of the content.
It premultiplies the image with white, mixing the antialiasing
on the edges of the text with white. This doesn't look very good
over video. Adding the black layer will force PS to premultiply
and mix the antialiasing with black, which looks better on video.
5. Saving the file brings up the dialog box in Figure 7.
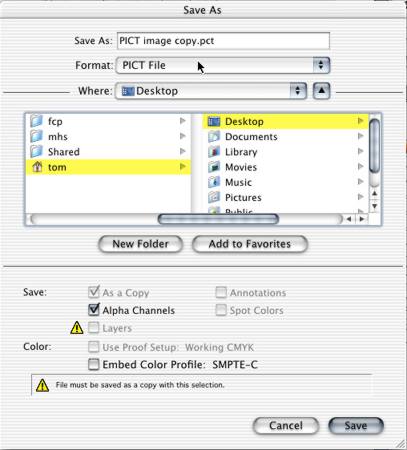
6. From the Format popup, select PICT File. Make sure the Alpha Channel checkbox is checked.
7. Click the Save button to call up one more dialog box (Figure 8).
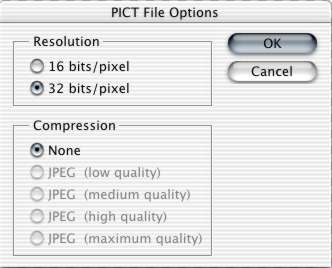
8. Set the Resolution to 32-bit.
It's eight bits per color channel, plus another eight bits for
the alpha channel. Do not compress the image. Compression will
lose the alpha channel.
That's it - you've made your PS file into a single layer PICT file with transparency.
When you import an oversized Photoshop file and place it inside a sequence, FCP will immediately scale the image. If the still is smaller than the image resolution, say a 500x200 image in a 720x480 DV sequence, the application will simply place it in the center of the screen with blackness around it. If the image is, say, 400 pixels wide but 800 pixels tall, FCP will scale it down to fit inside the window, as in Figure 8. If you do want to use the image at its full size, so that you can move across it, for instance, the first step you'll have to do is to return it to its full size.
1. Select the image in the Timeline and hit the Enter or Return key. Or Option-double click on it to open it into the Viewer.
2. Click on the Motion tab in the Viewer.
3. Set the Scale value back to 100.
Be careful that any Photoshop file you import into FCP3 has no empty layers, or adjustment layers, or layers with effects applied that have not been rasterized. Trying to import a file like this can cause an Out of Memory error message when you try to bring the file into FCP3 under OS X.
For people who come from a print background, the important point to note is that video doesn't have a changeable resolution. It's not like print where you can jam more and more pixels into an inch of space and make your print cleaner, clearer, and crisper.
Pixels in video occupy a fixed space and have a fixed size, the equivalent of 72dpi in the print world, which happens to be the Macintosh screen resolution. Dots per inch are a printing concern. Forget about resolution. Think in terms of size: the more pixels, the bigger the picture. Do not think that you can make an image 720x480 at a high resolution like 300dpi or 600dpi and be able to move it around in FCP. Certainly you'll be able to scale it up, but it will look soft, and if you scale it far enough - to 300%, for instance - the image will start to show pixelization. FCP is good at hiding the defects by blurring and softening, but the results are not really as good as they should be. FCP is a video application and only deals with pixel numbers, not with dpi.
Scanners, on the other hand, are designed for the print world where dpi is an issue. Because scanners generate lots and lots of pixels, this is very handy for the person working in video. This means that you can scan an image at, let's say, 300 or 600dpi, even a quite small image, and your scanner will produce thousands and thousands of pixels, which will translate into video as a very large image. You now have an image that's very much larger than your video format of 720x486 pixels. If your scanner can generate an image that's 2,880 pixels across, it's making an image four times greater than your CCIR601 video frame. You can now move that very large image around on the screen, and make it seem as if a camera is panning across the image. Or you can scale back the image, and it will look as if the camera is zooming back from a point in the image. Or reverse the process and make it look as if the camera is zooming into the image.
copyright©2002Tom
Wolsky
The article is adapted from the book Final Cut Pro 3 Editing Workshop by Tom Wolsky published by CMP books. To purchase this book or for more information, click HERE.
About Tom
Wolsky
He has his own production company, South Coast Productions, which
is based on the Media100, and is currently working on a short
documentary for the Mendocino Land Trust.
About the book
FINAL CUT PRO
3 EDITING WORKSHOP complements Apple's documentation with a series
of tutorials that teach readers the art and technique of editing
with Final Cut Pro by working through 13 lessons. Tutorials cover
the complete range of tasks, from installing the application
to outputting. All of the necessary materials, including raw
video footage and sequences, detailed instructions, tips, and
principles taught in film schools, guide the reader to a working
knowledge of Final Cut Pro. The companion CDROM contains everything
needed to perform the exercises, including raw video footage
and sequences
This article first appeared on lafcpug and is reprinted here with permission.
All screen captures, images, and textual references are the property and trademark of their creators/owners/publishers.