
The Basics - Getting Started May 9, 2001
The Basics - Getting Started May 9, 2001
The Basics - Picture in Picture, Animation, and Split Screen
By Ken Stone
Picture in Picture
Picture in Picture (PIP) is a common staple in video, frequently used in TV news shows. This often used technique is easy to do and can have many variations.
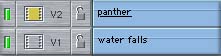
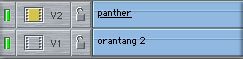
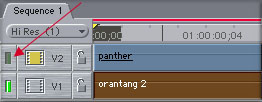
In the TimeLine put two video clips one on top of the other. Put your background clip on V-1 and the clip that will become the small PIP on V-2. Video that is on a higher track will always block out video that is on a lower track.
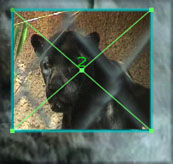
Double click on the clip that is in V-2 to open it in the Canvas window. In the Canvas window click on the drop down menu and select 'image + wireframe'.
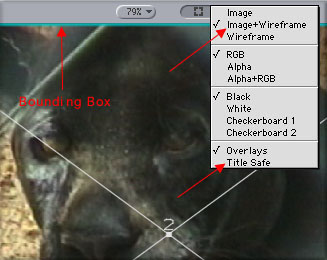
You will now have a blue 'bounding box' around your image with a white 'X' through the center and a number which denotes which V track is open in the Canvas. In this case, V-2.
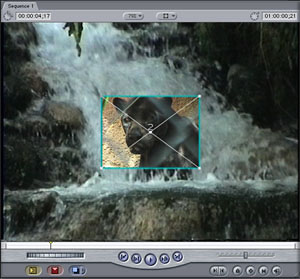
Click on any corner of the 'blue bounding' box and drag in to reduce the size of the picture until it is the size you want. As you reduce the size of the picture you will see the background clip that is on V-1.
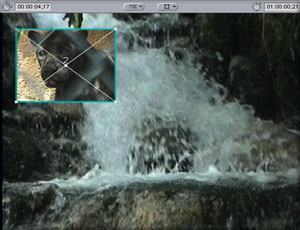
Now that your picture is sized, you can click inside the picture and drag it to where you want it placed. Turn on 'Title Safe' for accurate placement. .... Done. This process works equally well using stills.
Animated PIP
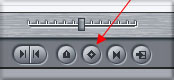
Now let's animate our PIP, moving it across the screen. This is one trick you won't see being used on the Nightly News! In the TL, move your Playhead to the start of your clip. Open the V-2 clip into the Canvas and check the position of your PIP. The Playhead is at the start of the clip and the PIP is at the location where you want the PIP to start its movement. At the bottom of the Canvas window, click on the 'Key Frame' button. This will 'set' the start time (position on the TL) and start location for the PIP's movement.
You will notice that now that you have set a 'Key Frame', the white X in the PIP has turned Green.
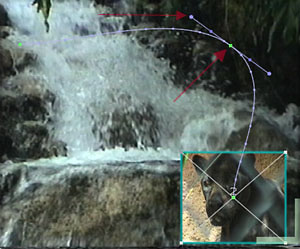
Move your Playhead down the TL to the halfway point of the clip. In the Canvas window, click on the PIP and drag it to its new location. As you drag, you will notice that a purple 'motion path' line is drawn showing the path between the first and second location of the PIP. Click on the 'Key Frame' button at the bottom of the Canvas window. Each time you set a key frame the motion path will be marked with a small green 'key frame' dot.
Now move your Playhead to the end of the clip; then drag your PIP to its final position and set your last 'key frame'. Again, you will see the purple 'motion path' and the ending green 'key frames' dot.

You can preview your moving PIP by holding down the 'option' key and scrubbing down the TL. (You will want to have 'snapping' turned off.) You can, at this point, render your composition. If you do, you will notice that at the start, the PIP jerks into motion and at the end of the motion path it stops very abruptly. For a smooth start and stop, control click on the green 'key frame' dots that represent the starting point and the ending point. Select 'Ease in/Ease out' from the contextual menu for each point; then render. When you render, FCP creates all the frames along the motion path. FCP will generate all the video between the Key Frames.
But you may not want your PIP to simply run across and then down the screen. By default, when we set 'key frames' on a motion path, it becomes a corner and this in turn creates an abrupt change in direction - not always what we want. We can smooth out or reshape the motion path to give a better look. Control click on the second (middle) green 'key frame' dot on the motion path and choose 'linear' from the contextual menu.
You will see that the motion path has now become curved at the middle key frame point rather then a right angle. Look and you will also see 'Bezier handles' coming off the 'key frame' point. You can click on one of the two Bizier handles and drag to change the shape of the curve. You can also click on any one of the green 'key frame' dots and drag it to a new location, changing the shape of the curve even further.
Split Screen
A Split Screen is very similar to a PIP. Start by placing two video clips, one on top of the other, in the TimeLine.
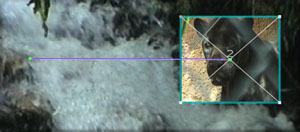
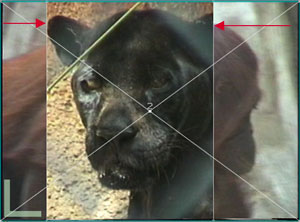
Open the clip on V-2 (Panther) into the Canvas window, with 'image + wireframe' selected. Select the 'Crop tool' from the FCP Tool bar. Place the Crop tool on each side of the Panther clip and drag in until the width of the image is about half the width of the Canvas window.
Now move the Panther clip to the left edge of the Canvas window. In the TimeLine, left-hand side, turn off the green 'visibility' button for V-2, the Panther clip. You will now be able to see the Orangutan that is on V-1.
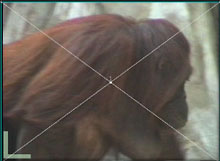
Select the Crop tool and crop the sides of the Orangutan; then move to the right. Turn the Visibility button on V-2 back on so you can see the Panther. Now that you have your Split screen blocked out you can adjust the cropping and position of each video track by opening a track back into the Canvas window and adjust by using both the Crop tool and the Move tool.

Yes, I know my final example (just above) could use a little adjustment.
Enjoy,
--ken
copyright © Ken Stone 2001
All screen captures, images, and textual references are the property and trademark of their creators/owners/publishers.