
Basics - 'Pleasantville' Effect June 30, 2003
How To Create the 'Pleasantville' Effect in Final Cut Pro
Basics - 'Pleasantville' Effect June 30, 2003
How To Create the 'Pleasantville' Effect in Final Cut Pro
One of the great phenomena of film is the sense of awe, bewilderment and amazement generated in viewers when a pivotal event or action occurs. Often times in films today, specifically action, adventure and science fiction, much of the reaction can be attributed to an effect of some sort. The better the effect the better the reaction. An effect is more than just being a spectacle; it is about its believability. Knowing that the audience knows, or at least should know, that what happens in a film is not real. It is incumbent on the film creator to design and implement an effect in a way that ensures that is could believably happen in the reality that the film generates.
The effect that we are going to create will extract the colour of an entire piece of footage except for one item. This is similar to the effect that was used in the movie Pleasantville. The "Pleasantville" Effect - if you have ever seen the movie, in some of the black and white sequences, some items start to become colour.
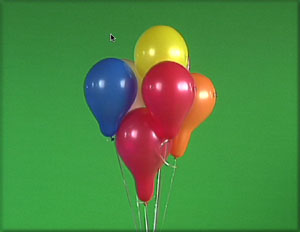
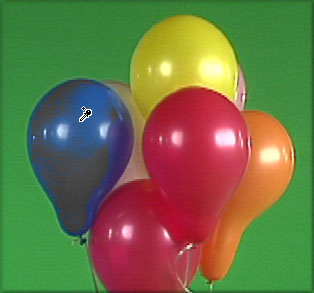
It is easiest to understand how to do this effect using simple objects that are one colour and have no textures lines or patterns. For this exercise I am going to use an image of a bunch of balloons of different. Each one is a single colour.
1. After you have launched Final Cut Pro import your asset into the Browser. For my example it will be a bunch of balloons.
2. Load your asset (clip) into the Timeline and then double click on it to load the clip from the Timeline into the Viewer. When you load a clip from the Timeline into the Viewer you are creating a dynamic relationship between the two windows. Whatever you do to a clip in one window happens in the other. The only difference is that loading a clip into the Viewer only allows for modification of that clip and not the rest of the timeline.
3. It is important to make sure that you alter the view settings inside of the Canvas window.
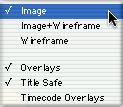
You may have Image + Wireframe selected. Although it is not bad to have this selected, with certain filters you cannot have this option active if you want to be able to use the features of the filter. Go to the View button in the Viewer. Change your selection to Image
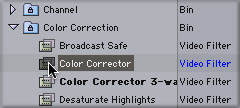
4. Go to the Effects tab in the Browser and open the Filters folder (Click on the small triangle to the right of the folder.)
5. Go to the folder labeled Colour Correction open it and then click (hold) drag and drop the Colour Corrector onto the clip in the Timeline or up into the Viewer.
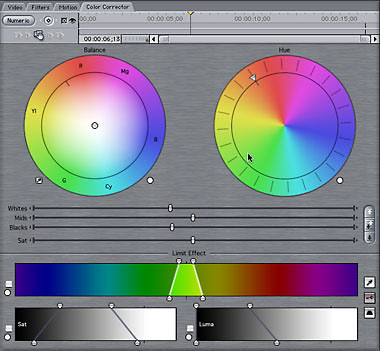
6. A new tab will appear in the Viewer call Color Corrector, click on it to access the colour correction tools.
7. Go to the Timeline and shift the Playhead to a new position on the footage that you are using. Try to find a section that will show the majority of the object that you want to sample colour from.

8. Select the Eye Dropper Tool in the Color Corrector Tab then go over to the Canvas window and select a colour sample. For my example I am going to choose the blue balloon in my cluster of balloons.
9. You will notice that in the Limit Effect area a one colour (blue) is prominent as it was the one that I originally select. What we need to do now is set up the image so that we can choose subsequent samples.

Go to the Saturation slider directly above the Limit Effect area. Movie the slider all the way to the left. You should see that the blue that was sampled now turns gray.

10. Sample another section of the balloon. Simply, click on the Eye Dropper again. Hold the shift key when you go back to the Canvas window to select another colour in the same object. You should see a tiny plus symbol beside the eye dropper. This indicates that you are going to add to the sample that you have taken earlier. Click to select the additional sample. Repeat as necessary. You will find that zooming into the object on the canvas window will allow you to select colour samples in greater detail.
11. Click on the key button in the Color Corrector window. This will change what you are viewing to a black and white picture. This view shows the mask you are creating. With this image in the Canvas window, you can use the handles on the Saturation and Luma sections of the Limit Effect Area to try and make the object completely white. Essentially you are creating a mask.
Your objective is to mask the item completely, it is important to make sure that you don't mask out too much. How much is too much you say? Although this is effectively a mask, you are not actually masking it to be placed over another item. You are "masking" out the colour. If you mask out everything you will also affecting the highlights and reflections too. While your objective may be to mask the item completely, it is important to make the effect more natural, you want to leave some highlight and refection as its original colour.
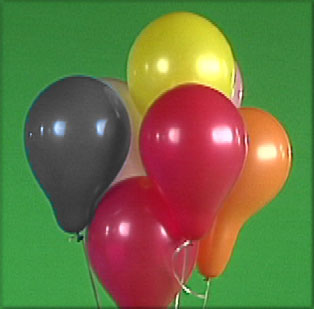
12. Click on the key button twice to bring it back to the desaturated object image. (My Balloon is gray).
*The key changes colour for three different views; Final, the default, shows the results of your color key effect, Matte shows the area that you have selected for your color key and Source shows the image with no color key effect applied.
13. Click on the invert button located under the key button, looks like a roof of a house.

Your image will now be desaturated except for one object. There you have it, the "Pleasantville" effect.

copyright © Darrin Sayewich 2003