
The Basics - Getting Started April 12, 2001
The Basics - Preparing Photoshop files for FCP
The Basics - Getting Started April 12, 2001
The Basics - Preparing Photoshop files for FCP
There is the old line that goes something like this: "FCP has the best text generator around, it's called Photoshop".
The text generators in FCP are very basic. Aside from limited text ability FCP can only use True Type fonts. Photoshop is a very powerful application which now employs vector graphics for it's text. This plus the fact that Photoshop can use both True Type Fonts and PostScript fonts makes it the text program of choice for many.
We will look at the two basic types of Photoshop images that you might want to bring into FCP. The first is a simple image like a photograph or text on a background. This simple image will not have a transparent background so it can not be superimposed over video. The second type of image will have a transparent background so you will be able to superimpose or composite it over video.
We will be working in the DV FireWire format in this article. If you are using another format the principles will be the same but you will use different dimensions, see the table at the end of the article.
As Photoshop and computers monitors use square pixels and Video uses rectangular pixels to display the image we will need to go through a conversion process to compensate for the change in pixel shape going from computer (square) to Video (rectangular), otherwise your images on NTSC will be distorted, taller, stretched up.
Basic Photoshop image. Non transparent background.
1) From PhotoShop File menu > new.
Why Photoshop?
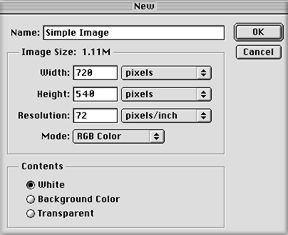
2) Set Width to 720 pixels, Height to 540 Pixels, Resolution to 72 dpi, Color Mode to RGB, and Contents to White or choose a Background Color.
If you plan to do a 'Ken Burn's effect', enlarge or move around inside your image (a photograph for example) you will need more digital information to avoid pixillation. There are two different ways to do this. You can increase the overall dimensions of the file and leave the dpi at 72. For a 2X enlargement create your file at 1440 x 960 or for a 4X 2880 x 1920. Another way to achieve the same results would be to increase the dpi of the file, leaving the file dimensions at 720 x 480, from 72 to 144 dpi for a 2X enlargement or 288 dpi for a 4X enlargement.
3) Create your artwork, set text, paste in photographs. When done with your art work do a 'Save As' copy/backup of this un converted image as "Image Name 540".
4) File menu > Image > Image size
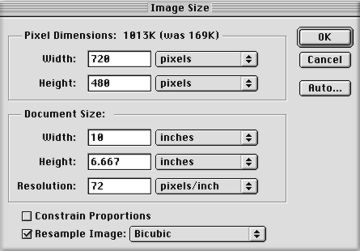
5) In the Image Size dialog box FIRST uncheck the 'Constrain Proportions' box.
6) In the Pixel Dimension section, top the dialog box, change your Height setting from 540 to 480. Leave the Width setting at 720.
7) Click Okay.
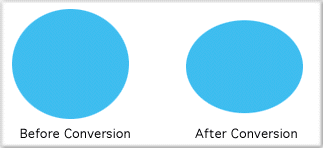
If you look at your image you see that it is now distorted, flatten down. Don't panic, this is the conversion process and when the square pixels get converted to rectangular pixels in NTSC your image will once again look correct.
8) Save as Photoshop format .psd.
9) Import into FCP and render. You will see that your image on NTSC once again has it's proper proportions.
Photoshop Image with transparent background.
The process is basically the same. You will use this approach when you have titles, art, logos, etc. that you want to superimpose over video.
1) From PhotoShop File menu > new.
2) In the contents section select 'Transparent'.
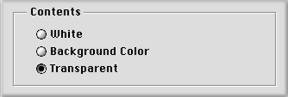
3) Create your artwork, set text, paste in logos etc.
4) Continue on using steps 4 through 8 above.
Creating Layers in Photoshop
Layers in Photoshop are very much the same as multiple video tracks in FCP. The advantages of using layers are two fold. First, in PS you will be able to change any one layer at any time without changing the rest of your work. Second, in FCP you will be able to use each of these layers as a separate video element, each layer on it's own video track, with keyframing, control over motion, opacity, transitions, etc.
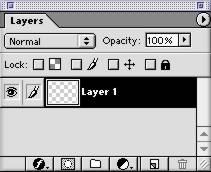
When you open a new file in PS the Layers Palette will show one layer or 'Background'. This first layer can be either transparent or non transparent depending on your needs. If you do not plan to superimpose this art work onto video then this first layer or background (non transparent) can be any color or have any artwork that you wish, like text, a drawing or photograph.
If you plan to superimpose your PS file over video and have selected a transparent background then leave this first layer alone. Don't put any art into it. Before you start to create your artwork open a new layer from the Layers palette and name it.
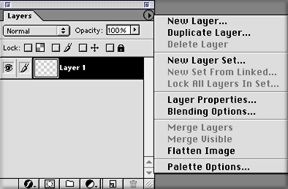
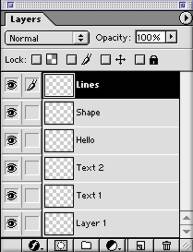
Make a new layer for each different element of your art work. You can have as many layers as you want. At any time you can click on any different layer in the Layers palette to make it active and modify it without changing any of the other layers. This is most helpful when you want to move elements around to align them. You can also click on any layer in the layers palette and drag the layer to a different position in the palette. This is how you control which elements are on top of or behind each other. If you want to remove a layer from your composition simply click on it and drag it to the small trash can at the bottom right of the layers palette.
When you are done with your art work I would first recommend that you make a duplicate of it, a back up. Save this back up, you may need to make changes at a later time.
There is one more thing to consider. If you do not plan to use unique layers in FCP you can select 'Flatten Image' from the Layers palette menu. This will collapse all your layers into the background. Flattening will give you a solid color background so before you flatten set the background color of your choice. When you import this flatten image into FCP, FCP will see it as a still frame. If you want to keep your layers unique for FCP then do nothing and follow steps 4 through 8 above.
On to Final Cut Pro
If you have kept all your Photoshop layers unique then after importing your image into FCP, in the Browser you will see that your PS file has now become a Sequence, not a still as when you have flattened your image in PS .
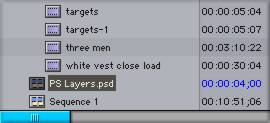
Drag your PS Sequence to the TL, double click it to open the Sequence.
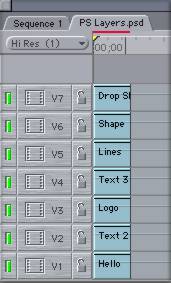
In your Browser create a new Bin and name it after your PS file. Select all the clips in the PS Sequence in the Timeline and drag them into the new Bin in the Browser. Each PS layer has now become a unique clip. It has become a still. Cool. You will notice the duration for my stills is 4 seconds. To set the duration that you want for your stills; Menu > Edit > Preferences > General tab. 'Still Image Duration' enter the duration that you want your stills to be before you import them into the Browser.
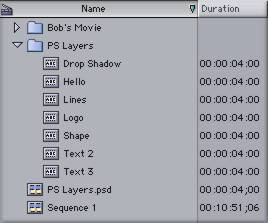
Close the empty PS Sequence and delete it from the Timeline, you can delete the old PS Sequence from your Browser as well.
You can now drag your stills (PS layers) to the Timeline and stack them on top of each other.
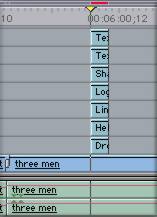
Each layer or element of your Photoshop file remains unique, this affords you the opportunity to move each one around on the Timeline and to apply all the effects that FCP has to offer. You can also apply FCP plug ins like Graffiti to each unique clip.
Caveat, there is always one caveat.
Newer versions of Photoshop now employ vector graphics for its type. If you are doing text but not using any of Photoshops' built in special effects such as drop shadow, emboss, bevel, etc, or if you do use these effects and 'flatten image' or 'merge visible layers' then there is no problem.
If however you use these effects and save your layered image 'as is', when you import into FCP you will see that all your effects are gone. If you do a 'rasterize' or 'rasterize all layers' from the Layers menu in PS, your type will be rasterized but not your special effects.
There are several work arounds for this. If you have Photoshop plug ins like 'Eye Candy' you can use Eye Candy to do drop shadow, emboss, inner bevel, etc. When these effects are done with Eye Candy they will not be lost when importing into FCP.
If you are using the Photoshop built in effects, when you have completed your work but before you do anything else you will need to do the following. In the Layers Palette place a new empty layer just beneath each one of your layers that contains PS special effects. So you might have: real layer- empty layer, real layer - empty layer, well, you get my drift. Now select your first layer that contains your special effects and from the Layers Palette choose 'Merge down'. This will force both your type and special effects down into the empty layer just beneath and rasterize both in the process. Then move to the next layer that has special effects and 'merge down'. Now when you import your layered PS file into FCP you will still have unique layers and the attending special effects. Extra steps to be sure but it does work.
| Video Format | Square Pixel Photoshop | Rectangular Pixel FCP |
|---|---|---|
| 601 NTSC 4:3 | 720 x 540 | 720 x 486 |
| 601 NTSC 16:9 anamorphic | 960 x 533 * | 720 x 486 |
| DV NTSC 4:3 | 720 x 540 | 720 x 480 |
| DV NTSC 16:9 anamorphic | 960 x 540 | 720 x 480 |
| 601/DV PAL | 768 x 576 | 720 x 576 |
| 601/DV PAL Anamorphic | 1024 x 576 | 720 x 576 |
| 720i/p high definition | 1280 x 720 | NA |
| 1080i/p high definition | 1920 x 1080 | NA |
Enjoy,
--ken
copyright © Ken Stone 2001
All screen captures, images, and textual references are the property and trademark of their creators/owners/publishers.