
Basics - Range Check Tool May 13, 2002
Basics - Range Check Tool May 13, 2002
The Range Check Tool in Final Cut Pro 3
Checking Luma and Chroma Ranges
By Ken Stone
Watching a little TV the other night, a local commercial came on. Halfway through the commercial a bright red telephone number came on screen. Too hot for broadcast. The red color of the phone number was smeared across the screen and the audio screeched, making me dive for cover. Obviously the commercial was not done using Final Cut Pro 3. (grin)
So what does Broadcast Safe mean? Here is a simple answer. Due to the physical nature of television broadcasting, there are limits to both the luminance (brightness) and chrominance (color saturation) of the video that that is acceptable
for broadcast. If the luma, chroma or both levels exceed these standards then problems will occur at the receiving end of the broadcast, on TV sets at home. Problems like smeared color, blown out highlights and bad audio. The audio itself might be at the correct level but when the standards for luma or chroma are exceeded it tends to ruin the audio as well. Different broadcast facilities have different standards so unfortunately there is no one fixed standard for the industry. If there is a 'defacto' standard it would be the Corporation for Public Boardcasting guidelines. Each broadcast facility makes guidelines available, of what is for them, a legal video signal.
We have had the ability to set Luma and Chroma levels for 'Broadcast Safe' in versions prior to FCP 3, using the Waveform and Vector scopes in conjunction with color correcting filters. We now have a new tool that make the process much easier. The Range Check tool.
Range Check Tool
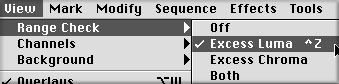
The Range Check tool offers three different modes for testing for illegal broadcast levels; Luma, Chroma or both. Range Check is selected from the View menu and can be used in both the Viewer and Canvas window, depending on which one is active at the time of selection. Range Check only looks at the frame that the Playhead is parked on and does not run in real time.
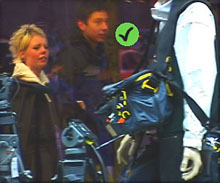
When Range Check is enabled you will always have an icon on screen.


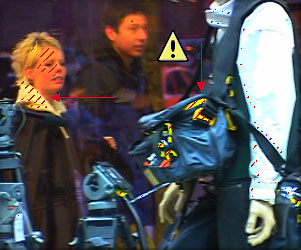
With the Range Check tool set to Luma (brightness), there will be green moving zebra strips over areas that are 90% to 100% luminance (cautionary), red moving zebra stripes for luminance of over 100% and out of range. With Chroma (color saturation) selected there will be red moving zebra stripes for areas over 100%. There are no green zebra stripes (as caution) with the Chroma Range check. When Range Check is set to 'Both', there will only be red zebra stripes showing out of range. No way of knowing which is out, Luma or Chroma. Despite the fact that Luma has the green zebra strips when in Luma mode, when set to both, the green zebra strips are not available.
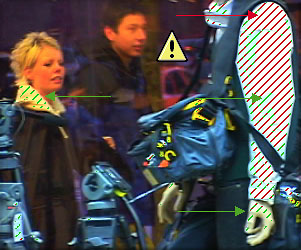
Luma Range Check - shows green zebra strips (green arrows) for those areas of luminance between 90% and 100%. Red zebra strips (red arrows) shows luminance over 100%. |
Chroma Range Check - shows red zebra stripes (red arrows) for those areas of chromance over 100%. No green cautionary green zebra stripes available with the Chroma Range Check. |

Range Check Both - Combines the red zebra stripes of both Chroma and Luma. The green zebra stripes from the Luma Range Check are gone. |
The Range Check tool is helpful in spot checking the Luma and Chroma values of your video footage. You will need to place the playhead on any frames of video that you want to check. This tool is also useful when doing color correcting. Turn on Range Check while color correcting to insure that your color adjustments don't push you over the top. The Luma Check is helpful in that it shows those areas of luminance that fall between 90% and 100% as well as areas that are too hot. I wish that there was an on screen marker telling us which Range Check is in use, Luma or Chroma. I often forget which one I am using. If you see green zebra strips you will know that it's Luma that you are using.
I have found having the green zebra strips of the Luma Check is very helpful for adjusting white levels and highlights (brightness and contrast). At the same time, I need to see my Chroma values as well. Range Check - 'Both' does not employ the cautionary green zebra stripes of the Luma Check and when red zebra stripes are displayed there is no way of knowing if it's Luma or Chroma that's out of range. There is a workaround. Make your Viewer active and select Range Check Luma, now make your Canvas active and select Range Check Chroma. This way you can have a check of both Luma and Chroma but in separate windows. You can have Range Check on when working in FCP but be sure to turn it off when laying off to tape.
The Range Check tool would be even more helpful if it employed a feature found in the Audio Peak Detection tool. 'Mark Audio Peaks' can check an entire Sequence and place markers where audio volume exceeds 0 dBs. We need a 'Mark Luma and Chroma Peaks' option that would cause FCP to scan an entire Sequence and place markers where our Luma and Chroma values exceed the legal broadcast range. Well, maybe in FCP 4.
Enjoy,
--ken
copyright © www.kenstone.net 2002