
|
White Paper - DVD Studio Pro
|
May 5, 2003
How to Build a Basic Still Menu for DVD Studio Pro
By Darrin Sayewich
It is always important to make sure that you have a concept of what you would
like a menu to look like prior to actually creating it. It is not necessary to create a
masterpiece prior to building, but knowing generally where you want buttons and
images to go usually makes the process a lot smoother. The final look always
becomes subjective at the point of creation. A simple hand drawing or using
layout software is always a good start to menu creation.
(Layout software often found on newer Macintosh tower units is OmniGraffle.
Check your applications folder or the system restore disc for it.
www.theomnigroup.com)
|
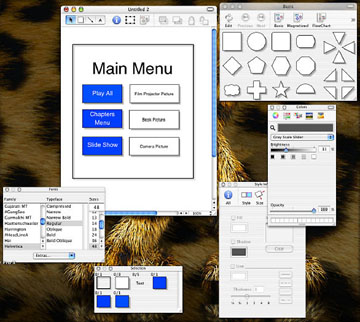
OmniGraffle is a
great tool for creating
a layout that
generally represents
what you want your
menu to look like.
Remember:
Like editing video,
DVD creation is 90%
organization and
10% creation.
|
|
(This lesson will require PhotoShop to create a still menu. All references will be made to PhotoShop 7.)
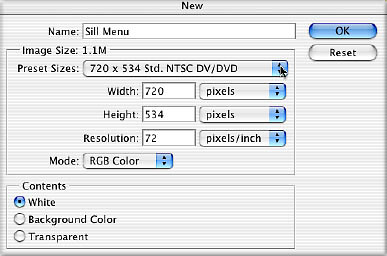
- After you have launched PhotoShop you will need to create a new
document. Simply go to File pull down menu and choose New.
- The New window will open and allow you to create a new workspace. We
want to choose a preset that is located under a preset pull down menu in
this window. Go to Preset then choose 720x534 Std. NTSC DV/DVD.
Keep the colour mode of this as RGB color. For the sake of this exercise
we will keep the background white.
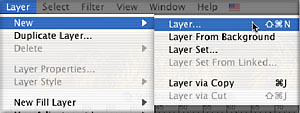
- Create a new layer. Go to Layer>New Layer. A new layer will appear in
the layer view window which is at the bottom right of your window.
- Select the paint bucket from the tool bar and paint this layer. It does not
matter what colour you have selected.
REMEMBER:
To paint the appropriate layer, you need to make sure that you select it in the
layer view window
- Delete the original Background Layer. Simply select the layer and click on
the trash can button in the layer window.
- Rename the new layer as Background. To do this all you need to do is to
control click on the name of the layer and choose layer properties. You will
see window that lets you change the name of the layer. Click OK when
you have completed the new name.
- To help make sure that when we create our menu, all items will be seen
on a television or NTSC monitor, it is important for us to create a safe title
area. We need to show our rulers for this. Go to the View pull down menu
and choose Rulers.
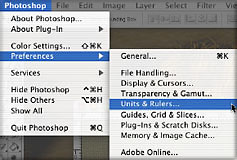
- To make it easer to create the
safe area, having the rulers set
to a percent measurement is
optimal. Go to the PhotoShop
pull down and choose
Preferences. A sub-drop done
menu will appear, choose Units
and Rulers. Change rulers to a
percent measurement, then click
OK.
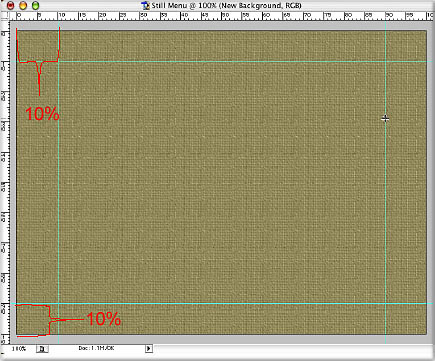
- We will now simply create the guides that we will stay within when creating
our menu. Mouse over one of the rulers located at the edge of the
workspace window. Click and hold with the mouse. Drag diagonally or
horizontally (depending on which ruler you started from) and you will see a
line. This is your guide. Simply place the guide 10% from the edge at the
left and right side, top and bottom of your image. You will find that this is
optimum for a workspace that will stay in the within the regions of a
television.
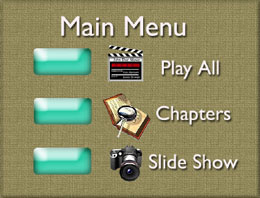
- With a simple still menu, buttons need be nothing more than placeholders
when created in PhotoShop. The actual button highlight will be created in
DVD Studio Pro. Using the rectangle shape tool or rounded rectangle tool,
located in the tool bar, create as many buttons that you might find
necessary for your project. (I am going to create three.) A new layer will be
created with each button (rectangle) added, so if you want to reposition
the pictures simply make sure that you have the appropriate layer selected
and move/nudge it with the Move Tool (v).
REMEMBER:
Unless you are going to create a more complex menu using overlays,
(overlays not shown in this lesson) your buttons should be square or a
rectangular shape as DVD Studio Pro can only create square or rectangular
highlights.
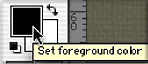
- We can choose a colour for the
buttons prior to creating them
buy clicking on the foreground
colour box in the tool bar.
Choose your colour and click
OK. or we can add a style like
we did to the background. Simply drag and drop a style onto to
appropriate button. (The colour of a button will be what the foreground
colour is set to prior to creating the button.)
REMEMBER:
You need to make sure that you have the layer that you want to apply the
style to select in the Layer Window.
- With many menus it is a stylistic choice to add picture references to the
buttons that you create. Simply import any picture file that you want to use
into PhotoShop. Select the area that you think works, (usually the whole picture) copy and paste it into your still menu. You can use either the
Rectangular Marquee tool in the tool bar to select a specific area or go to
the Select pull down menu and choose all. (For those that have previous
Macintosh experience simply using za will also work.) A new layer will be
created with each picture added, so if you want to reposition the pictures
simply make sure that you have the appropriate layer selected and
move/nudge it with the Move Tool (v). You also might need to change the
size of the picture. Simply choose Edit>Free Transform. You will see a
marquee box with Ňcorner pinsÓ appear around your picture. You can now
change the size, distort or skew the image in any way that you want. (If
you choose a corner pin and hold the shift key, you will constrain the
proportion. The picture will adjust its size proportionately.)
- Using the Horizontal Type
Tool (T) from the tool bar,
select an area and enter text.
If you look across the top of
your window near the pull
down menus, you will see
options for adjusting your text.
(i.e. font, size, colour) A new
layer will be created with each
new text layer added, so if
you want to reposition the
pictures simply make sure
that you have the appropriate
layer selected and move/nudge it with the Move Tool (v).
- If you want to add a drop shadow to any of the layers; text, picture, button,
simply go to Layer>Layer Style>Drop Shadow. A window will open that
will show you options for adjusting the drop shadow parameters.
- It is time to flatten out this image. Select the background layer. Go to
Layer>Flatten Image. (DVD Studio Pro will not recognize any PhotoShop
Styles. We have to flatten an image to ensure all of our stylized options
will stay with the menu.)
- We can now save the file. As this is going to be a still menu with buttons
generated in DVD Studio Pro, we can save this as PICT file. Got to
File>Save As. A window will open that show the saving options, choose
an appropriate location and click on save. A prompt window will appear
asking if you want to add any compression to the file, make sure that
none is selected.
DVD Studio Pro Starts Here
Import your menu into DVD Studio Pro. Go to File>Import. (Using command &
click with mouse, will allow for you to choose multiple items to use in
your DVD. You should also import MPEG assets.)
Drag the menu item into the Graphical View.
19. Go to the Property inspector and set/re-set the name of the item.
DVD Studio Pro Starts Here
Go to the Picture field in the Property Inspector and choose the Menu
asset that you created in PhotoShop. (PICT File)
Go to the Button Hilites field in the Property Inspector.
Choose the appropriate colours for your selected and activated states.
You also need to choose the percent that the colour is opaque. The
opacity value that we set in DVD Studio Pro will not be maintained when
we burn a disc. There is a 20% gamma shift that occurs when you burn.
Your menu items will become lighter. Always set your opacity higher than
you want to achieve the look you desire.
Double click on the thumbnail image in the Menu item that is located in the
Graphical view.
A sub-window will open and, if you set the Picture Asset properly you will
see your menu item. In the top left side of the window you will see a box
titled: untitled button. Select this button. You will know that you have this
selected properly because the button will have an animated marquee
around it and the Property Inspector will change.
When the button is selected the cursor will change to a hand.
Move the button to the appropriate location and resize it.
Re-name the button.
Go to a new location and drag a marquee around another item that you
want to be a button. (Do this twice)
Once you have completed your buttons, you need to set up the action that
occurs when you select the button as well as the button links. With a
button selected, go to the Property inspector.
Find the Action field and look for Jump when activated.
Select your MPEG or marker that you want this button to activate.
Go to the Button Links field and select the up, down, left and right direction
that you want to have remote buttons jump to when the disc is in a DVD
player.
Repeat steps 24 and 25 for each button that you have created.
copyright © Darrin Sayewich 2003
[Top]
All screen captures, images, and textual references are the property and trademark of their creators/owners/publishers.


