
The Basics - Setting Type 
August 27, 2001
Using the Text Generators in FCP
The Basics - Setting Type August 27, 2001
Using the Text Generators in FCP
Final Cut Pro 2.0 ships with 6 Text Generators although one of them, the 'Outline Text', is not mentioned in the manual. If I were to say that these text generators are pretty basic and underwhelming I don't think I would get much of an argument. Having said that, one of the new text generators, Outline Text, offers a large number of controls and new features.
All six of the text generators that come with FCP have common attributes and share a number of controls. We work with all of the generators in about the same way.
All FCP text generators have transparent backgrounds. If we place a text generator on V1 in the Timeline the transparent background will default to black when viewed on NTSC or PAL. If we place our text generator on V2 with a video clip beneath it on V1, the type that we set will be superimposed over our video allowing us to see both the type and the video together.
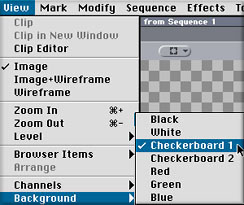
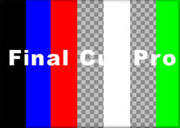
Because all text generators have transparent backgrounds FCP offers us seven different backgrounds to choose from so that while working in the Viewer or Canvas windows we will be able to see our type. These seven different backgrounds are artificial backgrounds. They are only 'viewing aids' and will not show up on NTSC. Because we can set our type in any color we choose we will want a background color that will contrast with the type.
To set our 'viewing aid' background make which ever window you will be working in active. From the Menu bar select > View > Background > Color. You will notice that the white background in the picture, below right, does not show the type because the color of the type is white as well. Remember that these colored backgrounds are aids only and will not show up in the final video.
Text Generator Basics
Text Generator
Let's start by using the basic tool for setting type in FCP. Drag the Text generator from the Effects browser and drop it on the TL, double click to load into the Viewer, select the Controls tab.
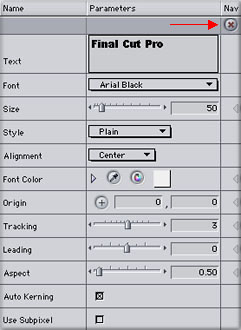 Text field (shown smaller here). You can type in any number of lines in this box, hit 'return' for each new line. Hit the Tab key to update your monitor.
Font selection menu. FCP can only see TrueType fonts and can not use PostScript fonts. When you select your font stay away from small, thin, or serif fonts as video has a difficult time reproducing these fonts. For the best results use large thick fonts.
Size field. Be sure to have Title Safe turned on in your Canvas window when setting the size of your type.
Style selection menu. Plain, Bold, Italic and Bold/Italic. If you are working with a font that might be a little thin you can select bold from this menu.
Alignment offers Center. Right, or Left aligned text.
Font Color offers several ways to select a color for your font. You can select the eyedropper then click on any color in your video, or you can click on the white square which will produce a color wheel from which you can choose a color. You can also click on the little right facing triangle and enter numeric values for your color.
Origin, location. Click on the + and then click in your Canvas window to change the position of your type, or enter numbers into the X and Y fields.
Tracking, called Spacing in other FCP text generators allows you to add space between each letter of your type.
Leading adds space between each line of type.
Aspect setting controls either the width or height of your type. Numbers below 1 cause the type to grow taller, numbers above 1 cause the type to become wider.
Auto Kerning must be checked for the Tracking and Leading settings to work.
Subpixel select Subpixel whenever you have moving type. This will smooth the motion of the type as it moves on your screen.
At the top right of the Controls box you will see a button with a Red 'X' in it (Red arrow above). This is the reset button and will return all your settings to default.
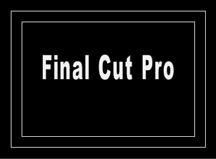
Type using the above settings as seen in the Canvas window. The inner white border is the Title safe area, the outer is the Action safe. |
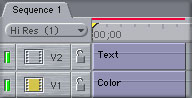
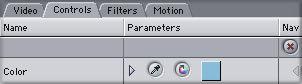
Black backgrounds are commonly used with type, but what if we want a colored background. We'll need to place one under the Text generator. From the Effects Browser > Matte > Color, drag this filter to the TL and place the Color matte on V1, place the Text generator on V2. Double click on the Color matte to load it into the Viewer and select the Filters tab. The Color Matte filter only does one thing, make a colored background, so it only has one control. Set the color you want for your background.
Once our type has been set there are a number of things that we can do with it. In the Canvas window, using 'image + wireframe' and the Motion tab in the Viewer we can move the text, spin, change the size and aspect ratio, add drop shadows, and change the color. Using Keyframing we can have all of these settings change over time. For more on this see Flying Type in Final Cut Pro and Keyframing in Final Cut Pro.
Lower Third Generator
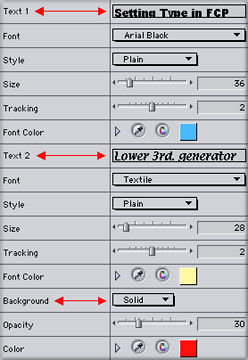
This generator offers a few more features then the basic Text generator and a few less. The Lower Third generator positions two lines of type in the lower third part of the screen, hence it's name and is limited to only two lines of type. Lower Third is often used in News and Documentary programs or for text captions that you want to run with your video.
This is the only FCP Text generator that allows you to use two different fonts in the same generator.
'Text 1' and 'Text 2' each of these text fields can have it's own settings; Font, Style, Size, Tracking, and Color.
Background option that offers either a thin Bar (line) between the two lines of type or a solid block of background color behind the two lines of type. The height and width dimensions of the background bar or solid can not be changed.
Opacity with the ability to change the opacity of the bar or solid. This background feature is helpful when there is a need to make the type standout from the background or video that might be beneath it.
While the lines of type come up in the lower 3rd part of the screen the type and background can be moved to a new position in the Canvas window as a unit using 'image + wireframe'.
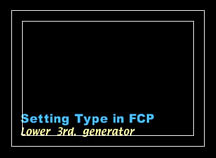
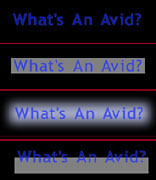
Default position of Lower 3rd. generator |
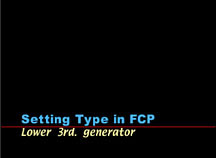
Shown with background set to Bar |
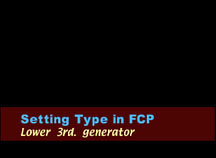
Shown with background set to Solid |
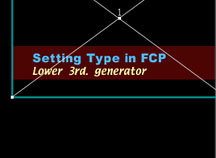
Type repositioned in Canvas window |
Typewriter Generator
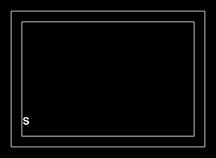
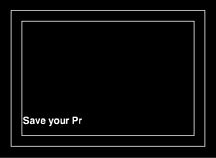
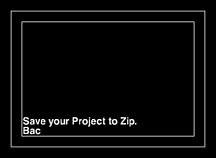
This generator does exactly what the name implies. As the clip is played the screen starts off blank. As the clip plays each letter is revealed one at a time, just like a typewriter. If you type a line into the text field and then hit return and type a second line the clip will play out in this manner. The first line will come in one letter at a time and then the second line will start appearing one letter at a time beneath the first line.
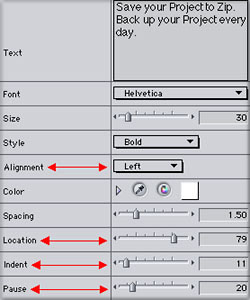
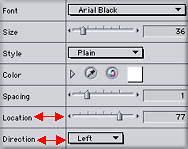
Alignment setting which defaults to Left as this is the natural way that a type writer works. There is also the option to have the type start out in the Center of the screen or from the Right hand side. When Center alignment is selected the type will start out in the center of the screen and as each new letter is added the line of type will grow out away from the center to both the left and the right.
Location setting defaults to 50 and positions the type vertically on the screen. The lower the number set for Location the higher on the screen the Type will appear.
Indent defaults to 10 this setting controls how far into the screen the first letter of type will be placed when it first appears. The higher the value the further in towards the center of the screen the first letter appears.
Pause has a default of 20, this setting controls the timing of the appearance of the letters as they come on screen.
|
|
|
|
Scrolling Text Generator aka Credit Roll
This is the standard Credit Roll that we see at the end of a movie and it's very easy to use. Drop the Scrolling Text generator on your TL, place your playhead near the beginning of the clip, load into the Viewer and open the Controls tab.
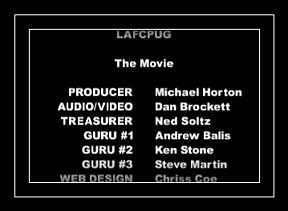
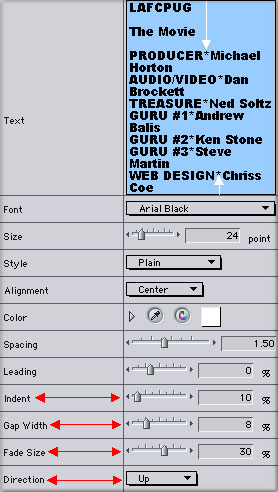 Text Field The Credit Roll, shown above, uses an undocumented feature. By setting our type in a certain way in the Text field we can create a gutter or gap between the two lists of names. We can also control the width of this gutter. The gutter will be centered on the screen. Look at the Text field to the right, in blue. You will notice that I have typed an asterisk (White arrows) between the words PRODUCER and Michael with no spaces. I have done this for each line. The trick is that when FCP sees an asterisk it knows to place a gutter or gap between the two words. The width of the gap is determined by the amount placed in the Gap Width field, show below.
Alignment offers Center. Right, or Left aligned text.
Spacing called Tracking in other FCP text generators allows you to add space between each letter of your type. For titles I like to start with a spacing of 1.5.
Leading adds space between each line of type.
Indent This control only works when Alignment is set to Right or Left and will move the entire column to the right or left.
Gap Width This setting controls the width of the gutter between the two columns of names.
Fade Size Now this is a nice little feature. What Fade Size does is enable us to fade the type in as it enters from the bottom of the screen and fade out the text as it exits the top of the screen. If you will look at my Credit Rolls you'll see that the word 'LAFCPUG' is starting to fade out just as it hits the title safe line at the top. At the bottom you'll see 'WEB DESIGN Chriss Coe" fading up just as it comes into view above the Title safe line. Changing the % value of this control will set the distance from both the top and bottom of the screen that the fade in/out occurs, I am set at 30%. Set to 0% if you do not want a fade in/out.
Direction Up/Down. Either Scroll up from the bottom or Scroll down from the top.
The speed that the type will scroll across the screen is determined by several things. The duration of the Text generator, number of lines of type, leading between each line and the size of the type. If the duration of the text generator is fixed then the more lines of type you have the faster it must scroll.
Crawl
This Text generator is much like the the Scrolling text generator except that it runs the type from side to side. The Direction menu offers Left or Right. The Location field will set the height placement of your text crawl on the screen. The higher the number you place in this field the lower on your screen the text will crawl.

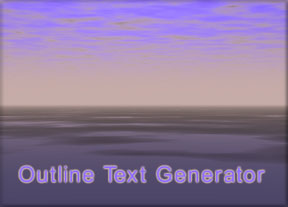
Outline Text.........Oh Yes
Now this generator adds a little excitement to setting type in FCP. It combines features of some the other text generators but with more control, it also has some new features. As this generator has so many controls we'll look at it by it's features. All of these controls are Keyframeable. It's called the Outline Text generator so we'll start with this feature.
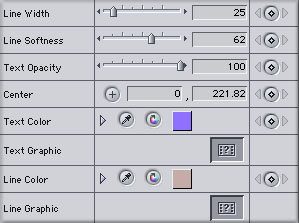 Line Width Sets the thickness of the Outline of the text.
Line Softness Acts like a 'feathering' tool. At low settings it smooths the outline but at higher settings it becomes a glow, as the value is increase the glow increases in size and spreads out away from the type.
Text Opacity A nice feature and it is Keyframeable to change the value over time.
Center Click on the cross hair button and then click in the Canvas window to position the type. Enter 0 into the first position field to make sure that the type is centered from left to right.
Text Color The eyedropper is great for sampling color from your video clip. I sampled the top part of the sky for a dark blue/purple. Using the Text Opacity control after sampling allows you to fine tune the color.
Text Graphic What I call an 'image well'. Really great, more below.
Line Color Sets the color of your Outline. I used the eyedropper to sample a color from the horizon of the video.
Line Graphic This feature works exacty the same as Text Graphic. The image that goes into the image well will be mapped to the Outline surrounding the text. Of course you will need a very thick Outline for the image to show.
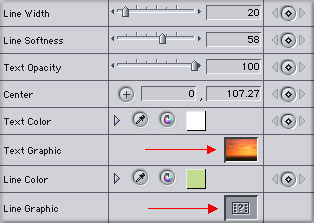
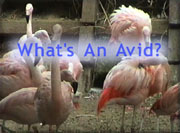
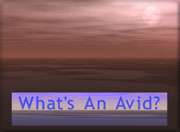
The 'image well' as I call it, Red arrows above, is a great feature. You can drag and drop any image or even video into the image well and the image will be mapped to either the body of the type or the Outline of the type. If you use a video clip in the image well you should know that the video clip won't play in the body of the Text, it will be more like a freeze frame. You also do not get a choice of which frame gets mapped to the type so it would be a good idea to make a freeze frame of the exact frame that you want to use and then drop that into the image well. When there is an image in the well then the Color Setting control becomes inoperative so it does not matter what color you have showing in the Color Setting box. To remove an image from the well control click on the well and select 'clear'.

|

|

|
The three images above have a sunset image in the Text Graphic image well. The first image has the Line Width set to 0, so no Outline. The second image I used the Line Color eyedropper to sample some light green foliage in the video, a Line Width of 8, very little Line Softness. The third image has more Line Softness producing a glow around the type rather than a line.
Backgrounds. The Outline Text generator has a fully functional and complete background section. There is a background function in the Lower 3rd Text generator however it is very limited, we can not control either the size of the background nor it's placement. With the Outline Text generator we have complete control, we also have a Back Graphic image well for use of a graphic image for our background instead of a solid block of color.
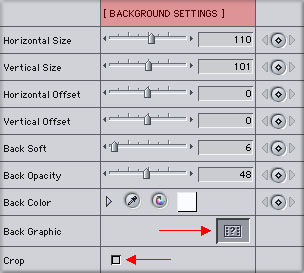 Horizontal Size and Vertical Size. These two settings are used to set the height and width of our background block. You will need to enter sizes into both of these fields before you will see the background on the screen.
Horizontal Offset and Vertical Offset These two controls allow the positioning of the background independent of the type. In the Canvas window, using 'image + wireframe' you can move both the type and the background together as one unit.
Back Soft This control can be used to soften the outer edges of the background and can range from a slight feather to a full blown glow.
Back Opacity. The background can be 100% opaque to 100% transparent. This can be very useful for seperating type from the background video that it is placed on.
Back Color For picking a color for the Background. There is an eyedropper with this control.
Back Graphic. This is an additional feature of the Background function. We can place an image into the 'image well' which will then be used in place of a solid Background color. All the controls are available to us when using Back Graphic except the Back Soft control. There is no way to soften the edges of an image used in the image well.
Crop. This control is used only when we have an image in the image well. Checking this option will cause FCP to crop, enlarge, the image that is in the image well. This gives us a second choice of what part of the image we want to work with.
If you have not figured it out by now I can tell you that I am impressed with the Outline Text generator. So much so that I now use it as my default Text generator. I simply set Line Width to 0 if I don't want the Outline. This Text generator offers a very large number of controls all of which are Keyframeable. There is a lot that you can do in the way of special effects using the Outline Text generator. The only feature that I wished worked with the Back Graphic, image well, is the Back Soft. It would be great to be able to feather the outer borders of the image that is used in the image well. One last tip. All of FCP controls that use sliders to set amounts have an under used feature. Look below, on either end of the slider are small triangles, Red arrows. Clicking on either of these triangles will increase or decrease the amount by one unit. Great way to tweak your settings.
Enjoy,
--ken
copyright © Ken Stone 2001