
The Basics - Travel Mattes July 20, 2001
Travel Mattes Alpha and Luma
and the Alpha Channel
The Basics - Travel Mattes July 20, 2001
Travel Mattes Alpha and Luma
and the Alpha Channel
We have worked with Mattes, Masks, and Color Keys (Mattes and Masks in FCP) to composite images. As you recall we placed a background image on V-1, a second image on V-2 and then placed the Matte or Mask of our choice (Mask Shape- Image Mask - Four-Point Garbage Matte, etc.) onto the clip on V-2, loaded the Matte in the Viewer and adjusted the parameters of the Matte to control which part of the image on V-2 became transparent and which remained non-transparent.
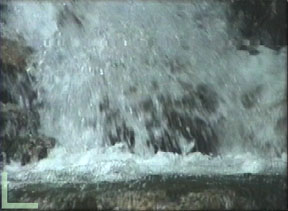
Let's use Travel Matte Alpha and later we'll look at how it works. First I place my background video of a waterfall on V-1.
While Travel Mattes Alpha and Luma also control which parts of an image become transparent, they are different and work differently from the other mattes that are available in FCP. Both of these travel mattes key from luminosity and work directly with the clip that is directly below on the TL. Those parts of the image that are bright, like white text, become the area of transparency, those parts that are dark will be non-transparent. Travel Mattes Alpha and Luma offer the unique ability to shape the image of one video track using a second video track as a stencil. The video which is shaped or framed by the stencil video will then float over a background video. The result will be moving video in the shape of text floating on a background of moving video. This being FCP the text is keyframable.
Travel Matte Alpha
In my example I will use the Text Generator which will create white text on a transparent background. The first thing I will do is place the Playhead on my background clip, V-1 and hit the 'Mark Clip' button at the bottom of the Canvas window. This will set 'in and out' points in the Timeline for my V-1 background clip. Now I target V-2 by turning on the Yellow film icon at the left of the Timeline to make V-2 my target track. I drag the Text generator from the Effects Browser to the Canvas window and drop on 'Overwrite'. Because I have set 'in and out' points on my V-1 clip the Text Generator will drop into V-2 and have same duration as V-1.
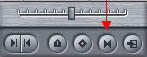
Mark Clip button - Canvas window |
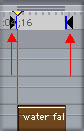
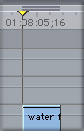
In and Out points set |

Target track indicator |
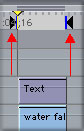
In and Out points set |
I double click on my Text Generator on V-2 to load it into the Viewer and select the Controls tab. We are going to use our text as a stencil so we want to have very thick massive type. The larger the type the more video will show through in the shape of the letters. Arial Black is about the thickest font that comes stock on the Mac. I set my font size to 220 and font color to white.
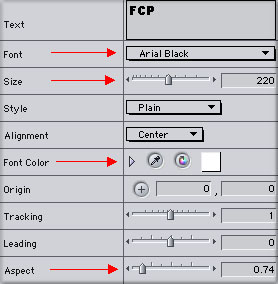
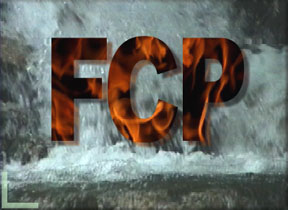
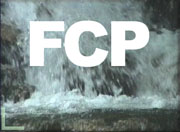
Looking at my Canvas window I see the letters "FCP" as white text on top of my background video. But it's too high in the frame. Setting my Canvas window to 'image + wire frame' I use the Move tool to pull my text down. I also want to have the text fill more of the screen so in the Text Control box I set 0.74 in the Aspect settings. This changes the shape of my text making it taller. I also want my text to have a drop shadow so I click on the Motions tab and check the Drop Shadow box.
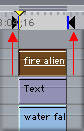
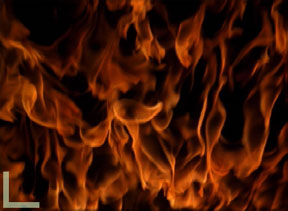
Now that I have my text enlarged and positioned I am ready to place my third element, fire, onto V-3. With my Playhead on the clips in the TL, I 'Mark Clip' from the Canvas window and target video track three. I drag my fire clip to the Canvas and do an 'Overwrite' which places the fire clip on V-3 with the same duration as the clips on V-1 and V-2.
Now we are ready to apply our Travel Matte Alpha. But don't go looking for it in your Effects Browser, it's not there. We are not applying a matte here. From the Menu > Modify> Composite Mode. You will see that the default Composite setting is 'Normal'. We have 12 different Composite Modes to choose from. Each Composite Mode works by using a different method of blending two clips. What is and what is not transparent is based on the luminosity and chroma of the clips. Unlike matte filters found in the Effects Browser, there are no controls in Composites Modes, no way to change their parameters, no keyboard shortcuts, and they can not be Keyframed either. Composites are like a 'one trick pony'.

Select the fire clip on V-3 in the Timeline and then from the menu select Composite Mode > Travel Matte Alpha. Remember, the clip that is selected for Composite Mode, fire on V-3, works with the clip that is directly below it on the Timeline, the text clip on V-2.
So How Does This Work
First we are going to have to take a look at how our video images get their color and luminosity and then we are going to have to look at the 'dreaded' Alpha Channel. Yikes!
Color Channels
The video clips that we work with in FCP are comprised of three channels, RGB; Red, Green and Blue, these are the Primary colors. These three channels carry all the visual information that make up the color values of the images that we see on the screen. Each channel carries information about it's own color and each color can range from 0 to 255. A value of 0 would be no color at all and a value of 255 would be the maximum density of that color, either Red, Green, or Blue. Each and every pixel has three channels of information and each channel's color value can range from 0 to 255. Every pixel has it's own color value and can be different from every other pixel. With all the possible different variations from 0 to 255 for each channel and the fact that the three channels combine to produce the final color means there are millions of different colors that can be achieved.
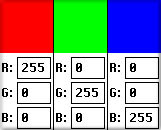
Each channel at 255 color value |
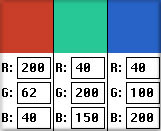
Each channel with different color values |
The Alpha Channel?
Video has three channels and these channels carry the color information. An Alpha channel is a fourth channel which is created by FCP and deals only with luma information and is comprised of 256 levels of gray. The Alpha channel carries information about which areas of the image (in the three color channels) will become transparent, which areas will remain non-transparent, and all the semi-transparent values in between. This fourth channel is not unlike the color channels. It too is comprised of pixels (it is a grayscale) and each pixel can have it's own value from 0 to 255. The values from 0 to 255 do not relate to color but rather to transparency. These Alpha pixels are not inherently transparent but rather they carry the information about how transparent or non transparent the color pixel that it represents will be. A pixel in an Alpha channel that has a value of 0 will be completely non transparent. A pixel that has a value of 255 will be completely transparent. Pixel values that fall between these two outer numbers will have varying degrees of transparency, a value of 127 would be 50% transparent. Again, we are talking about the Alpha channel containing 'information' regarding the amount of transparency on a pixel by pixel basis.
And where does the Alpha channel get this information regarding transparency? The Alpha channel gets the information from the brightness or luminosity of the color channels in the video. If an area of the video is white, then this is recorded in the Alpha channel as 100% transparent. If an area of the video is black, this would be 100% non-transparent. The brighter the image the more transparent the matte becomes, the darker the image the less transparent. Because the Alpha channel can carry values of brightness from 0 to 255, black through gray to white, we can have tonal range in our stencils. A drop shadow is a good example of why we need to have this tonal range. A drop shadow consists of pixels that range from dark, but not black, near the letters to light gray, but not white, further away from the letters. An Alpha channel can properly record such information and Travel Matte Alpha will use this information in it's stencil. Our stencils don't have to look like 'cookie cutters'.
A good example of an Alpha channel is found in the Text Generator. When we set type in FCP and have a transparent background surrounding the type, the information regarding transparency is carried in the Alpha channel that FCP created for our text.
Travel Mattes Alpha and Luma
Travel Mattes Alpha and Luma both work by looking for areas in the image that are bright (white), it is Luminosity that they key from. Bright text, (white text) will be regarded as that area of the stencil that is open and will allow an image to pass through. Any part of the image that is black (dark) will be non transparent and will not allow the image to pass through.
These two mattes work differently and are used in different situations. If we have an Alpha channel we will use Travel Matte Alpha. Travel Matte Alpha is designed to work with the Alpha channel and use the transparency information in the Alpha Channel to form the stencil. Because the Alpha channel contains luminosity values from 0 to 255 our stencil can have areas of complete transparency as well as areas of semi-transparency, and non-transparency.
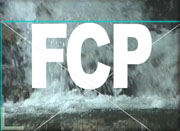
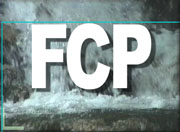
There will be situations that you will not have an Alpha channel to work with. In this case Travel Matte Alpha will not work properly. When there is no Alpha channel we use Travel Matte Luma. Travel Matte Luma can not use tonal values (can not work with an Alpha channel), but it will use the color white to create transparency. Any luminosity value less than pure white will be regarded as non-transparent. This will produce a 'cookie cutter' type stencil. In the two samples below; the sample on the left, Travel Matte Alpha, shows our white text with it's attending drop shadow. The sample on the right, Travel Matte Luma, can not use the information of the drop shadow so the drop shadow is lost. You will also notice that the edges of the text using Travel Matte Luma are a bit jagged.


Some last thoughts
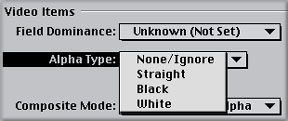
There is a bit more to Alpha channels then I describe above. For one thing there are actually two different types of Alpha channels. 'Straight' Alpha channels are separate channels, a fourth channel to the three color channels. FCP's Alpha channel is a 'Straight' type of channel. There are applications, like Photoshop, that do not use Straight Alpha channels, Photoshop's Alpha channels are actually embedded into the three color channels and are called 'Premultiplied' Alpha channels. These two different types of Alpha channels are not interchangeable. If you have a Premultiplied Alpha channel and are using it as a Straight Alpha channel you will have artifacting of white and colored pixels along the border where the transparent and non-transparent areas meet. If you are using a Straight Alpha channel but treating it like it was a Premultiplied Alpha channel you will have artifacted color pixels in the semi-transparent areas of your image. FCP can work with either type of Alpha channel. You can change the type of Alpha channel by control clicking on the clip and choosing 'item properties' then select the correct Alpha channel setting. Use Black or White for Premultiplied Alpha channels.
I mentioned that Composite Modes are not adjustable or keyframable which is correct. You can change the way that the Alpha channel interprets transparency by changing the Luminosity of the clip itself, and you can keyframe these changes in the clip as well. Changing the brightness level of the clip will change how the Travel matte will record transparency. This will give you the ability to modify which parts of the image are transparent, semi-transparent, or non-transparent over time.
In my example above I use the Text Generator to create my stencil video. You can use art from other applications like Photoshop. In my example I wanted my type to be taller, to fill more of the screen so I used the Aspect setting in the Text Controls box. This will enlarge the text and the text will stay sharp however you can only enlarge so much before you run into the Bounding box. Another way to enlarge the text is to open 'wire frame + image' in the Canvas window, click on the corner of the blue Bounding box and stretch up. While you're text will be bigger there will be some distortion, soft edges, as you enlarge. The best way to have really large text would be to set it the size you want in Photoshop first and then import into FCP.
A little more about Travel Matte Luma. I stated that Travel Matte Luma does not work with an Alpha channel, it works by looking at the luminosity level of the text. With my text example Luma would see white text and make the white text transparent, the open part of the stencil. If I were to change my white text to a 50% gray color then Travel Matte Luma would key at 50% gray. The open part of the stencil that Luma creates would be for the mid tones of the video clip having a value of 50% luminosity. The mid tones areas of the video clip would show through the stencil. So Travel Matte Luma can work with semi-transparent material and can do a drop shadow only the drop shadow with Luma will not have the smoothness of gradation that Travel Matte Alpha has. Travel Matte Luma will show banding and jagged edges in the drop shadow area. Always use Travel Matte Alpha when possible, much better results.
The ability to control the transparency of a video clip or parts of the video clip lie at the heart of all the compositing work we do in FCP.
Enjoy,
--ken
copyright © Ken Stone 2001