
How To: Boris Graffiti 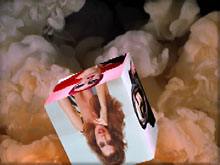
July 8, 2002
Graffiti 2 - Cube Spin
Mapping still images to a spinning Cube over moving VideoBy Ken Stone
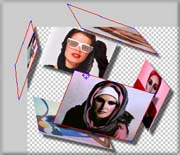
Last week I wrote a review of Graffiti 2 by Boris. In the review I showed a screen shot of a spinning, tumbling and rotating cube that had six different still images mapped to each face of the cube. The cube was superimposed over moving video as the cube moved across the screen. I have received a number of e mails asking: 'How is this done?' So, here's how.
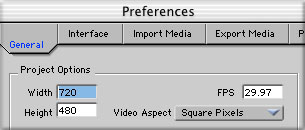
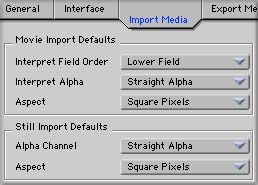
Launch Graffiti Keyframer, close the Text box and open Preferences. There are two settings we need to adjust for using stills and later importing into FCP. Under the General tab, set Width and Height (for NTSC) to 720 x 480. Frames per second to 29.97 and Video Aspect to 'Square Pixels'. This will insure that your 720 x 480 still images will fit properly. Then click on the Import tab, Alpha Channel to 'Straight' and Aspect to Square Pixels.
After we finish building our clip in Graffiti we will use the Graffiti plugin to bring our Keyframer file into FCP. It is FCP that sets the duration of the incoming Graffiti clip. This duration is set in Prefs > General tab > 'Still/Freeze Duration'. Once inside FCP you can change the duration of the Graffiti clip in the usual manner. If you do change the duration of the clip, the keyframes in Graffiti will automatically redistribute themselves. Nice feature.
First, in the Timeline, delete all existing tracks. You can have an empty TL each time you start Graffiti by going to Prefs > Interface tab and select 'Start with Empty Timeline'. Enter the time for this composite in the 'Duration' field, (Blue arrow below). Because FCP actually sets the duration of the Graffiti clip, we set the duration for the clip in Graffiti simply as a reference. Next select 'Add Movie Media' or 'Add Image Media', depending on your choice of moving video or a still image for your background, (Red arrows below). A dialog box will open, navigate to the file you want for your background and click 'Open'. This will load the video or still image into the Composite window. This is your Background. I like to click on the name of the first track and change it to read 'Background', (Green arrow). To the right of the arrow you can see your media type, a film strip.

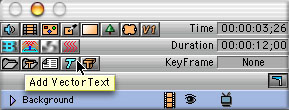
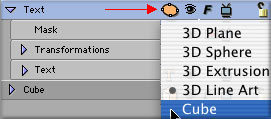
Now we want to set up our cube. Click on the 'Add Vector Text' button, (below left). This will place a Text track on the TL. Click on the 'track Shape type' icon, (Red arrow below right). This will produce a drop down menu, select Cube. The Cube shape will not yet show in the Composite window.
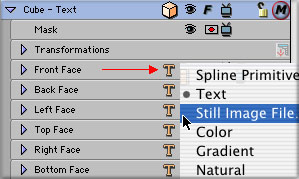
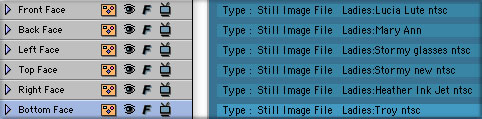
This will produce a new track, 'Cube - Text', on the TL, shown below. If you will look to the top right you will see the letter 'M' (in Red circle below). 'M' is for multiple faces, if you click on the 'M' it will turn into a 'S' which is for single. When in 'S' mode, one still image will be mapped to all six sides of the cube. Below, we are set to 'M' and you can see there is a separate Face track for each side of the cube. Clicking on the 'T', sets the Media type for that one track. Choose Still Image file from the drop down menu. This will open a dialog box where you can navigate to your still image, click Choose. You will now notice that the still image that you have set for your Front Face track fills the Composite window, blocking out the background track. Don't worry, we will resize later.
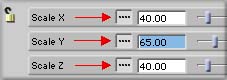
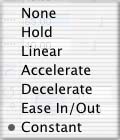
It is the aspect ratio of the Front Face image that sets the aspect ratio for the cube. Graffiti will interpolate the rest of the images if their aspect ratio is different. You can change the aspect of the cube by changing the scale of any of the sides of the cube. In the Controls window, Position tab, set the Interpolation for scale X, Y, Z, to Constant, (Red arrows below). Click on the padlock, it will open and you can change the scale for X, Y or Z, changing the shape of your cube. When you set the Interpolation of Scale to Constant you will not be able to keyframe (change) the size of the cube.
Go through all the remaining faces and map a still image to each face. When you are done your TL will look like the one below.
Now we will work with the cube. The first thing to do is resize the cube, which does not yet look like a cube. Make sure that your playhead is at the start of the TL. Click on the keyframe button under the playhead, it will turn red showing it's active. You can resize in the Composite window by dragging in on your image or in the Controls window. In Controls window, (shown below), clicking on the interpolation box will produce a drop down menu. I have chosen Ease In/Out as this will give me Bezier handles on my motion path. Just to the right is the size box. As the size for X,Y and Z are locked together you only need to enter a number in the Scale X box. I have used 40% for my size. Now move the playhead to the last keyframe, click on the keyframe to turn it red and enter the same scale information as set for the first key frame. This will keep the size of the cube constant. If you want your cube to change size as it moves, enter different numbers for scale.

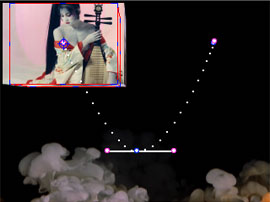
Return again to the first keyframe, activate it and move your cube to its starting position, I then then moved my play head to the middle of the TL and set a new keyframe for the cubes second position. Then to the last keyframe for the final position of the cube. Shown below with motion path and Bezier handles. Still does not look like much of a cube but it's there.
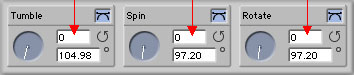
Moving from keyframe to keyframe set your Tumble, Spin and Rotate parameters. You can enter revolutions instead of using degrees for these attributes, (Red arrows below). You can also have each motion start or end at different points in time. One complete revolution for a 10 second clip will turn the cube at a speed that will allow you to see each face of the cube.
In the preceding, I set each set of the parameters one at a time. You can keyframe size, motion, Tumble, Spin and Rotate all in one shot.
Once you have added these movements you can scrub the TL, now you can see your six sided cube in all its glory.

Into FCP
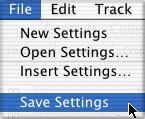
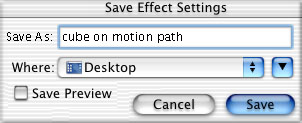
We have been working in Keyframer so we will need to save our Graffiti file. In the File menu select Save Settings and navigate to where you want to save your file. No rendering is done in Keyframer.
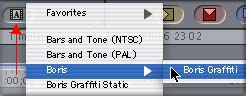
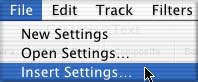
Launch FCP 3 and from the bottom of the Viewer window click on the 'A' drop down menu. Boris > Boris Graffiti. This will launch the Graffiti plugin. From the Graffiti File menu select 'Insert Settings' and navigate to your Graffiti Project. This will open the project in the Graffiti Composer window. Simply click on the 'Apply' button in the lower right of the TL and your project will be placed on the FCP Timeline waiting to be rendered.

If you want to tweak your composition when in FCP simply load the clip into the Viewer, click on the Controls tab then click on the Graffiti icon near the top of the controls window. This will open the Graffiti plugin with all the same controls that are found in Keyframer. A word of caution; if you have already rendered the Graffiti clip in FCP, launching the Graffiti plugin will cost you your renders even if you make no changes in Graffiti.
If you are using a moving video clip in Graffiti as your background, there really is no way to trim the video clip in Graffiti. I use my background video clip in Graffiti for positioning. Once back in FCP I open the Graffiti plugin, before rendering, and delete the Background track. This leaves me with just the cube spin on a transparent background. I move the Graffiti clip to V2 on the FCP Timeline and place the video background clip on V1. Now I can trim the video clip to suit my tastes without effecting the cube track. I can also move the video clip's position in relation to the cube clip. Having the background and cube clip as discrete clips allows flexibility.
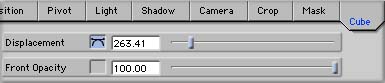
There are a number of additional effects that can be applied to the cube. Select the Cube track on the TL, in the Controls window click on the Cube tab. You can enter a value for Displacement, what I call disassemble. This effect is Keyframeable so you can 'disassemble' or 'reassemble' your cube over time. Click on the Shadow tab and you can set drop shadows for each of the dissembled faces of the cube.
You will find that as the cube tumbles forward the picture on the Back Face of the cube is upside down. You can change the orientation of this picture or any other. Select the 'Back Face' track, then in the Media Image tab > 'Flip Image'. Use the drop down menu to change orientation. Another little trick, if you have an image on a transparent background like a logo you can place this image on one of the faces of the cube. You will be able to see around the logo into the inside of the cube. If you turn off track visibility for the Front Face track before you render, there will be no front face, you will be able to look into the cube and see the photos on the walls of the inside of the cube. Very 3D.
I should point out the Graffiti is really a Vector Title Animation program not an FX program. It is really for creating animated Titles but because of it's power it can handle some graphics effects as well. Boris now has 'Boris FX' for OS X which is a 'Video' FX program that goes way beyond what Graffiti can do with 3D shapes and effects.
As I worked on this article I rendered my cube spins in FCP. I am on G4 dual 800 running OS X, my six second cube spin movie took about 2 1/2 minutes to render. The clarity and motion on NTSC is superb. Below, I have included a little six second, QT Cube Spin movie for you.
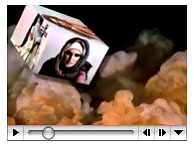
click on movie to download
203 k QT movie
Enjoy,--ken
copyright © Ken Stone 2002