May 26, 2008
By Andrew Balis
(This article is an excerpt of an article from the moviola.com Resource Center. The first part is printed here, and the second part is continued at Moviola's site, and includes goodies for you to download, namely some new Easy Setups to make your life a bit easier)
Since HDV became a native format to edit in Final Cut Pro, there has been constant debate as to how to work efficiently, maintain as high a quality as possible when applying effects, and other issues as well. The best news on this front came recently. Starting with Final Cut Pro version 6.0.2, there are additional settings we can use when capturing HDV via FireWire that will convert the source material into Apple's new ProRes or ProRes HQ formats. I'll outline how to use these new settings, as well as I've created several new Easy Setups for you to download to avoid having to create all these yourself.
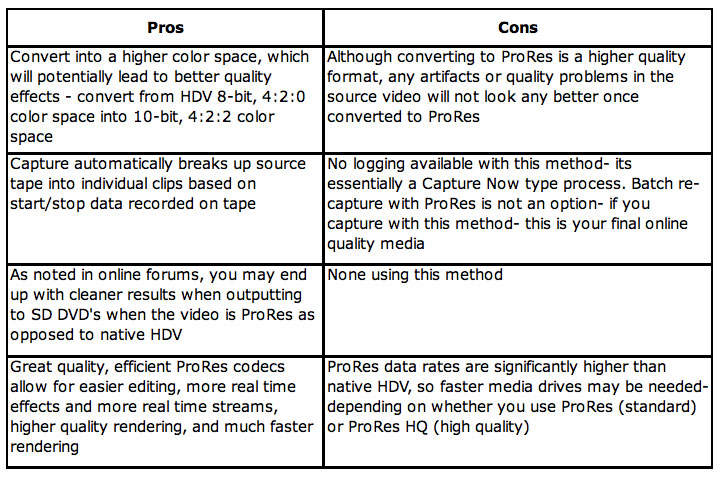
Let's start with a few pros and cons to these new options:
Requirements to Capture From HDV To ProRes:
- Final Cut Pro 6.0.2 or later
- Unlike standard practice with Final Cut Pro, we do not choose a capture preset with the same frame rate as our footage. This is handled automatically by FCP, whether the footage is 60i, 30p or 24p, it will all get captured in the correct frame rate.
- The settings are slightly different than other ProRes options when capturing through a capture card. The frame size for 1080 video will be 1440x1080, non-square pixels, the same frame size as native HDV. This will be properly recognized as 16x9 video during outputs.
To Access The New Settings Manually:
Although Final Cut Pro does not come with new Easy Setups for capturing into ProRes, there are two new Capture Presets buried in your Capture Presets. In the second part of the article, I've created new Easy Setups for you to download, so the next three steps aren't necessary if you use the Easy Setups.
1. Go to the Final Cut Pro menu > Audio/Video Settings.
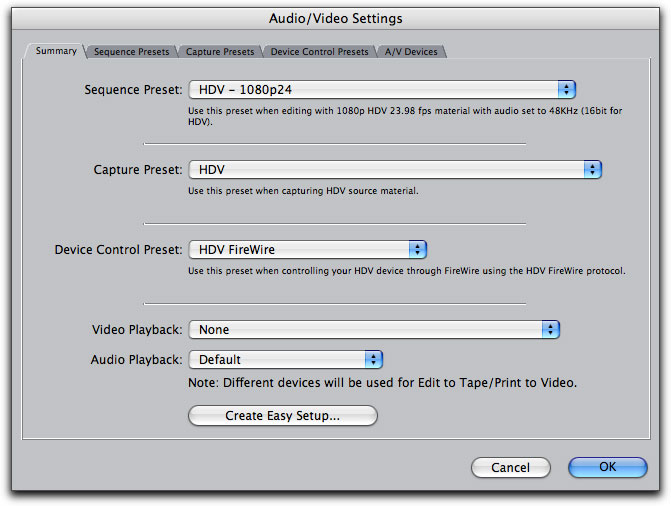
It doesn't matter what your current Easy Setup is as you'll be changing these settings manually.
2. Under Capture Presets, click into the menu and choose one of the new presets shown next. Again, don't worry about frame rate, as FCP will handle this automatically. You just need to choose between ProRes (standard quality) or ProRes HQ (high quality).

3. Also in the Audio/Video Settings, check the Device Control Preset matches the device you are using.
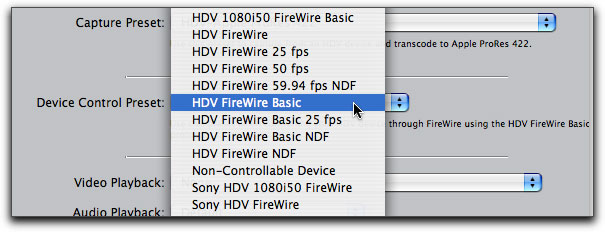
As a general rule of thumb, Canon cameras use the HDV FireWire Basic option, and Sony cameras use the Sony HDV FireWire option. This is not the whole story though. To find out what your camera or deck uses, go to this Apple page to find out the correct choice: Supported Devices for Apple Pro Applications.
Capturing From HDV Into ProRes Via Firewire
1. Insert a tape in your camera or deck and rewind or fast forward to the spot you want to start capturing from.
2. Go to File menu > Log and Capture. Instead of bringing up the standard Log and Capture window or the HDV Log and Capture window, a small window will pop up, prompting you to name the clip to be captured.
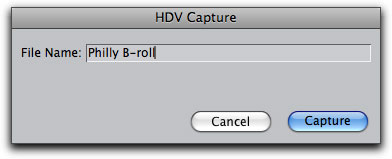
Once you click Capture it starts capturing, similar to a Capture Now.
3. To stop capture, press Escape. When deciding when to press Escape, look in the viewfinder or LCD screen of your HDV camera, as the capture window in FCP may be lagging behind the video. This can be seen by looking at the bottom right corner of the capture window.
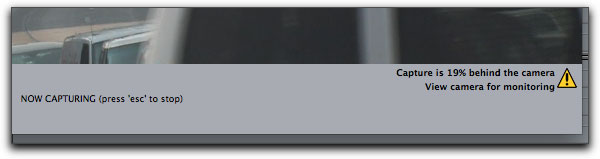
In fact, even after you press Escape, FCP may take a little time to finish processing the video, so don't be concerned if the capture window doesn't close immediately.
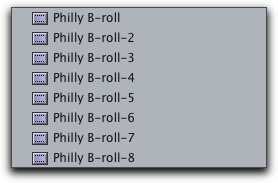
After capture is complete, the capture process automatically breaks up the source material into individual clips, as shown next, based on when the camera started and stopped during shooting.
4. To rename the clips in a way that will make you and media management "happy", rename the clips, then highlight them all, then right-click over one of the selected clips and choose Rename > File to Match Clip.
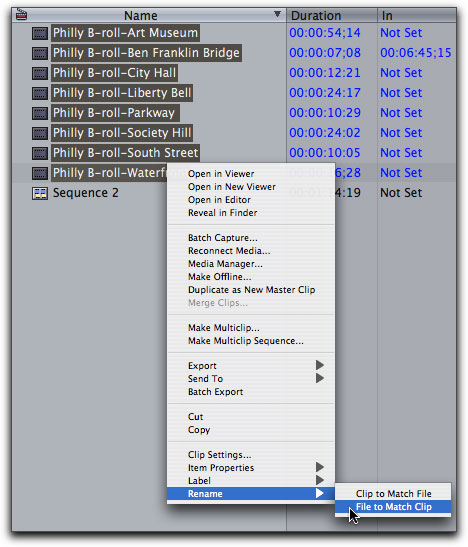
Now the clips and media files have the same names which is helpful in case you ever need to Reconnect Media.
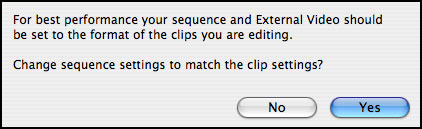
5. If you are not using one of the new Easy Setups I've created, you'll need to create a sequence that matches these captures. The easiest way in Final Cut Pro 6 is to create any new sequence, edit a first clip into it, and when you're prompted by the following dialog box, choose Yes and the sequence will be converted to match your clips.
Part 2 - Continued At Moviola's Website In The Resource Center.
In the second part:
- Download new Easy Setups for Sony and Canon devices, for all frame rates- 24p, 30p, 60i, for ProRes and ProRes HQ - a total of 12 new presets.
- Instructions for installing and using the new Easy Setups.
- How to output back to HDV tape if necessary.
- Data rates for all these new options- for all frame rates, for ProRes and ProRes HQ so you know whether or not your hard drives can handle a specific format.
1. Moviola's Resource Center- main page has links to 3 different sections:
- Final Cut Studio- tips, tricks, troubleshooting solutions, media storage tables and information on media storage, links to various downloads, web links for various resources like Apple support articles, new articles around the web, configurations for various versions of FCP, plugins available for Final Cut Studio and much more.
- Avid- tip, tricks, resources around the web, available plugins and links, media storage tables and more.
- The Knowledge Zone- Several sections devoted to gain more insight into anything and everything related to SD and HD, differences between various formats, insight into many misleading topics including what frame rates to shoot for compatibility with SD and HD broadcast and distribution, the different aspect ratios used with various formats, info on color spaces, bit depth and why it matters, types of compression, a glossary of terms and more.
Andrew Balis is a cinematographer, editor, post production consultant and Apple certified instructor. Andrew is currently working for Moviola Education in Hollywood- as lead Final Cut instructor and in-house workflow specialist. Andrew has authored and co-authored books, DVDs and other writings on Final Cut including the best-selling DVD Tutorial, 'Color Grading in Color' and 'Color Correction in Final Cut Pro' from Ripple Training. He also co-authored the Apple Pro Series book Advanced Editing Techniques in Final Cut Pro 4, authored and co-authored the original Apple certified curriculum for beginner, advanced, and effects classes developed at Moviola Education, and wrote the Final Cut Pro curriculum for the Apple Education/CNN Video Journalism classes offered in the K-12 market.
copyright © Andrew Balis 2008
are either registered trademarks or trademarks of Apple. Other company and product names may be trademarks of their respective owners.
All screen captures, images, and textual references are the property and trademark of their creators/owners/publishers.