

FCP 2 Book Excerpt October 29, 2001
Final Cut Pro 2 - for FireWire DV Editing
Focal Press
Excerpt from Chapter 6 'Compositing and Special Effects'
FCP 2 Book Excerpt October 29, 2001
Final Cut Pro 2 - for FireWire DV Editing
Focal Press
Excerpt from Chapter 6 'Compositing and Special Effects'
Pub date: December 8, 2001
FCP 3 Addendum update to this Excerpt Article.
Pages: 624
ISBN: 0240804996
Price: 49.99
Illustrations: 500 screen shots
1. What exactly is Compositing?
Periodically, we have mentioned the word Compositing in the course of this
book. What does this term mean? Compositing, in its most literal sense,
means to take a stack of items and making them into one item. When we
discussed analog video standards, we referred to one such standard as
Composite. Composite video, if you will remember, is a video signal where
all the different luma and chroma electrical signals are integrated into one
electrical waveform. They become one composite signal.
Compositing in Final Cut Pro and other applications involves the process of
taking more than one image and integrating the various images into one
image. As one Final Cut Pro editor puts it, "Compositing is everything above
Video Layer 1." As we discovered when we worked with the sequence Timeline,
Final Cut Pro allows up to 99 separate video tracks. The good news is that
in this manner Final Cut Pro gives you fantastic flexibility in customizing
the way those separate layers work together when they are composited into
the flat image you see on the video screen.
To be successful at Compositing, you really have to rework the way you think
about making a visual image. Compositing is the foremost of the tasks in
which there is never any one right way to accomplish a goal. Part of that
lies in the fact that compositing, more than any other element, requires a
mental vision of the results. Your uniqueness as a human and an artist
cannot help but shine through.
No two compositors generate the same results, just as no two painters use
the same brushstroke. Why must you undo your prior knowledge of image
making? Because sometimes, adding red to an image is more about taking away
green than it is about painting with red. Final Cut Pro gives you the
ability to obscure or reveal imagery using not only the various features of
light, such as opacity (visible to invisible), hue (the shade of the color)
and saturation (density of the color), but also the way that obscuration or
revelation occurs over time, also known as keyframing.
We'll start with an exploration of Layering, Track Opacity and the Composite
Modes. In the course of setting up and using these effects tools, we will
also learn to use Wireframe, Keyframe Interpolation, the Text Generator,
Matte and Masking tools, and the Alpha Channel.
From our definition of Compositing, we already know that we need more than
one layer in a sequence in order to create a composite. Layers in a sequence
are stacked, one on top of the other. What you see in the Canvas window is
actually what lies in the sequence as seen from the top layer down. Imagine
that your sequence of video layers is a messy stack of different types of
paper. Some sheets cover others; some are more transparent than others,
allowing you to see through them to the next layer underneath. When you edit
video clips into a layer on the sequence, you are inserting a new sheet into
the stack.
2A. Setting up a sequence for compositing layers
Step 1. Create a new sequence in your project. Edit an initial video clip
into the sequence in the Video 1 track.
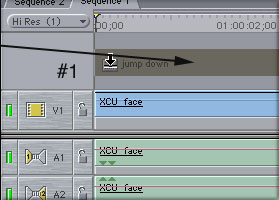
Step 2. Choose another video clip, drag it to the sequence, position it in
the Video 2 track and drop it (figure 6-1). If no Video 2 track yet exists,
simply place it where the track should be, and Final Cut Pro will
automatically create one.
Chapter 6: Compositing and Special Effects
2. Compositing Layers
A glance at the Canvas window will reveal that the video clip in the Video 2 layer is covering the clip in the Video 1 layer. This is because, by default, all video clips are at 100% opacity. We have already explored this opacity feature in our discussion of the Clip Overlay button. When we adjusted the opacity in that chapter, there were no other video layers involved. Since the default background color for a Final Cut Pro sequence is black, changing the opacity of the clip simply resulted in a fade to black. But now that we have more than one video layer, changing the opacity of the layer on top will reveal the layer below.
Step 4. First, make sure that the Clip Overlay button is enabled in the Timeline window. Remember that the Clip Overlay button, though a part of the Timeline window, is actually a function of sequences within the Timeline window. Just because it is enabled within one sequence does not mean that it is enabled in others. If you do not see the rubberband line going through the clips in a sequence, rubberbanding is not enabled.
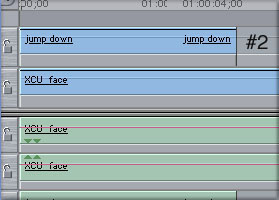
Step 5. Choose the General Selection tool at the Toolbar (shortcut-the A key) and adjust the rubberband line of the clip in Video 2 layer (figure 6-2). As you pull the line down, the red render bar will appear as expected, but looking at the Canvas window will reveal that the clip in Video 1 layer is beginning to appear through Video 2 layer. If you drag the line all the way down to zero, layer 2 will be transparent, totally revealing the clip beneath it.
If we render the clip, playing back will reveal that the entire clip carries the opacity level we set the rubberband line at. But how useful could this be in everyday life? Setting a static, unchanging opacity level in a clip might be useful in some situations, but in most, we need to be able to control the level of opacity over time within the clip. To do so, we need to introduce the concept of keyframing.
2B. Keyframing in the Sequence Timeline
Keyframes come into use with almost all visual effects in Final Cut Pro, as well as other popular editing and compositing applications. Keyframing means that for a certain feature in a clip, such as opacity, a certain value exists at a certain time. For instance we could set a keyframe at the tenth frame of the clip for an opacity value of 25%. Any other frame of the same clip could have the same or a different percentage value of opacity. On any frame where we establish a specific, definite value, we create a keyframe.
In the digital universe, everything has a value. The example we are working with, opacity, has a value at any given time of between 0 to 100 percent. At 0%, the clip is transparent; at 50% it is half-transparent; and at 100%, the clip is opaque. No keyframes are necessary for a clip to have an initial value; all clips do. But establishing a keyframe and giving a specific frame a value give us the ability to change a value in a single clip over time.
If we assign the first keyframe for a feature in a clip, the value for the feature for the duration of the clip still does not change. Even though we have a keyframe, the value of this initial keyframe doesn't change to a new value. The lesson is that one keyframe in a clip expresses only one value. To express a change in values in a clip, you must have two or more keyframes, each of which has a different value. We set a keyframe for the value we want the feature to have initially, say 100% opacity, then we set additional keyframes for the change in values we wish to see over the duration of the clip, say 50%, then 25% and then 0%. If we do not want a value to change over time, there is no reason to insert a keyframe at all.
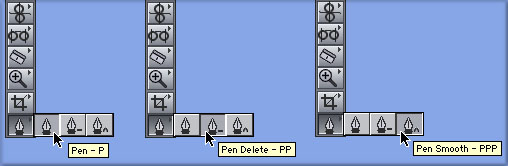
To insert keyframes into a clip's opacity in a sequence, we need to have two features enabled. Firstly, we need Clip Overlay to be enabled, since this is where our sequence keyframes will be inserted. Next, we need to go to the Toolbar and enable one of the last two toolsets, the Pen tool. If you click on the Pen tool and hold the mouse button briefly, you will see three options: the Pen tool, the Pen Delete tool and the Smooth Pen tool (figure 6-3). We will discuss the Smooth Pen tool subsequently, but for now we are concerned with the Pen and Pen Delete tools.
Step 6. Select the Pen tool and return to the sequence. Look to the clip in the Video 2 track that you adjusted the opacity of previously. Move the mouse pointer to the beginning of the clip and place it near the rubberband line (figure 6-4).
You may want to go into your Preferences and change Thumbnail Display from Name plus Thumbnail to Name. This will remove the thumbnail from the clip in the sequence, making it easier for you to work with the rubberband line at the beginning of a clip.
When you move to the beginning of the clip, the mouse pointer will change from the familiar arrow into the shape of the Pen tool. This indicates that the Pen tool is able to assign a keyframe for the frame you are presently hovering over.
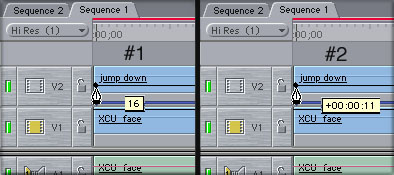
Step 7. Click on that rubberband line, hold the mouse button down and drag the keyframe up and down. As you do, the value box appears next to the mouse pointer informing you of the current value of the keyframe you have just created by clicking on the rubberband line.
Step 8. Now, without releasing the keyframe, drag it from left to right and back. A Timecode value box appears instead, informing you how far you have moved the keyframe from its original clicked position.
As long as you have the keyframe under your thumb of your mouse button, you have total control of the value it represents, the time it occurs within the clip, and the sequence the clip is included in. If you let go of the mouse pointer, but you want to change the keyframe's value or position, simply grab it and drag again. After you have established a keyframe, the Pen tool displays as a crosshair when suspended over it.
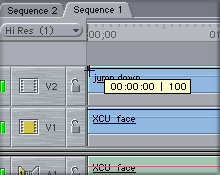
Step 9. Drag the keyframe all the way to the left, so that it occurs on the first frame of the clip. Then before releasing it, drag it all the way up to the top of the clip, so that its value is 100% (figure 6-5).
Now we have one keyframe. But as we mentioned earlier, one keyframe is really no different from having none. To establish a change in value, we need to add a second keyframe that occurs either before or after the initial keyframe. Since our first keyframe is at the beginning of the clip, we will move up several seconds to add the second one.
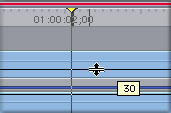
Step 10. Send the sequence playhead back to the first frame by hitting the Home key on your keyboard. With the Timeline window active, type in "+300" which will move the playhead up 3 seconds from its present position (figure 6-6). Move the Pen tool up to the sequence playhead and watch for the Pen tool to bulls-eye the yellow triangle above the playhead indicator. When it does, click and drag the newly created keyframe down until it hits O% (figure 6-7).
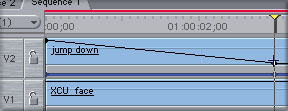
Now you will have two keyframes, each of which contains a different value. The first keyframe is at the beginning of the clip at 100% and the second is three seconds later at 0%. More interesting than this is the fact that between the two keyframes is a long slanting line denoting the change in value of opacity for all the frames in between the two keyframes. This is referred to as interpolation.
2C. Keyframe Interpolation
Interpolation is a process by which the computer comes up with all the values between two known values, saving you a lot of calculation. If you know that the opacity value for the clip at the first frame was 100% and at the end of three seconds it was zero, you'd have to do some quick math to figure what percentage of change occurred during each frame of video in between the first and the last. You could do it, but like most people, you probably hate long division and fractions and, frankly, setting all those intermediary frames wouldn't be worth it (except for rotoscoping animation artists!).
Luckily, we are dealing with a computer here, a machine designed to crunch numbers. We give Final Cut Pro the values we want the clip to have at the beginning and end keyframes in the clip, and it figures out the values for each frame in between in less time than it would take you to remember where you left your calculator. If you move the playhead back through the area of the clip that is between the two keyframes, you will see that the Video 2 layer clip slowly and evenly goes transparent as the opacity keyframe values go from 100% to 0% over 3 seconds. Each frame between the two keyframes is displayed with a progressively smaller percentage of opacity. And all you need to have for this is the two opacity keyframes that change.
Charles Roberts is Assistant Professor of
Video and Digital Media at Fitchburg State College, and a regular
contributor to 2-Pop (Creative Planet's Digital Filmmaker's Resource Site)
To Purchase this book
copyright © Butterworth-Heinemann 2001
NOTE: lafcpug gets a small percentage of sale if you purchase through this link.