June 2, 2008
By Seth Kenlon
Depending on how you look at it, Final Cut Express is either Apple's gift to the poor independent filmmaker or it's a just-enough editor crippled in just the right places to make it unfeasible for any kind of real project. Either way, it's fun to cheat a little and take an editing program that cost you $200 and make it act more like its $1200 equivalent. Here's how to get the most out of your Final Cut Express when you're color correcting.
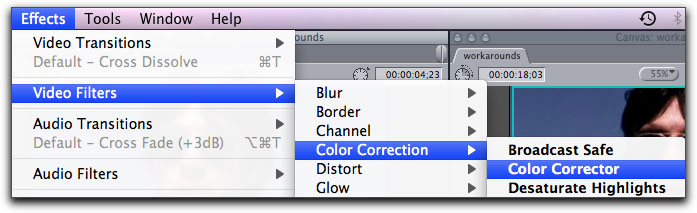
There is no Three Way Color Corrector in Final Cut Express as there is in Final Cut Pro, but all of the components are there. The first video filter to apply to a clip you wish to color correct is the Color Corrector filter. As always, make sure the clip you want to work on is selected in your sequence.
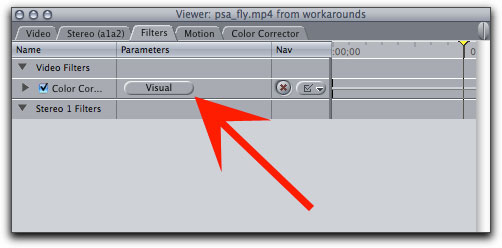
Now move over the Motion tab in your viewer, and click the Visual button next to the Color Corrector filter.
This is the same interface for the same tool in Final Cut Pro, but primarily what we will be using here are the luma sliders at the bottom of the window. These sliders allow you to crush black tones, increase highlights, and modify mids. You can also adjust color saturation here.
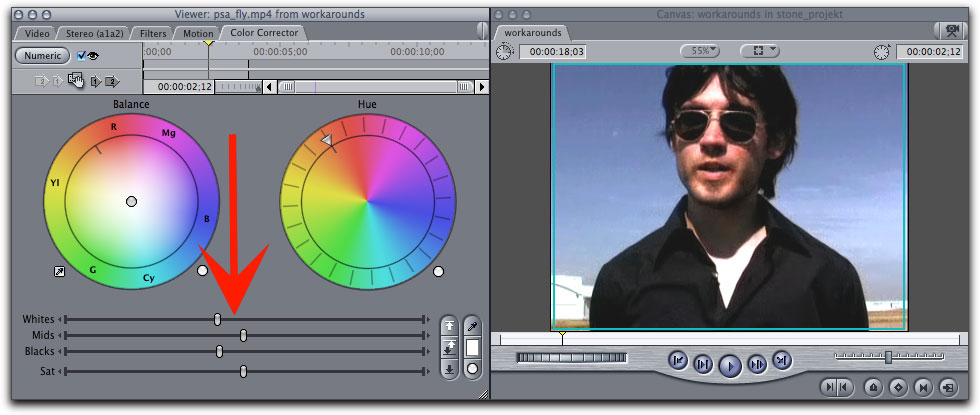
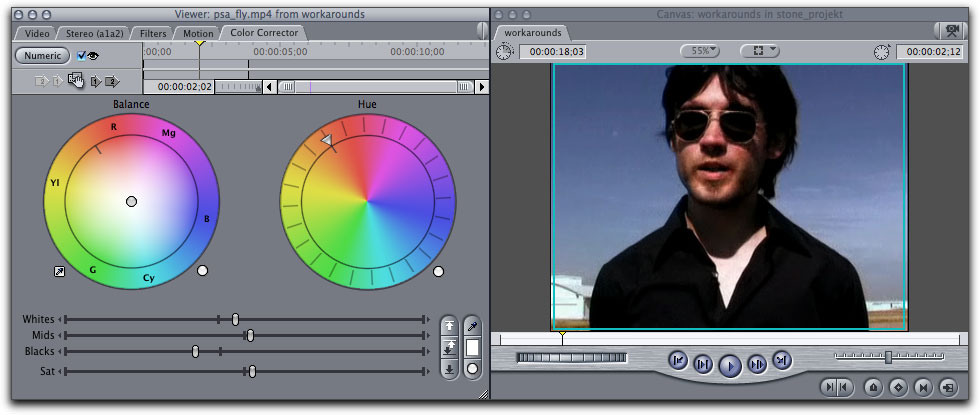
Understand that these sliders are effecting the luma levels of the entire frame; you are not effecting the luma of a specific color channel. This is the very reason the color wheels here are not the way we will do color correction; we want more control over specific areas of the picture.
To achieve more detailed control over color, we'll need to resort to the RGB Balance filter.
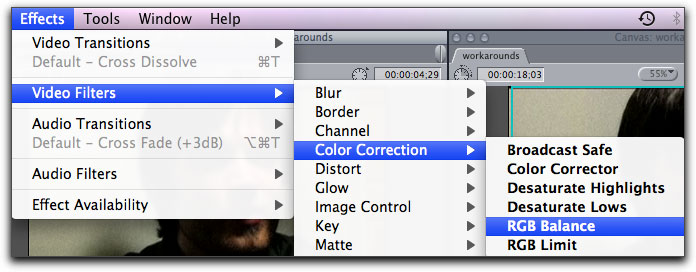
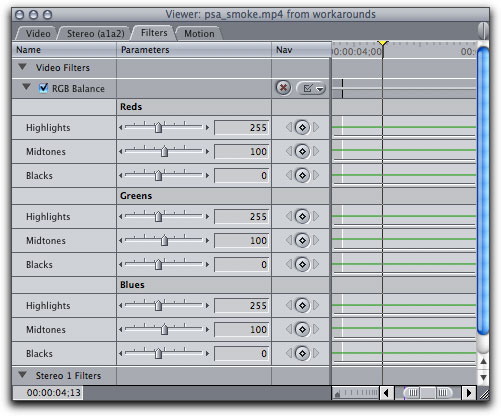
The RGB balance filter lacks the pretty interface of Color Corrector or the Three Way Color Corrector tool of Final Cut Pro, but basically does the same thing: it allows you to limit your color adjustment to either the brighter regions, the darker regions, or the mid-range regions of your picture.
Now you can begin tweaking your image with basically the same control that you have in Final Cut Pro. The concept is the same as the color wheel; the colors are complimentary and by adding one hue you will be subtracting another. The color of the frame is separated into three channels, and each channel is separated into highs, mids, and blacks.
Due to the lack of proper color wheels, achieving typical hues within a channel is a bit more tricky than in Final Cut Pro. There is, for instance, no easily pinpointed amber hue, a typical shade to add to those warm beauty shots. Instead, you'll have to add red to the midtones and subtract blue, because it is the combination of red and yellow that creates amber, and it is by subtracting blue from a channel that we achieve yellow.
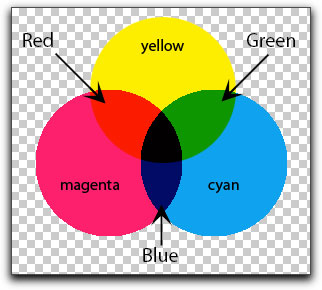
The easiest way to remember this is the way Bill Hornsby, my college DP professor, taught me: the relationship between colors can be expressed in this bit of stock market advice:
- BuY
- RC cola
- and General Motors
...which means that Blue is opposite of Yellow, so subtracting blue will yield yellow (while, obviously, adding blue will make a picture more blue. Red is opposite Cyan, so subtracting red will yield more Cyan, and finally Green is opposite Magenta and so to subtract green will make your picture more magenta.
With this knowledge, tweaking the RGB sliders in the RGB Balance filter will be easy and powerful.
Secondary Color Correction
What makes the Final Cut Pro 3-way Color Correction filter so powerful is its ability to limit a selection to a certain color or color range, and apply color correction to only that selection. With this, you are able to make the reds redder or the blues bluer, and so on. It is known as secondary color correction.
In reality, the function of this limited selection filter is the same as a color key. You key out the color you want to effect, inverse the key so that everything around that color disappears, and then apply color correction to the color that remains. The Final Cut Express version of this, then, would be the combination of the Chroma Key filter and the RGB balance filter, with the added option of using the Color Corrector filter for adjustment of luma values.
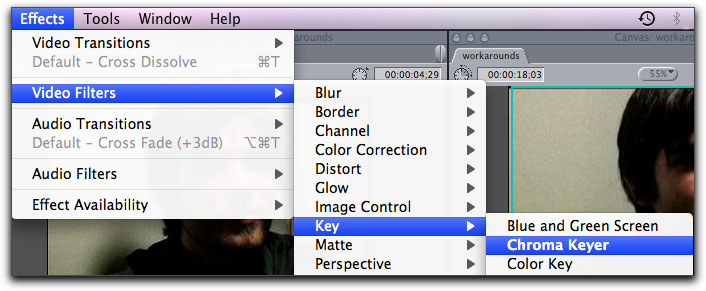
Let's start with the Chroma Key filter. Select a clip on your timeline, and duplicate it on top of itself. To do that, you'll want to option-click on the clip, shift-drag it straight up, and then release the option key, and finally release the mouse button (and yes, it must all be done in that exact order!)

Now select the top clip and go to Effects > Video Filters > Key > Chroma Keyer.
Now double click on the clip to bring it into your viewer and click on the Visual button to be taken to the keyer's controls. So that you will be able to see what is being keyed in the next few steps, you'll want to select the bottom clip and press control-B. This temporarily makes the clip invisible, although you won't notice until you start keying.
Selecting the color you wish to effect is as simple as clicking on the eye dropper icon and then selecting the shade you want to correct in the canvas. This brings the hue slider to a fairly exact match of what you clicked on. Often it will be necessary to spread the hue selection to better capture all the shades of the color you are trying to capture. Using the Saturation and Luma sliders will also help define the shade you want to effect. Keep in mind that the angle of the selection also defines how "deep" your selection goes into the hues you are looking for. The more obtuse the angle, the more liberal the selection will be when determining what falls into your selection while a more acute angle will be more strict.
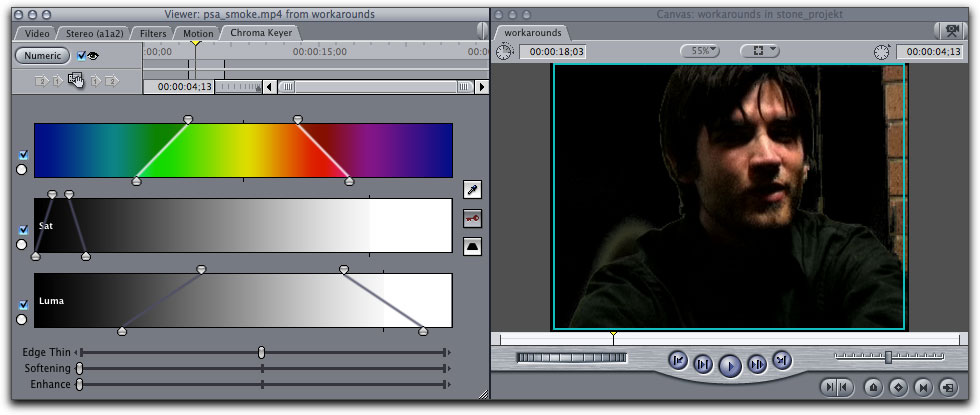
Keep in mind that during this stage, you are looking to key out the instances of the color that you are going to effect.
Once you've selected the color range you wish to effect, you'll want to click the invert button
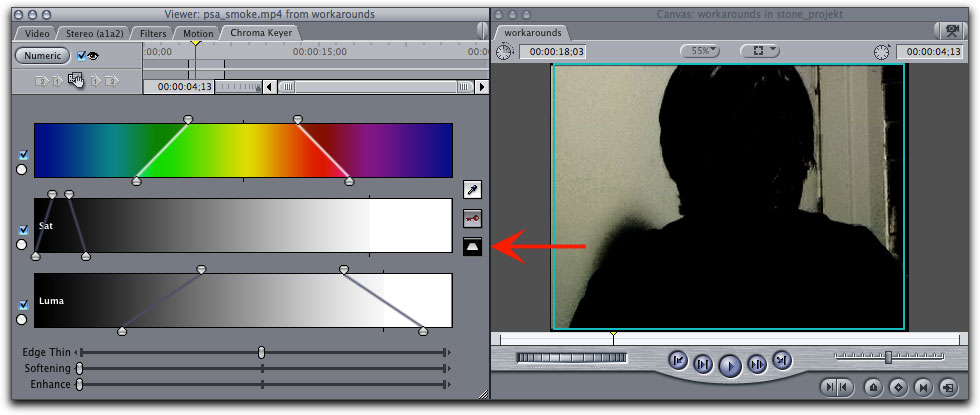
which will cause everything but your desired color to be keyed out. Now we're ready to color correct. You may wish to reactivate the bottom clip at this point by hitting control-B on your keyboard.
Add to the clip the RGB Balance filter, again in the Effects > Video Filters > Color Correction menu. Possibly you'll also want to add a Color Correction filter for luma adjustment. Since the shade of the color being effected is on the upper layer, the adjustments will show up only in the color not keyed, and the bottom video layer shows through everything being keyed out. Together, they equal a clip that has had primary and secondary color correction applied.

The disadvantage to this method is that there is technically no Primary Out opportunity, but if it is necessary then you could nest these two clips and apply yet a third RGB Balance and Color Correction filter set to the nest. Of course, in Final Cut Express there is no proper method of nesting sequences, so you'll need to use yet another workaround.
Create a new sequence from File > New > New Sequence. Call the sequence NEST or something that makes logical sense. Double click on it to open it. Cut and Paste the two clips that you've color corrected into the new sequence. Now take the new sequence from the browser and drag it into your original sequence. The region that appears in the timeline is a nest containing the two color corrected clips, and you can now select it and apply an RGB Balance filter to it that will affect both clips.

Timecode
Another thing that Final Cut Express traditionally lacks is a tool that should be used even farther along in the post production process. When sending out video to your sound person, or even to yourself for sound work in an external program like Logic or Pro Tools, it is common to include a timecode "burn-in". To do this in Final Cut Pro you would nest your finished movie sequence and place a Timecode Generator filter on the nest. However, in Final Cut Express there is no Timecode Generator.
Luckily, a third party vendor, 1z1 Screenworks, has designed a Timecode Generator that will work in Final Cut Express. The filter, DisplaySourceTC, can be found at http://www.1z1.at/plugins/#displaysourcetc
The link to download the entire 1z1 plugin pack is at the bottom of the web page. To install the free timecode plugin, simply drag it into your /Library > Application Support > Final Cut Express Support > Plugins. Restart Final Cut Express and it should appear in your effects menu.

To apply the filter, the sequence must be nested; otherwise the filter will display the source time code of each clip instead of the entire movie itself. The advantage of embedding or "burning in" the timecode of the movie for the sound mix is essentially quick reference. It is much easier to tell that one's sound mixing program is not set to the proper timecode if there is a big black box containing the true timecode of the picture. Otherwise, the sound engineer may mix at the wrong framerate without realizing it. This is a handy filter and necessity for professional production.
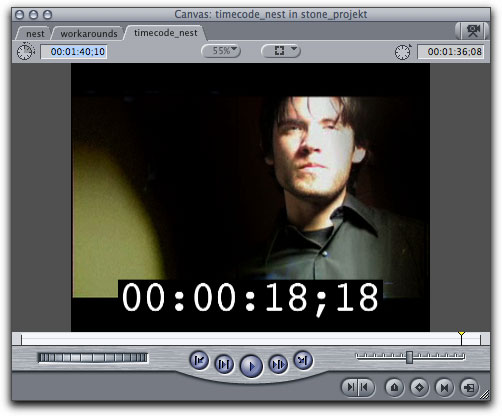
To make adjustments to this filter, such as making the timecode larger in the frame or giving it the traditional black box behind it, control-click on the nest region and select "Open in Viewer". You'll find all the filter parameters in the Filters tab of the Viewer window.
All in all, there are a number of powerful features and tools in Final Cut Express. Some have been removed from the easily accessible right-click contextual menus and hidden away in the menu bar. Some require work-arounds. And of course some are indeed missing altogether. Hopefully with these tips, you will be able to circumvent its limitations and use the program to its fullest potential.
Seth Kenlon is a *nix geek and video artist. His
articles on video codecs have appeared in Linux
Journal and he has spoken at the Southern California
Linux Expo. Currently, he lives in San Francisco
working in the tech industry and doing
pre-pre-production for a feature film.
[Top]
copyright © Seth Kenion 2008
are either registered trademarks or trademarks of Apple. Other company and product names may be trademarks of their respective owners.
All screen captures, images, and textual references are the property and trademark of their creators/owners/publishers.