
October 11, 2010
By Andrew Balis
So you've mastered working with Final Cut Pro's 3-Way Color Corrector filter but you've taken the color correction toolset as far as you can within Final Cut. Now you'd like to take advantage of Color- this great, powerful application that ships with Final Cut Studio. The only problem- the workflow seems off-putting. You're not sure of a good set of steps for prepping your project and getting it into Color. And it seems equally confusing what you need to do to render properly and get your project back out of Color.
We'll explore details for all the following steps except for the actual grading/color correction- whether you're prepping for a Color finish for yourself or prepping a project for another colorist.
1. Prep the Final Cut Pro Timeline
2. Send the sequence to Color for testing for problems and roundtrip this project back to Final Cut Pro
3. Send the sequence back to Color for final grading
4. Grade in Color
5. Render (creates new, final media)
6. Output back to Final Cut Pro- final output from Color is sent back to Final Cut as a new sequence
7. Optionally, go back to Color if needed to change looks on some shots, re-render, and have those looks update properly in Final Cut Pro
Sounds somewhat straightforward, but there are steps for prepping the sequence before it is sent to Color, and there is a checklist of items to consider before rendering out of Color. And, as I'll mention again later, not all these steps are needed when prepping a project for Color. The process may be very quick and only take very few steps, or in some cases, it can be more involved. But this article can walk you through those different processes. Once you've done it once, it won't seem so intimidating. Let's take a look.
There are certain differences between Color and Final Cut (well, that you could have probably guessed) that we need to account for. Not everything translates well from Final Cut to Color. Here's the highlights:
- Color doesn't like long sequences.
- It is an easier workflow with fewer Timeline tracks in Color.
- Most effects applied in Final Cut Pro do not "appear" in Color but will show up back in Final Cut Pro when the final project is rendered out of Color. We may instead prefer to color correct with the effects applied while working on the image in Color.
- Different problems can creep in when working with mixed media in Color- mixed resolutions, frames rates and aspect ratios
We could do a few things to make Color happy or simply just make the workflow easier on ourselves. We'll follow some steps steps for eliminating those things from our Final Cut timeline that could cause problems for Color, "baking-in" certain effects and media types and look at how certain items need to be handled.
The good news- not every project has as many elements that need special attention. So although we'll cover it all- chances are, you're mileage will vary and every project won't need as much prep.
I'll assume the edit is complete, and if necessary, media is re-imported or re-captured at the final high resolution you want to master and color correct with.
The original project that was edited, or project that was delivered to you, we would want to avoid messing up as we prepare it for Color. It is an original, conformed, final version- it would be helpful to have it intact to be able to refer back to at any later stage, either to confirm that everything in the final color corrected version matches the edit of the original or to troubleshoot other problems down the road.
So, duplicate the original project (either at the Finder level or doing a "Save Project As" in Final Cut).
Let's take a moment to talk about naming conventions for projects and sequences. Throughout the article we'll be looking at duplicating projects and sequences, and only making changes to the duplicated projects/sequences. This helps as a way of keeping track of the original edit, and how we're progressing as we prep for Color. This also gives us an opportunity to backtrack if a problem arises since we'll have duplicates of our projects and sequences.
So you'll want to find a way of naming these different versions of your FCP projects and your sequences as you go along. Pick your own naming conventions and stick with them for consistency. I'll give you some examples of this as we go along, but remember I'm only giving you one possible set of naming conventions. Use something that makes sense to you, or falls in line with the company you're working for.
So, for the article, you'll see me using examples where I name projects and sequences with the extension "CC" as part of the name. This helps to differentiate between projects and sequences that were from the original edited project, and anything with the label "CC" is used to label a sequence or project that will be used for the color correction process.
Next is the first project that was duplicated. As you can see I've renamed them to know which is the original online (finished) edit, as well as the project we'll use to prep for color correction.
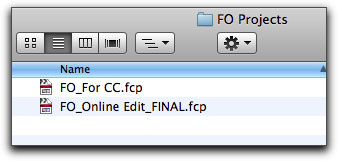
You'll also notice I added the initials of the name of a sample project "FO". This really helps when you've got multiple projects on your system- so you can quickly spot both your Final Cut and Color projects that relate to a particular show.
Open the new project- the one labeled for CC (for the grading stage).
Delete Unnecessary Items
We have the original online edit in another project, with all the bins and source clips potentially as well. In this project we don't need anything but the final sequences, so feel free to delete all bins and clips from the Browser. The only thing you'll leave in the project is any final sequences. We'll reap a few benefits from this:
- Less items in the Browser means smaller project size which is always easier to manage.
- We only need to work with the sequences at this point, so it lessens confusion and clutter in the Browser.
- If we "create" new clips for replacing select items in our sequences, it will be less confusing at this stage if the only clips in the Browser are used solely for prepping for color correction.
But just to be sure- do these things only on a copy of the original online edited project!
Duplicate Sequence
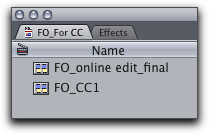
In the upcoming screenshot the final sequence has been renamed with the extension: _online edit_final. This is the final edited sequence.
Next, duplicate the sequence. We won't want to touch the original sequence, so if anything goes wrong during the prep, the grade, or any other step we can always trace back to the original sequence. Right-click on the sequence in the Browser and choose duplicate.
Next rename the new sequence. This will be the 1st of potentially a few duplicates we'll be creating for the prep for Color. Next, I changed the extension to _CC1.
Open this new sequence.
Duplicate As You Go
In fact, for each new process of the prepping process that you go through, it's a good idea to keep creating new duplicate sequences. This gives you the flexibility to track back to see if any problems arise in a specific sequence- you can always compare it to a previous sequence. And if needed, copy elements out of a previous sequence into the current one. I'll give suggestions along the way where you might want to create these duplicate sequences.
Next is a list of all the things I like to do in this first duplicated sequence (_CC1).
Lock Your Audio
Start by locking all audio tracks so they can't accidentally be affected during any following stage.
Reducing Timeline Tracks
Next let's get rid of unnecessary video tracks.
Bring Down Cutaways
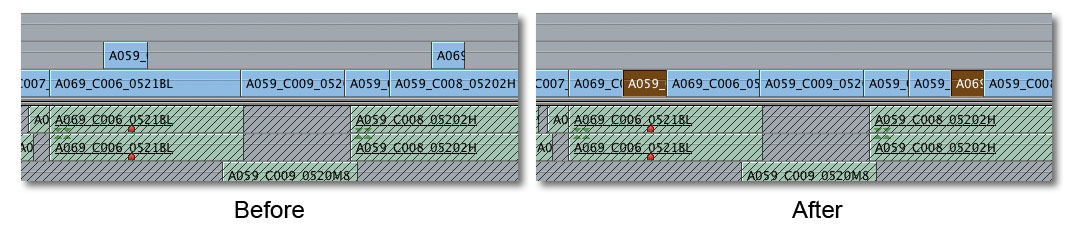
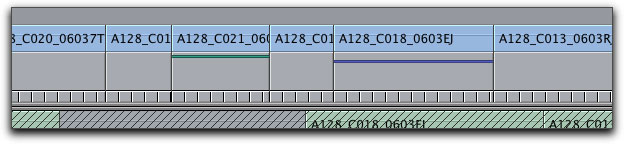
Any shots that exist on higher tracks that are being used as a cutaway should be collapsed on to the lowest most track possible (hopefully V1). Which shots can be brought down? Any shots that are full frame, no composite mode applied or lowered opacity. If you see more than one image at a time on the screen, whether a split screen or a blending of two or more images, then don't bring the shot to a lower track. Next is an example of clips we would leave as is on multiple tracks since opacity is used to blend all three clips on screen together.
On the other hand, as we discussed, cutaways should be brought down. To move shots down, select them, hold down the Shift key, and drag straight down. Tip: Command-click on multiple shots to select them altogether. Then Shift-drag the multiple shots down in one step.
This step is helpful for two reasons- not only will we have less tracks do deal with in Color, it is also easier to copy color correction effects between clips on the same track. So clips on different tracks make the process of copying corrections between them just a little harder than it needs to be.
Move any other clips lower down as possible
If text or other video generators or graphic clips can be moved to lower tracks, do it (but don't place them on to the same track as other clips).
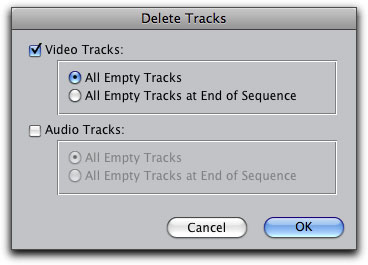
Delete Empty Tracks
Go to the Sequence menu and choose Delete Tracks. In the dialog box that opens, check the box to delete video tracks. The default that is chosen next is to delete all empty tracks. This is good. Click OK in the window.
Flag Items Requiring Special Handling
If someone else is handing off the sequence to you, you may ask that they do as much of this as possible, but it may be something that falls on you.
I personally like to do this with sequence markers (not clip markers) as it is easy to later scan the sequence for these markers and make the necessary adjustments.
What kinds of things would we flag?
- Graphics
- Freeze frames
- Shots to be replaced for one reason or another
We'll cover how to handle these types of things next.
Getting Rid of Nests
Note in the next screenshots that the two nests in the Final Cut timeline (the purple-like clips) translate into two tracks (the original clips within the nests) when brought into Color. The clips seem to translate somewhat fine, but one video clip looks cut off by the text clip.
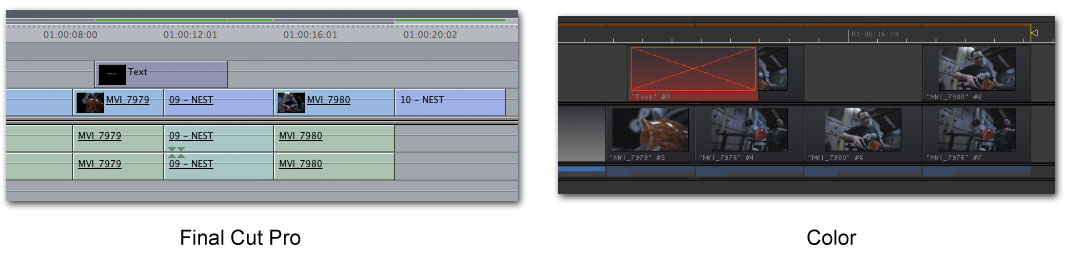
Actually, once rendered and sent back to Final Cut, in this case, the clips render correctly and appear correctly in nests back in Final Cut and the text clip comes back fine.
But in other cases it may not translate correctly, so consider taking these nests out of the sequence before going to Color. Or if the nest should be handled as one item to be graded in Color, then bake in the nest- see the section- "Baking In Media").
If you do want to get the nests out of your final sequence:
1. Copy these nests into another temporary sequence if needed so you can reference any effects you applied to the nest.
2. Delete the nests out of the original edit sequence.
3. Send the nests to Color separately if they need to be graded (you will use the original nest in the Browser when you send these to Color).
4. If you nested multi-layered Photoshop documents, copy them out of the Timeline to another sequence. Copy them back into your final graded sequence that comes back from Color. These types of nests don't seem to be fully supported at this time.
There are two cases where we should consider recompressing (re-formatting) our sequence into a new compression format before sending it to Color. This all has to do with not wanting to send certain media types to Color or combinations of different media types. The following is a list of potential problematic media- but if there is only a few clips that could be an issue- instead of recompressing the whole sequence, refer to the section on "Baking-In Media" to deal with clips individually.
- Mixed Media. If a sequence contains different resolutions, different frame sizes and aspect ratios (even HD formats have multiple different frame sizes with different native aspect ratios) and different frame rates. In some cases, these things may not cause a problem, but in most cases, you can end up with problems once the sequence is sent back to Final Cut Pro at the end of grading. Specifically shots may be sized or repositioned incorrectly.
- Media Types Color does not "like". This one is an area where not everyone agrees. Some swear that they have no problem with certain formats, others do report problems. I have seen issues with certain formats in the past so I like to play it safe.
Color technically accepts many different QuickTime formats (referred to as "Input Formats"- see Color User Manual for more info), but I only like to take the following formats directly into Color:
- DV
- DVCPRO 50
- DVCPRO HD
- ProRes (any flavor is supported, but only ProRes 422, ProRes 422 HQ and ProRes 4444 are high quality mastering formats- I would personally only recommend ProRes 422 HQ or ProRes 4444)
- Uncompressed (8-bit or 10-bit)
- If working with a Kona card, also the 10-bit AJA RGB codec
- Native RED media. There is a caveat here. At the time of this writing, the RED team has put up beta versions of a new plugin for Final Cut Studio that adds new RED support. These are not found on RED's website yet, and can only be found at reduser.net in the forums. Specifically, this adds the capability of real-time accelerated debayering by adding support in Color for the RED Rocket card (if you have one). If you do, then run some tests to see if this new plugin is solid and stable. If so, then bringing RED media natively into Color would be very nice. I just finished a RED project where we converted everything to ProRes 4444 first, since the plugin was not yet available and we didn't have a RED Rocket on the Color system.
On the other hand:
I personally avoid bringing in any Long-GOP media, like HDV or XDCAM EX, although there is support for these formats in Color. I have seen issues in the past, so I like to avoid them. It is also less processor intensive to work with I-frame formats like ProRes. It is also nice to get the footage into a better color space and bit depth like ProRes before working with it in Color (from 4:2:0, 8-bit formats to 4:2:2, 10-bit formats).
In addition, I have seen issues with uncompressed QuickTimes generated in Avid. Once hitting the Color timeline, in some cases there is an immediate luma shift. I can't say this is the case with all versions of Avid, so do tests to see what works. If there is a problem, you can recompress the media with Final Cut Studio.
Media Manager and Recompressing Media
1. Eliminate any nests out of your sequence.
If you placed a multi-layered Photoshop graphic into your sequence, it appears as a nest and may not be handled well (ok- it probably will get mangled during the process).
If you nested a series of clips, take the nest out of the sequence, leaving a placeholder like slug or a text clip. Handle this nested sequence as a separate sequence to send to Color.
2. Take note of "Motion tab" effects. Effects created on the Motion tab like a split screen or a motion path may not make it through the Media Manager in exactly the same way as the effects were created. Since you have the original sequence in your Browser as well, you can always check these items by comparing the original with the recompressed sequence, and make tweaks to the effects as needed.
3. Select the _CC1 sequence in the Browser.
4. Go to File > Media Manager.
5. Make choices as shown in the following screenshot. Where there is a drop-down menu called "set sequences to", choose the final resolution you want to send to Color. Tip: When your desired final output will be from a ProRes sequence, choose a "full raster" sequence preset- like ProRes HQ, 1920x1080, 24p instead of a non-full raster sequence size like 1440x1080.
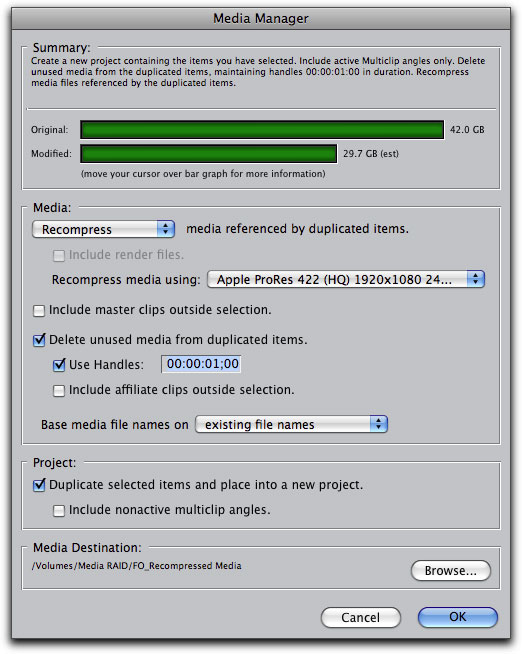
6. For project, choose to "Duplicate selected items and place into a new project" as in the last screenshot.
7. Click the Browse button, and choose a location for the media.
8. Once your choices are made, then click OK in the Media Manager. You'll then be prompted to name the new project and a location to save it.
When the media manager process is complete, all original mixed media formats will now be all in one compression format (but in a newly opened project). Both the new and previous project are both opened into the Browser.
Copy the new recompressed sequence from the new project into to the original Color prep project you were working in so everything is accessible in the same project.
You may want to rename this sequence with an extension like _MM_CC2. This way you know when in the process the sequence was recompressed (MM for Media Manager).
Double check the motion effects in the original _CC1 sequence and compare them to the newly created sequence to be sure the motion effects were handled properly. Specifically- check things like split screen elements- whether it's position, scale or rotation, make sure they match.
The one main reason people seem reluctant to work in Color as it initially seems complicated with how to work between Final Cut and Color when certain effects are created in Final Cut Pro.
Although we'll look at how each type of specific effect is handled next, overall we should realize that Color does not recognize most Final Cut effects and they won't be seen in Color. But, Final Cut sends the sequence to Color using XML data, and that information is kept intact (in most cases) so when the final graded sequence is sent from Color to Final Cut, the XML data re-creates all the effects you did not see in Color, and they re-appear in your final, graded Final Cut sequence.
But maybe it's critical for us to see these effects as we grade in Color, so let's start by looking at how different categories of effects are handled.
Finding FX
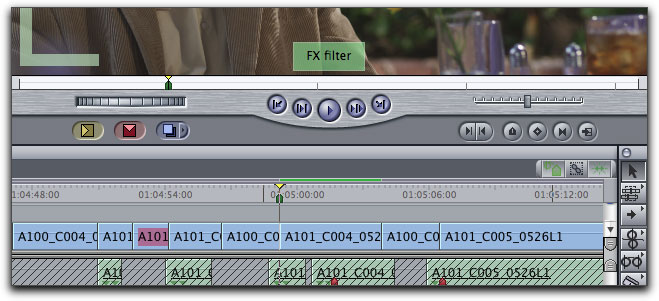
Although there's a colored bar over every section of the timeline where an effect is applied or where there is mixed media, you can use another guide to spot all effects quickly.
In the lower, left corner of your Timeline is a little button with a blue and green line on it. It is the Clip Keyframes button. Click on it to turn it on.
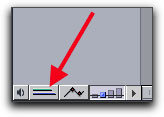
This opens up a gray bar under each of your tracks which holds information about the different effects in your sequence. Now you will be able to scan the Timeline quickly to spot which clips have effects:
- The green bar indicates filter effects.
- The blue bar indicates motion effects (which also includes any mixed formats in the sequence).
Transitions, Motion Projects and Generators
Throughout a Timeline, wherever you have these items in Final Cut, you will see a placeholder for these effects in Color. For slug, Final Cut generators like text, and Motion projects, you'll see a clip with a red X. This is fine. You will see icons representing transitions. You won't be able to see the actual clips and effects in Color, but they will roundtrip fine back to Final Cut Pro.
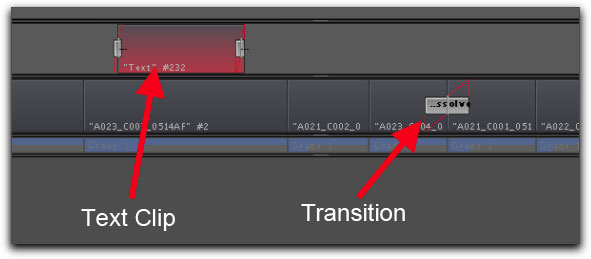
If you need to grade these items, you can "bake" them in so they will show up in Color. Refer to the section on "Baking In Media".
Freeze Frames
Starting with Color 1.5, freeze frames created in Final Cut are compatible with Color. They can be graded, rendered out of Color, and will be seen correctly once back in the final graded sequence in Final Cut.
But there are a couple considerations, that if not followed, will create problems- the result being that they won't be rendered properly and the freeze frame that shows up in the final sequence in Final Cut will be referencing the wrong frame- not the one you originally created.
So here's what we need to do to work with freeze frames correctly:
- Place any freeze frame on the V1 Timeline track only.
- Do not place any transitions on a freeze frame (you will have to remove these before sending to Color, then replace them once the final graded sequence returns to Final Cut. Or you can bake in the freeze frame with the transition (refer to the section "Baking In Media")
Graphics
Not all types of graphics are handled the same way in Color. And they don't follow the same rules as freeze frames or Final Cut generators. Let's take a look.
Photoshop Graphics
As we covered earlier, multi-layered Photoshop graphics placed into a Timeline as a single clip is considered a nest. Since nests may get mangled during the roundtrip from Final Cut to Color and back again, I would suggest placing each individual layer of the Photoshop graphic into the sequence instead of nesting the whole graphic as one clip. If the Photoshop nest is needed, see the section earlier about handling nests.
Single Layer Graphics
Whether you placed a tiff or jpeg or other single layer graphic in your sequence, starting with Color 1.5 these graphics will be handled fine by Color. You will be able to see them in Color, grade them, and send them back to Final Cut graded. If the graphic supports an alpha channel, that transparency will be maintained into Color, as well as back out of Color.
Single layer graphics can be placed on any video track in Final Cut, and will appear correctly on the same track in Color.
Motion Tab Effects
When you send a sequence to Color, effects created on the Motion tab are being tracked using XML between Final Cut and Color. Although only some of these effects will be seen in Color, they will all reappear on the Motion tab back in Final Cut in the final graded sequence. This means these effects are not rendered into the final media- the effects are still "live" back in Final Cut and will require a final render in the Final Cut Timeline before final output.
Effects Seen in Color
Effects seen in Final Cut will be translated into effects in the Geometry Room in Color. Although the names for these effects will be different in Color, and the interpreted numerical values will look different- the effects, if handled correctly, should be translated correctly and will look the same.
Color will show you the following Final Cut effects:
- Scale
- Center
- Rotation
- Aspect Ratio (in the Distort section)

Even if Color does not display certain Motion tab effects, like Crop or Opacity- these effects are still being maintained in the XML data and will reappear back in the final rendered sequence back in Final Cut.
Behavior of Motion Tab Effects Between Final Cut and Color
1. If a "static" (non-keyframed) effect is created in Final Cut, it will be seen in Color, and should roundtrip back to Final Cut correctly.
2. If a static effect is created in Final Cut, then adjusted in Color, the new changes should roundtrip back to Final Cut correctly.
3. If an animated (keyframed) effect, like a Center point animation, is created in Final Cut, it will be seen in Color. Do not manipulate these types of effects in Color or they may not roundtrip back to Final Cut correctly.
4. If a static effect is created in Color in the Geometry Room, it should be sent back to Final Cut correctly.
5. Do not create an animated Pan & Scan effect in Color. It will not roundtrip back to Final Cut correctly at all. This feature is currently supported just for output for a DI (digital intermediate) and will render into DPX files on output- but will not output at all for a traditional SD or HD video finish in Final Cut.
When you send your final graded sequence back to Final Cut, double-check these Motion Tab effects against the original Final Cut sequence that was sent to Color. Make any adjustments as necessary. I have personally found that sometimes a split screen will roundtrip properly, and other times the clips are not positioned exactly as they were in the original edit. So it's a good idea to looks for these kinds of discrepancies.
*Note: Animated Motion tab effects have been handled differently in different updates to Color. So I would suggest doing tests and seeing how these types of things are handled in the version of Color you are working in.
Speed Effects
Basically- both constant speed and variable speed effects are handled fine by Color and will show up back in Final Cut correctly. Here's a few details:
- No speed effects are rendered into the final media in Color. They are sent back to Final Cut as "live" effects. These effects should be rendered in the final graded sequence in Final Cut before final output.
- If a variable speed effect is sent to Color, not all frames of the shot may be seen the same as in Final Cut. Once roundtripped back to Final Cut, the correct frames should be seen. If this is an issue for grading, then bake-in the speed effects (refer to section "Baking In Media").
Filter Effects
Video filters applied to clips in Final Cut will not appear in Color (except for the Color Corrector 3-Way filter which we'll come back to in a minute). These effects are being tracked with XML, so when you send the final graded sequence back to Final Cut, they will reappear back on the Filters tab, and will require rendering before final output.
The problem is that we probably want to grade our clips with these effects visible in Color. For instance, if you apply diffusion type effects in Final Cut, but grade in Color without seeing these effects, then you may not end up getting the look you want. Since a diffusion effect alters the texture and possibly the contrast of the shot- we are essentially guessing at what the final look would be.
The solution for this is to "bake in" these effects before we send our sequence to Color. In other words, we output a self-contained QuickTime movie of our clip with the effect, then bring it back into the Final Cut Timeline before the sequence is sent to Color. Then we can grade with the effect on the shot. We'll cover baking in media in the next section.
Color Corrector 3-Way Filters
Apple gives us the option to apply a color corrector filter in Final Cut, and then have that effect translated into a correction in the Primary In Room in Color. Sounds nice, but I've yet to find this helpful. Contrast seems to usually translate from Final Cut to Color well, but color balancing does not. Maybe in a future update this will work better, but so far I've found the hue is misinterpreted and the effect is usually balanced differently in Color, usually too strong.
That being said, if you want to send color correction from Final Cut to Color, here are the rules:
- Only one Color Corrector 3-Way filter is translated, and it is applied to the Primary In Room in Color.
- If multiple Color Corrector 3-Way filters are applied, only the last one in the chain is sent to Color.
- And "Limit Effect" controls applied to a Color Corrector 3-Way filter will not be seen in Color. The Limit Effect controls will be ignored and the effect will be applied globally into the Primary In Room in Color.
- To avoid color correcting twice over, after the effect is sent to Color and translated into a Primary In Room correction, it is automatically stripped out of the XML data. So when the final graded sequence is sent back to Final Cut, there won't be the color correction filter on the FIlters tab for the clip.
I personally will take note of these effects in Final Cut, but will remove them before sending to Color.
Baking in media is about exporting a self-contained QuickTime of a section of the sequence (or more likely just one clip at a time). This creates new media where something like an effect is now permanently part of the shot- and can now be graded in Color.
Here's some things we should consider whether or not we want to bake-in:
- FIlter effects: As just mentioned, baking in filters allows us to see and grade them in Color.
- Mixed media: Mixed resolution sequences may get mangled by the roundtrip to Color and back. If there is a majority of one format, but some clips are of a different format, you can bake these clips and turn them into media that matches the sequence. If the majority of the sequence is mixed, you might consider using the Media Manager as outlined earlier to recompress the entire sequence into a single format.
- A clip that ends on a freeze frame: Although you can grade both the video and the freeze frame in Color- they will be two separate clips. If you want to treat them as one clip- then bake the two clips together.
- Motion projects: If the Motion project needs to be graded in Color- then you would want to bake it in. But if you do this, all layers and elements of the Motion project are baked together- so you will be grading the final composite from Motion as a single element- unable to color correct individual elements.
- Speed effects: If you are having issues with speed effects in Color, you can bake them in as well.
- Consolidating multiple tracks with mattes or composite modes that need to be graded as a single clip.
Baking-In Media
I bring up baking in media as the next to last step in your prep for Color. Consolidating tracks, media management and marking effects should all be done before this.
You can either bake in a section of the sequence, or a clip. If you are baking in multiple clips together like a composite of more than one track, or a clip and the subsequent freeze frame with a transition at the end, then you'll mark a section of the sequence to export.
On the other hand, if you are exporting a clip with an effect or recompressing a mixed format clip into same format as the sequence format, there is an easier way- you'll export just the clip.
Start by duplicating your sequence in the Browser again. If anything goes wrong you can always refer to the previous sequence. Rename the duplicated sequence, adding the extension _CC3 (or whatever sequence version number you are up to at this point).
Baking-in One Clip at a Time
1. For exporting individual clips at a time, double click the clip into the Viewer first. This way, when you export, you'll already have the correct in and out points set (even if the clip has a transition on on end). In addition, to help track down possible issues later, when you export this way, you'll export the clip timecode with the export (as opposed to the sequence timecode).

2. Go to File > Export > QuickTime Movie. If you are doing a lot of this, then it's good to know the shortcut: Command/E.
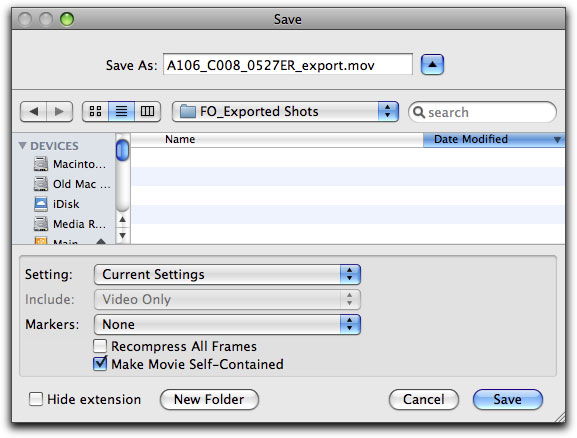
3. Choose to export video only, and leave settings set to Current Settings, which will be the settings of the sequence, not the individual clips in the sequence. Make sure the box "Make Movie Self Contained" is checked. Name the clip with the original clip name with an extension that makes it clear this was a shot exported to bake-in an effect or format, like _export. Choose a folder on a media drive you've created for just this purpose as the destination, like FO_Exported Shots.
4. After the export, re-import this clip.
5. Open clip into Viewer.
6. Set and In point in the sequence at the first frame of the original clip to be replaced.
7. Perform a 3-point Overwrite edit by dragging the clip to the Canvas or pressing the red button in the Canvas (or F10).
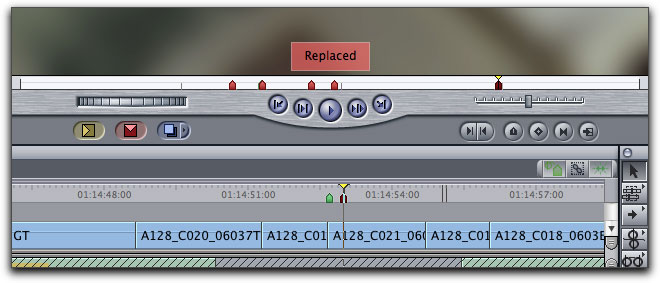
8. Place another sequence marker over this section of the sequence, next to the original marker that originally identified this section to be exported. The new marker, hopefully using a new marker color, could simply read "Replaced" for the marker name.
9. Repeat these steps as necessary throughout the Timeline.
Baking-in Clips With Transitions
Here's the scenario- one or both clips on either side of a transition have video effects that need to be baked in.
This could be complicated if you try and export sections of the timeline around a video transition. But we've already got a great trick for this which we started in the previous section- exporting the clips from the Viewer. It also involves using the Replace edit function.
This is essentially the same as exporting and replacing other clips, but this time you'll use Replace Edit instead of Overwrite Edit.
1. Start by double-clicking one of the Timeline clips into the Viewer and export it from the Viewer. This is good because it will include enough handles to incorporate the transition when you re-import this clip.
2. Re-import the clip and load it into the Viewer.
3. In the Timeline, place the playhead somewhere over the clip to be replaced.
4. In the Viewer, place the clip playhead on the same frame as in the sequence.
5. Drag clip from Viewer to Canvas and drop on Replace edit.
This will replace the clip 'under' the transition. Repeat these steps for the clip on the other side of the transition. This can be quite fast of a process and precise.
Baking-in Sections of a Sequence
1. For a sequence section to be baked, mark an In and Out point in you sequence around the elements you want to bake-in.
When marking In and Out points, make sure that your out points don't extend into the following shots in the Timeline. More precisely, for an Out point, if you navigate to an edit point, either by snapping or using the up or down arrow key, be sure to back-up by one frame before marking your Out point.
2. Export a QuickTime movie as described above.
3. After the export, re-import this clip.
4. Open clip into Viewer. Don't bother marking any in or out points as the sequence is still marked correctly from the previous export.
5. Perform a 3-point Overwrite edit by dragging the clip to the Canvas or pressing the red button in the Canvas (or F10). Since the marked sequence covers only the section you exported- you will end up only replacing this section.
We'll also want to make Color happy by not sending incredibly long sequences to Color. If you are working with a sequence above around 30 minutes, you'll want to break down the sequence into several smaller sequences, or "reels". It's not only easier on Color, it's a more manageable size for you as you're working.
- Create new sequences that are approximately 20 minutes in duration, or approximately 200 edits or less.
- Copy these smaller sections of the master, longer sequence into these smaller sequences.
- Send each of these sequence to Color separately.
I like to have each of these smaller sequences each in their own project. For example:
Project name:
FO_REEL001_CC proj
Sequence names:
FO_REEL001_online edit_final
FO_REEL001_CC1
I personally prefer to start breaking up the project into reels near the beginning of the prep process. If the sequence needs recompressing, I'll do it after that. If it doesn't need recompressing, I'd prefer to break it into reels right at the start of the process from the initial online edit.
Here's one way to approach this:
After having the final online edit locked, duplicate the final project several times at the Finder level. Duplicate the project for as many reels as you would need to correct (5 reels for a 90 to 100 minute movie). Each of these duplicated projects should be renamed, for example:
FO_REEL001_CC proj
FO_REEL002_CC proj
FO_REEL003_CC proj
FO_REEL004_CC proj
FO_REEL005_CC proj
Open each of these projects, one at a time, rename each sequence to the name of the reel. Delete everything in this sequence except for the section that represents that reel.
For example, Reel001 is from the beginning of the Timeline to minute 20. Delete everything after minute 20. Open the Reel002 project, rename the sequence, and keep minute 20 to minute 40. Delete everything before and after. Do this for each reel.
Also keep the intact original project to be able to have a full version of the show:
FO_full film_online edit
Then, in each project, you'll consolidate tracks, mark the sequence and bake-in media on a reel by reel basis.
Let's send the sequence to Color twice- once as a quick test, then send the final sequence to Color to start grading.
Start by duplicating your final sequence with all effects and mixed media baked in, and rename in a way you know this is the final sequence that is being sent to Color. For example:
FO_CC4_final
Testing the XML
A great little trick to test out and see if anything might go awry when roundtripping your sequence is to send the sequence to Color as a test, then without starting to color correct or render, you'll then send the sequence right back to Final Cut Pro. You can then check out any motion effects that weren't handled well, or look for any other problems.
1. Select the final sequence in the Browser, and go to File > Send to > Color.
2. A box will appear on the screen asking you to name the Color project. Change the name to have the extension _Test (i.e. FO_CC4_Test). Color will open with the new project.
3. Next go to the File menu in Color and choose Send to > Final Cut Pro.
4. You will get a couple warnings that clips aren't rendered and the sequence will link back to the original media. This is fine. Just click OK when these boxes appear.
5. Back in Final Cut Pro, you'll find the new sequence in your Browser, with the original name of the sequence with the words (from Color) in parenthesis. Open this sequence and check for any problems and correct them as needed.
6. Once you are done checking this sequence, delete it from the Browser so it can't be confused with the final rendered sequence you'll eventually send from Color back to Final Cut.
Send Final Sequence to Color
This time, you'll send the sequence to Color to start grading.
1. Again, select the final sequence in the Browser.
2. Go to File > Send to > Color
3. When the box pops up for naming the Color project, name as desired. I prefer to leave the name as it defaults, the same name as my final Final Cut sequence.
After you have finished color correcting in Color, it's time to render and get the final sequence back to Final Cut for final output, whether to tape or a QuickTime output.
User Prefs
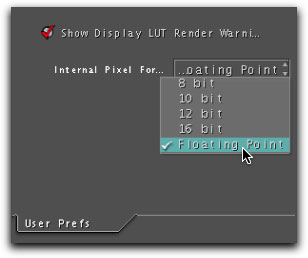
In the Setup Room, click on the User Prefs tab. Next to the label "Internal Pixel Format" choose the desired prcessing quality. For 10-bit HD, you may want to render at a slightly higher level, like 12 or 16-bit. If you have the time, set it to Floating Point to take advantage of 32-bit processing. The higher the bit depth, the longer the render time.
Project Settings
Also in the Setup Room, click on the Project Settings tab. There are a few settings to check here.
Broadcast Safe
This is optional, but is generally going to be used. Make sure the checkbox is checked.
Handles
Directly under the Broadcast Safe settings is an option labeled Handles. If you want to render out handles before and after each clip's In and Out points, then enter an amount in this field. If you do add handles, double-check the results back in Final Cut to be sure Color rendered the correct frames of your clips.
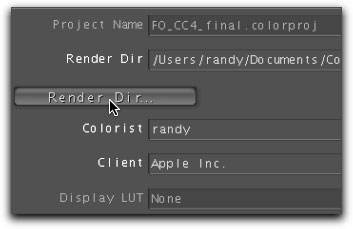
Render Directory
When you first opened Color, you set a "default" Render Directory that Color will use if you don't specify other wise. Chances are, this is not the location where you want to send the final rendered media, which should go to a fast media drive.
There are actually two locations to set a render directory- the User Prefs tan and the Project Settings tab. On the User Prefs tab, choosing a render directory only affects the "default" location.
Instead, we'll choose a Render Directory on the Project Settings tab. This is for the current project.
Click on the box "Render Dir..." which opens the dialog box for setting the Render Directory for this particular project.
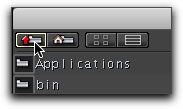
The dialog box is a little confusing at first for navigating. Start by clicking the List button.
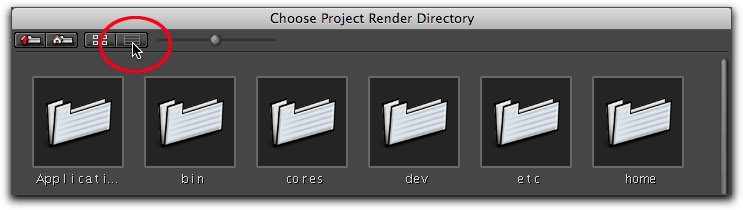
Then click the Up button to navigate up through your computer directory.
Keep clicking the button until you can't go any further. Look for the folder labeled Volumes. Double-click into it. Look for the media drive you want to render to. Double-click into it. Then click the button "Choose". Color will automatically create a folder with your Color project name in this location.
QuickTime Export Codec
Also on the Project Settings tab is a menu labeled QuickTime Export Codec.
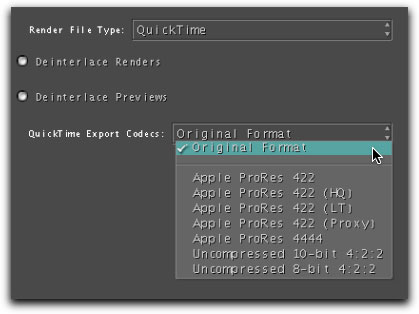
Choose a format to render out into. This takes a little bit of explanation.
There are two categories of options for rendering out of Color: "Original Format" and "Export Format".
In the Project Settings tab, by default, before you make any changes yourself, next to the words QuickTime Export Codec will be an automatic choice labeled either "Original Format" or it will list a specific format like ProRes HQ.
Original Format
Certain formats that come in to Color will be able to export in the same format that they started- same codec, same frame size and aspect ratio. These formats are limited to:
- DV
- DVCPRO 50
- DVCPRO HD
- Uncompressed (8 and 10-bit)
- ProRes (all flavors)
When these formats are sent to Color, the option for export format will already be set to Original Format by default. You can definitely choose another option listed in the menu if you desire (for example, you came into Color with DVCPRO HD but you want to render out as ProRes HQ).
Export Format
If a format is not supported for Original Format then you will see the setting set to something other than what was sent to Color. You can change this setting to any option you see in the menu.
These options will be limited to:
- Uncompressed (8 and 10-bit)
- ProRes (all flavors)
- AJA Kona RGB 10-bit (if Kona card is installed)
If you choose any specific Export Format, either because Original Format was not available or because you want to render into another format, you will always render out as a "full raster" frame size when working in HD.
Specific Native Formats
DVCPRO HD 720p = 960 x 720
DVCPRO HD 1080i/p = 1280 x 1080
HDV 1080i/p = 1440 x 1080
16 x 9 Full Raster Frame Size
720p = 1280 x 720
1080i/p = 1920 x 1080
For example, if you started with DVCPRO HD 960 x 720, but choose ProRes HQ on output, the final media and sequence will be the full raster 16 x 9 frame size of 1280 x 720.
When rendering, you can do the entire sequence, or render as you go. If for instance, the first part of a sequence is complete, and you are going to leave for a break, you can render just that section so you don't have to do it later.
Render
To start, if you want to add only a selection of clips instead of the whole sequence, either shift-click or command-click to select the clips to be rendered. If you want to add the whole sequence to be rendered, you don't need to make a selection first.
Next, click on the Render Queue Room. Choose either the Add Selected or Add All button.
The next step is optional. Press Shift/Z to see the entire sequence. This allows you to see the progress of the render with indicators in the sequence.
Next, it's time to render. Choose the Start Render button. During the render, there are a few indicators that show the progress:
- Yellow color in Timeline: clip queued to be rendered
- Pink color in Timeline: clip currently being rendered
- Green color in Timeline: clip rendered
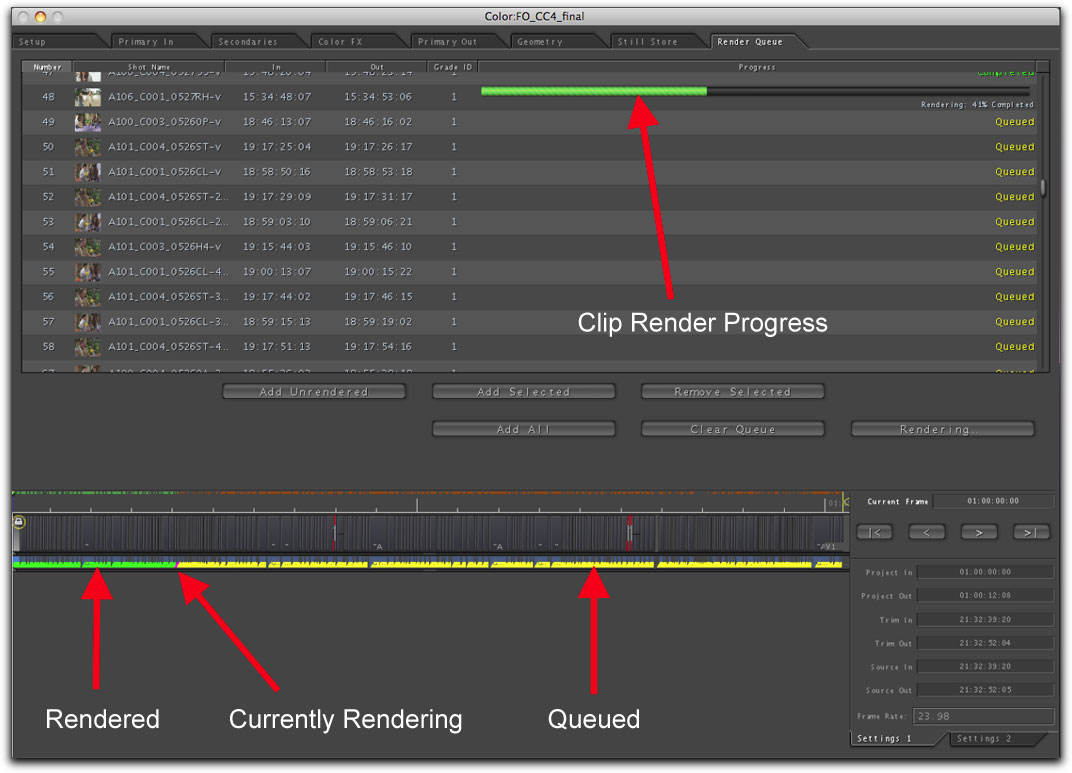
You'll also see a progress bar run across each clip as it's being rendered.
Return to Final Cut
After rendering is complete, save the project and you're ready to return to Final Cut.
Go to the File menu > Send to > Final Cut Pro
Back in Final Cut
This process launches Final Cut, and usually, if it can be located, opens the original Final Cut project that was used to send the sequence to Color.
You'll notice a new sequence back in the Browser, with the words (from Color) at the end. If you double-click it open, you should find a sequence that looks like the original one sent to Color, but this will point to the newly rendered media, and will have sequence settings that match the rendered footage.
Checking For Accuracy
You may want to lay in a copy of the original (online edit) sequence over the new color corrected one to look for any mis-matches or problems from the render.
1. To do this, duplicate the new sequence from Color and add an extension to the name like _for review. Open the new sequence.
2. Copy the video track in the un-corrected, online edit sequence.
3. Click back to the new color corrected sequence (for review), and lock the video track in the sequence.
4. Turn off Auto Select across from the color corrected track, then make sure it's on for the track above.
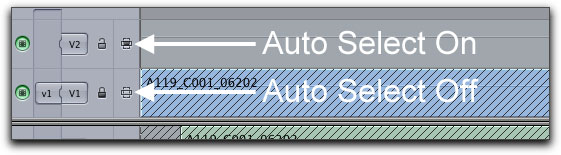
5. Paste the original online edit track above the color corrected track.
6. Bring down Opacity to about 50% on the top track and copy this attribute to the following clips on the same track.
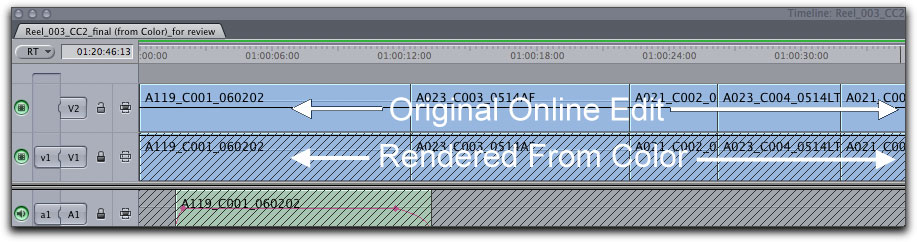
As you scrub through the Timeline, look for any mis-matches in the two video tracks (it will appear as a ghosting of the 2 tracks if the frames don't match).
If for any reason you needed to go back to Color and do more work, there are two options that give you this flexibility.
If you go back into your Color project (launch Color- it will take you to the default projects folder), you can make changes in two different ways.
Change the Settings on a Current Grade
If you go back to the original grade and make changes, the green color on the clip goes away. If you add these clips to be rendered, you don't need to re-send the sequence back to Final Cut. Just on switching back to Final Cut, your sequence will auto-connect to the newly created media file, and the previous rendered grade in Final Cut goes away.
Change Settings on a Different Grade
You might instead prefer to change the settings on a new grade, as it will allow you to keep the originally graded and rendered version already in Final Cut. If you decide to go back to the original rendered version, it's available in both Color and Final Cut.
In Color, add a new grade or choose from a different existing grade other than the current one. Color correct, then render the new grades on the group of clips that have been changed. Send the sequence back to Final Cut to have the new changes take place in another new sequence created back in Final Cut also named (from Color), and still take advantage of the already rendered, other portions of your original sequence that didn't change.
Conclusion
I hope this helps make Color feel more available to you. I know it might at first seem like a lot to do to prep a sequence. But as I said earlier, not all things need to always be done in every sequence. You might make one duplicate of your sequence for prepping on one occasion and and another time need four duplicates for more prepping stages. It'll overall hopefully fall somewhere in-between in most cases.
Andrew Balis is an editor, colorist, cinematographer and Lead Instructor at Moviola Digital Arts Institute, teaching workshops in Final Cut Pro, Color, After Effects and Photoshop. Andrew has authored video tutorials including Color Grading in Color and Color Correction in Final Cut Pro for Ripple Training; books including co-author of the Apple Pro Series book Advanced Editing Techniques in Final Cut Pro 4; custom course curriculums including Troubleshooting in Final Cut Pro, RED Workflows in Final Cut Pro, HD Workflows in Final Cut Pro and Assistant Editing in Final Cut Pro for Moviola, and the iPhone apps Moviola Pro Video Guide and the Final Cut Pro Field Guide.
[Top]
copyright © www.kenstone.net 2010
are either registered trademarks or trademarks of Apple. Other company and product names may be trademarks of their respective owners.
All screen captures, images, and textual references are the property and trademark of their creators/owners/publishers.