July 7, 2008
By Andrew Balis
One of the most confusing issues that comes up frequently with new users of Color is how to get in and out of Color with different types of video formats. Therefore, the purpose of this article is to clear up the confusion by presenting the four main workflows Color can utilize, as well as how each format can be handled by Color. This article relates to users of Color version 1.0.2 or later. We'll look at how to handle video formats captured via capture card, as well as how to work with "native" formats captured via FireWire such as DV, DVCPRO 50, DVCPRO HD and HDV.
First let's cover the terms used here:
Input format: Many formats are supported for input into Color. This does not however mean that they can be exported in the same format. This term only relates to input.
Here's a few examples of supported input formats:
Uncompressed (8-bit and 10-bit)
ProRes (SQ and HQ)
DV
DVCPRO 50
DVCPRO HD
HDV
XDCAM
For the full list of input formats, check out the Color User Manual.
Original format: This describes a format that can be rendered out of Color in the same format as was input into Color. This term only relates to output.
Here's the complete list as of Color 1.0.2:
Uncompressed (8-bit and 10-bit)
ProRes (SQ and HQ)
AJA Kona RGB (if AJA Kona card is installed)
DV
DVCPRO 50
DVCPRO HD
Apple Intermediate Codec
Apple Pixlet
Photo JPEG
Export Format: This describes your choices of formats that can be rendered out of Color, no matter what the source format. This term only relates to output.
Here's the complete list as of Color 1.0.2:If you're wondering why the "Export Format" list is shorter than the "Original Format" list, this is because you can only export in an original format if you started with that format. An "Export Format" can be used to output no matter what type of material you started with.
Uncompressed (8-bit and 10-bit)
ProRes (SQ and HQ)
AJA Kona RGB (if AJA Kona card is installed)
Now let's look at each of the four workflows:
1) Capture Card Workflow- Original Format
This is the preferred and recommended workflow and will yield the highest quality.
1. In Final Cut Pro, capture video using a capture card using either the Apple Uncompressed codec or one of two Apple ProRes codecs.
(alternate option: convert a sequence of clips into ProRes or Uncompressed before sending to Color)
2. In Final Cut Pro, select the sequence, then choose File > Send to > Color.
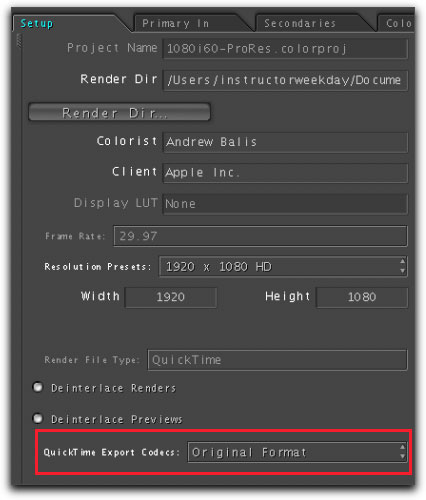
3. After grading in Color, but before rendering, go to the Setup Room > Project Settings tab.
4. In the QuickTime Export Codec pop-up, notice that the default is set to Original Format. This option will render out files in whatever format was input (in this case, the original format is the Uncompressed or ProRes codec you used to capture). Leave this setting at its default.
5. Add the clips to Render Queue and render.
6. Go to the File menu and choose > Send To > Final Cut Pro.
Back in Final Cut Pro, a new sequence is created with the words, "from Color" in the name. This sequence will be in the exact format you began with in Final Cut Pro - same frame size, same pixel aspect ratio, same codec, etc. In the Timeline, the render bar above the clips is the standard "gray" color, indicating that the clips match the sequence settings and do not require rendering.
7. In Final Cut Pro, output the sequence to tape using your capture card.
2) Native Format Capture And Output - Original Format
Use this workflow if you captured from a native format such as DV or DVCPRO HD, sent the sequence to Color for grading, and you want to output your clips back to tape via FireWire to the same videotape format. There is one important note however; this particular workflow is only possible with the formats listed above under the term "Original Format". For example, this workflow would not be possible with HDV source material (we'll come back to HDV in the next workflow).
1. In Final Cut Pro, capture video over FireWire (or other native option) into a native format supported as "Original Format". In this example, we'll use the Panasonic format DVCPRO HD 720p24.
2. In Final Cut Pro, highlight the sequence, then choose File > Send to > Color.
3. After grading in Color, but before rendering, go to the Setup Room > Project Settings tab.
4. Under QuickTime Export Codec the default is set to Original Format. This setting will render out files in whatever format was input - in this case, DVCPRO HD 720p24. Leave this setting at the default. This is one of the few formats that supports rendering into the same codec as the original.
Also, you can ignore to the other settings listed here. For example, in the next screen shot notice that frame size is set to 1280x720.
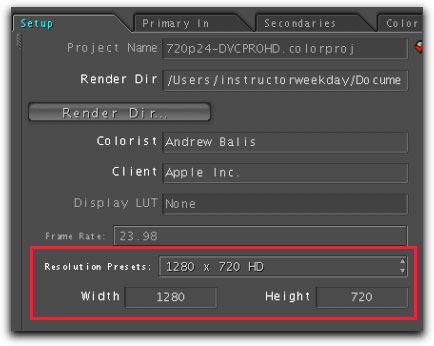
For those familiar with this flavor of DVCPRO HD, you'll know that the native frame size is actually 960x720. Once exported, the final video will have the correct frame size for DVCPRO HD at 960x720. In fact, never worry about the frame size listed here, as only the setting under the QuickTime Export Codec pop-up determines the final frame size.
5. Next, add your clips to the Render Queue and render.
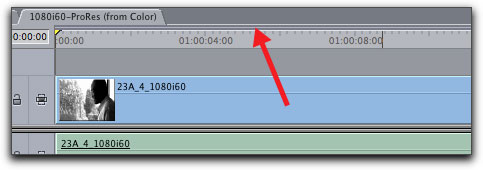
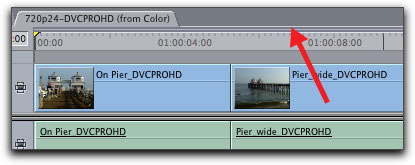
6. Go to the File menu and choose > Send To > Final Cut Pro. In Final Cut Pro, in the Sequence Settings of the new sequence sent from Color, notice that the format is the same as the one you started with - in this case, DVCPRO HD 720p24 at a frame size of 960x720.
In the Timeline, you'll also notice that the render bar above the clips is the standard "gray" color, indicating that the clips match the sequence settings.
7. Output to tape via FireWire to the same native format.
This workflow is exactly the same as the capture card workflow (workflow 1) except that the final sequence in Final Cut Pro will be in the same original DVCPRO HD format and can easily be output to DVCPRO HD tape via FireWire.
3) Start With Native Format - Output to Different Format
This workflow applies to two different scenarios:
1) Start with a native format (like DVCPRO HD), and output the video through a capture card to another videotape format at the best possible quality for final mastering.2) Start with a native format that is supported for input into Color but is not supported as a format for output from Color. An example of this is HDV.
1. Capture or ingest the video via FireWire or USB from videotape, P2 card or XDCAM media. In this example, we'll use HDV.
2. In Final Cut Pro, highlight the sequence, then go to File > Send to > Color.
3. After grading in Color, but before rendering, go to the Setup Room > Project Settings tab.
4. Choose an export format. Notice that the QuickTime Export codec pop-up is set to ProRes HQ by default, since the input format (HDV) is not supported for output in the same format.

If you click the pop-up for QuickTime Export Codec you'll notice that Original Format is grayed out.
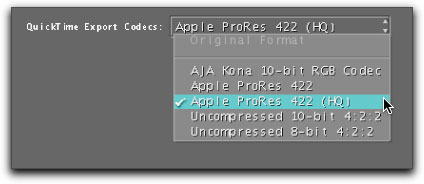
Although ProRes HQ is chosen in this case by default, you can choose other available options listed here, like an Uncompressed codec.
5. Add clips to Render Queue and render.
6. From the File menu choose > Send To > Final Cut Pro.
At this point you'll be prompted by the following dialog box.

7. Choose Yes.
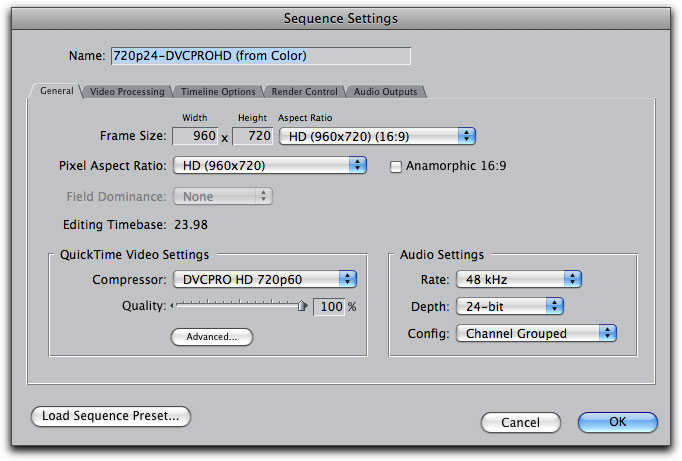
Back in Final Cut Pro, the new clips and sequence will be ProRes or Uncompressed, whichever you chose (ProRes HQ in this example). In the Sequence Settings, notice that the frame size is set to 1920x1080.

This is full raster 16x9 HD - 1920x1080 frame size, using square pixels. On the other hand, HDV has a frame size of 1440x1080, using non-square pixels. So this process not only uses ProRes or Uncompressed codecs for output, but the frame size is automatically scaled up as well. This is the perfect option if you wish to output through a capture card.
In the Timeline, the render bar will be gray over the clips, indicating the clips match the sequence.
4) Start With Native Format Not Supported For Output - Final Output to Tape Back to Native Format
This one sounds a bit confusing because I had difficulty coming up with a good way to describe it . Here's the scenario: you start with a format like HDV which will import into Color, but won't output in the same format. In the end, you wish to output the video back to HDV tape.
This workflow is very similar to the previous example with one exception.
1. In Final Cut Pro, capture or ingest video via FireWire or USB from videotape, P2 card or XDCAM media.
2. In Final Cut Pro, highlight the sequence, then choose File > Send to > Color.
3. After grading in Color, but before rendering, go to the Setup Room > Project Settings tab.
4. Choose an export format from the pop-up. Notice that the QuickTime Export codec is set to ProRes HQ by default since the input format in this case is HDV, which is not supported for output in the same format. Choose between one of the ProRes or Uncompressed options.
5. Add the clips to Render Queue and render.
6. From the File menu choose > Send To > Final Cut Pro.
At this point you'll be prompted by the following dialog box:

7. This time, choose No.
Back in Final Cut Pro, the new clips and sequence will differ from one another. The clips will be ProRes or Uncompressed (whichever you chose), but the sequence settings will be set to the same format you started with, in this case HDV.
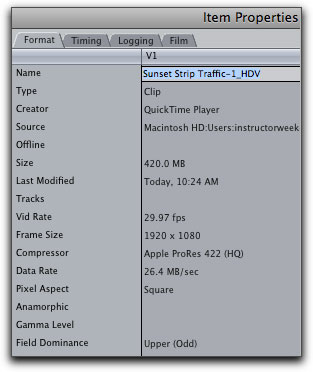
Clips settings are full raster 1920x1080, and ProRes.
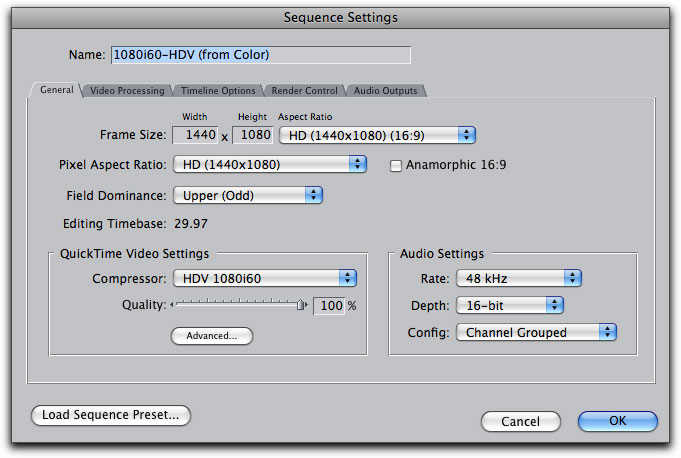
On the other hand, the Sequence Settings are 1440x1080 and HDV.
Because the clips and sequence don't match, you will see a colored render bar over the sequence clips indicating a mismatch between the clips and sequence settings. This is perfect for this scenario as we wish to output to HDV, so we would want the sequence using HDV settings.

8. Render the sequence and output to tape using the same native format you started with. Even though the clips are ProRes, the sequence itself is still HDV, and once rendered and conformed, the sequence is in the proper format for output back to HDV tape.
As a final side note, although I used HDV as an example, many users of Color highly recommend that you convert HDV video into a different format before bringing it into Color. Aside from the fact that other formats user a higher quality color space and are more pliable in post production, users have reported problems that seem to be related to the nature of the Long-GOP compression used in HDV and XDCAM. These same users are reporting problems with in or out points shifting, or keyframe animations not being executed on the correct frames. This is something to keep in mind if you plan on doing extensive grading on clips that originated from HDV or XDCAM sources.
Hopefully, this article cleared away some of the fog regarding the best ways to get your footage in and out of Color. Color is a powerful grading tool, but to use it effectively, you need to have a solid understanding on the way Color handles with the myriad of video formats now available.
Andrew Balis a cinematographer, editor, post production consultant and Apple certified instructor. Andrew is the author of Color Grading in Color and Color Correction in Final Cut Pro tutorials from Ripple Training.
copyright © Andrew Balis
© 2000 -2008 Ken Stone. All rights reserved. Apple, the Apple logo, Final
Cut Pro, Macintosh and Power Mac
are either registered trademarks or trademarks of Apple. Other
company and product names may be trademarks of their respective
owners.
All screen captures, images, and textual references are the property and trademark of their creators/owners/publishers.