
September 8, 2008
Compressor H.264 movies from FCP for the Web
This is a companion article to the QuickTime H.264 movies from FCP for the Web.
Some sections of this Compessor article are the same as in the QuickTime article.
By Ken Stone
We've all seen Flash videos at YouTube. Flash does an excellent job of reducing long videos into very small files, but there is a price to be paid, the quality of these videos can be very poor indeed. Even with the new 'higher quality' YouTube videos, the quality is not representational of the video that we work with in Final Cut Pro and Final Cut Express. Additionally, YouTube is not the only game in town. Many of us place videos at our own web sites and at other web sites as well. When working in FCP, we struggle to maintain the highest quality video possible. For the web, we need to produce movies that will deliver high quality video.
Compressor has a codec that will do what we need, deliver high quality video at lower data rates then the codecs that we used in the past. The codec is H.264 (MPEG-4 Part 10) and comes in a variety of flavors. So versatile is the H.264 codec that it is used in a number of different applications. It is used in Blu-ray and the now defunct HD DVD (Toshiba), it is also used by some cable and satellite broadcasters. A number of new video cameras also now use H.264 as an acquisition format. And of course, the topic of this article, for web distribution.
Internet Delivery
There are two different methods for delivering your QuickTime movies over the Internet, Progressive and Streaming. Real Time Streaming (RTSP protocol), is used for live events like Internet radio and video. The file is delivered in real time for viewing but is not written to the hard drive. This is one reason for using Internet Streaming, no copy is made. With this type of delivery, the size or bandwidth of the file is critical. If the size or bandwidth of the file is too great, slower internet connections like dial up or slow DSL will have problems playing back in real time. Each Internet Service Provider has different requirements for Internet Streaming, you'll need to check with your ISP for particulars.
Progressive, also known as HTTP download, is downloaded to the viewers hard drive and is not dependent on the speed of the viewers internet connection. The QuickTime movie will start to download and when enough material is in the cache, the movie will start to play. This is called 'Fast Start'. If someone is on dial-up or has a slow connection, then they will have to wait a bit longer for the movie to start. Progressive delivers high quality playback regardless of users' Internet connection speeds. Progressive is much simpler to implement and runs from a standard web server without the need for support from the ISP.
In this article we will be creating Progressive QuickTime movies in Compressor. While it's true that Progressive is not dependent on the speed of the internet connection, slower connections will have to wait longer before media starts to play, the file size of the QuickTime movie is important. If the file is too big, it will take a long time for the movie to start playing. A large file coming down a slow internet connection could take forever. Even with a high speed internet connection, a very large file could take too long for your viewer to sit there waiting for the movie to begin. So it is important that we create QuickTime movie files that are as small as possible while still maintaining the quality level we desire. Additionally, ISPs charge their users for download bandwidth. If your movie files are extremely large and downloaded often, it could get to be expensive.
The FCP Timeline
When we are ready to export our video to H.264 and encode it in Compressor, we'll need to do some testing of different Compressor settings to determine the best H.264 export settings. Some people export the entire timeline, but for testing, this process takes way too long and often discourages the user from doing the number of tests required to zero in on the best settings.
Go through your timeline and find a small section of video, 15 to 30 seconds, that presents challenging video to encode, like fast movement of the talent, rapid pans or transitions, which can be very difficult to encode well. Picking difficult video to test with will ensure that all of the video on the timeline will encode well.

On To Compressor
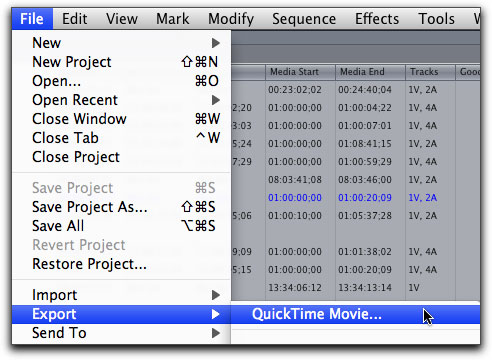
There are two different ways to get your FCP movie into Compressor. With In and Out points set in the timeline, from the File menu choose Export - Using Compressor. This process, causes FCP to hand off video to Compressor, one frame at a time. This can be a very slow process and it does tie up both Compressor and FCP during the handoff. On occation there can be problems with this process.
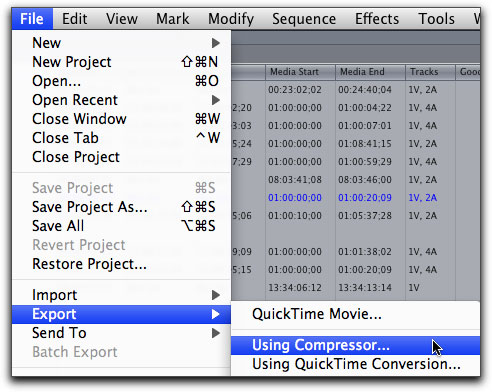
The other way to get your FCP test video into Compressor is from the File menu Export - QuickTime Movie.
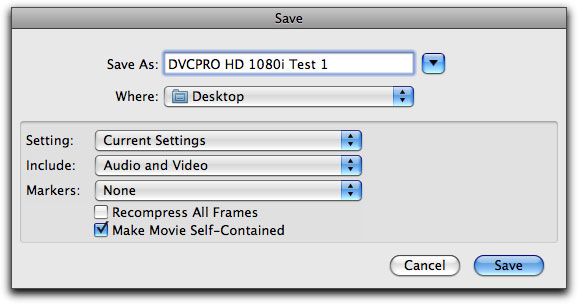
In the Save dialog box, enter a name for the export and set Desktop for the destination. Settings should be at 'Current Settings', Include: Audio and Video, Markers: None. Leave the 'Recompress All Frames' Unchecked. The last option is 'Make Movie Self-Contained', this is is my preferred choice. If you uncheck this box, you will export what we call a 'Reference' movie. A Reference movie does not contain video media, but rather, it has pointers that reference back to the video media in FCP. A Reference movie is much smaller than a Self-Contained movie and is quicker to export, but change or move anything in FCP and the Reference movie will become invalid. I have found that a Self-Contained movie is rock solid and can be used even after the FCP project has been changed or deleted. I would only recommend making a Reference movie if you are short on hard drive space.
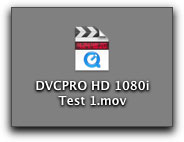
After your QuickTime Movie has been exported it will appear on your Desktop. Note that it sports a FCP icon. We will take this QuickTime movie and drop it into Compressor.
Quality vs. File size
There are a number different settings in Compressor that control both the quality and file size of the video. It is by making adjustments to these settings that we can arrive at the best combination. The first is choosing a codec and in this case we will be working exclusively with H.264. The next item is the frame size of our output, the height and width of the on screen video. Both the frame rate and keyframe rate play an important role as well. We can further reduce file size by changing the audio export options.
Compressor
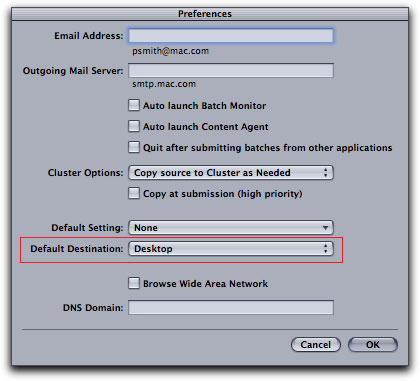
Launch Compressor. When setting up a job in Compressor and assigning a codec, it is necessary to drag a 'Destination' (location of the exported files) into the Batch window, but there is another way. Open the Compressor Preferences and set the 'Default Destination' to Desktop. Now you will no longer need to set the Destination. When you add a Preset for the job to the Batch window, Compressor will set the destination to the Desktop for you automatically.
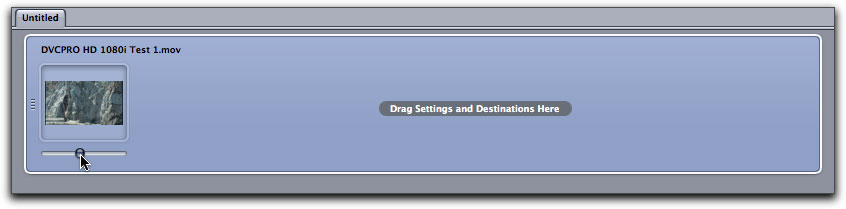
Drag your QuickTime self-contained movie that you exported from FCP into the Batch window.
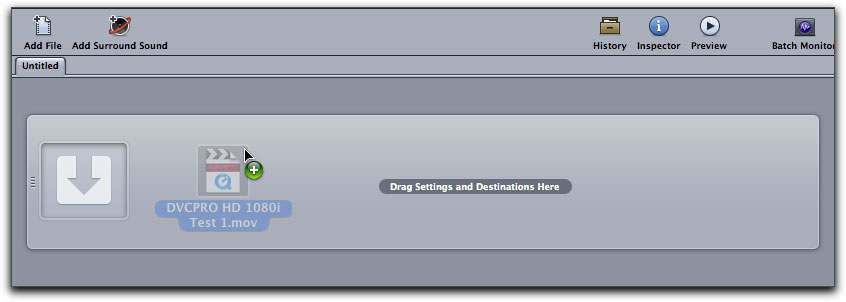
After you have dropped your QuickTime movie into the Batch window, you'll see it in the small preview window, there is a slider that allows you to scrub through the clip.
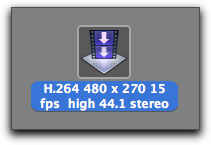
Next we want to add the H.264 Preset to the job in the Batch window. Select 'Settings' in the 'Settings - Destinations' window. First twirl down the 'Formats - 5 Groups' folder and then twirl down the 'QuickTime 5 settings'. Inside you'll see the H.264 preset.
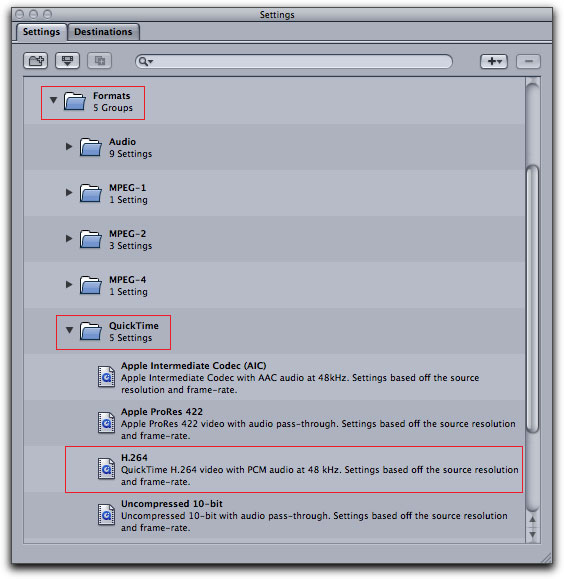
Click on the H.264 preset and drag it into the Batch window.
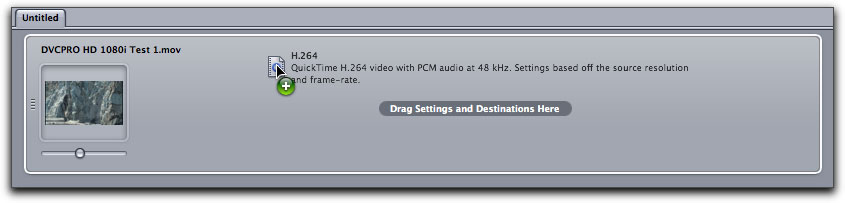
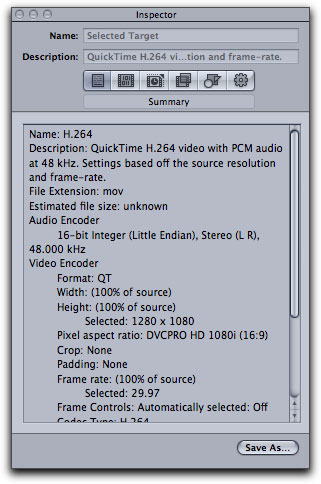
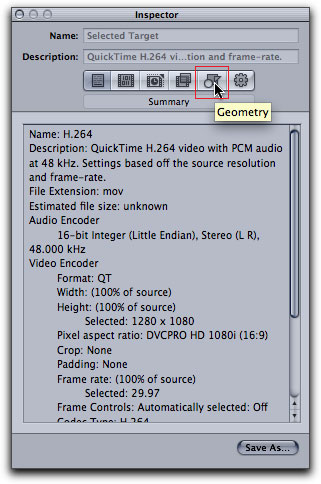
The H.264 preset has been added to the job. Notice that the Desktop destination has been added for us. Click on the job to load it into the Inspector.
The Inspector window shows the default settings for the H.264 preset.
Video Size Settings
We have all seen numerous movies on the internet and we probably have a good idea of what size we would like our final movie to be, and as the dimensions of the final QuickTime movie has a large impact on file size, I always start my workflow by setting the 'Size' adjustment first.
Back 'in the day', many of us were working with DV-NTSC (PAL) footage in FCP. Since that time, things have become a little bit more complicated in that we now work in a number of different formats and we deal with different dimensioned source files.
And just to keep things interesting, some of the codecs that we now work with, like HDV, AVCHD and DVCPRO HD, use horizontal compression to reduce the size of the files written to tape or card, to save space and reduce bandwidth. So, 1920 x 1080 could actually be 1440 x 1080 or even 1280 x 1080. Now we know that FCP is smart enough to uncompress the horizontal dimension back to full raster for playback (in Real Time), the good news is that Compressor is equally astute. This is great for us because it means that the dimensions of the source footage does not matter, only the aspect ratio of the format. In the case of all the new HD formats, the aspect ratio is 16:9.
This is okay because we will be using the Custom setting and entering our own sizes. Let's say that I have some HDV video and I want to put the movie on a web page. Remembering that it does not matter if the source footage is 720 or 1080, the fact that it's 16:9 is what counts.
One movie size that I like, has a width of 400 pixels. Using the 400 width, I divide 400 by 16 which comes out to 25. I then multiply 25 times 9 for the height which equals 225. So, the dimensions of my exported QuickTime move will be 400 x 225 and I enter these figures into the Custom Size box. The process is simple, divide your chosen width by 16 and then multiply the results by 9 for the height of your movie.

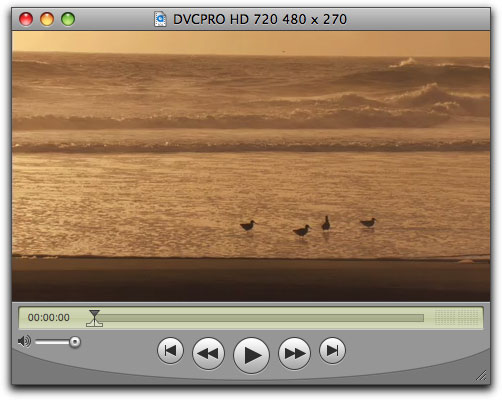
Another movie size I find appealing has a width of 480 pixels. I divide 480 pixels by 16 which equals 30, which I then multiply by 9 for my height, which gives me a height of 270 pixels.
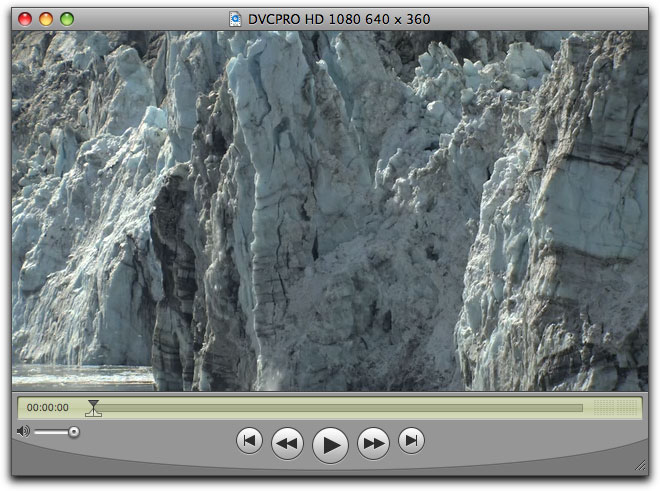
Even larger yet, a starting width of 640 pixels. Divided 640 by 16 = 40. 40 times 9 = 360.
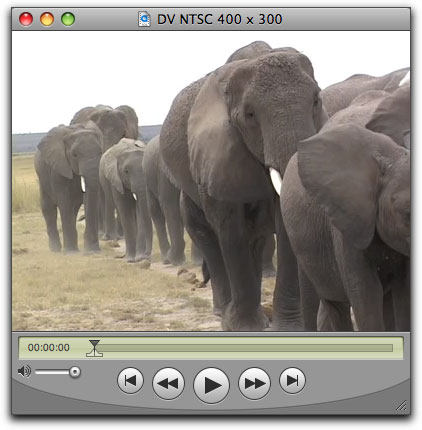
If file size and bandwidth is an issue you can go smaller. There is one caveat with the QuickTime player. With different size movies, the QuickTime Player changes size to give a 'wall to wall' output, that is to say that there will be no pillar or letterboxing effects, as you can see from the examples above. If the width of your QuickTime movie goes below 380 pixels, when you view the movie on your Desktop you will see pillar boxing, shown below left. Don't worry, this is an issue with the QuickTime Player, there is nothing wrong with your movie and once the movie is embedded in your web page and view on the internet, the QuickTime Player will display the movie properly as shown below, right, which is an actual embedded 2 second clip (go ahead and click on the Play button).
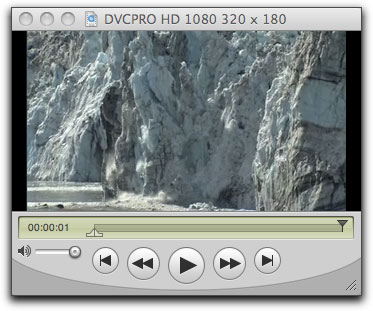
Screen shot of the QuickTime Player
on the Desktop showing pillar boxing.
|
|
When working with DV NTSC, 720 x 480, we need to remember that Standard Def. digital video uses rectangular pixels, the pixels are taller than wide. However, we will be viewing the finished QT movies from the internet on a computer screen and computers use square pixels. The outcome of this would be that the video in the finished QT movie, when displayed on a computer screen, would show some distortion. The images would be slightly squished down. Although DV does not show correctly in QT, because it is meant for display in a non square pixel environment, H.264 is able to playback these pixels correctly on a square pixel display. You can use a 4x3 or 3x2 aspect ratio for picking frame sizes, whichever is most convenient.
Here are some suggested 4x3 frame sizes. You can create your own dimensions by picking a width and dividing the width by 4 and multiplying the results by 3.
- 160 x 120
- 240 x 180
- 320 x 240
- 360 x 270
- 400 x 300
- 480 x 360
- 640 x 480
A few last thoughts about the dimensions of your exported QuickTime movie. When you are doing the math, both the width and height of your exported movie must be whole numbers, the QuickTime 'Export Size Settings' box does not accept fractions. So, while 400 pixels is okay, 400 divided by 16 = 25, a width of 420 will not work because 420 divided by 16 = 26.25 and 26.25 multiplied by 9 = 236.25. As long as your width, when divided by 16, comes out as a whole number, then the height, determined by multiplying by 9, will always be a whole number too. I hope you are following my drift.
If you speak with professional encoders they will tell you that when working with H.264, both the height and width dimensions must be divisible by 8. This is because the H.264 encoder works in blocks of 8. However, when working with sizes that are appropriate for web pages, you'll be hard pressed to find many sizes that have an aspect ratio of 16:9, where both the height and width are divisible by 8. If your dimensions are not divisible by 8, it might mean that the displaying render engine has to work a little harder to play back your QuickTime movie, but there should be no ill effects. I checked a number of H.264 QuickTime movies on the web and none of them have dimensions that are divisible by 8.
Setting your desired movie size in Compressor
We will be modifying the default settings for our H.264 job. In Compressor, all settings are entered to the Inspector, it's in the Inspector that we will do all of the work.
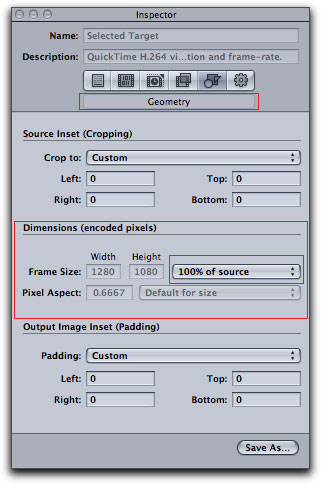
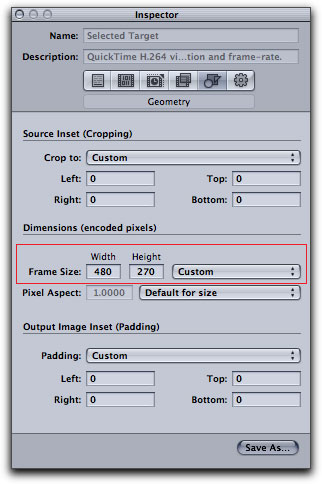
There are a number of tabs in the Inspector. As we are going to start by setting the frame size of our movie, click on the 'Geometry' tab.
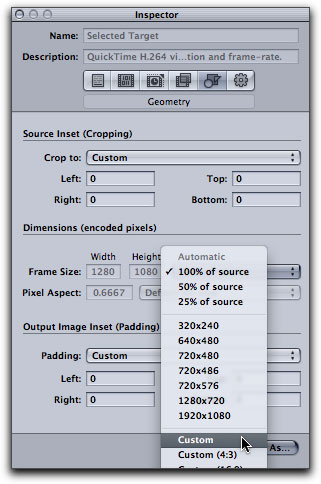
The Geometry tab middle section is 'Dimensions (encoded pixels) and this is where we will set the frame size. Click on the '100% of source' drop down and select 'Custom'. As I have picked 400 x 225 as my QuickTime movie size, I have entered 480 and 270 into the dimension box. After you enter your dimensions, check to be sure that 'Custom' has not switched to another setting, as seems to happen from time to time.
Encoding
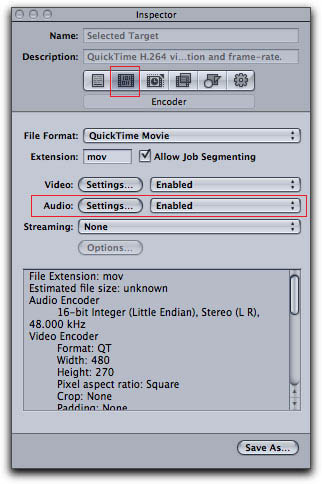
With the output dimensions set for our QuickTime movie, it's time to turn to working with the H.264 codec. Click on the 'Video: Settings' button.
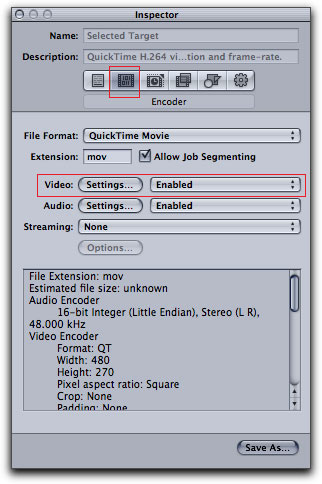
The 'Standard Video Compression Settings' window will open, shown below at default settings. Notice that the windows and settings in Compressor's 'Standard Video Compression Settings' are exactly the same as in QuickTime and involves the exact same workflow.
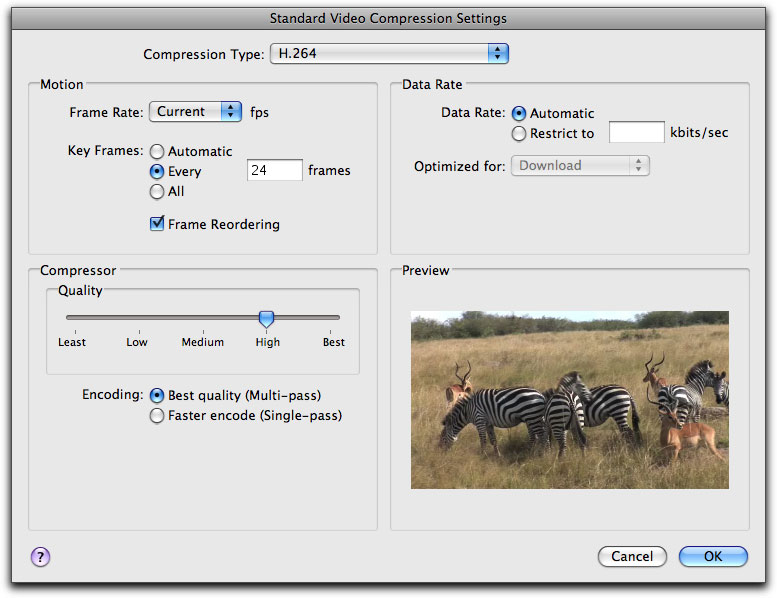
There are three sections, Motion, Data Rate and Compressor, that control the finished file size and the playback quality of our QuickTime movie. The Motion section is shown below at default.
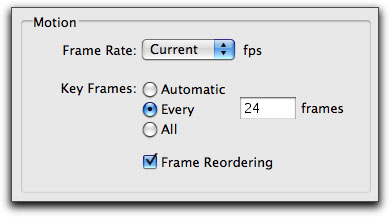
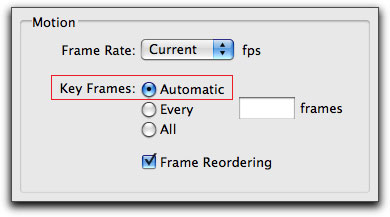
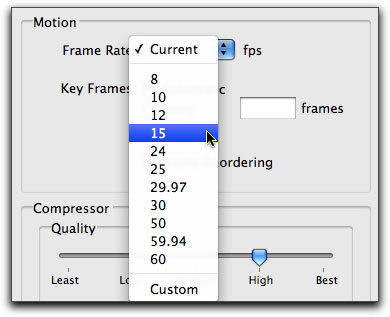
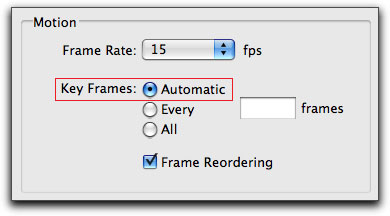
First on my list is to find a good frame rate for the export. Lowering the frame fate, the number of frames displayed every second, will cut file size. The frame rate that you choose will depend on the amount and speed of motion in your video. If your video is of 'talking heads', then you will be able to lower the frame rate by a large amount. On the other hand, if your video is of a Baseball game, which can have some fast motion, the amount that you can reduce the frame rate will be limited. So some testing is in order. Before you pick a trial frame rate, set 'Key Frames' to automatic, we'll talk about this in a minute.
The video I'm working with is DVCPRO HD 1080i 60, which means that it has a frame rate of 29.97. For my first test I am going to start with a frame rate of 15 frames per second. After export, open the movie in QuickTime and play. How does the video look? Does the motion look smooth or choppy? If the motion looks good, you can go back and reduce the frame further, to say 12 frames per second. Now, how does this playback? The idea of this testing is to continue to lower the frame rate until you get poor results. Once you hit an unacceptable frame rate, go back to the next higher frame rate where the motion still looked good. This will be your frame rate.
I mentioned above to set the Key Frames to Automatic. The keyframe lies at the heart of compression and has everything to do with the output quality of our QuickTime movie. The flavor of H.264 that we are using is an Interframe codec, using Temporal compression, which means that it works with groups of pictures or GOPs (often 15 frames in a group). The H.264 codec is able to compress, reduce the size of a file, by taking one frame of full video information and then generating the next number of frames by storing only the differences between each frame and the first full image frame. By storing only the changed information, the file becomes much smaller. This first frame is called a 'keyframe' or 'I' frame.
In the past, with older codecs, we could enter values for how often a keyframe is created. However, if we set this parameter to 'Automatic', we will let Compressor determine the optimal keyframe rate (file sizes vs quality) based on the video it is working with. I have found that using 'Automatic' works very well.
The last item in the Motion section is 'Frame Reordering'. 'Frame Reordering' can help improve the quality of the finished movie, but it is processor intensive. For our intended destination of the web, this is not an issue. If you are creating QuickTime movies for the iPhone or ATV, which have less processing power than our Macs, you would want to uncheck the 'Frame Reordering' box.
The two other two sections are 'Data Rate' and 'Compressor Quality'. While these are two different parameters, they are linked together. When Data Rate is set to Automatic, Compressor will determine the best data rate (quality vs. file size) based on where you set the Quality slider. You will note that when Automatic is selected, that the Quality slider, in the 'Compressor' section, is active.

Selecting 'Restrict to' rather than Automatic allows you to enter specific bandwidth amounts and would be used when you plan to stream your movie from a streaming server. Internet Streaming is used for live web cast, internet radio shows, or the radio stations found in iTunes. Internet Steaming is different from the common QT downloads that most of us use. If you are not creating Streaming QT movies, and most will not be, leave this setting at the default, Automatic. As shown below, when 'Restrict to' is selected in the Data Rate section, the Quality slider in the Compressor' section becomes grayed out and is not available.
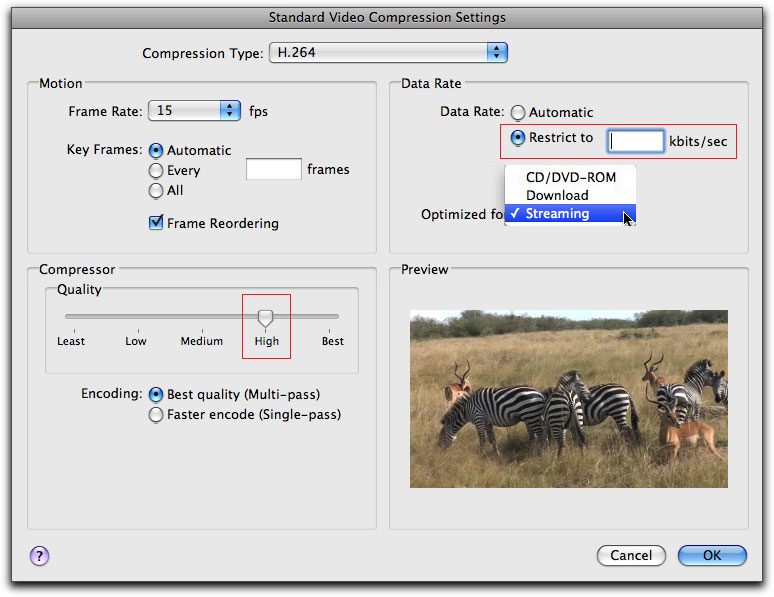
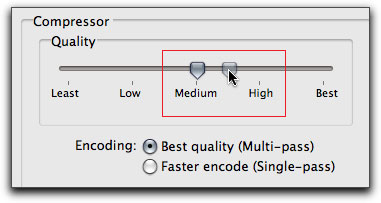
With our frames size and frame rate established and the Data Rate set to Automatic we can now move to the Compressor section where we can use the Quality slider. Obviously, the Quality slider allows us to adjust the quality of the encode and thus further control the file size. We will test the Quality setting in the same way that we tested the frame rate. Export the short QuickTime test movie and check the quality. If it looks good, move the Quality slider down and test again. Continue until you find the lowest quality setting that the video still looks good. Most often you'll find that a setting in the area of Medium will work well.
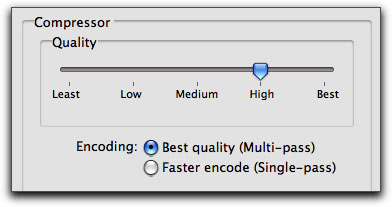
At the bottom of the Compressor section you will see encode settings for Multi-pass and Single-pass. Selecting Multi-pass allows Compressor to run a first pass in which it will evaluate the video and a second pass to encode using information gathered in the first pass. Multi-pass will produces better quality video at the same file size, but the process does take longer than Single-pass.
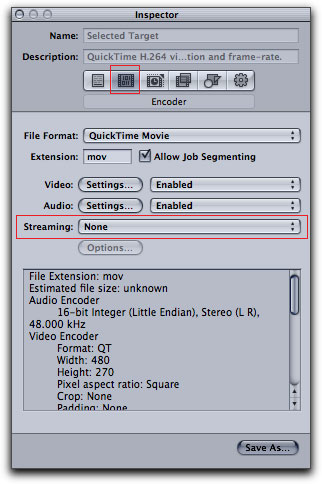
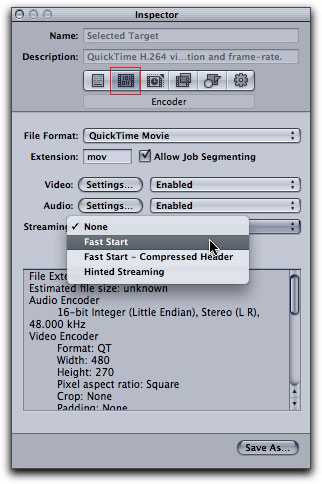
Click Okay to return to the Inspector window and while still in the Encoder tab, look for 'Streaming' which defaults to None. As we want to deliver Progressive QuickTime movie downloads, set this to 'Fast Start'. The QuickTime movie will start to download and when enough material is in the cache, the movie will start to play.
Frame Controls
With the output dimensions for our QuickTime movie set and H.264 configured, it's time to turn to working with the Compressor 'Frame Controls'. Click on the Frame Controls tab in the Inspector window. If you have been using QuickTime Pro to create your web movies, then Frame Controls is new to you. Frame Controls uses Optical Flow technology borrowed from the 'Shake' application. It is this Optical Flow technology that makes the difference between the low quality we get when doing this work in the FCP timeline and the much higher quality we get when using Compressor. Using Frame Controls is a must any time that you are changing frame rates or frame sizes.
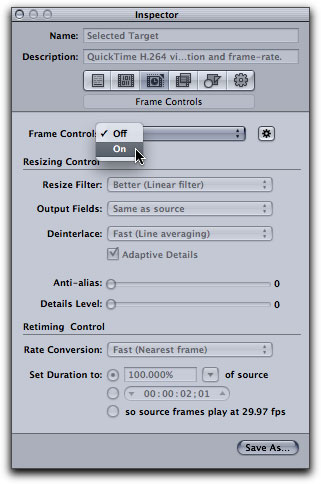
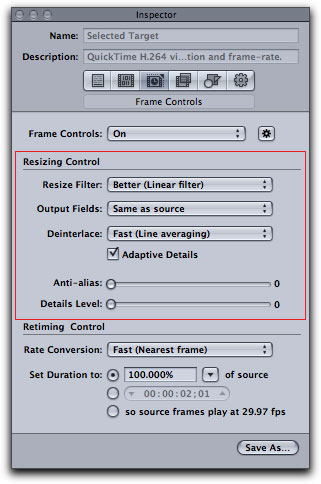
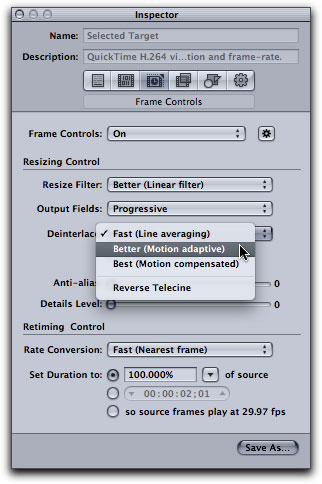
Some people use Compressor to create web QuickTime movies but pass right over the Frame Controls, and they wonder why their final output looks so bad. If you will look at the default Frame Controls section (below left), you will see that it is grayed out by default, notice that all the other settings in the Inspector are grayed out as well. Clicking on the 'Off' drop down does nothing. This is likely why some people missing setting Frame Controls, because it appears to be inaccessible to them. We need to turn Frame controls on. Click on the gear icon just to the right of the Frame Controls menu, this will activate the Frame Controls setting and you'll see that 'Off' is no longer grayed out, (below middle). Now you can click on the Frame Controls drop down and select On, (below right).
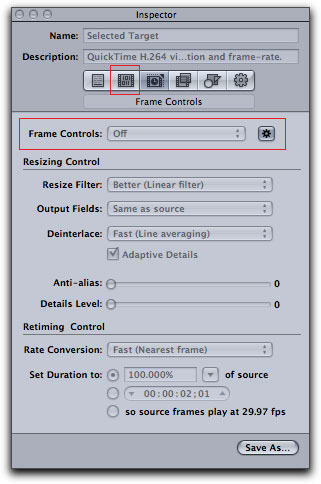

If you choose to leave Frame Controls off, the results that you'll get from your export will be no better than if you did the same conversions in the FCP timeline. Enabling Frame Controls will produce far superior results.
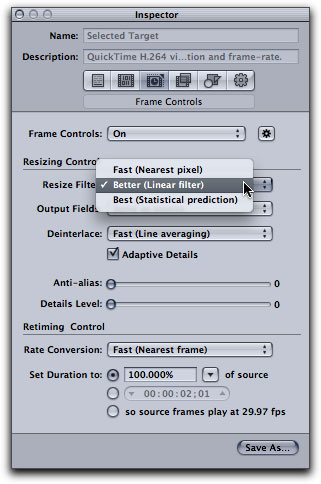
Once we have enabled Frame Controls, you can see that the entire Inspector window becomes active, (below left). In the 'Resizing Control' section, the first menu is the 'Resize Filter'. We have a tendency to want to always select the highest quality settings for our exports, we do want the best quality, right? However, selecting the highest quality settings in the Frame Controls section may mean that the encoding process will not be completed in your life time. Often the visual quality difference between Better and Best is not discernible, but the additional time required to encode at Best can be alarmingly long. Leave the Resize Filter at Better which is the default.
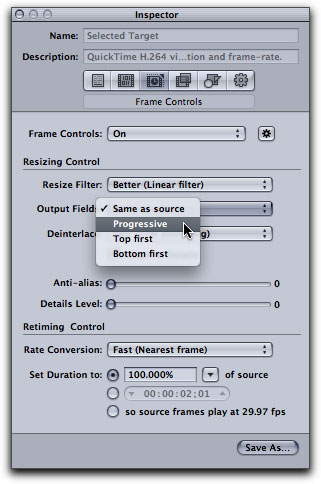
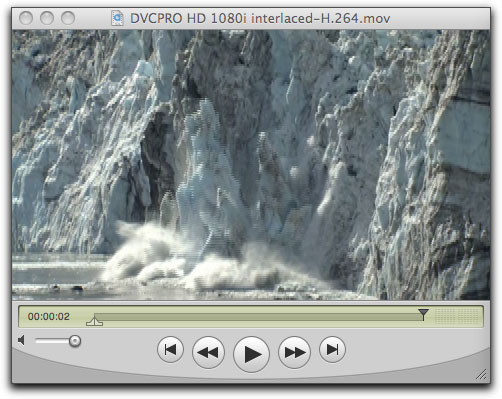
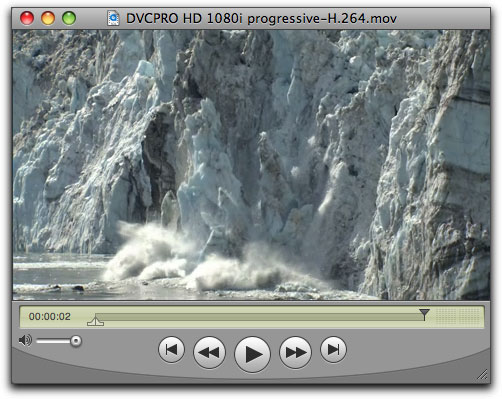
The next menu down is 'Output Fields' which defaults to 'Same as Source'. I am testing DVCPRO HD 1080i footage, so one might think that 'Same as Source' would be correct. However, we are exporting for the web, QuickTime movies to be viewed on computer monitors, so we will want to set this to Progressive. Interestingly enough the size of the exported QuickTime movie is the same for both Interlaced and Progressive.
Two screen shots below are of finished Compressor exports. The one on the left has Output Fields set to 'Same as Source', which in this case is interlaced. The image on the right uses the same interlaced source footage but the 'Output Fields' is set to Progressive. The quality difference is obvious.
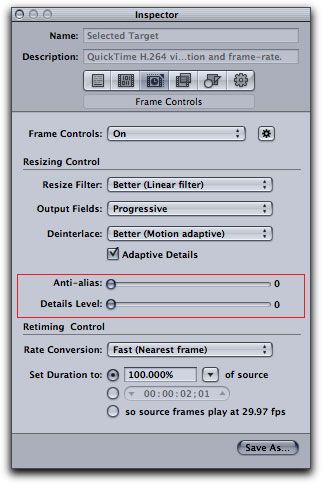
Next is the Deinterlace menu, (below left). This menu is not about whether or not to deinterlace but rather about Compressor's method of deinterlacing. Once again, moving this setting to Best (Motion compensated) will take forever. Set this to 'Better'. Next is 'Adaptive Details' check box would be Un-checked if the output video is progressive and its destination is for computers or mobile devices like the iPhone or iPod. This would save a great deal of encoding time. But for everything else, leave this box checked. Below this are the Anti-alias and Details Levels sliders. These sliders can be used for fine adjustments of your final export. The Anti-alias slider adds a bit of smoothing to edges in the video image and the Details Levels slider does the opposite, it sharpens. Obviously you would only use one or the other slider, as using them both would simply cancel out the effect. The last section, (below right) is 'Retiming Control'.
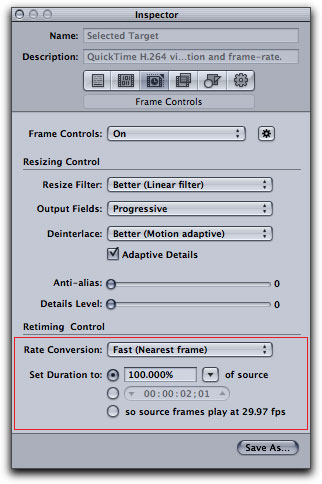
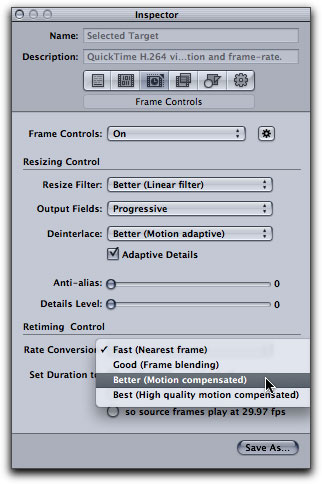
There are two parts to the 'Retiming Control' section; 'Rate Conversion' and 'Set Duration'. The 'Set Duration' would be used to either speed up or slow down your video and because Compressor can use Optical Flow technology, the end results will be vastly better than using Duration or Speed changes in FCP. For this article we will be looking at 'Rate Conversion' setting.
Earlier on I discussed the possibility of reducing the frame rate of your video from say, 29.97 to 15 frames per second, to reduce the file size of your final export. Changing the frame rate, either up or down, is a challenging proposition. When lowering the frame rate, frames will need to be thrown out, which can produce choppy playback. Increasing the frame rate is equally problematic as new frames would be need to be generated out of thin air.
This is where Optical flow comes into play, as it uses sophisticated logarithms to either remove or add frames. 'Fast' (Nearest frame) is the default settings. The next option is 'Good' (Frame blending), but we have all seen the quality of frame blending in FCP and we know that we need better results. My choice here is 'Better' (Motion compensated) which will add to the encoding time required but does produce better results.
Using Frame controls for the first time can seem a bit daunting, but it's really just a matter of a few setting to tell Compressor how to do its work.
- Turn Frame controls on.
- Resize Filter to Better.
- Output Fields to Progressive.
- Deinterlace to Better
- Adaptive Details checked
- Rate Conversion to Better
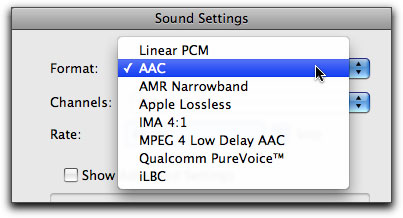
Sound
Move back to the Encoder tab, and click on the 'Audio: Settings' button.
 This will open the 'Sound Settings' window and, once again, all of the windows and settings are the same as in QuickTime Pro.
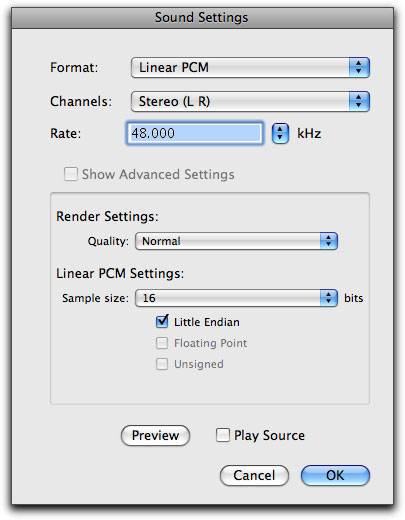
You can leave these settings as is for maximum sound quality, but it might be a bit of 'over kill' for our computer speakers and will do nothing to reduce the audio file size. How you adjust these settings depends on the audio in your movie. If the movie contains a lot of dialog or maybe concert music, you might want to make small adjustments to the audio settings. If the audio is not that critical, like background music or ambient sound, then you can further reduce the audio settings for a smaller file.
The AAC encoder found In the 'Format' drop down menu is a good choice. Depending on your audio you can select Mono over Stereo to reduce the file size.
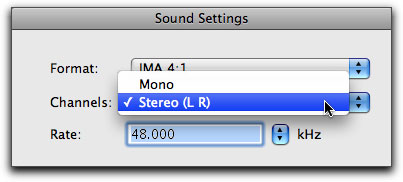
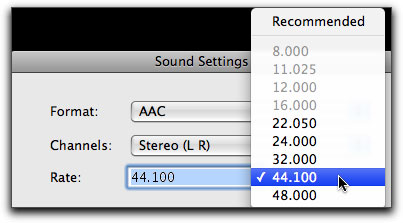
The next setting is 'Rate' or audio sample rate. The native audio sample rate for FCP is 48k, but remembering that the audio sample rate of audio CDs is 44.1k, this might be a good choice. You can choose 32k for smaller size, again, depending on your audio.
The Render section follows and generally you can leave the settings in the 'Render' section at their default, shown below. For audiophiles you can move up the Render Quality, additionally you can increase the Target Bit Rate setting up to improve audio quality.
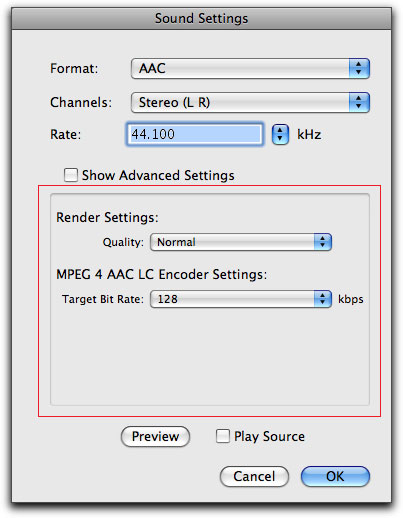
In the Sound Settings window, at the bottom, is a Preview feature for you to test out your audio settings, (no need to export the movie to audition the audio). If you place a check in the 'Play Source' box you can listen to the source file for comparison. A very nice feature.
Testing
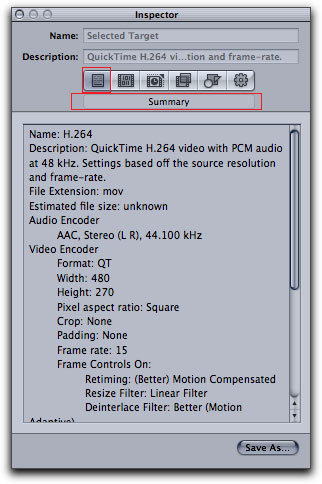
Okay, so we have worked our way through the different settings and are ready to do our first test. Click on the Summary tab in the Inspector where you can review your settings.
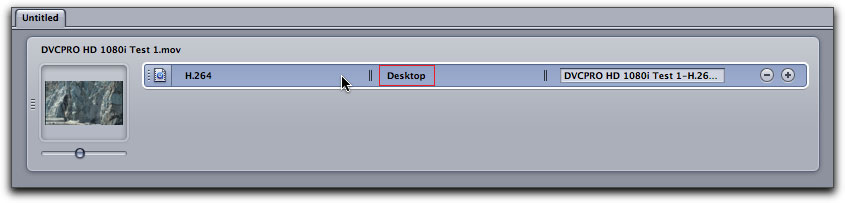
Back in the Batch window you will see the job name, 'DVCPRO HD 1080i Test 1. At the bottom right of the window is the Submit button, click on it.
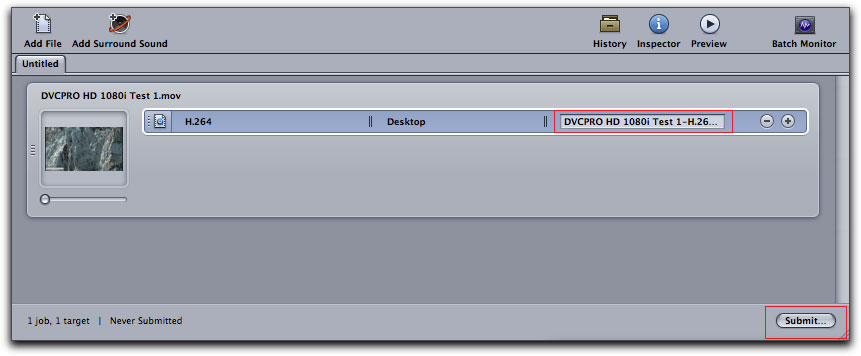
This will open a new window. You will notice the 'Name' box, which in this case is the same as the Name in the Batch window. However, the name that shows here will not be the final name for the exported file, this name applies only to this job and will only show up in the History window, (more on the History window in a minute). If you want to change the name of the finished exported file, you must change it in the Batch window.
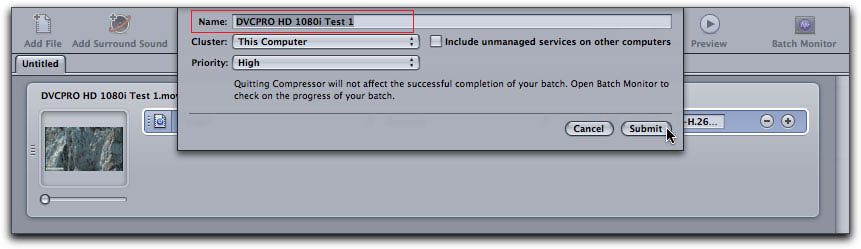
Hit Submit and Compressor will begin the encode process. Some people like to use the Batch Monitor to view the progress of their encode. For some reason, I am not a big fan of the Batch Monitor and I prefer to use the History window, which is right below the Preview window, to view the progress. You will need to twirl down the 'Today' item.
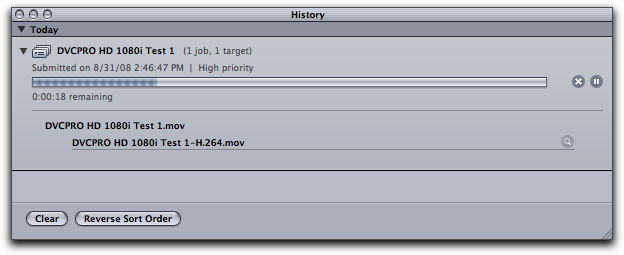
When the encode has finished, the QuickTime movie will appear on your Desktop, play the movie in the QuickTime player to evaluate the quality of the encode.
For example; let's say the the movie looks pretty good, the size of the movie is what you want, the motion plays smoothly but the over all quality of the video is a little lower then you want. Easy to adjust and retest. Click on the Encode tab in the Inspector, click on the Video settings button. Move the Quality slider up a bit. If you were at Medium, maybe move it half way up to High. It could be that the file is larger than you want, but the quality is very good overall, you might want to move the Quality slider down a bit, or decrease the frame rate. You can, of course, make adjustments to any of the parameters. In some cases, where there is just normal motion in the video and and not rapid motion, I have been able to move the Quality slider down close to the 'Low' setting and have gotten good results.
For our example, you have adjusted the Quality slider and you are ready to retest, so you go back to the Batch window, but wait, what this, the name of the file is in red and there is a warning explanation mark. Don't worry, this is just Compressors way of telling you that the file name has already been used, it's sitting on your Desktop (your last export). You can proceed, but the new export will over write the existing file, which you probably want to keep for comparison purposes.
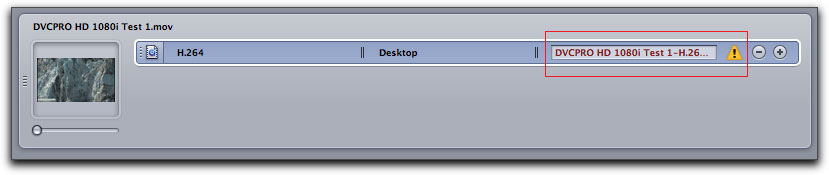
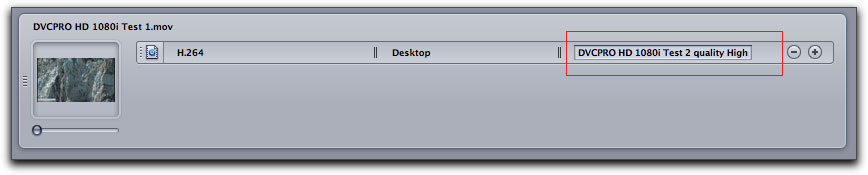
You are going to want to change the name in any case and give it a name that reflects the settings of this test. Once you have changed the name, the text color will changed back to black and the warning will disappear. Go ahead and click on Submit.
You can clear any job in the History window once it has run, select any job you want to remove and hit the delete key, clicking on the 'Clear' button will remove all items in the History window. But, get this, if there is a job in the History window that you used in the past and the settings are what you want to use, you can select the item in the History window and drag it up to the Batch window and drop on a new job in exactly the same manner as you would drag in a Settings Preset. Very nice.

Saving Custom Presets
A few weeks ago I wrote a companion article QuickTime H.264 movies from FCP for the Web and I lamented the fact that there was no way to 'Save' the finished QuickTime settings for future use. This is not the case when using Compressor. When you have completed your testing and have all of the parameters set to your liking, you can save these settings as a Custom Preset for future use. Additionally we can create a 'Droplet' which is a very cool feature.
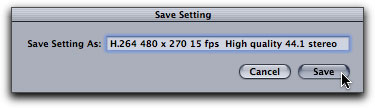
I have done several tests and now have the Inspector setup the way I want and it's time to save it as a Custom preset. Bottom right of the Inspector window is a 'Save As' button, click on it to get the 'Save Settings' box. I have given it an appropriate name which describes the important settings.
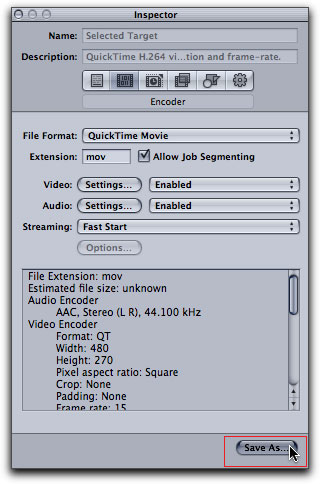
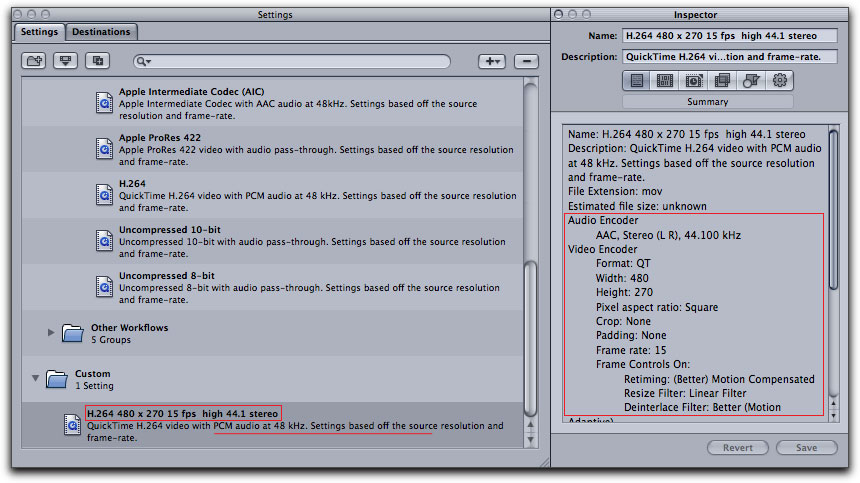
When you Save your new preset, it will show up in the Custom folder in the Settings window. Shown below left, you can see the name for the Custom preset is correct, but look just under the name at the general description (underlined), it does not reflect the new settings, so just ignore the general description. If you click on the Custom preset it will load into the Inspector, which in the Summary tab, shows all of the correct settings.
In the future you can apply your Custom preset to a new job. You can use this preset as is, or in the Inspector, make any changes that are appropriate for the new job. Even though you are working with a Custom preset, any changes you make in the Inspector will be reflected in the encode. When you are done, if you wish, you can Save the Custom with the changes and give it a new name. Over a period of time, it could be that you would have a set of Custom presets that would cover a wide range of encoding needs.
Saving a Droplet
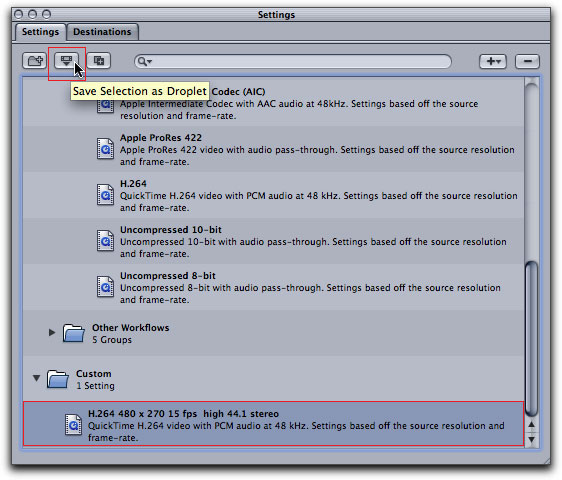
Compressor offers another way to save a Custom preset, it's called a 'Droplet'. A Droplet is a small application made by Compressor from a Custom preset. To create a Droplet, select the Custom preset in the Settings window and then click on the small Film strip icon upper left of the Settings window.
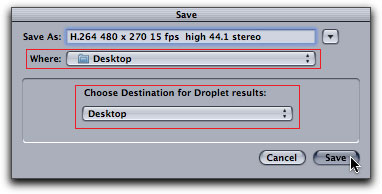
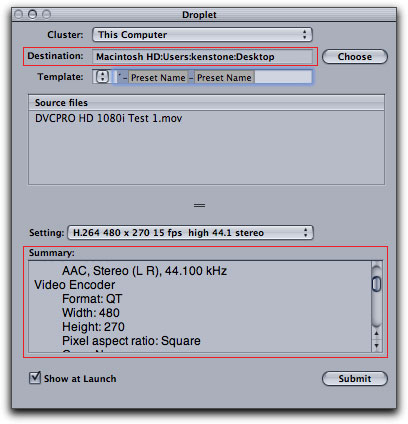
This will open the Save window. The 'Save As' box will pickup the name that you used when you saved the Custom preset. You can change the name if you like. I always set 'Where' to my Desktop for convenience, however, if you build a number of Droplets you may want to make a 'Droplets folder for storage. The last item is 'Destination for Droplets Results', which I also point to my Desktop. When you Save, the Droplet will appear on your Desktop.
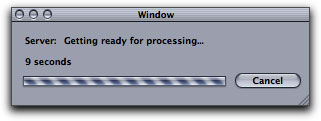
When you want to use a Droplet to encode a file or files, there is no need to launch Compressor, drag the file(s) you want to encode onto the Droplet. When you drop a file(s) on to the Droplet (in the case of my example this would be a QuickTime Self contained movie), a widow will open briefly, 'Getting ready for processing'. After that, the Droplet window will open. You can change the Destination of the finished encode if need be. There is also a Summary window. Just as with a Compressor preset, the General description in the Summary window does not reflect the actual settings. Scroll down in the Summary window and You'll see that the correct settings are there.
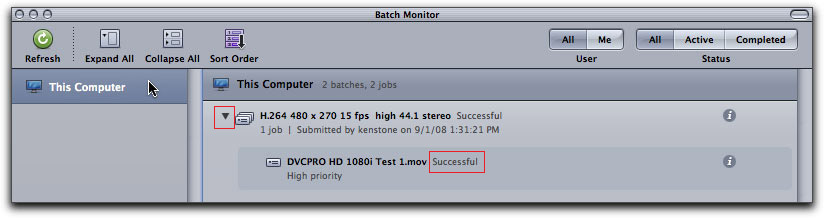
When you click the Submit button the Batch Monitor window will open. At first glance, the Batch Monitor appears to be empty.

Click on 'This Computer' and the job section will open up. Very much like the History window, twirl down the job to see the progress and results of the encode. When the process has been completed the encoded QuickTime movie file will be on your Desktop.
Creating Droplets for common encoding tasks can be a real time saver. You can make Droplets for any encoding chore, one of the most common uses for Droplets is to convert CD 44.1k audio to AIFF 38k audio for use in FCP. Droplets are small in size, about one meg and can be emailed to anyone who is running Compressor, so you can share your encode settings.
Gamma Correction
In the days before the introduction of H.264, Sorenson 3 was my codec of choice. One of the most frustrating issues of using Sorenson is that while the exported QuickTime Sorenson movie might look great on a Mac, when this same QuickTime movie was played back on a PC, the movie looked too dark. This is because the basic 'Gamma' output is different on Macs and PCs. H.264 is a much more intelligent codec, as the H.264 codec automatically buries 'Color Sync' profiles in the QuickTime movies. At playback, the H.264 QuickTime movie will check the platform of the viewer and adjust gamma automatically, serving up a gamma corrected version for that platform, Mac or PC. This is a powerful feature.
Final Thoughts
QuickTime vs. Compressor. Between the H.264 QuickTime to the web and the H.264 Compressor to the web articles, I have done a lot of testing. Using the same settings for Export as QuickTime with Conversion or Compressor, I have found the exported files have the exact same size, so as far as file size goes, both workflows produce the same size results. While many of the settings windows are exactly the same in both Compressor and QuickTime with Conversion, QuickTime is a bit more simplistic and is easier to use, no Frame Controls to fool with. So why use Compressor if the process is more involved? There are several reasons. The inability to Save settings in QuickTime makes me nuts, the need to redo all of the settings every time I want to encode for the web is a huge waste of time, even when I know exactly what settings I want to use. Compressor offers, not only the ability to save settings as Custom presets, but the ability to create Droplets as well. The advantages of this are not to be underestimated.
So, if there is no difference in file size, what about the quality of the finished movie? Remember that I always keep reducing the quality of my exports, by lowering the Quality or Frame rate until I find that point at which the quality is no longer acceptable (then move back up). Up until that point, the quality of the QuickTime with Conversion and Compressor is the same. It's when you get to that point, that Compressor with its Frame controls, comes into its own. At the last stages of testing, when the QuickTime with Conversion starts to become unacceptable (and would have to be moved back up), the export from Compressor is still acceptable. So, in the end, you can produce smaller exported files using Compressor because you can seriously tweak the frame setting details in the "Frame Controls" dialog section of Compressor's Inspector. This will produce smaller files, yet still provide you with the quality that you need. Using 'Frame controls' adds to the export time from Compressor, but the extra (needed) quality is worth the wait.
There is a Preview window in Compressor, just above the History window. Now you might think that you can use the Preview window to view the quality of your encode settings as you make changes in the Inspector, but what it previews is limited. It will dynamically display changes you make in either the Geometry tab, (i.e. cropping), or in the Filter tabs, (i.e. Brightness and Contrast) in the Inspector window. However, the Preview window does not display the media with the encode settings that you have applied via presets in the Batch window or in the Inspector. So, it is necessary to export tests and play them back in the QuickTime Player to evaluate your video.
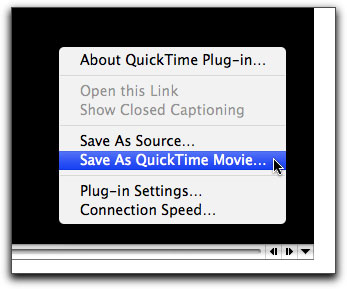
I mention that Progressive QuickTime movies are downloaded to your hard drive, but you will not be able to locate it in the Finder, you'll need to save it first. To save a copy of the movie, once it has completed the download, control or right click on the movie and select 'Save As QuickTime Movie', you will then be asked where to save it. Saving will happen almost instantly as the file is already on your hard drive. If you find a QuickTime movie on the web that is close to what you want, after it has completed download and you have saved it, open it in QuickTime Player and from the Window menu - Show Movie Inspector. This will show you the format, audio properties, movie size, fps, data size - rate and duration, you can use this information in Compressor.

Producing good QuickTime movies for the web is a bit of a black art. There are a number of ways to reduce the size of a QuickTime movie but it comes at a price, quality. Testing is a must. I often will build a number of QuickTime test movies (you should see my Desktop), changing parameters as I go, trying to get that 'right' combination of quality and size.
Enjoy,
--ken
[Top]
copyright © www.kenstone.net 2008
© 2000 -2008 Ken Stone. All rights reserved. Apple, the Apple logo, Final
Cut Pro, Macintosh and Power Mac
are either registered trademarks or trademarks of Apple. Other
company and product names may be trademarks of their respective
owners.
All screen captures, images, and textual references are the property and trademark of their creators/owners/publishers.


