

February 15, 2010
CrumplePop Split Screen Plug-In
http://www.crumplepop.com - $69.00
Review by Steve Douglas
The art of the split screen has been used time and time again in both movies and television. Up until now it has been done by most in Final Cut Pro by scaling and cropping media, spending much time making sure the distances, size and shapes of the screens were just right, nesting and often sitting through significant rendering times. 'Bullitt' starring Steve McQueen in 1968 is one of the first movies that I can recall using it and the current TV show '24' has used the split screen effect for as long as the show has been on the air.
CrumplePop has recently brought out a new plug in for Final Cut Pro that makes the job of creating any number of different forms of split screens as easy as one could imagine. In actuality, you get two plug-ins; one with roughly 70 different split screen appearances and the other provides customizable sets of blocks so as to make your own forms of split screens.
Once downloaded, they are installed in your system's HD/Library/App Support/Final Cut Studio/Motion/Templates. Even though CrumplePop does not advertise that this plug in works in Motion as well as Final Cut Pro, it does. You just need to open the templates in Motion and scroll down and it will be there. In Final Cut Pro, it's the same story as it is found in your templates folder.
CrumplePop's Split Screen plug-in supplies the same 70 different presets for 35 different formats, both progressive and interlaced, so the chances that it will not be compatible for your individual camcorder are quite slim. That said, it is suggested that you install in the Motion Templates folder only the templates for the formats that you generally shoot in. As you need to use the Split Screen for other shooting formats, you can then install those into the Motion templates folder as well. What to do with the complete folder with the rest of the formats? Either place it somewhere you won't forget or install the entire thing at one time. Either way, adding up both the Split Screen and the Split Screen Blocks folder accounts for close to 200 MBs.
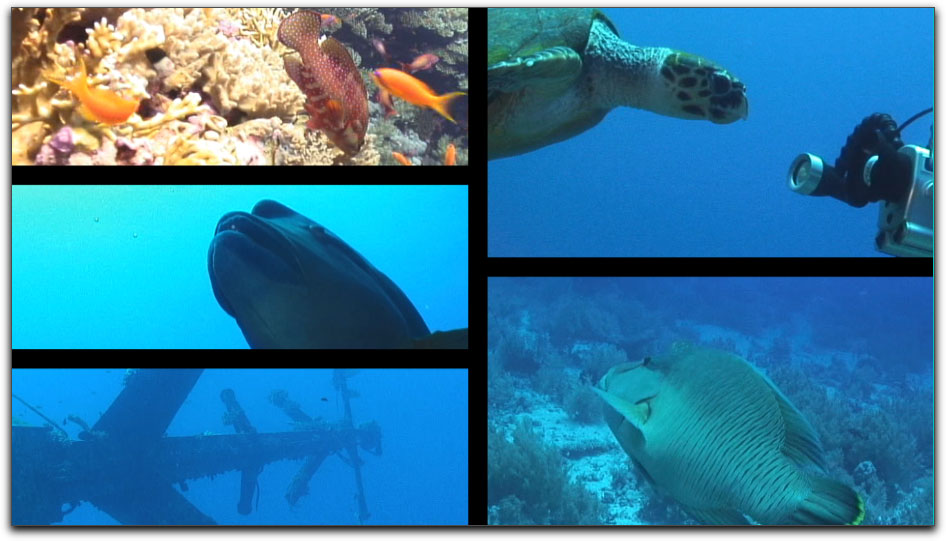
The many different choices of split screen appearances are all labled for easy identification. This one is the HD Triple Block Left med.
Once you have decided on which type of split screen to use, and there are many to chose from, you simply drag it from the CrumplePop Split Screen folder found in the templates folder and drag it to the timeline. Set the duration and open it in the control tab of the viewer. Then it is a simple matter of dragging your video or photo into the drop well. Positioning the clip within the split screen block is easily done in the Viewers Control tab. The clip within the Split Screen will start with the in point that you have set for the clip.
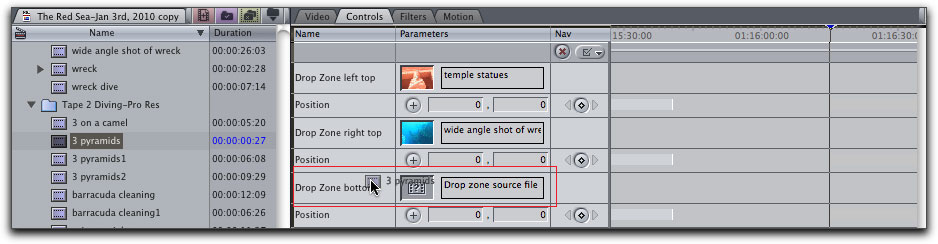
Two of the wells have clips already dragged from their bins in the browser to the wells of the CrumplePop Split Screen, here I am dragging in the 3rd.
I found it interesting that any color correction or other filter you might have applied to the clip will be ignored once the clip is dragged into the CrumplePop well. However, you can bring over a color correction filter and drop it on the CrumplePop template itself and color correct from there. The only problem with this solution is that each of your media sources would all be affected or color corrected the same way. Applying any other filter to the template would also affect all media within the split screen. The issue with filters getting lost when you drop footage into SplitScreen (another is that a clip's audio also gets lost when you drop it into a Template) is actually a limitation of Apple's own architecture and implementation of the Master Templates and is not due to a bug in CrumplePop's Split Screen plug-in.
Attention should also be paid to the length of each clip before you drop them in the well. If your Split Screen duration is 10 seconds and one of your clips is only 6, that block will, as expected, go dark. I would love to see a duration setting within the CrumplePop Split Screen interface so that individual clips could be set to come in at specific times within the template's duration.

The T box right split screen. You are able to individually position each clip within the frame.
Compositing it over another clip allows me to control the color of the boundary boxes though using a colored matte would accomplish the same thing.
The default clips come in at 48 seconds, which you can then cut down, to whatever duration is needed. On my 3GHz dual core Mac Pro a ten second clip using one of the CrumplePop's Split Screen choices with 5 video sources took 2 minutes, 20 seconds to render. Another 10 second clip using only 2 video sources, took 1 min, 36 seconds to render.
The CrumplePop Split Screen set is the first of its kind that I have used and I find it to be a fantastic way to significantly cut the amount of time that would be required to create these manually. The assortment of different split screen appearances leaves little to be desired and, with the addition of the CrumplePop Blocks, you can make any number of your own customized appearances. I do hope that in future additions to the set that there may be some oval or round blocks to use as well. With the purchase of the CrumplePop Split Screen comes a downloaded set of 6 video tutorials which can also be accessed via the CrumplePop website. Though the 6th video tutorial on 'trouble shooting' had a one minute audio dropout at 2:30 seconds into the video, the same tutorial can be found on their website with audio intact. While the Split Screen plug in was intuitive to use, these video tutorials can come in handy and are well done.
While there is no serialization or registration of this plug in, I was told that the company would contact purchasers for any future upgrades.
My bottom line is that the CrumplePop Split Screen gives a heck of a bang for the buck. It is the type of plug-in that will probably be used often which makes it well worth having.
Steve Douglas is a certified Apple Pro for Final Cut Pro 7 and underwater videographer. A winner of the 1999 Pacific Coast Underwater Film Competition, 2003 IVIE competition, 2004 Los Angeles Underwater Photographic competition, and the prestigious 2005 International Beneath the Sea Film Competition, where he also won the Stan Waterman Award for Excellence in Underwater Videography and 'Diver of the Year', Steve was a safety diver on the feature film "The Deep Blue Sea", contributed footage to the Seaworld Park's Atlantis production, and productions for National Geographic and the History channels. Steve was a feature writer for Asian Diver Magazine and is one of the founding organizers of the San Diego UnderSea Film Exhibition. He is available for both private and group seminars for Final Cut Pro and leads underwater filming expeditions and African safaris with upcoming excursions to the Cocos Islands, Costa Rica, Lembeh Straits, Indonesia, and Wakatobi. Feel free to contact him if you are interested in joining Steve on any of these exciting trips. www.worldfilmsandtravel.com
[Top]
copyright © Steve Douglas 2010
© 2000 -2010 Ken Stone. All rights reserved. Apple, the Apple logo, Final
Cut Pro, Macintosh and Power Mac
are either registered trademarks or trademarks of Apple. Other
company and product names may be trademarks of their respective
owners.
All screen captures, images, and textual references are the property and trademark of their creators/owners/publishers.


