September 13, 2010
By Gerard Tay
This was one of the biggest news at the 2010 NAB Show. Blackmagic Design acquired Da Vinci Systems, and I had the opportunity to check out the new Resolve. The software was still in development when I met it, but already had pretty impressive features to boot. Just to be clear, I am by no means a colorist and although I have worked with Apple Color for a couple of years, seeing the de-facto standard for color correction in action was something else.
The DaVinci Resolve is one of the most popular color correction tools used on many of your favorite Hollywood films and TV commercials. It was behind the color for Avatar, Transformers, Terminator Salvation, and many, many others. I have been a big fan of digital color correction, since it was first introduced on films such as “Pleasantville” and “O Brother, Where Art Thou” and the leaps and bounds that digital color correction technology has improved over the years, means that today, it is almost like having the entire film in Photoshop!
One of the main features of the Resolve is that it operates largely in real time, and plays back both video and audio, so you can have a good look and feel as you perform your color correction. Imagine having a client in the room, and you are unable to properly playback the video and audio during the color grade, and that is one of the main reasons why the DaVinci Resolve is so popular in many of the highest end suites in the world. Next to that, with the Resolve for Mac, you are no longer limited to “Linux island” and you are now able to do a file ingest with an EDL, FCP’s XML or Avid’s AAF, and it is able to access codecs through Quicktime, so it supports software based codecs such ProRes and heck, even Dvcpro HD!* To those of you who have used Apple Color, moving onto the Resolve will not be that much of a leap, since you are already used to the lift, gamma and gain controls, as well as the color wheels.
Setup
The software version of the DaVinci Resolve is a full featured implementation that is now available for $995. But that is not the end of the story. You also need compatible hardware such as a Mac Pro and suitable storage to playback video in real time, such as an eSATA RAID. The qualified graphics cards for the DaVinci Resolve are the Nvidia GTX285 and the FX4800, and the Resolve will use the stock GT 120 graphics card for display of the user interface. The reason for this is because the Nvidia cards perform all the heavy lifting of the effects work through Nvidia’s proprietary CUDA technology.
Next to that, you also need the Blackmagic Design Decklink HD Extreme 3D capture card to monitor the video as well as to interface with video decks. (Yes, you can capture and go to tape on the Resolve!)
For the control device, you have the option of the Resolve control surface, which comes bundled together with the software at $29,995, or you can opt to buy the Tangent Wave for $1500.** Alternatively, you can choose to use the mouse, or a Wacom Tablet, but I would highly recommend having a control device and I will get into the reasons later.
Alternatively, if you don’t have a Mac, you can get a Linux license on top of the Resolve Control Panel for an additional $19,995. Although you cannot do a Quicktime based ingest like you can on a Mac, one of the key advantages of this is that with InfiniBand, you can bundle a few GPUs together and scale up the real time performance based on your needs. The ability to work with multiple GPUs makes the Linux version more viable when dealing with complex nodal grades and stereoscopic 3D. However, we are likely to see even more powerful GPUs in the near future!
Recommended Configurations:

The Resolve with the Tangent Wave control surface (great if you have a small table)

The Resolve control surface (for the big boys)
More buttons means faster and better control. Bring on the gizmos!
Key Features
The Resolve operates in full floating point precision and in YRGB (that's Luma channel). Like in Apple Color, it has curve controls, so you can adjust the curval response on the Luma, and individual red, green or blue channels. Also, like most other color correction tools, you can adjust the master lift, gamma and gain, as well as on the individual RGB channels. The software is fully nodal, so you can shift the order of the correction nodes easily, as well as pull effects and keys. One of the biggest features is the 3D pixel tracker. This totally floors Apple Color’s single point tracking tool. The Resolve's 3D pixel tracker tracks an area or subject, and adjusts for changes in scale, position and rotation. We did a test and tracked the flickering sign on the football board, and it still tracked flawlessly and boy, it was fast!

The Resolve configuration panel
Here you can set up your project. Setting up for interlaced formats is done here with just one click. And did I mention you can hear the audio mix as you grade? Or you can turn it off and grade to music, if you like music.

Deck control on the Resolve
The Resolve can work with both interlaced and progressive footage and it has very cool conform tools, so you can easily make loads of changes in the edit room after you have done your color grade, and you can still re-import the new footage and keep the original grades on your shots. Also, it can run through a video clip, automatically notching each cut by analyzing changes in the luma signal. The next key feature, which I mentioned earlier, is its ability to do a file based ingest through Quicktime. Next to that, it can natively access RED footage and allow the colorist to manipulate the metadata from the RED camera. These are huge features for the tapeless workflow.

The Color Correction Panel (really, really, it is not rocket science)
For color correction, like in any other industry standard color correction tool, you have lift, gamma and gain controls as well as the 3 way color correction wheels. Also, you can pull qualifiers and secondaries, on top of custom shapes, to light and color correct each and every subject in the shot. You can also draw out keyframes to tweak the vignettes and strength of color correction according to your subject.
Aside from color correcting each clip, you can also apply overall grades in track mode. This lets you perform a global correction to the entire track, so you can use this to quickly do a one light telecine before you start your offline edits.

The Resolve Render Panel
Like most high end finishing stations, you can capture and go to tape from it. Another HUGE feature is the ability to export to Quicktime. The network wants an Mpeg-2 of the commercial spot and you got Episode Pro… How big is this? Need I say more?
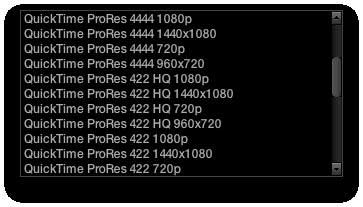
Quicktime Export Options!
There is an old saying that beauty is in simplicity, and one of the things that I love so much about the Resolve, is the scaling and rotation algorithms, as well as the sharpen and blur features. They look so good, they look almost like the blur and zoom on camera lenses. And here is an example of these two really basic features that I love so much about the new software.


Before and After color grade, with scale and rotation applied
After enlargement and rotation, you can see the skin texture more clearly, and the best part is that it looks so natural.
Some Drawbacks
The Resolve was designed to work alongside the Revival, another machine from Blackmagic Design, which does dust and grain removal. As a result, the scratch removal tools in the Resolve are basic (c’mon, you really don’t want your colorist to spend hours de-graining the footage you shot in low light, do you?)
Another drawback is that there is no GUI display for the 3 way color correction wheels, so as I mentioned earlier, you are very much happier with a control surface, and also you work much faster. Another feature that I hope will be incorporated into future versions of the Resolve, is a shot stabilizer. Although this not a visual effects software, sometimes, you get a bump in the camera and you really wish you can just remove it there and then. That said, these are really not standard or expected features in a color correction environment.
Conclusion
The price of the Resolve has certainly gone down, and that is a very welcome move indeed. I was definitely looking to it for the features, and it certainly did not disappoint. In today’s age where you can easily have more than one software on a single machine (After Effects, and Final Cut Studio or Avid Media Composer), this is certainly a worthwhile addition to your suite. Because it is now on a Mac, you can not only have it as a stand alone grading system, you can also integrate it as part of a really powerful workstation at a relative budget, complete with Final Cut Studio for editing, Adobe After Effects or Nuke for motion graphics and compositing, and the Resolve for color correction and grading. And now you have no more excuses to tell your clients that they cannot watch the grade in real time.
copyright © Gerard Tay 2010
*Importing of FCP XML was under development at time of writing
**Prices are estimated
***Note that exporting to ProRes requires installation of Final Cut Studio, as ProRes is a proprietary codec owned by Apple
****Pictures appear courtesy of Blackmagic Design.
 Gerard is a freelance broadcast editor and fellow geek who works in the small but congested urban jungles of Singapore. When he is not too busy swinging between editing suites and solving the intricacies of the L-cut, he keeps a blog and posts on the LAFCPUG (like everyone else should).
[Top]
copyright © Gerard Tay 2010
© 2000 -2010 Ken Stone. All rights reserved. Apple, the Apple logo, Final
Cut Pro, Macintosh and Power Mac
are either registered trademarks or trademarks of Apple. Other
company and product names may be trademarks of their respective
owners.
All screen captures, images, and textual references are the property and trademark of their creators/owners/publishers.