
June 7, 2010
Diving the Deep - Underwater Videography
By Steve Douglas
Filming underwater can be challenging. Fish are not the most cooperative actors and will rarely perform their behaviors for multiple takes until you get the video clip filmed just right. You have to be immediately ready and capable when a good filming opportunity presents itself. Let us explore many of the skills you can utilize in order to maximize your abilities thus producing the best results for your filming endeavors.
Filming video underwater is considerably different than shooting topside. On land you have the benefits of a tripod to keep your camera steady and your horizon straight. Underwater, the use of a tripod is not always pragmatic, yet unless you are filming your version of an underwater 'Blair Witch Project', the need to keep the camcorder steady is vitally important as, in essence, you are shooting handheld. There is nothing that will distract more from your filming efforts than a shaky shot. No matter how great the subject of your filming is it will be ruined and distracting if it is moving forward, backward, up and down.
To keep your camcorder's housing steady the videographer must have excellent buoyancy control. Practice in the water hovering over a reef or any object. Try not to use your fins or arms to keep you in one place. Avoid sculling your hands to maintain body position or depth. Neutral buoyancy is an important skill for all divers, and especially so for photographers and videographers.
While there is no one 'best' position or method for holding an underwater housing there are few filming methods and tricks, which will contribute to a more stable shot. One is to
relax your grip upon the housing itself. Imagine that your arms are a flexible cushion, which can adjust to both currents and surge while holding its place. Holding on too tight will exacerbate even the slightest movements, breathing included. Just as a marksman is taught not to tense up and to keep a light finger on the trigger, so must the videographer. I often find myself holding on to the housing with one hand while the other cradles the bottom. Cradling the bottom of the housing places my elbow into my abdominal area and forms a 3-point platform, similar to a tripod, offering a steadier filming position. It often depends upon the filming situation and diving conditions, however, the cradle method is usable in most filming scenarios and should serve you well.
I'll not say what models of camcorders one should consider for filming underwater, however, just as for topside use, the better the cam, the higher the quality image. Just as important is to realize that the finest camcorder and housing in the hands of someone who does not know how to properly use it will produce far less quality than someone with a lesser quality camcorder in the hands of the shooter who knows what they're doing and how to operate the camcorder and housing with the diving skills to match.
Do keep in mind that not all camcorders have housings made for them, so if you are considering buying a camcorder for underwater use, check around to see if there is an underwater housing made for it. Also be sure that you will have access to manually white balance from the housing as well as manually focus. In my mind, these are the two most important controls a housing must have whether they are manual control or electronic housings.
Know where the controls are on your housing and be able to access them without looking. Absolute familiarity with your own equipment will enable you to access the controls without taking your eyes off your subject. Once you start looking for the housing controls or try to figure out how to use them properly, your attention will be diverted from your subject and you will not be able to maintain either the shot's composition or the steadiness the cam will need from you in order to produce an even piece of footage.

Each housing, depending upon the manufacturer and camcorder model will have its' user controls in a different place.
The more you practice with the housing, the more familiar you will be with it when it is time to film. The housing pictured is the Light & Motion Bluefin with hi resolution monitor back.
One thing I never do, either on land or underwater, is to utilize the camcorder's digital zoom. In fact, I instruct everyone to simply disengage the digital zoom from within the camcorders' menu. Digital zoom works not by zooming closer to your subject, but by enlarging the pixels of the image your camera's iris has focused upon. This produces very poor results by sharply cutting down on the sharpness, color and resolution of the image. For all intents and purposes, digital zoom should never be used either topside or underwater.
On the topic of Zooming, an error that far too many underwater videographers make is using the standard zooming control far too frequently. Too much zooming in or out can really contribute to an audience's potential nausea. Think first before you zoom in closer to enlarge the frame area of your subject. It would be far better for you to swim closer to the subject, thus filling up the frame that way. In addition, by getting closer to your subject you will greatly reduce the amount of backscatter and other particulate visible in your clip. Video lights, like a photographer's strobe, tend to illuminate those nasty particulates. Getting closer to that fish will go a long way towards eliminating them. In addition, you will find that your subject will be more sharply focused and the colors will be brighter and more engaging. This is because your camcorder does not have to film through 8 feet of water before it reaches its subject.
This is not to say I never use the zoom control. Often, before I set the camcorder to begin recording, I will zoom into the subject, make sure it is framed and focused nicely for the images' composition, hit record and then slowly zoom out. I find that a slow zoom out from an extreme close-up to medium or wide-angle shot may be a very effective way to highlight my subject. It creates initial intimacy and wonder with my subject and then allows the viewer to see it in a larger scope in relation to its' environment. This makes for a dramatic and natural effect, which can be used when editing for your final film production.
Wide-angle shots are great when used as establishing shots. They show the viewer the location of the dive, the type of reef, and water conditions, but when used exclusively, they create a serious lack of diversity when redundantly repeated within the story line. Thus, when filming, remember to change up the type of shots you are taking. Get those wide-angle shots, but don't forget the close-up and extreme close-up if your system is capable of using a macro or super macro lens. When you are in postproduction and editing, using a variety of shots and filming angles will make for a far more interesting film. While there is no hard and fast way to use these shots a Wide Angle clip, followed by a close up or extreme close up will provide your audience with perspective regarding both the size of your subject, location and even the fish behavior.
Attention to composition is as important underwater as it is topside. The rule of thirds within the frame still applies, however, underwater, the angle that one shoots at is another important consideration. Some might refer to this 'rule of thirds' as simply leaving enough nose room for the subject within the composition of the image.
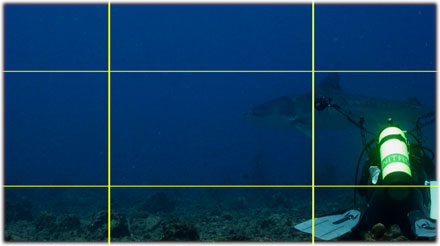

The image on the left leaves both of the subjects, the photographer and tiger shark, in the far right 3rd of the image creating an unbalanced appearance.
This is a good example of poor composition. The image on the right displays a superior balance of the subjects throughout the frame.
It is always best to try to shoot marine creatures, whether they be clownfish, barracuda or shark from slightly underneath. This provides both size and depth to the creature. When one shoots downward on a fish the entire image tends to flatten out.
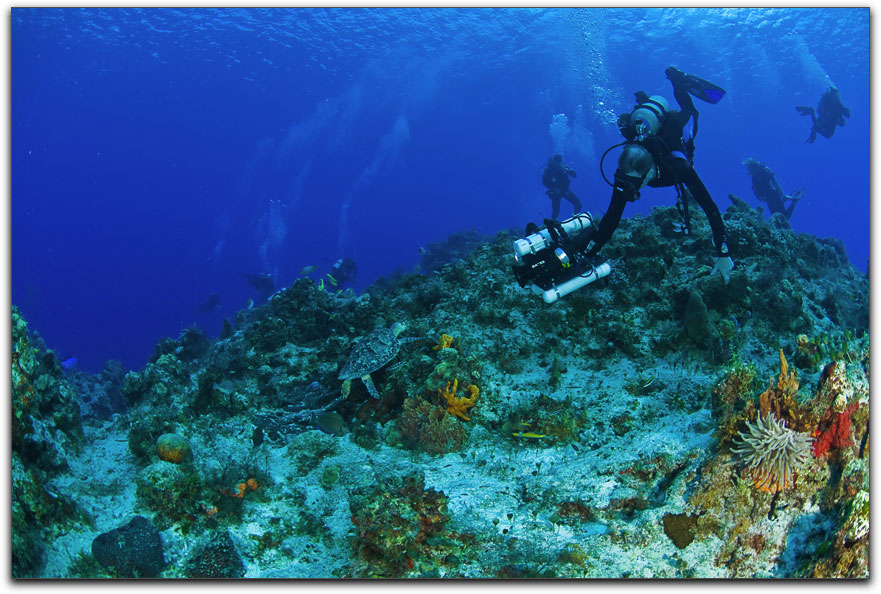
This videographer is shooting downward. This will decrease the depth of the image and the turtle will appear flattened out against the reef. Photo by Nancy Boucha.
When shooting from underneath you will not only get a clear shot of the vibrant colors of many species but also, as in the case of filming sharks, an excellent view of their mouths, teeth and eyes giving character to your subject. Shooting from the side is also fine but, even then, I try to stay a bit low with the housing aimed slightly up.
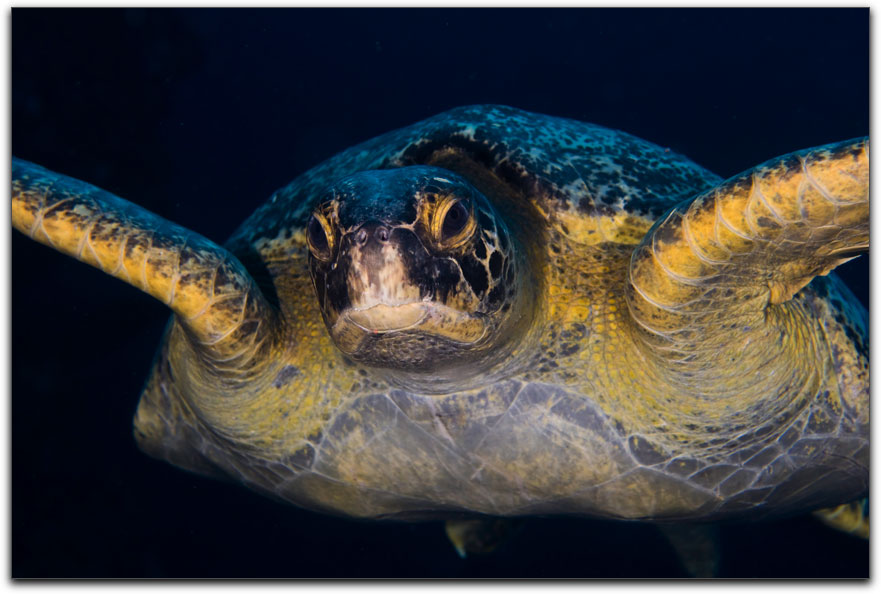
This photo by Nancy Boucha demonstrates the slightly upward position Nancy shot from. With the cam slightly up, the image gives the turtle character and depth.
Finally, to get the best possible images underwater you must have, at least, two video lights. As we descend into the water, colors will dissipate with the reds and yellows being the first to go. Once we reach about 60ft, the only colors left tend to be a greenish blue. While most underwater housings supply UR filters to help bring back the color, they really can't be used in shallow water above 30 feet without getting a red haze over the entire image.
In the old days, underwater video lights barely reached 3000 degrees Kelvin and even the most expensive lights burned at only 3400k. What's more, and only if you were lucky, they had a burn time of barely 25 minutes. They were big, used heavy batteries, and were clunky to use. The underwater industry has made many advances in lighting since then and now there is a diversity of HID lights with color temperatures between 5400 and 6000k. They are much smaller, lighter to pack and have considerably longer burn times. In addition, Light & Motion have two sets of lights, the Sunray 1000s and Sunray 2000s which utilize extremely long lasting LEDs with multiple output levels which makes switching from a macro shot to a wide angle shot much easier.
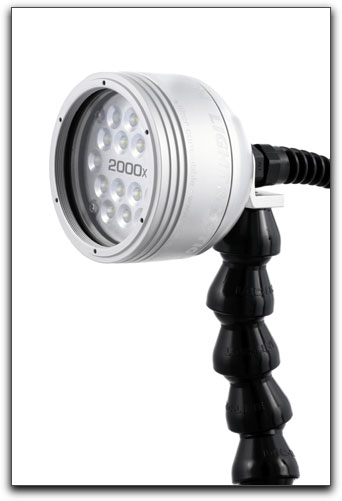
The latest thing in long lasting, lightweight underwater lights with multiple power settings.
The Sunray 2000s has 3 settings for 2000, 1000 and 500 lumens, while the Sunray 1000s have settings for 1000, 500, and 250 lumens. I use the higher power settings for wide angle shots and the lower settings for those close up or macro shots, or for when there is a lot of particulate in the water. It is additionally important to remember that underwater lights do not have a long throw of light, which makes getting closer to your subject even more important.
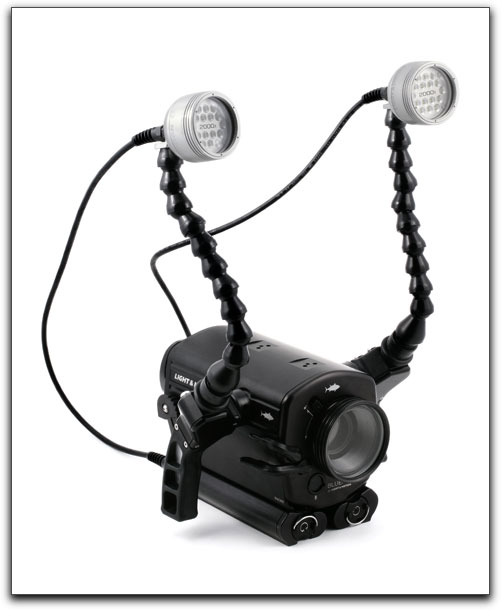
Two lights are always necessary when filming underwater.
Note that these lights, produced by Light & Motion, are attached by flexible arms for repositioning underwater.
Each of these techniques takes practice and it is by repeatedly diving and filming that you will enhance your abilities as a filmmaker. Remember that no matter how advanced an underwater videographer you are, just as with films shot topside, in the end, the most important thing is the quality of the story that you tell within your underwater films. The reward will be the self-satisfaction gained by having increased your skills and the resultant applause of the audience as they watch your production.
Side Bar Quick Tips
- Make sure you are very familiar with both the controls of your camcorder as well as the controls on the housing.
- Concentrate on keeping the camcorder steady during filming. Use an underwater ledge or your camcorders framing markers to maintain a straight horizon.
- Whenever the lighting changes, readjust the manual white balance.
- Disconnect the Digital Zoom and use the Optical Zoom sparingly.
- Practice proper buoyancy control always.
- When filming, try to shoot your subject both from different angles as well as with a variety of focal points.
- Avoid shooting down on any subject.
- Just as it is with photographers, the rule of thirds applies to the framing and composition of a video clip.
- Always be aware of your body and legs while filming. Avoid at all costs any damage you might do to the corals, reef and other marine life.
Steve Douglas is a certified Apple Pro for Final Cut Pro 7 and underwater videographer. A winner of the 1999 Pacific Coast Underwater Film Competition, 2003 IVIE competition, 2004 Los Angeles Underwater Photographic competition, and the prestigious 2005 International Beneath the Sea Film Competition, where he also won the Stan Waterman Award for Excellence in Underwater Videography and 'Diver of the Year', Steve was a safety diver on the feature film "The Deep Blue Sea", contributed footage to the Seaworld Park's Atlantis production, and productions for National Geographic and the History channels. Steve was a feature writer for Asian Diver Magazine and is one of the founding organizers of the San Diego UnderSea Film Exhibition. He is available for both private and group seminars for Final Cut Pro and leads underwater filming expeditions and African safaris with upcoming excursions to the Cocos Islands, Costa Rica, Lembeh Straits, Indonesia, and Wakatobi. Feel free to contact him if you are interested in joining Steve on any of these exciting trips. www.worldfilmsandtravel.com
[Top]
copyright © Steve Douglas 2010
© 2000 -2010 Ken Stone. All rights reserved. Apple, the Apple logo, Final
Cut Pro, Macintosh and Power Mac
are either registered trademarks or trademarks of Apple. Other
company and product names may be trademarks of their respective
owners.
All screen captures, images, and textual references are the property and trademark of their creators/owners/publishers.


