

Basics - Audio Volume April 29, 2002
Basics - Audio Volume April 29, 2002
Digital Audio in Decibels & Final Cut Pro's Audio Peak Detection Tool
Audio peaks in Final Cut Pro
By Ken Stone
The time has come to talk about setting volume peaks in Digital Audio. The discussion that follows is for Final Cut Pro users and is not meant for audio pros.
I have been reading a number of the new FCP books that are hitting the market. I was absolutely shocked to find that in some of these books the information given about digital audio, setting peaks (volume), is so completely wrong that following the advice given is a guarantee to complete audio disaster. This is totally unforgivable. Why. . . . . because in both the FCP 2 and FCP 3 manuals there are complete audio sections that cover all this correctly. All the authors had to do was read the Final Cut Pro manual before writing their books. Sorry about the rant. I should point out that there are a number of excellent FCP books out there and you can find reviews of these book at this web site and at the lafcpug web site.
There are several different elements that we need to look at when working with Digital Audio in FCP.
Dynamic Range
You are driving along in your car listening to the CD player. You have the volume knob set to where you like it. As you know, there will be parts of the program that you are listening to that will be softer than the rest. Some parts will be louder. If you think of Classical Music, it can have quiet parts were only one instrument is playing and other parts that are very loud with all 130 members of the orchestra playing. This range from quiet to loud is called the Dynamic Range. Change the CD to a 'Books on CD' with the narrator reading text and you might find that the volume level is fairly consistent. This difference in dynamic range between the two different CDs happens without your touching the volume knob on your stereo. Dynamic range and audio volume are two different elements of audio. Changing the volume will not change the dynamic range.
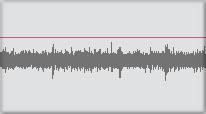
Narrow dynamic range |
Wider dynamic range |
Volume
Audio volume is measures in decibels, dB. With analog audio it was determined and standards were set so that a reading of 0 dB on a VU meter was the highest volume level before audio distortion sets in. Audio that exceeds 0 dB is called 'overdriven' audio. It's at 0 dB that analog audio starts to distort. The higher the dB reading the more distortion. But analog audio is very forgiving. Going +2 or +3 dBs over 0 results in very minimal distortion, often described as warm or fuzzy. Go a few dB louder yet and you have the 'Rolling Stones' sound.
Not so with digital audio. Digital audio is totally unforgiving in this respect. Once your volume level hits 0 you experience is called 'digital clipping' (square wave clipping). A warm and fuzzy sound it's not. You must keep the very loudest part of your audio (spikes) below 0 dBs.
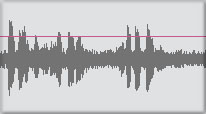
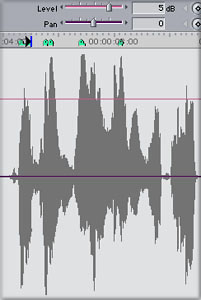
So how do we do this? We need a reference. Apple has chosen -12 dB as the reference level and has provided us with the 'Bars and Tone' video Generator which has a preset -12 dB 1 kilohertz (kHZ) tone. We are also provided with a horizontal pink line, shown below, which denotes -12 dB audio level. This 'audio overlay' reference line can be found in both the Viewer window, audio tab and in the Timeline.
Red arrow shows -12 dB reference line Audio waveforms peak at -12 dB Narrow dynamic range |
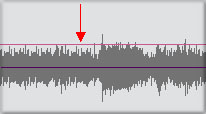
Red arrow shows -12 dB reference line Audio waveforms peaking well above -12 dB Wide dynamic range |
Peak at -12 dB
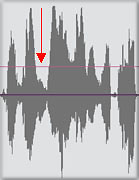
For an example, lets say that we have audio of two actors in a conversation. We want to set the volume on the Timeline so that the loudest part of the conversation hits -12 dB on our meters. The distance between the -12 dB that we set for the audio and -1 dB the maximum allowable loudness for digital audio is called 'head room'. Our two actors may be having a normal conversation in which case the dynamic range, the difference between the softest and loudest audio, will be narrow. It could be that no audio from the conversation exceeds -12 dB. Now during the conversation a door opens and several people enter the room talking loudly and the door slams shut. This additional audio could well be louder than -12 dB and the door slam, louder yet, will create an audio spike. It is essential that the louder audio and the spike from the door slam not hit 0 dB. This is why we have the 12 dBs of headroom. It's our safety margin for audio spikes.
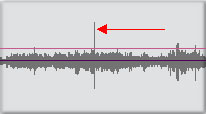
Red arrow shows audio spike |
Reading Audio Levels
The introduction of Final Cut Pro 2 provided us with on screen VU meters. Playing the Timeline allows us the opportunity to actually see our audio levels. Examples of the VU meters are shown below. The meter on the left depicts audio that is at -12 dB and has green colored volume bars. The second meter from the left shows -2 dB and the tops of the colored volume bars have changed to orange as a visual warning. The next meter to the right has hit 0 dB or above. The top of the volume bars is red denoting that audio clipping has occurred. At the very top of of the VU meters are two small square boxes. When clipping has occurred these small boxes turn orange and will stay orange so that we will know that at some point in the audio the volume was too high. The meter on the far right has a thin horizontal red peak line between the two volume bars, shown by the red arrow. As we play the Timeline our volume bars rise and push up the red peak line denoting the highest volume level reached. Even though the volume bars fall back, the red peak line remains at the high point on screen showing us the highest dB level of our audio. As the audio is being played the volume bars rise and fall showing audio volume in real time.
|
-12 dB |
-2 dB |
over 0 dB |
red peak line |
This is a big help. Before FCP 2 all we had was the pink audio overlay line that we knew was set at -12. However, how many dB above -12 a waveform might be, was pure guess work. With FCP 2 we got meters that show audio volume levels and if the small squares at the top had turned orange we knew that we had clipped our audio. But where?
The Audio Peak Detection Tool
Now with FCP 3 we have a new tool that will actually place markers in the Viewer window, audio tab and on the Timeline at those points where clipping has occurred. Now we know where our audio is clipped.
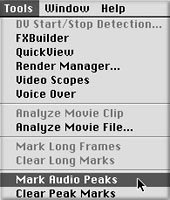
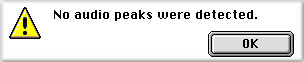
You can select a single clip or multiple clips in the Timeline or Browser, or you can check the entire Sequence by making the Sequence in the Timeline active (be sure that no individual clips are selected). From the Tools menu select 'Mark Audio Peaks'. FCP will then look at the audio levels. If no peaks are detected you will be presented with a message to that effect.
FCP 3 places green 'markers' at those points that clipping occurs. In the Viewer window, shown below left, markers are placed in the scrub bar. Below right the markers are placed on the Timeline. You can move from marker to marker by using 'shift m' from the keyboard to go forward and 'option m' to move back. Maybe the 'Mark Audio Peaks' Tool should be called the 'Mark Clipped Peaks' Tool.

Watch Those Peaks and Overall Volume
The most important thing to remember when working with digital audio is that hitting 0 dB will cause digital clipping which can produce a horrific sound. Equally important to understand is that even if we keep our peaks below 0 dB in FCP, and the audio might sound just fine, is that we output our projects to other mediums. Broadcast, VHS dupes, DVD, Web, etc. While our audio might sound fine in FCP staying just below 0 dB, often this high level of audio is just too hot for other mediums.
While Apple and Sony (for mini-DV) set the standard at -12 dB, -20 dB reference is the standard in most professional digital audio for picture, including Digital Betacam and HD. Some might say that peaking at -12 dB is still too hot and they use -20 dB as their reference.
Don't be afraid of lower volumes. This is digital audio and lower volume audio is quite clean.
Enjoy,
--ken
copyright © www.kenstone.net 2002