
Panasonic Varicam - Workflow January 17, 2005
Workflow With Panasonic HD
And Final Cut Pro HD
Panasonic Varicam - Workflow January 17, 2005
Workflow With Panasonic HD
And Final Cut Pro HD
By Andrew Balis
One of the main selling points of Final Cut Pro HD (version 4.5) is the ability to easily work with hi definition footage shot in the Panasonic DVCPRO HD format using the Varicam camera, so named because it allows for multiple frame rates when shooting.
And best of all, this footage can flow into your computer with ease via a simple FireWire cable connected to a tape deck. Editing storage and final mastering are possible on even the most modest of systems. There is no need for a specialized capture card or extremely fast and expensive hard drives. In fact, you'll find working with this footage in Final Cut much like working with DV.
Overall, the amount of equipment needed in post production is minimal.
Production:Post Production:
- Shoot with Panasonic HD Varicam camera (AJ-HDC27F) at 720p/24
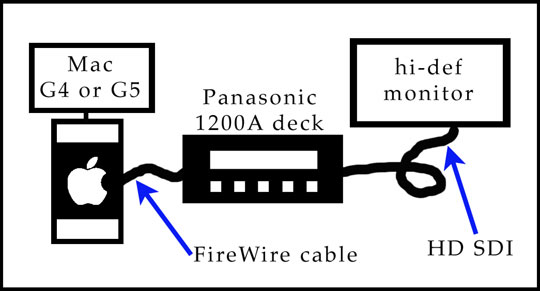
- Use Panasonic AJ-HD1200A deck to input/output material into Final Cut over a FireWire cable.
- Use a 6 to 6 pin FireWire 400 cable from computer to tape deck for capturing from, outputting to, and controlling the deck from within Final Cut.
- Install two files on your Mac found on Panasonic and Apple's web sites.
- For critical hi definition monitoring, like for color correction, connect a BNC cable from the HD SDI Out on the 1200A deck to HD SDI In on a hi def monitor.
- Hard drives for media when working on a G4: A good FireWire 400 drive is plenty fast enough for 24p footage.
- Hard drives for media when working on a G5: An internal or external SATA drive is plenty fast enough. We used an external SATA array purchased from ProMax. No striping of drives was needed on the G4 or G5.
To put this in perspective, if we had gone the direction of a hi definition capture card, working at "uncompressed" resolution capturing through HD SDI, we would have had to handle files with data rates exceeding 100Mb/sec, as opposed to the mere 5.5 Mb/sec of this new route.
If you are using the Panasonic 1200A deck (AJ-HD1200A) which allows you to use FireWire for input and output, then this file is important. One thing this fixes is a strange double-image on an externally connected monitor. As it states on Apple's web site, this updates QuickTime components used by Final Cut Pro HD.
2 Frame Rate Converter for Final Cut Pro HD
Download and install this file. This file will allow you to properly convert footage shot as slow or fast motion so that it plays as intended. It will then show up as an option in Final Cut (we'll cover this in a minute).
In fact, right now, only fractional frame rates are compatible with capture and sequence presets. They are: 23.98, 29.97, and 59.94. The other sequence frame rates, 24, 30 and 60 are available on the camera, but are not compatible for a sequence timebase in Final Cut. If you plan on shooting 24p, make sure the camera rental house knows this so the camera can be properly set to 23.98, since the display in the viewfinder will always read 24, whether its set to 23.98 or 24. This is not easily found in the menus yourself, it involves changing the frame frequency setting of the camera (it should be set to 59.94Hz).
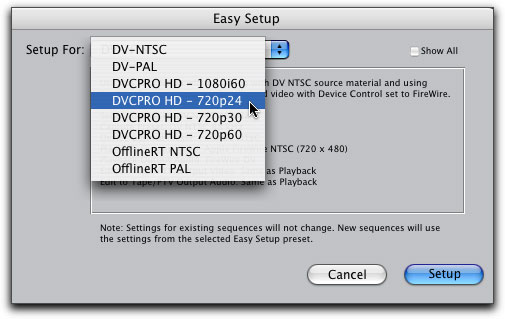
From the Final Cut menu, choose Easy Setup. From the Easy Setup dialog box, choose DVCPRO HD - 720p24. Then click the button Setup.
Note: In the the choices below for 720p, although the presets read 24, 30 and 60, in reality this indicates 23.98, 29.97, and 59.94. Don't let this throw you. Just realize those are just common terms used when indicating these formats, a kind of shorthand.
If you're the curious type, and you inspect these capture and sequence presets, you'd notice a couple things that seem odd, at first. Normally, certain aspects of your capture and sequence presets should match exactly. This DVC Pro HD is an example of a format that follows a different set of rules.
To access the current capture or sequence preset, go to the Final Cut menu > Audio/Video Settings, then click on the appropriate tab. Find the current preset (with the checkbox next to it) and double-click it to open it (it will automatically be duplicated since these are locked presets).
Offline/Online
With the above equipment, we could work with hi definition footage in Final Cut without a lot of extra expensive equipment. Additionally, we worked at online resolution for the whole edit. In other words, we brought in the footage into Final Cut at full recorded quality, working with the format in its native resolution. The media files were somewhat small and had low data rates, around 5.5 Mb/sec for 24p, so there was easily enough room on our drives for a meager 20 hours of footage at full resolution. Because of this, there was no need for a traditional offline/online, in other words no need in the end to re-capture at a better quality or transferring to another machine to create the final mastered video. With the aid of a color correction session also done in Final Cut, our final output was done from Final Cut via a FireWire cable back to 720p on tape.
There are two files you need to install that are essential when working with Panasonic DVCPRO HD footage with Final Cut. Even if you have Final Cut Pro HD, you still need these files for full functionality with this format. Included are links that are active at the time of this writing.
1 DVCProHD Components 1.1
This file can be found at http://www.apple.com/support/downloads/dvcprohdcomponents.html. It will bring up a result for DVCProHD Components 1.1. Click on the link, download the file and install it.
This is a link to the download page: http://www.panasonic.com/business/provideo/support/fcphd.asp
Next let's look at an acceptable timebase for Final Cut, in other words what frame rate you will be cutting with. Although the Varicams can shoot at many frame rates, there are only a few compatible frame rates that can match Final Cut capture and sequence presets. For instance, our shoot was photographed in 24p. Well, the viewfinder display read 24, but we actually recorded at 23.98 frames per second. You have a choice whether to shoot at 23.98 or 24. Of these two choices, only 23.98 is currently compatible with Final Cut Pro HD (version 4.5).
Now you might be wondering how to take advantage of the different frame rates on the Varicam cameras to achieve fast or slow motion similar to shooting different frame rates on a film camera, especially since I just mentioned that only a few frame rates are acceptable in Final Cut. Let me re-phrase: only 23.98, 29.97 and 59.94 are acceptable frame rates for "regular" speed, in other words the frame rate you edit at. You can shoot a low frame rate like 4fps for fast motion, or 60fps for slow motion and these will all be available for you in Final Cut. These off-speeds need to be handled differently than any normal speed footage that is shot. We'll take a look at capturing regular speed footage like 24p, as well as how to properly capture and convert footage shot as fast or slow motion.
Choosing a preset called an Easy Setup will put into place all the main
necessary settings for a project, like capture and sequence presets. This is
especially important when working with DVCPRO HD, where the preset details
are crucial. We'll take a look at an easy setup for the 720p hi def format
at 24 frames a second (23.98), but their are also Easy Setups for other
DVCPRO HD formats. This includes presets for frame rates of 30 (29.97) and
60 (59.94) and the 1080i format.
Capture Preset
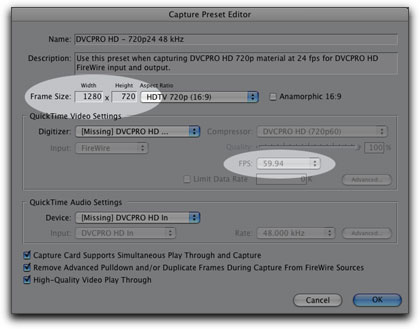
Frame Size:1280x720 FPS (frame rate): 59.94 |
Sequence Preset
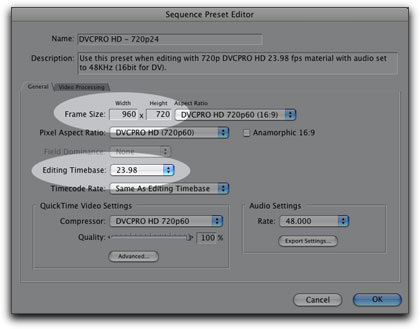
Frame Size: 960x720 Editing Timebase (frame rate): 23.98 |
Although the frame size doesn't seem to match between capture and sequence, these presets are correct. When working with DVCPRO HD natively in Final Cut, the dimensions of the format are 960x720. Also, although the two different frames rates seen above also appear to be a mis-match, this is also correct, as we'll look at next.
In the previous illustration of the 720p/24 capture preset, notice that it is set for capturing at 59.94fps (frames per second). This is because the DVCPRO HD 720p format always plays back and records on tape at a constant rate of 59.94 fps (unless the hertz setting for the camera is changed). It does this to allow for multiple frame rates. For example, when you shoot 24p, it still records on to tape at 59.94. It does this by photographing 24 frames, then creates duplicate or redundant frames to fill up the rest of the 59.94 video stream.
Because the duplicate frames are flagged differently than the original 24
frames, and final cut can read those flags, it can extract out only the
correct frames, creating 24 frame media during capture.
Notice the checkmark at the bottom of this capture preset, indicating that the duplicates frames will be removed during capture.
Capturing 24p footage
After you choose the 24p Easy Setup, simply go to the Log and Capture window and capture as you would any format.
That's how we start at 59.94fps on tape but end up with a sequence at 23.98fps in Final Cut.
Capturing Off-speed footage
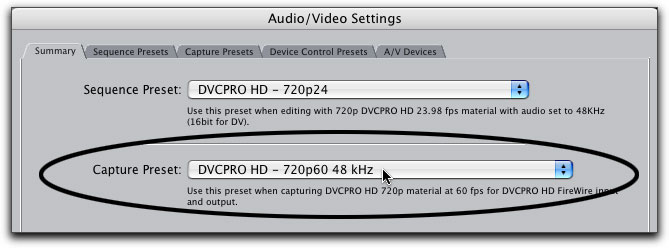
Any footage not shot at this frame rate should be captured with a different capture preset. Go to the Final Cut menu > Audio/Video Settings. From the main Summary window that opens, go to the Capture Preset pulldown menu and choose DVCPRO HD - 720p60 48kHz. Whether you shoot at 10 or 60 fps, you capture with this one preset. This will capture the footage at 59.94 frames a second, but won't remove any duplicate frames.
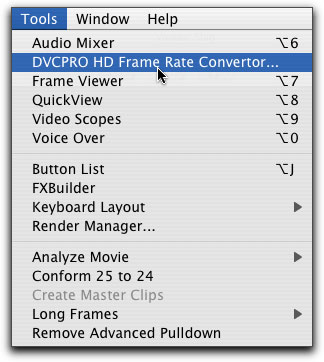
After the off-speed footage is captured, it needs to be converted. Here's where one of those files you installed earlier comes into play. Highlight an off-speed shot in the Browser that's been captured at 720p60. Go to the Tools menu > DVCPRO HD Frame Rate Converter. If earlier you didn't install the frame rate converter, you won't see this option.
In the dialog box, you are being asked about your sequence's timebase, in this case 23.98. Whether the clip was shot at 10 or 60 fps, you would only choose 23.98 in this window. Additionally, choose to make the new file self-contained, and if you wish, the results can automatically be re-imported into Final Cut.
For more details on the frame rate converter, check out the Frame Rate Converter Help.pdf that comes with the download.
Beware this process strips the timecode and reel number on the new clip/media file so it may be a good idea to keep a copy of the original captured media file at 720p60 if you ever need to refer to the source on tape.
When multiple recorded frame rates are on the same tape, sometimes a clip can be captured at an incorrect frame rate, needing rendering when the clip is placed into a sequence. Although you can render the clip as Apple suggests, you can also try and recapture the clip correctly.
The trick is to give Final Cut some handles from one frame rate to the next during shooting. In other words, after the action is over at one frame rate, record an extra 5 seconds at the end. After the frame rate is changed, when you start a new shot, record an extra 5 seconds at the beginning before any usable action. This way, each frame rate has enough handles for pre- and post-roll on the tape deck during capture into Final Cut. For any off-speed shots, I found it most reliable to log and capture them one at a time.
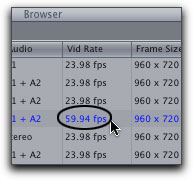
Also, after incorrectly capturing a few clips without noticing, I found it helpful to keep the Vid Rate (video frame rate) column in the Browser close at hand. If one of the 24p shots got captured incorrectly at 59.94, it would be seen right away in the column after capturing.
I would then re-log and capture that part of the tape with shorter handles to hopefully capture it at the right frame rate.
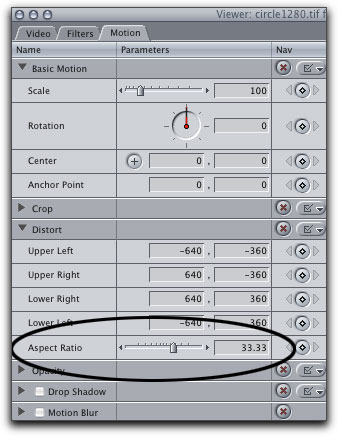
When working with Photoshop native files, although they can be imported with all layers intact, Final Cut will not alter the aspect ratio on these graphics. Final Cut only changes the aspect ratio on single layer graphics like a tiff, pict, or jpeg. Therefore you'll need to change the aspect ratio on any imported layered Photoshop graphics to keep them looking correctly proportioned. To do this, highlight a Photoshop clip in your Timeline by single-clicking on it, then press Return to load it into the Viewer. On the Motion tab, under Distort, set the Aspect Ratio to 33.33.
Although the computer screen playback is not advertised to mirror the final color space of the video, and the monitors have limited adjustments, I still found the picture pretty close on three different Apple flat screens I tried on two systems to our final online monitor (a good CRT hi def monitor). It gave us a way to have high quality playback during the offline edit without any additional expenses. It's even a great way to put in rough color correction ideas to get an idea about the final look of the project before you should eventually get a properly set-up external monitor for final color correction and output.
If you have two monitors connected to your computer, even better. One can serve as a full time playback monitor, and the other for the Final Cut windows.
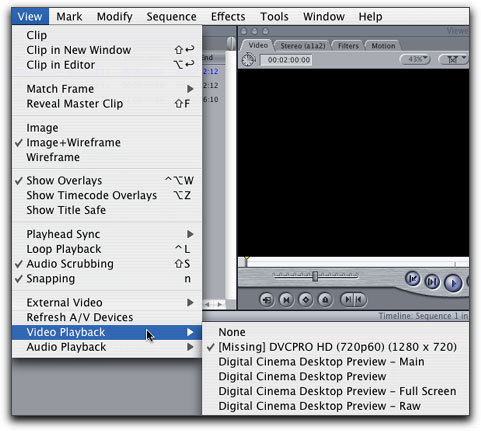
To access Digital Cinema Desktop, go to the View menu > and choose one of the options. This example shows the options when two computer monitors are attached.
After choosing Digital Cinema Desktop, you may jump straight into full screen playback. Therefore, its good to know the keyboard shortcut for turning it off or on: Command/F12. Once in full screen mode, use the spacebar or J,K,L for playback.
Also, you'll need a good amount of RAM and a fast computer for this feature to work at the best quality. To see and possibly raise your current playback quality, go to the RT pop up menu in the left side of the Timeline and make sure it is set to high. Although this menu also decides the playback quality of real time effects, it affects the playback quality of all footage when using Digital Cinema Desktop.
When playing back from Final Cut out to the 1200A deck and then to an
externally connected hi def monitor, we were faced with an odd blinking in
the monitor. On one system, a dual 1gHz G4, the blink was every 3 seconds or so. On a dual 2 gHz G5, the blink was about every 6 seconds or so. Not sure what causes it, but I've heard the same reports from other users. On recording to tape and subsequence playback, the blink is not present. So it apparently doesn't impact the recording, just direct viewing from
Final Cut. Because we used Digital Cinema Desktop for playback on good
cinema displays for the entire edit, this ironically only affected us during
final color correction and output.
Whether any new releases of the OS or QuickTime have resolved this issue are un-tested to me. At the time of editing, we were using Final Cut 4.5, OS 10.3.4 and QuickTime 6.5.1. If anyone reading this has experienced a fix when connecting an external monitor using a later OS or QuickTime software configuration than ours, write in and we'll update the article to be as up to date as possible. Otherwise, until a fix is released this seems to be a current issue.
You can opt to record from the camera directly to other decks like a D5, bypassing the internal tape recorder, but although this can preserve 10 bit quality, it adds a lot of expense in post production (as well as the rental of the deck during production). You would then need a capture card and fast, expensive, striped drives to work at that higher resolution and much higher data rates.
As a final note, I want to thank Charles Roberts most of all, who went down this path before me, and helped guide me in the right directions when this project started up. Also, thanks to Bruce Royer and Leszek Burzynsky for bringing me on the project and their desire to leap into the un-known with this workflow, which worked great overall. Thanks also to Aaron McNally from Moviola who let us have generous use of the 1200A deck to run different tests. Last but not least, thanks to Ken Stone for having this kind of forum for sharing our different experiences.
Multiple Frame Rates On Tape
Shooting and recording multiple frame rates on the same tape. Yes, it possible, and yes it can cause headaches. Apple recommends to capture one frame rate at a time in this online support article: http://docs.info.apple.com/article.html?artnum=93818.
Once an Easy Setup has been chosen, simply go to the File menu > New > Sequence to generate new HD sequences.
I want to thank Ryanne Higley at Keep Me Posted who did our titles, and did a few tests to find the right dimensions to work with. Turns out, even though the Final Cut sequence is 960x720, you would want to create full screen graphics at 1280x720, the standard frame size for all 720p video. When the graphic is placed into the sequence, Final Cut automatically squeezes it horizontally to show up in correct proportion either in Final Cut, out to tape or an external monitor. The graphic is squeezed just enough to fill the frame from edge to edge. You can see how Final Cut does this by opening a graphic from the Timeline by double-clicking it into the Viewer. Click on the Motion tab, then twirl down the triangle next to Distort. Final Cut will have automatically changed this setting to 33.33.
Offline monitoring was a breeze because of Digital Cinema Desktop. This is a feature new to Final Cut 4 that allows you to turn your computer screen into a full screen playback monitor. This is great if you can't afford to keep the 1200A deck all the time, or you don't have a hi def capture card, or a hi definition monitor.

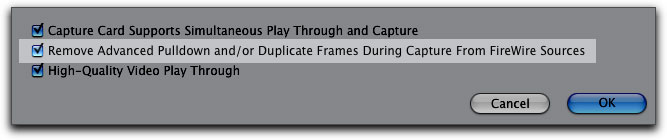
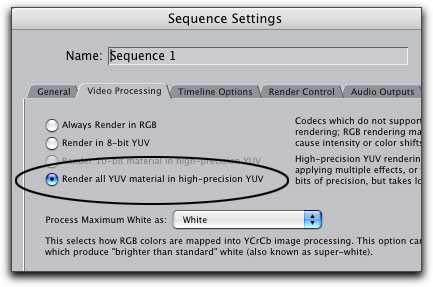
The defaults for the DVCPRO HD Easy Setups are not set by default to the best render quality. To fix this, make the Timeline window active, go to the Sequence menu > Settings. Click on the Video Processing tab. Choose the rendering option shown circled below. Although you will still output 8 bit video, any effects will be calculated internally at 32 bits, possibly creating better results.
For on-lining or finishing in Final Cut with this workflow, check the user's manual of the deck to ensure you'll record 720p to tape from the menu on the deck. Also get a professional hi def monitor that can accept HD SDI In, and connect a BNC cable from the deck to the monitor. External Monitoring to a properly calibrated monitor is the best way to ensure that your finished look is properly interpreted when outputting/mastering to tape.
One quick note about outputting. At the time of this writing, we were not able to get the 1200A deck to generate a pre-set timecode on to tape correctly. We could output, just not pre-stripe the tape to the desired timecode. Also, you will need a fast computer to output at the proper or best output cadence, or pulldown. In our case, only the G5 could do this.
This workflow is the most simple and least expensive way to bring hi def footage into Final Cut, but not necessarily the best route for all scenarios. Higher resolution or a better color space may be needed than what's recorded using the camera's on-board deck. In order to have such a low data rate, the DVCPRO HD footage is somewhat compressed, about 7:1, with 8 bit recording. Similar to working with DV, any post work done on a compressed format can bring out the format's weaknesses, such as when doing extensive selective color correction and chroma-keying.
Andrew Balis is a cinematographer, editor, post production consultant and Apple certified instructor teaching classes in Final Cut Pro to industry professionals at Moviola Education and UCLA. He is co-author of the Apple Pro Series book Advanced Editing Techniques in Final Cut Pro 4. Andrew co-authored the original Apple certified curriculum for beginner, advanced, and effects classes developed at Moviola Education, and wrote the Final Cut Pro curriculum for the Apple Education/CNN Video Journalism classes offered in the K-12 market.
All screen captures, images, and textual references are the property and trademark of their creators/owners/publishers.