DVD@CCESS September 15, 2003
Updated August 20,2004Understanding DVD@CCESS
By Alex Alexander
Project Requirements
- DVD Studio Pro 2
- an Acrobat PDF fileOptional Downloads
DVD Studio Pro 2.0 Project
File: dvd_access_proj.sit
Size: 1.5 MBsBuilt and Formatted DVD image file
File: dvd_access_img.sit
Size: 2.5 MBsPreface
This project covers the simple mechanics of dvd access and DVD-ROM file storage within a dvd project. If you wish to author a dvd and provide access to a file or files and /or a web links such as a web page or email link, then this tutorial will help clear up the dvd-rom and dvd access functions in DVD Studio Pro 2.0.
Summary
This project will focus on providing a link within a dvd project to an acrobat pdf file that we will embed into a dvd disc. A link from the main menu will spawn the embedded pdf files to launch on a PC or Macintosh computer that supports the dvd access function. Other needed items such as testing your dvd through the build and format will be detailed at the end of the project. We will also cover preference settings required in the dvd player application for dvd access functionality on the Macintosh. A brief detail of how the dvd access supplemental application works on the PC is covered.
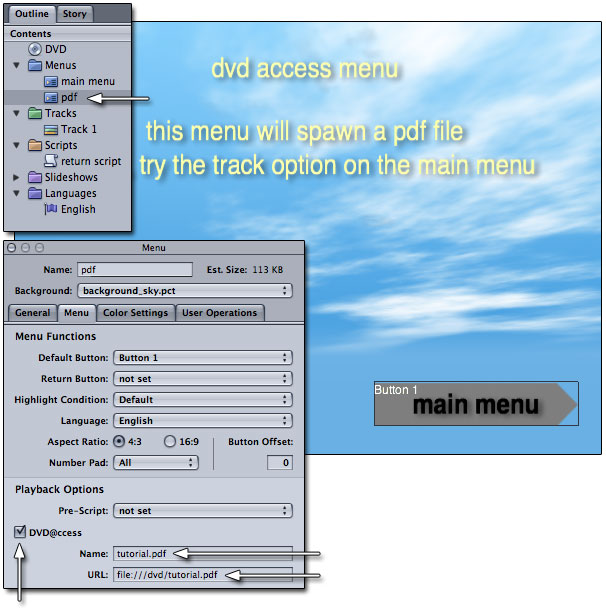
Outline Tab
This project contains two background pict files and two pict overlay maps for button use, a sample track for track and a pdf file that is embedded into the dvd. We will create two menus. The main menu, which will play a sample track and a pdf menu, which contains the dvd access support call to launch the provided pdf file using Acrobat on your personal computer.
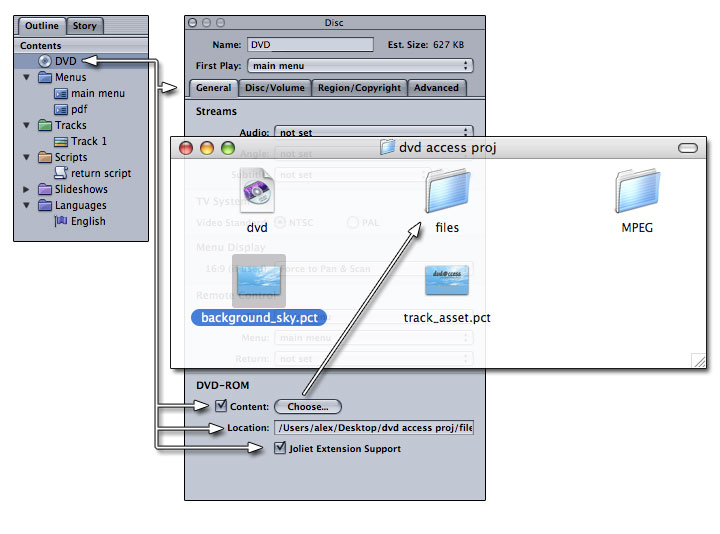
Take note of the outline tab graphic above. The dvd asset itself carries the name; DVD, and has two menu assets. The two menus are named: main menu, and pdf. The single track for video is named, main movie. The dvd access function relies on the knowledge of where a file will be located on the dvd. For that reason it is important to note the name of the dvd itself, as that will be part of a path link to the file we will add later on to the pdf menu property using the property inspector.
Assets Tab
My assets tab is very simple. I have one pict file that serves as a track asset and one background pict that serves as a menu backdrop. The buttons and settings are all set using DVD Studio Pro default buttons and settings within property inspectors.
The pdf file we will include is not an item that needs to be part of the assets tab. The pdf file is instead a setting in the dvd asset property described next. You can use any file you like, but for the purposes of this tutorial, I will use a pdf document called; tutorial.pdf, which is simply a copy of this tutroial in pdf format.
Stage 1 - Setting the DVD Property Inspector for DVD-ROM functions
Note the outline tab. Again, the name of my dvd project is; DVD.
[DVD-ROM]
Follow the white arrows for the properties that require your attention. Note the general tab is the area of the property inspector we are working in. Under the area at the bottom where the section reads; DVD-ROM, I have selected the content check-box. I simply click on the choose option and navigate to where my pdf file is held. I do not actually select the pdf file itself, I only go to the folder that holds the file in it's root. In this case, this is a folder which I have inside the dvd project folder I am working with and that folder is called 'files'. Selecting files will fill in the location information automatically.
[Joliet Extension Support]
I have also selected the Joliet Extension Support check-box as this supports Microsoft® Windows™ file formats.
[Property Inspector File Location Information]
The image above is the results of a built and formatted dvd. Take note that the DVDcess folder and my pdf file have been added to the dvd's root exactly where the video_ts and audio_ts folders are normally alone. This is the file location we need to be aware of using the property inspector going forward in this tutorial.
*The dvd's file location for this file will be: 'file:///DVD/tutorial.pdf'.
You need to add that file location to the property inspector for a menu or track / chapter marker coming up next.
[top]
Stage 2 - Menu or Track / Chapter DVD@CCESS
[Menu Property Inspector]
Here we are in my menu asset labeled PDF. My main menu has two buttons. One goes to a track asset and one a menu asset. That menu asset is my pdf menu. When the user goes to this menu, the pdf file will automatically launch as long as the user is using a dvd access compatible software dvd player on a Macintosh or PC personal computer.
In the pdf menu property inspector, take note of several settings required.
[Playback Options]
1. In the playback options, check the DVD@ccess check box.
Just under that option, note the name and URL fields.
2. Add the name of your pdf file.
3. Add the file location in the URL field.As discussed in stage one, you now need to know the file location as it relates to the actual dvd which you have not yet burned. The file location for my example is; file:///dvd/tutorial.pdf. This is because once the dvd is built, the file location we chose with the choose option in the dvd's property inspector will add the file to the root of the DVD since the folder I chose has no other folder inside of it. We can't launch of folder, so I chose the folder that had my pdf file inside of it. Any contents inside that folder will be placed in the root of my dvd after it is built. The location of my file is therefore, file:///dvd/tutorial.pdf.
The dvd part of file:///dvd/tutorial.pdf is the name of my dvd.
Anytime a user enters this menu, the pdf file will now spawn automatically.
Let's look at how to do the same thing with a track asset.
[Track / Chapter DVD ACCESS Property]
The track method of adding dvd access functionality is almost identical to the menu method. The exception here is that these are set using a chapter marker within a track. Note the property inspector in this image is for Chapter 2 of my track asset. Chapters have the option of DVD@ccess as did the menu asset we just reviewed.
[Playback Options]
1. In the playback options, check the DVD@ccess check box.
Just under that option, note the name and URL fields.
2. Add the name of your pdf file.
3. Add the file location in the URL field.As before, the file location for my example is; file:///dvd/tutorial.pdf. This is because once the dvd is built, the file location we chose with the choose option in the dvd's property inspector will add the file to the root of the dvd since the folder I chose has no other folder inside of it. The location of my file is therefore, file:///dvd/tutorial.pdf, as stated before.
Anytime a user passes this chapter, the pdf file will now spawn automatically.
[top]
Stage 3 - Setting the preferences
[DVD Studio Pro 2 Preferences]
In testing your dvd access project, you'll need to set some preferences. One of these is within DVD Studio Pro itself and the other is within the Apple® DVD Player software.
- Open the preferences of DVD Studio Pro 2.
- Select Simulator.
- Under Features, check the Enable DVD@ccess Web Links check box.
- Select OK.
[Apple's DVD Player Software]
- Open Apple's DVD player software.
- Select Disc Setup.
- Under the Internet option, select the Enable DVD@ccess web links check box.
- Click OK.
[top]
[PC DVD@ccess Installer]
Inside every dvd access enabled dvd you author, a special folder is included. This folder is called; DVDcess, and inside this folder is a dvd access enabler for PC users as well as documentation for using dvd access with PC software dvd players.
[top]
[Using the project download]
Once you have downloaded the project file and opened it, you will see this red area in the dvd property inspector's location field. This is to let you know that the file location of the pdf file is no longer valid since it is based on my project location, not yours.
You will need to re-link the Files folder.
- Click on the Choose button in the property inspector of the dvd asset.
- This opens a file browser. Now navigate to where you have downloaded the dvd_access_proj folder and open that.
- Select the Files folder.
- Click Choose.
The red text in the Location area will now return to normal, and you are free to use DVD Studio Pro's simulator and test the project for yourself.
You can also download the completely built DVD image file from the link above and see a fully working sample within your Apple DVD player software.
Good luck!!
[top]