
Editing Double-System Sound March 3, 2003
Editing Double-System Sound material
A suggested workflow in FCP
By Phil Ashby
Double-system sound (or separate sound as it's known in the UK) shooting, although unusual for video production, is the norm for location filming, and certainly in the days of 16mm film was the standard route for TV productions. The technical quality of the sound recording on professional video camcorders can be very good (although on some prosumer units it is middling, to say the least), but most sound recordists, given the chance, prefer the flexibility and control they have with their own separate recorder (be it DAT, mini-disc or even analog tape). Camera operators too can appreciate losing the umbilical connexion to the sound mixer, or the need to worry about the radio mic links.
You may have spotted the assumption here, that there is indeed a 'sound recordist' - so we are talking about shoots with a 'crew' and not a person.
There is a price to pay for this flexibility, and it comes when the material is being edited; there's more of it, and first off, the sound tracks have to be married to the video tracks. There's an extra headache - this relationship needs to be kept track of throughout the edit.
How do you do that with FCP? I'm not claiming this is the only way to do the job, nor even the best, but it's a system that has worked for me, fairly reliably.
First off, it's worth repeating that double-system sound involves a deal of extra work in post-production, and you need to budget the time for this. But you probably know that already if you've opted to work this way, and have balanced it against the aforesaid flexibility. In our case, the sound quality on the camera we then operated (Sony PD100) wasn't up to the production standard we required on a project, and we decided to record sound with the HHB Portadisc (which we use for other sound-only projects). This is a professional quality Minidisc recorder, with two sound inputs and the ability to transfer digitally to the Mac through the USB port. Note there is NO time-code (SMPTE style) on this system, but the MD does record a time of day (minutes and seconds) and number each track: sufficent for identification, but not enough to lipsync with! So syncing is done the old-fashioned manual way; however the stability of the MD recording is such that we found no loss of sync against the video over 10 minute takes.
A couple of routines helped to keep the editing flow smooth:
Shooting:
We recorded a safety (syncup) track on the camera, from the internal mic. Portadisc and camera real-time clocks were adjusted to match at the beginning of every day - they would drift apart by about a minute in a couple of days. This was to aid identification later, as a check on the logs we kept. We didn't put slates (clapper-boards) on shots, but used finger clicks or louder hand-claps, identifying MD track number on sound.As it happened, I was using the Photo/JPEG codec to capture the video clips in FCP for the rough edit - which meant a full-resolution recapture would be needed later on. If you don't shoot clapper-boards, the quality of the pictures might not be good enough for syncing if you don't have a camera sound-track reference.
Capture into the Mac:
Video was treated as usual, batch captured from DV.The MiniDisc sound was captured through the USB lead, using 'Capture Now' in FCP. There's a Mac OS problem here (using OS 9). Effectively you're using the Mac's Audio mixer app to select the USB line input. I found the system could become unstable unless I did this before running FCP. The snag is that this will mute the Mac's internal speakers, making monitoring difficult. The easiest work-round (we have a Folio audio mixer hooked in to the Mac for monitoring) was to plug the MD's analog output to the tape monitoring input of the sound deck, and listen to that.
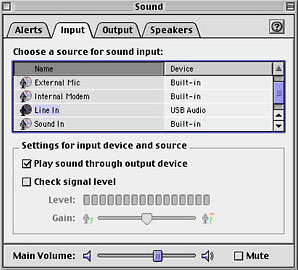
The Mac Audio Control panel, with USB line in selected. Switch the MD on and plug it in before selecting. Do this before running FCP.It's true to say I find the Mac to be somewhat cranky about USB devices. As with firewire, I prefer to put the AV device on its own port at the back of the Mac, and chain all the other devices (keyboard, graphic tablet, shuttle controller) off the second port. Often I find a deal of unplugging and replugging is required before all devices are happily co-habiting with the Portadisc. Maybe it's just an OS9 habit? Whatever, it's important to check the system is happy and stable before running FCP.
The workflow for capturing sound from the MD was:
1. Configure L&C with USB line input, non-controlled device. It'll be 44k sampling, using the internal Mac hardware, which matched the Portadisc. Clip settings Audio only 1+2, no video!

Log & Capture window, control settings
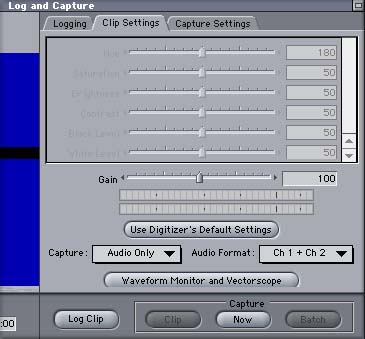
Log & Capture window, clip capture settings2. Configure Portadisc to play 1 track at a time (it'll pause at the end of each track, and gives a countdown too - 'track' here meaning a stereo take, not a timeline track). This isn't essential, given it's 'capture now' under manual control, but it is easier to keep the sound in separate clips corresponding to separate takes.
3. Hit play on the MD, click on capture now. When finished, don't forget to save tracks in a folder marked 'MDs for XXProject 44k' or whatever, on the capture scratch disc.
4. Whilst capturing in real time, amend/write sound log to identify which tracks correspond to which day/time. (Afterwards, type the information in to the notes column for the sound clip, and for belt-and-braces, add this to the info for the matching video clip.)
Then, after capturing, convert all tracks to 48k sampling, and store in a separate folder. I used QT to do this, outside of FCP. I figured this would save a lot of hassle in FCP, working with 'wrong' sampling freq. (Our cam is DVCAM, 48k as are clips, and sequences).
For reassurance, I also copied all the clips (48k) onto a CDR. These audio clips have become the primary source, and it'll always be possible to 'recapture' by copying the QT audio file back into the Mac from the CDR. It's quicker and more repeatable than re-transferring the MD tracks.
Finally, in FCP, import all 48k clips into a bin. Ours were named in the pattern 'MD_tk11_48k' where tk11 means take 11. This information is what will appear in the timeline as well as in the bins, and will be referred to frequently.
Pre-editing of clips:
Ours was a documentary project, not quite A roll interview/B roll cutaways, but certainly split neatly into one programme section per location. I made up sync clips for each shoot, by editing video clips and (camera) sound into a sequence., then editing the MD clip to another sound track..Syncing I found straightforward - the method I use is to rough-sync by cueing ins and outs for the edit of the MD clip onto the audio track. Then I adjust by eye with waveforms turned on in the time line, and finally adjust by ear. With both sound tracks playing, and the MD track selected, use the < and > keys to change its position a frame at a time until the echo is gone. You do need to be fairly close in sync to begin with, and have the levels roughly equal. It is possible to make adjustments in increments of less than a frame, by fine adjustment of the in point on the audio track, but I didn't find this necessary for lip-sync in the first place. Purists may disagree, but there's a trade-off between perfection and time taken here. (And moving by increments of a frame is all that's available to the film editor.)

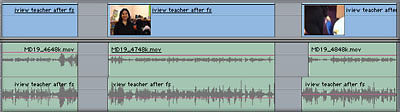
Sequence of sync'd up clips. Audio track 1 is the MiniDisc sound, imported as an audio file. Audio track 2 is the camera mic sound. Near the end of the clip you can see the obvious match of the two tracks. The camera audio track was on auto level and is -very- high level. The MD was recorded to a more conservative setting to avoid distortions on peaks. Waveforms have been toggled ON to show the match. Thumbnails are also ON for the sake of the screen grab.Once I'd found sync, I moved the MD sound up to Audio track 1, leaving track 2 as a reference.
Select and Link each clip to bolt the sync down between the video and audio tracks, and when you've finished, Duplicate the sequence in the browser and rename the Copy 'Safety' or whatever. In this work pattern, the sequence of sync'd clips becomes the play-in material, and it's well worth having a fallback of the original before you start messing around with it in the Viewer!
Clip as before in the sync sequence, now the tracks have been locked - the names are underlined to show this.At this stage, one workflow (which was mentioned in a recent Apple article) would be to burn a DVD or clone these sequences off to a DV tape, and treat them as raw material for editing, but it's not essential.
Program Assembly:
I tried several methods of building the program itself from the sync'd clips, and some gave me problems either when I tried to recapture, or with interpreting the clips on the timeline (using subclips for instance.).The method I found that gave least trouble later is as follows:
The source material is the sync'd sequence, accessed from its timeline. That is edited into another timeline to make the program sequence. I use two monitors hooked up to the Mac. The right hand screen contains just the timeline views, with the two timeline windows one above the other.
Here's the important action in the workflow, marking up the shot.
Mark IN and OUT on the source timeline, then Opt-A to make this a selection, Apple-C to copy, then, in the program sequence, Apple-V to paste (at the position of the playhead). Pasting takes note of target tracks, and preserves the stacking of the clips that are pasted, but beware -it will overwrite any other material. It's safest done onto wide open spaces as you first assemble.
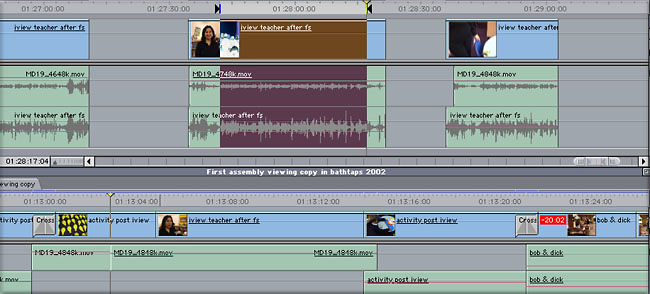
The upper timeline is the source sync'd clip, with IN and OUT marked, and the area selected ready for copy/pasting. The lower timeline is the program assembly. This screengrab was taken some time after the assembly was done to show the layout. I do not advise pasting into a full sequence such as illustrated here, without a deal of experience!The big advantage of pasting clips this way is that it preserves the names of the MD and video clips in the program timeline.
I don't recommend using the sync'd clips in the Viewer and editing as inserts or overwrites from there, nor making subclips from the sync'd clips and using these subclips as playin material. Both these methods can lead to nesting of nests - bad news for recaptures, I found in previous trials. I'm not saying they definitely don't work, but problems are just that much more difficult to unravel when your main sequence doesn't show the primary clips and soundtracks in the timeline.
As you'll maybe have noticed from the screenshots of the timelines, I played safe and kept one track of the original camera sound in the 'sync' sequences, so I always had a reference to playback against the MD sound. It's not absolutely necessary - provided you ensure that you mark the video and audio tracks 'in sync' and lock them together for each clip that you sync up.
One tip that will save a lot of time is to keep to a discipline with your use of audio tracks - for instance, keeping all MD clips on 1, camera sound on 2 (or further down to keep out of the way), narration on 3 - or more if you are making a stereo mix, of course.
Once you've laid the clips in, you can close the source timeline, and trim edits in the program sequence in the conventional way. Because you've pasted this sequence from original clips, you're as free as ever to trim, extend, and overlap clips.
If you do keep the original camera tracks in the assembly of the program, don't forget to mute them (or delete) before mixing down!
copyright © Phil Ashby 2003
Phil Ashby is producer / editor for production company Bright Filament, who specialise in science/technology and education based programmes in all electronic formats known to man and woman. His biggest fears for the future are that one day Apple will perfect FCP and there will be no problems left to solve, the accumulated weight of manuals will overstress the structure of his house and that render times will shrink to negative numbers, thus increasing the working day.
All screen captures, images, and textual references are the property and trademark of their creators/owners/publishers.