
February 5, 2007
Encoding for Windows Media Using Compressor - Flip4Mac
By Brian Gary
Let's face it, for as much as we revere our Macs, we unfortunately live in a PC world. When delivering content for the web we also have to realize that a large population of the viewing audience will watch our movies on PCs and, unlike our Macs, those PCs do not come pre-installed with QuickTime. Even though the QuickTime player (and browser plug-in) is free for PC users, there are many instances where you may have to additionally distribute movies as Windows Media or where WMV is the only viable option.
For example, I produced and directed a series of commercials www.factivafindstime.com for Dow Jones/Reuters where we originally were going to deliver QuickTime movies using H.264 as the CODEC. At the last minute, the client wanted to make sure we reached the widest possible audience and requested that we also deliver Windows Media movies.
Fortunately, Compressor has an open plug-in architecture called QuickTime Components. We were then able to install Telestream's Flip4Mac software and encode with Windows Media inside our existing Compressor workflow. Now, up front you need to know that Flip4Mac is not free-although a free, player-only version does exist. The SD version of the software costs $99 and the HD version sells for $179.
Installing the software is straightforward with most components going into your /Library/QuickTime directory:
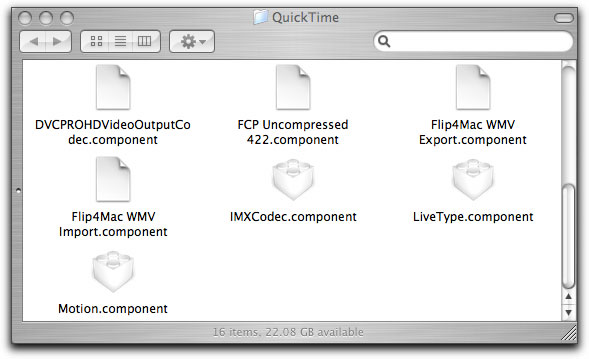
The installer places both an import and export component in the QuickTime directory.
A preference pane also installs, but it mostly deals with licensing and playback: so there's nothing to set in terms of encoding. Basically, it's install and you're ready to go.
Since a WMV preset doesn't come pre-installed in Compressor you will have to create one as a custom preset. Launch Compressor and in the Presets window click the Settings tab then click on the "Create a new setting" pop-up menu:
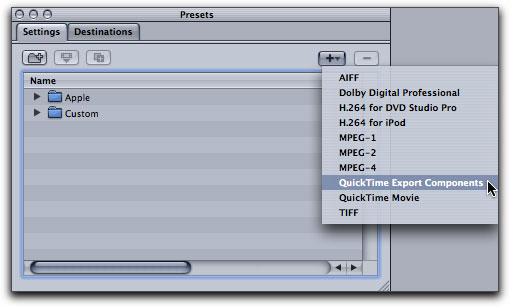
When you choose "QuickTime Export Components" from the list, a new custom preset will appear in the Custom folder. Select the new preset to open it into the Inspector Window.
The main difference when working with QuickTime Components versus the existing QuickTime CODECs within Compressor, is that you adjust the encoder's settings in a separate window not in the Inspector window directly. The Inspector window is just the launch pad:
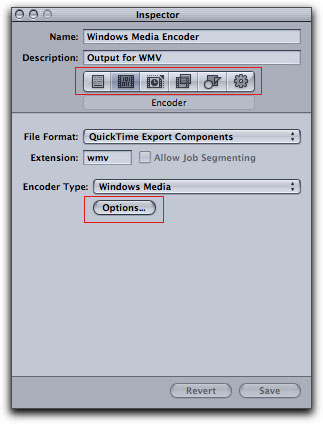
When using QuickTime Components, the Frame Controls and Geometry settings
(accessed via the buttons across the top) are not available. You can still add post-encoding actions.
Click the "Options" button to launch the WMV Settings window.
When working with Windows Media encoding you have all of the usual suspects:
- One Pass or Two Pass: how many times the encoder will view the media before it begins encoding. The rule of thumb here is that Two Pass will give you better quality, but take longer to encode.
- Bit Rate (including Variable Bit Rates): how much bandwidth the movie consumes--the more data the better the quality, but at the cost of increased file sizes.
- Frame Size and Frame Rate.
- Audio Encoding Adjustments: One or Two Pass, Constant or Variable Bit Rate Compression and the ability to set the target Bit Rate.
- Annotations: Copyright, Description, etc.
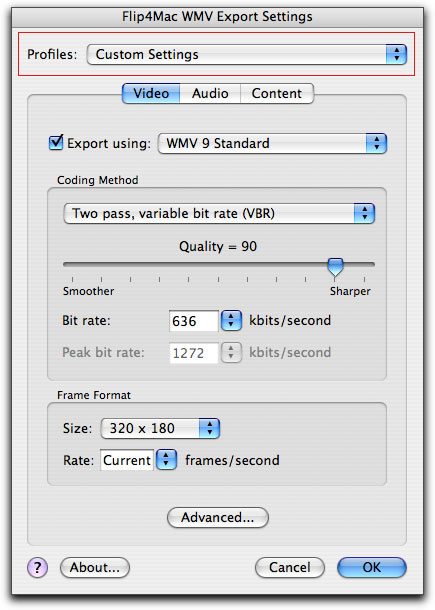
The Profiles pop-up menu is the best place to start.
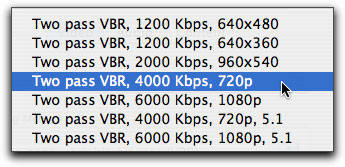
The Profiles pop-up menu contains many presets that pretty much address any delivery situation you can think of:
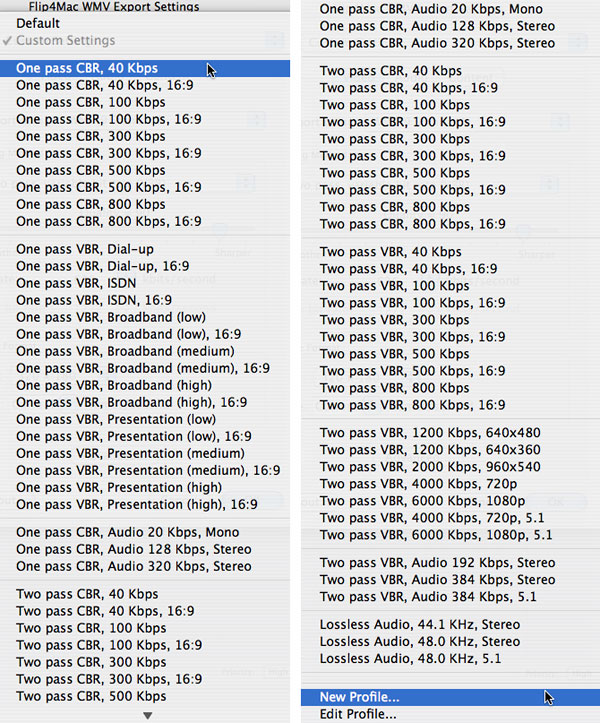
As you can see the list of presets is quite long and exhaustive.
Flip4Mac divides the WMV presets initially by One or Two pass compression then by target bandwidth. For example if you want a high quality movie for an audience of DSL subscribers then a good choice would be "Two pass VBR, 800 Kbps" (use the 16:9 option if your movie is widescreen). When you choose a preset in the Profiles pop-up menu all of the settings flow to both the video and audio options.
Even if you don't immediately see the profile you want listed in the Profiles pop-up menu, use the presets to dial you in and then you can tweak any of the parameters to your heart's content. You can even create new profiles from scratch by choosing "New Profile" from the Profiles pop-up menu.
|
|
|
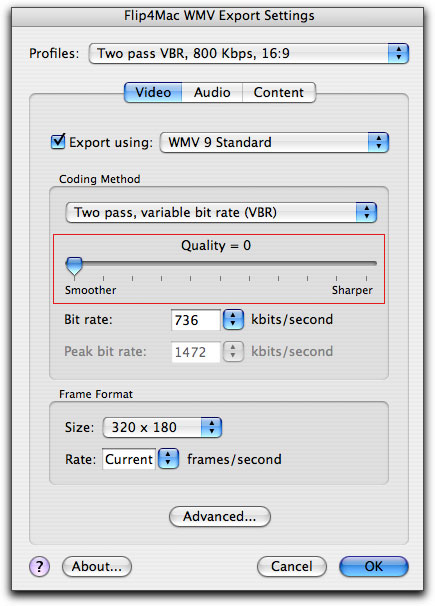
Use the Quality slider to adjust the encoder's behavior when it reaches the
bandwidth limit: smoother playback or sharper quality. If you choose
a setting in the Smoother range, then the encoder will reduce picture
quality to maintain frame rate. If you choose a setting in the
Sharper range, then the encoder will reduce frame rate to maintain
picture quality.
|
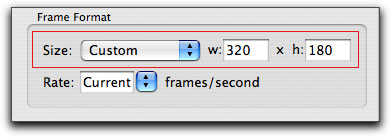
You can set a custom frame size by choosing "Custom"
from the Size pop-up menu:
|
Click the "Advanced" button to access more detailed keyframe and interlace parameters:
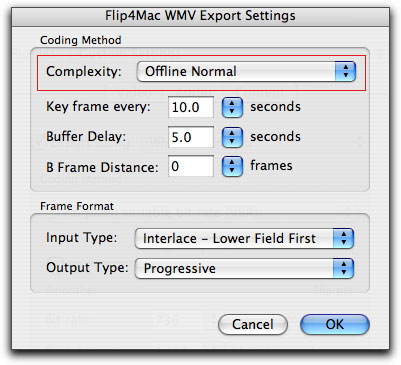
The Complexity pop-up controls how long the encoder will spend on the media based on the basic settings.
The "Live" choices encode faster, but "Offline" choices will produce higher quality.
Windows Media treats keyframes similarly to QuickTime in that the more frequent the keyframes appear in the data stream the higher the quality but at the cost of increased output file size. In addition to keyframes (I frames), Windows Media uses B frames (bi-directional frames that look either forward or backward to an adjacent keyframe) to aid compression. The greater the distance between I frames using B frames will allow for greater compression (smaller file sizes), but at the expense of some quality and increased encoding time.
The Buffer Delay setting dictates how many frames the viewing Player should hold based on the target bandwidth and any variable bit rate settings. Meaning, a higher number in this field lets the encoder be more aggressive with bandwidth spikes on complex footage, but will require that the Player (on the receiving end) hold more frames in its buffer to ensure smooth playback.
For the most part, the profiles bring the video in on target (based on the bandwidth expended), but the audio settings seem a bit too conservative until you get to the HD targeted profiles (and even then, it's still a bit conservative):
Therefore, you will probably want to increase the audio settings manually no matter what profile you choose in the Profile pop-up menu.
Fortunately, adjusting the audio is very easy because you've only got two adjustments:
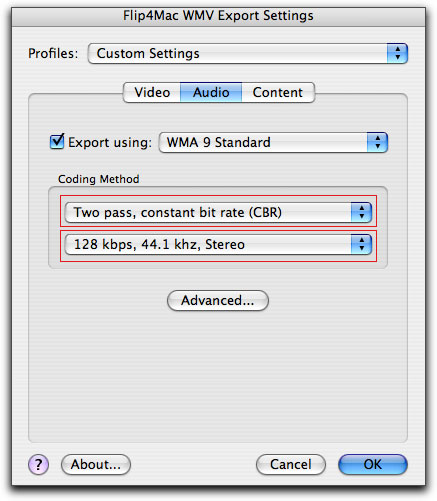
The top pop-up menu adjusts whether the encoder does one or two passes on the audio and whether it employs a constant or variable bit rate.
The bottom pop-up menu lets you set the target bit rate, sample rate and channels (mono or stereo).
In most cases, a two pass, constant bit rate with a data rate of 128 kbps sampled at 44.1kHz works best. This tends to optimize the trade-off between output file size and sound quality. If you are not happy with the results, first try upping the data rate (bottom pop-up) and then try a variable bit rate (VBR) from the top pop-up menu.
Under the Content tab you add metadata for your output media:
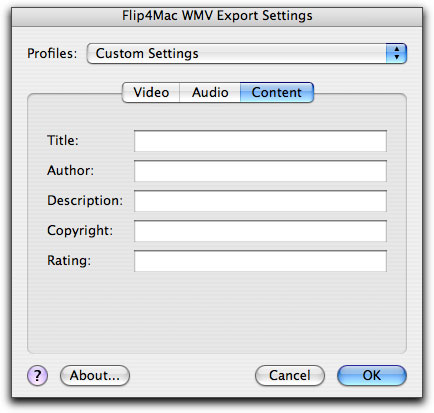
Input the appropriate information in the fields.
When you have the entire settings adjusted, click OK and that will return you to the Inspector window inside Compressor.
You can apply custom presets in the same manner as the Apple default presets:
- From the Settings menu
- From the Setting column in the Batch window
- Drag and drop from the Presets window onto a piece of source media in the Batch table
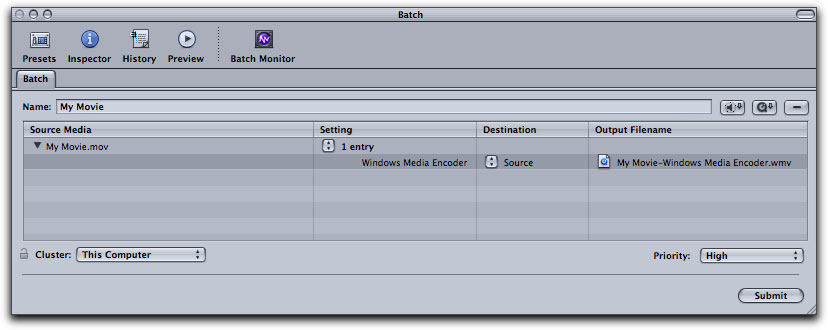
The best part is that you can now lineup WMV jobs along with your other encoding jobs in the Batch window and not have to leave Compressor to process the files--a real timesaver.
In addition to Windows Media you can use On2 Technologies' Flash plug-in to create Flash 8 compatible video and the free Real plug-in will create the .ram files used by the Real Player. QuickTime Components in Compressor let you add third-party encoders to your toolbox without having to learn additional software--you stay right in the familiar Compressor interface. Being able to just easily add a job in Compressor's Batch window, especially when a deadline fast approaches, can make up for the expense of third-party software.
Addendum
There is a known bug that may affect Two-Pass VBR encodes where the resulting video will have a green tint, or the video will shift towards the green colorspace. If you run into this problem, the workaround is to use one of the CBR (Constant Bit Rate) settings in either a single or two pass preset. Flip4Mac hopes to have an update that will fix this issue by May 2007, so check their site for details. They are also offering a beta version here (www.flip4mac.com/wmv_beta.htm). The 2-pass VBR, green cast issue has been fixed with the release of
version 2.1.1
 Award-winning writer, producer and director, Brian Gary heads Flying Chaucer
Films LLC in Los Angeles and Flying Chaucer Productions LLC in New Orleans. Under those shingles, the multi-hyphenate Gary, creates a wide array of content for commercial, television, theatrical release and the Web. Gary's education includes the Actors Studio MFA program in New York City. Accomplished editor rounds out his filmmaker's skill-set and always on the cutting edge of technology, Brian Gary tours globally speaking to an audience of Final Cut Pro editors. In 2005, he joined forces with Sennet/Sheftell Entertainment, where he infuses the company with tech-savvy entertainment industry
experience and acumen. In addition, Brian has a DVD tutorial, The Art of Encoding with Compressor from Ripple Training and is the author of the Apple Pro Training Compressor Quick Reference Guide Apple Pro Training Series.
Award-winning writer, producer and director, Brian Gary heads Flying Chaucer
Films LLC in Los Angeles and Flying Chaucer Productions LLC in New Orleans. Under those shingles, the multi-hyphenate Gary, creates a wide array of content for commercial, television, theatrical release and the Web. Gary's education includes the Actors Studio MFA program in New York City. Accomplished editor rounds out his filmmaker's skill-set and always on the cutting edge of technology, Brian Gary tours globally speaking to an audience of Final Cut Pro editors. In 2005, he joined forces with Sennet/Sheftell Entertainment, where he infuses the company with tech-savvy entertainment industry
experience and acumen. In addition, Brian has a DVD tutorial, The Art of Encoding with Compressor from Ripple Training and is the author of the Apple Pro Training Compressor Quick Reference Guide Apple Pro Training Series.
[Top]
copyright © www.kenstone.net 2007
© 2000 -2007 Ken Stone. All rights reserved. Apple, the Apple logo, Final
Cut Pro, Macintosh and Power Mac
are either registered trademarks or trademarks of Apple. Other
company and product names may be trademarks of their respective
owners.
All screen captures, images, and textual references are the property and trademark of their creators/owners/publishers.


