February 18, 2008
By Rick Young
 Whenever a new technology hits the market there are always teething problems. In the case of new video cameras there are often new formats and codecs to work with. Does your NLE of choice have the new codecs and is it capable of handling the different flavors of the new codecs, frame rate, color space, frame size, progressive or interlaced, SD or HD, etc. Even when your NLE has been updated to accommodate these new technologies, problems can still arise, because users are trying finding their way, working to find the best approach to integrate it into their workflow.
In the case of the Sony EX1, this presents a challenge to users in that the camera only shoots HD. In a world caught between SD and HD one needs to know how to do good quality conversions from HD to SD otherwise one is locked into HD world only.
One might be tempted to just put all the HD footage into a DV timeline in Final Cut Pro, render and then output from there. Unfortunately this does not provide the best results. Outputing the images using this method and you will see they look 'murky' to say the least.
Compressor or other encoding software provide options but these too produce less than beautiful images. For the person working with the footage this is particularly frustrating - the images look sensational in HD and worse than a cheap DV camera in SD. That's not why one spends about $6500 or more for this camera. And for clients who want SD you gotta give them good looking SD...
The Solution
Here's the workflow I use, I am working in PAL 25 fps:
(1) Edit your EX1 footage as HD within Final Cut Pro - I also choose to Render in ProRes as this does away with most of the problems which have made editing long GOP in the past such a torturous experience. Any rendering that takes place uses ProRes, thus eliminating the need to conform the video while working.
(2) Once your edit is complete go to Easy Setup and select DV-PAL Anamorphic or DV-NTSC Anamorphic

(3) Create a new Sequence
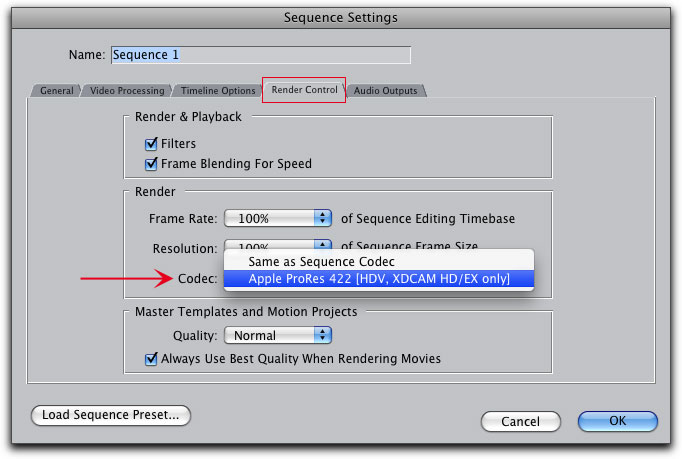
(4) Go to Sequence settings and set the parameters to match those shown below. Essentially most of the defaults stay the same, however you need to check the Anamorphic 16:9 box and set Field Dominance to None.

(5) Click the Advanced button (shown above) in the Sequence Setting window, in the Advanced window (below) check 16:9, set the Quality to best, and choose Progressive unless you are working with interlaced footage.

(6) Return to the Timeline where you're edit was done with the EX1 footage in HD. Select All and Copy.
(7) Paste this into the SD Timeline you have created and render.
(8) Export as a self-contained movie.
The result is an excellent looking DV file down-converted from HD. You can also choose other formats to encode to in the Sequence Settings Menu if DV is not the format you need for SD output.
This provides an efficient workflow for those wishing to shoot on the EX1 and output to standard definition.
I began this article by saying that problems with new technology can be caused by several factors - in this case there is nothing wrong with the technology - users simply need to find the best way to integrate the Sony XDCam HD format into their workflow.
Rick Young is the Editor for MacVideo - a website devoted to post-
production on the Mac platform and associated camera technology. Each week MacVideo features a movie of the week and an interview of
the week.
copyright © Rick Young 2008
are either registered trademarks or trademarks of Apple. Other company and product names may be trademarks of their respective owners.
All screen captures, images, and textual references are the property and trademark of their creators/owners/publishers.