
Final Cut Pro 2.0 - Settings October 22, 2001
Mastering The Settings of Final Cut Pro 2.0
Final Cut Pro 2.0 - Settings October 22, 2001
Mastering The Settings of Final Cut Pro 2.0
SO MANY SETTINGS
FCP has the ability to work with many different video configurations; audio sample rates, codecs, frame rates, frame size, NTSC or Pal, Aspect Ratio, device control, 16:9, Firewire, Video Capture cards and more. Because of this enormous flexibility FCP also has an enormous number of settings to match.
There are four different areas of settings:
AUDIO/VIDEO SETTINGS
FCP is all about settings. When we capture video we have to capture it with the proper settings in place. The source tape that we are capturing from has its own configuration. Frame size, frame rate, aspect ratio, compressor, audio sample rate, etc. The capture settings must match these specifications exactly in order to capture properly. For example if the video we are capturing has an audio sample rate of 48 k then our capture settings need to reflect this audio sample rate. If we then capture video that has an audio sample rate of 32 k, we need to change the setting to match this different audio sample rate. All of this must be reflected accurately in 'Capture' settings.
When we place our clips into a Sequence, the Sequence itself must reflect these same settings. If the Sequence settings are not the same as the captured video then FCP will need to render the captured video to make it match the Sequence settings.
In FCP we can capture through a number of different devices, via FireWire or Video Capture Card. So, we have 'Device Control' settings.
When we output to tape or view our work on NTSC or PAL monitors, there are 'External Video' settings.
All these settings may seem a bit daunting at first but FCP gives us ways to manage our settings. FCP groups these settings into what it calls 'Presets'. There are a number of different Presets that match the setting needs of most FCP users. For example there are Presets for DV-NTSC and for DV-PAL. You can select the correct Presets for your system and get to work. If these Presets don't match your needs you can change, name and save your custom Presets. FCP offers yet another feature that allows us to group our Presets into a one block setting called 'Easy Setup'. Clicking on different Easy Setups will change all the settings in one shot. More on Easy Setup later.
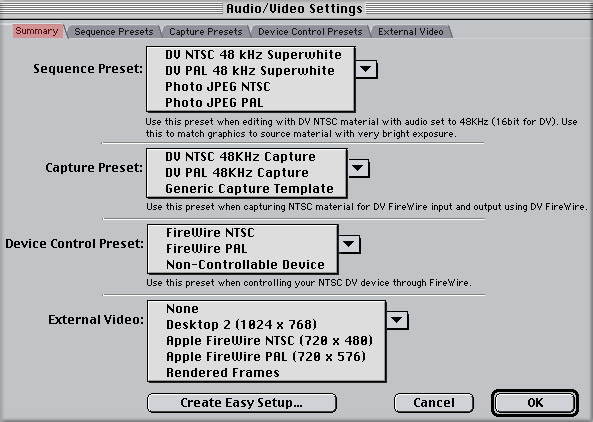
The Audio/Video Settings box has five tabs. It opens with the Summary tab. There is one tab each for the four areas below.
1) 'Sequence Presets' which sets the parameters for all new Sequences.
2) 'Capture Presets' which controls how you will capture your audio and video.
3) 'Device Control Presets' for controlling your camera/deck.
4) 'External Video' for playback and recording.
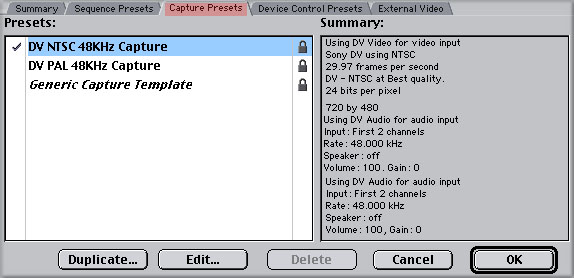
The Summary is more then just a summary. The 'Audio/Video' dialog box opens with the 'Summary' tab showing the four areas of FCP setup. Each of the four areas of settings has a drop down menu with different choices. There is a complete summary for each of the items in the drop downs. We can quickly make changes right here without having to go into the actual settings. Open Audio/Video Settings, click on the a Preset drop down and select your new Preset. Done.
Okay, you are looking at the different Presets that are displayed in the drop downs (shown below) and you don't see a setting that is correct for your situation. Time to look at the other four tabs.
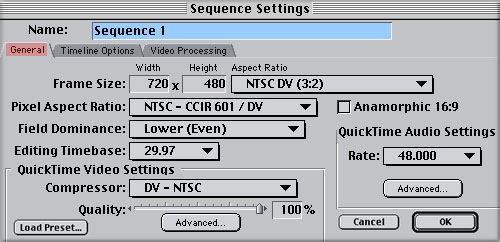
So what is a Sequence anyway? A Sequence is like a container into which we place all our audio and video to make up a Project. A Sequence exists in the Timeline and it's where we build our Projects. As such, the Sequence has to have a number of parameters that define it. Frame size, frame rate, audio sample rate, pixel aspect ratio, field dominance, editing time base (frames per second) and compressor (codec). When we create a New Sequence from the menu > File > New > Sequence, our new Sequence gets its settings from the 'Sequence Presets'.
The Sequence Presets tab lists all the 'Presets' that FCP can use for a new Sequence. As you click on each Preset, the information in the 'Summary' box to the right will reflect the settings that go with the item you selected. You will notice that these 'Presets' are locked. They are the default 'Presets' and can not be modified.
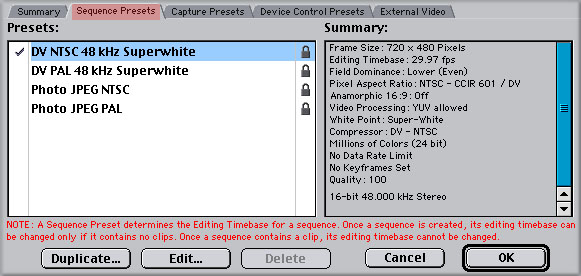
So, what if none of the 'Sequence Presets' properly defines our Sequence. We can build our own 'Sequence Presets' to fit our needs and of course name it. In the Sequence Presets box above you will see a 'Duplicate' and 'Edit' button. As all the existing Presets are default and 'locked' we can not edit these Presets. We will take an existing Preset, one that comes close to what we want and make a Duplicate of it. When we click on the 'Duplicate' button we are presented with the Sequence Preset Editor. This is where we will do our work.
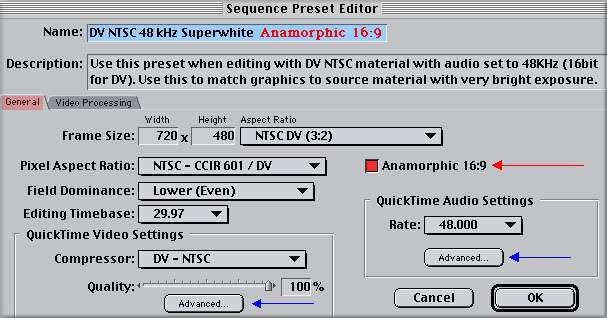
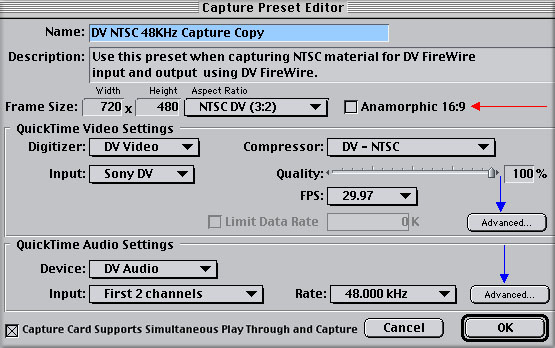
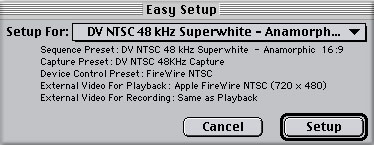
Suppose that "DV NTSC 48 kHk Superwhite" is perfect but now you will be working with 16:9 footage. Your existing 'preset' is not 16:9. The Sequence Preset Editor that is open in front of you is a copy of the original so we can make changes to the copy and leave the original Preset unchanged. Check the 'Anamorphic 16:9 box (Red arrow). Now change the name of this new Preset to reflect this change. Click Okay.
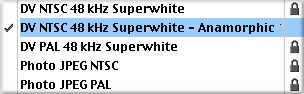
You will be returned to the 'Sequence Preset' window and there is your new Preset. It is checked so it will be the active Preset. You will also notice that it is not locked. If you select it and hit the Edit button, it will open right back up in the Preset Edit for additional changes.
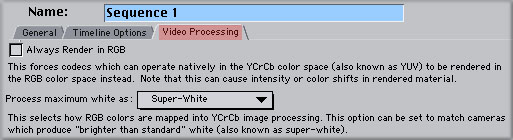
You will note that in the Sequence Presets Editor there is a second tab, 'Video Processing'. The Video Processing tab controls the way that FCP renders. It can render as RGB, White, or Super-White. If you are DV Firewire make sure that the 'Always Render in RGB is UNchecked. In the 'Process maximum white as" select 'Super-White'. This will insure that brightness values between video clips and rendered clips will be consistent. Render in RGB is used with some Capture cards and third party AfterEffects plugins.
Ah, the art of capturing your video correctly. The art is in the settings. The Capture Preset Editor settings control all aspects of the capture process. In Capture Presets you are presented with several Presets and a complete summary for each one. Again, these Presets are locked so you will not be able to Edit. Clicking on the Duplicate button will open the Capture Preset Editor.
There is a video and audio section. Each section has an 'Advanced' button for even more settings if need be. It is critical that your Capture settings match your source tape. The audio sample rate, either 32k or 48k, must be the same as the audio sample rate of the source tape. After you have your settings in place 'name' this new Preset before you click Okay.
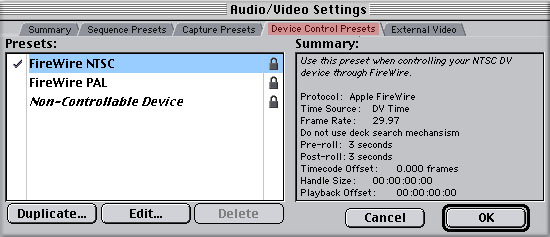
For FireWire DV, FCP can control your DV camera/deck, giving remote control of the camera/deck, communication and timecode transfer. This is what gives FCP the ability to perform 'Log and Capture'. If you are using a non-controable device such as the Sony Media Convert box then you will want to chose the 'Non-Controlable Device' Preset.
As with the the Capture Presets tab the Device Control tab opens to a list of of default Presets with summaries for each Preset. Click on the Duplicate button to open the Device Control Preset Editor.
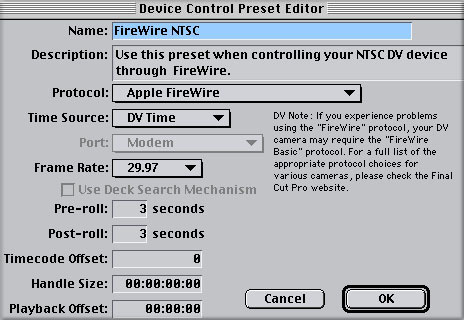
The Device Control Preset Editor presents us with one dialog box for all Device Control settings. The first setting 'Protocol' offers choices for different brand devices and serial control. For all Sony cameras/decks chose 'Apple Firewire', for Canon cameras you should start with the 'Firewire Basic' setting. For DV select 'DV Time' in the 'Time Source' menu. Frame rate will be 29.97 for NTSC and 25 for PAL. Pre-roll and Post-roll settings give the camera/deck time to get up to speed before capture and time to come to a stop after capture. I prefer a Pre-roll of 5 seconds rather than the default of three seconds.
The 'Timecode Offset' box is used for correcting Timecode Offset if there is a difference between the Timecode shown on your deck and the Timecode of your captured video. During the Logging process, 'in and out' points are set for each clip we want to capture. It is a good idea to always capture some extra video both before the 'in' point and after the 'out' point. This extra video is called 'Handles' and I set 'Handle Size' to two seconds, 00:00:02;00, which will cause FCP to capture two extra seconds at both the head and tail of the clip. 'Playback Offset' is used when there is a delay between the start of Playback in FCP and the start of the recording process in the camera/deck.
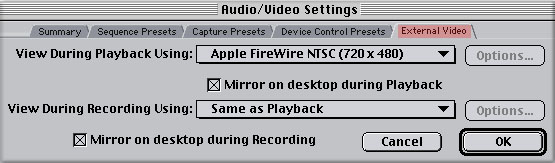
The last tab, External Video, controls output (playback) from FCP for both viewing your video from the TL to an external NTSC or PAL monitor, and for Outputting to Tape. In the 'View During Playback Using' drop down menu you will have a choice of Apple Firewire NTSC or PAL. If you have a 'Matrox RTMac' or PCI Capture card then these options will be reflected in the drop down menu as well. There is a 'Mirror on Desktop during Playback' box which will play your video in the Canvas window at the same time as FCP outputs your video to an external NTSC or PAL monitor and to tape. If you have an older Mac with a slower processor and are dropping frames during Playback, you can UNcheck this box to lessen the load on the processor. In the 'View During Recording Using' drop down, select 'Same as Playback'. Have 'Mirror on desktop during Recording' checked.
EASY SETUP
Because there are so many different possible configurations FCP offers a number of 'pre-built' 'Easy Setups' to choose from. Each 'Easy Setup' is a combination of the four main tabs of the Audio/Video Settings box. DV - NTSC and DV - PAL are two of them. If none of the 'pre-built' sets are right you can change, name and save a new set that reflects your needs. You can have any number of custom sets and easily switch between them by simply selecting the set in the 'Easy Setup' box. It is likely that one setup will work for you, set it once and forget about it.
The sets that are listed in the 'Easy Setup' will be applied to any new Sequences that you create.
From the Edit Menu > Easy Setup. The Easy Setup box will offer you basic configurations from the drop down menu. As you select each different Easy Setup the summary below will change to show you the specific settings for your selection. Included in the summary are the same four aspects of FCP settings shown below..
1) 'Sequence Presets' which sets the perameters for all new Projects or Sequences.
2) 'Capture Presets' which controls how you will capture your audio and video.
3) 'Device Control' for controlling your camera/deck.
4) 'External Video' for playback and recording.
If you had selected 'FCP 2.0 with Matrox RTMac' during the FCP 2.0.2 Installation then several options for Matrox RTMac would show up in the Easy Setup drop down as well.
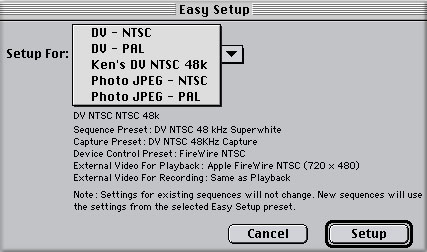
Easy Setup is a convenience device, a one click tool for switching between different 'pre-built' or custom settings groups that we have built ourselves. For example. There is an Easy Setup for 'DV-NTSC' that will work right out of the box for many. This Easy Setup is set to capture audio at an audio sample rate of 48k. Let's say that you have a Sony VX1000 that only records at an audio sample rate of 32k. You can build your own Easy Setup that will capture at 32k and name it 'DV-NTSC-32k'. Now when you capture from tapes shot with the VX1000 you can select this new Easy Setup with just one click from the Easy Setup drop down menu.
In the Sequence Preset section above, we built a new Sequence Preset for Anamorphic 16:9 Now that an 'Anamorphic 16:9' Sequence Preset has been built, if we go back to the 'Audio/Video Settings' dialog box, Summary tab, we can see our new Anamorphic 16:9 Sequence Preset. Click on 'Create Easy Setup' button at the bottom of the Audio/Video Summary page, name it, click Okay. You will now be presented with a 'Save' box, name your new Easy Setup to reflect it's settings and save it into the 'Custom Settings' folder.

Now you have a new 'Easy Setup'. Note, the only place that you can make a new, custom Easy Setup is from the Summary tab in Audio/Video settings.
Easy Setups are portable from one FCP system to another, you can take all your settings with you. To be portable FCP must create Easy Setups as a files, placing them into the Custom Settings folder. To access an Easy Setup open your System folder > Preferences folder > FCP Data folder > Custom Settings folder. Inside you will find all the Easy Setups. You can select your Easy Setup file and drag it to a Zip. Once on Zip you can move it to another Mac and place it inside the Custom Settings folder in the new Mac. Open FCP, go to Easy Setup in the Edit menu, find your Easy Setup from the drop down and click on the 'Setup' button. Now all the settings that you were using on the first Mac will be in place. A very cool feature. You can trash an Easy Setup by dragging it from the Custom folder to the trash. However, there is a glitch. Even if you trash an Easy Setup from the Custom folder it will still show up in the Easy Setup drop down menu even thought it's not really there. The only way to remove an Easy Setup from the Easy Setup dialog box is to trash your FCP Prefs which are found inside the FCP Data folder in the Prefs folder of your System.
When you first install FCP there will be several locked 'pre built' Easy Setups. Unlike custom Easy Setups that you build yourself and store in the Custom Settings folder in FCP Prefs, these locked Easy Setups are stored in the FCP Plugins folder > FCP Settings > Hardware Settings.
Here's a thought. If you make an Easy/Setup and have everything just right, back it up to Zip.
SEQUENCE SETTINGS
Yikes, you thought that we were all done with Sequence Settings. All our work so far with Sequence Presets, in Audio/Video, has been done for any new Sequences that we are about to create. When you open a new Sequence in the TL its parameters will match exactly the Sequence Presets settings in Audio/Video. But what if you have a Sequence open and need to make a change. Going back and changing Sequence Presets will not do it for us. Sequence Presets are for new Sequences, not ones that already exist and are open.
Why would one want to change Sequence Settings for an existing Sequence? Well, we might need to change the way that information is presented to us in the TL. Case in point. It is possible to have FCP show waveforms in the TL. Because the drawing of waveforms in the TL takes processing power and slows down the scrolling of the TL you may have this feature turned off. Now you need the waveforms in the TL so you can modify your audio volume.
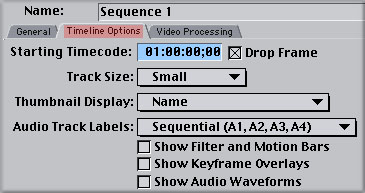
To change settings in an existing Sequence, click on the TL to make the Sequence active, from the Sequence menu > Sequence Settings. We are presented with the Sequence Settings dialog box. Yes, once again there are tabs for us to choose from. General, Timeline Options and Video Processing. The only setting that can not be changed is the 'Editing Timebase', frames per second. All other settings can be changed. When you make a change in the Sequence Settings dialog box and click Okay the changes are instituted immediately.
The General tab should look familiar to you. It is the same dialog box that we find in the Sequence Presets dialog box in Audio/Video. All of the settings choices are the same.
The Timeline Options tab controls how we view elements in the Timeline and can be set to your personal needs. This is where you can turn on or off Waveforms, change the way clips are presented, either with a clip thumbnail or clip name only, Show Filter and Motion Bars and Keyframe overlays. By default, the 'Starting Timecode' of the Timeline is set to 01:00:00;00. The ability to change the starting TC is useful when working with several Sequences that will go end to end into a final Project. When preparing a Project for broadcast, your tape will begin with color bars and test tone before the beginning of the actual Project. If your Bars and Tone run one minute you will deduct one minute, '00:01;00', from your start time so that the actual Project will start at the top of the hour. I should point out that you can not record the TC from the Timeline when Printing to Tape using DV decks via Firewire. It requires serial deck control and a production deck to print the TC from the Timeline to tape. The Timeline Options tab defaults with 'Drop Frame' selected. This does not mean that you are telling FCP to drop frames, rather it refers to a 'Drop Frame' system of frame counting. For Firewire DV 'Drop Frame' is correct.
This is the same dialog box as found in Sequence Presets. It is here in Sequence Settings so that you can change the rendering options for an existing Sequence. The Video Processing tab controls the way that FCP renders. It can render as RGB, White, or Super-White. If you are DV Firewire make sure that the 'Always Render in RGB is UNchecked. In the 'Process maximum white as" select 'Super-White'. This will insure that brightness values between video clips and rendered clips will be consistent. Render in RGB is used with some Capture cards and third party AfterEffects plugins.
PREFERENCES
Yet more settings, however the Preference Settings found in the Edit Menu are different. We have been working with settings that define our Sequences and Projects, Capturing media, Device control and Video output. Preferences settings are different in that they allow us to set up the look and functionality of the FCP interface. Preferences enable us to manage our work flow.
The Preference dialog box has five tabs and opens with the General tab.
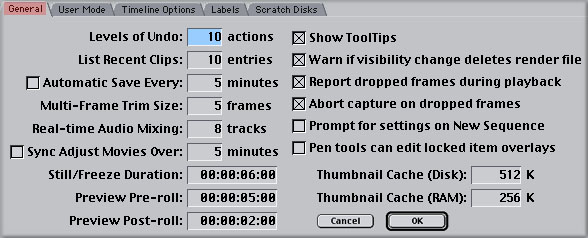
The 'Standard' user mode provides us with full FCP functionality. The 'Cutting' station is very limited in the effects and transitions that can be applied. This could be heplful for students just starting off with FCP or more likely for Projects that need to be exported as EDLs (Edit Decision Lists) as EDL do not support many effects and transitions. This would be most helpful when working 'off line'.

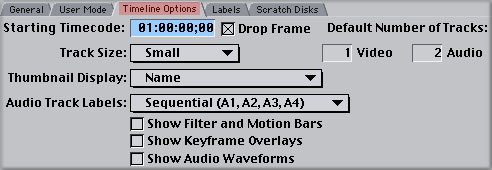
Timeline Options does not belong here in Preferences. It is not a Preference, it is a 'Sequence Preset' and belongs in with the other Audio/Video Settings. Changes made in this Timeline Options dialog box will be reflected in any new Sequence that is opened. If you want to change any of the Timeline Options for an existing Sequence then use the Timeline Options tab in Sequence Settings from the Sequence menu.
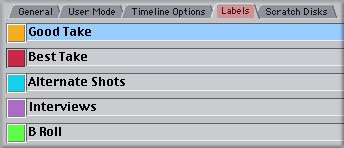
You can change the descriptions of labels, Good, Best, etc. in the Labels tab, the Labels colors are fixed. A Label can be applied to a clip in the Browser by Control clicking on the clip and selecting Label from the contextual menu. The clips icon will take the color of the label you gave it, unfortunately the clips thumbnail also takes on the color. There is a Label column in the Browser what shows the description of any clip that is Labeled. You can also Label clips in the Timeline. Control click > Item Properties > 'Logging Info' tab.
What's in a name? A 'Scratch Disk' is the name given to any hard drive that FCP writes captured video to. It can also be called a Media Drive. This same drive will be used to store your audio and video render files as well.
The first time that you launch FCP your main hard drive will be 'Set' as the default 'Scratch' disk. While it is possible to use your main HD for capture of DV Firewire (not Capture cards), at some point, as the drive fills up, you will encounter problems. Asking one hard drive to serve up the Mac OS, FCP and read and write video files all at the same time will lead to problems, most often in the form of dropped frames. It is essential that you have a second hard drive to use as your Media drive for your captures.
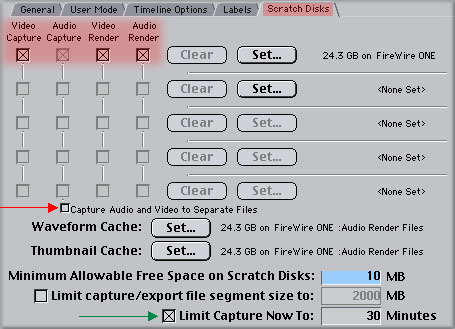
Okay, so you have a second HD to use as your Scrach Disk. FCP needs to be told which drive to store captured media on. The Scratch Disk Tab is where we designiate which hard drive(s) will be used for this purpose.
The first thing to check is towards the bottom of the box. 'Capture Audio and Video to Separate Files' should be UNchecked (Red arrow). Some PCI Capture Cards might use this feature but if you're DV, leave it unchecked. At the top of the box on the left, the first row, make sure that all four boxes are checked.
To select your Media drive click on the top 'Set' button, this will open a navigation dialog box, click on the Desktop button and find your Media drive, double click on the drive to open it in the dialog box. You will now be inside the Media drive. Click on 'New' which will open a 'new folder box'. This will be your Project folder, give it a name for your first Project and click the 'Create' button.
The new Project folder will open in the dialog box window with the Project folder name at the top of the box. From the bottom of the dialog box click on the 'Select' "" button. FCP is now pointed to this folder and will create three folders inside your Project folder; Audio Render, Capture Scratch and Render files.
At the bottom of the 'Scratch Disk' tab are two 'Set' buttons, Waveform Cache and Thumbnail Cache. I 'Set' both of these to the same Project folder as my captures and renders. In fact, I put everything into this folder, even all my CD audio, stills etc. I like everything in one place.
At the very bottom of the 'Scratch Disk' tab, two last items. 'Minimum Allowable Free Space on Scratch Disk" defaults to 10 megs. I think that this is too low. I would suggest a setting of 10% of the drives capacity. 'Limit Capture Now To' (Green arrow) is an excellent new feature in 2.0. When you do a Capture Now FCP needs to prepare disk space before it can capture and this takes time. If you know about how many minutes you intend to capture you can tell FCP to prepare only as much disk space as you need (add an extra 10 minutes). This will save a lot of time.
In FCP you can 'Set' up to five drives as media drives. When one drive fills up FCP moves to the next drive on the list. It is important to note that when you first name your Media drives (if you have more than one), give them unique names. 'Media 1' and 'Media 2' are not unique enough names and may confuse FCP.
Conclusion
Too many settings, well at first it would seem so. Considering the fact that FCP can work with so many formats, from DV all the way to High Def, all these settings are necessary.
For DV FireWire, NTSC or PAL (audio at 48k), with or without the Maxtor RTMac card, setting up FCP takes just one click. From the Edit window, Easy Setup. Select the correct Easy Setup setting in the drop down and click the 'Setup' button. In Preferences from the Edit menu, check your Prefs, General Tab and then 'Set' your Scratch Disk. You should be 'good to go'.
Enjoy,
--ken
copyright © Ken Stone 2001