
FCP 4 - Time Remap June 30, 2003
Time Remap - Final Cut Pro 4
By Ken Stone
FCP 4 - Time Remap June 30, 2003
Time Remap - Final Cut Pro 4
By Ken Stone
Since the beginning FCP has had the ability to change the speed of a clip. The speed change applied to a clip is a 'constant' speed change. You can speed up or slow down a clip by a fixed amount only. A 10 second clip can be set to run at 50% speed, thus doubling the duration of the clip to 20 seconds. A 10 second clip can be set to run at 200% thus giving the clip a duration of 5 seconds. FCP also offers 'Frame Blending'. Frame Blending causes FCP to create or interpolate additional frames that are needed to accomplish smoother looking motion. In addition, there is the ability to select 'reverse' which will run the clip backwards.
You apply Speed changes to a clip on the timeline, by selecting the clip, and from the Modify menu > Speed. When a speed change has been applied to a clip, the length of the clip on the TL will lengthen or shorten to represent the new duration. When the clip changes length on the TL, all surrounding clips will ripple up or down the TL to accommodate the new length of the clip. In addition it is possible to use 'Fit to Fill' to force a clip to become an exact length, in effect, changing the duration of the clip.
Constant Speed
Selected clip on TL |
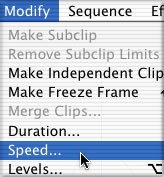
Modify menu > Speed |
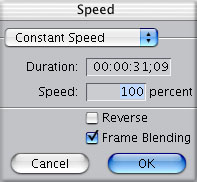
Speed dialog box |
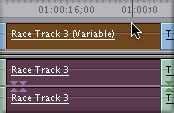
This feature does work well but is limited, limited to a constant speed for the entire clip. If you want the clip to have a variable speed, say starting at 0% and finishing at 200%, this is not possible. The work around has always been to cut the clip into pieces using the razor blade and then applying a different speed to each piece, ie; 25%, 75%, 150% then 200%. An inelegant solution. With FCP 4 a new feature has been added, 'Time Remap' and now we can now smoothly and creatively ramp the speed of a clip.
Variable speed or Time Remapping, as it is called, gives the us the ability to produce variable speeds within a clip. We can run the motion faster, slower or both, make the motion stop, run backwards or even produce a still frame. For example, a clip can start playing in 'slow mo', speed up, then run backwards, then run forwards, then backwards again, speeding up and slowing down all the while. Well, you follow my drift.
Time Remap is quite different than 'Duration'. Duration uses a dialog box to enter a speed change for the entire clip, Time Remap uses tools to change the speed, either the Pen tool or the Time Remap tool. Time Remapping work can be done in two different locations in the FCP interface; in the timeline using the 'Remap' tool or in a new section in the Motions tab of the Viewer window called 'Time Remap', using the Pen tool.
There is an other difference between 'Duration' and 'Time Remap'. When Duration is used, the length of the clip changes on the timeline to reflect the duration change of that clip. With Time Remap the duration of the clip does not change. This is important to understand. If a clip runs for 10 seconds, no matter how many speed changes, starts, stops, freeze frames or reverse motion, that are applied to the clip, the run time for the clip will always be 10 seconds. Time Remapping does not change the overall duration of a clip.
So how is this possible? Here's how. If you slow the clip down in one place, somewhere else in the clip the speed is increased to compensate for the slow down. If the start of the clip runs slowly, then later the clip will run faster. It's an equal trade off. The need for Time Remap to use this speed trade off scheme does have it's limitations, discussed later in this article. While Time Remapping alters the speed of the video portion of the clip, it leaves the audio portion unaffected. You would not want to Time Remap a clip of a 'talking head'. (grin)
So how does Time Remap work?
Time Remap in the Motion tab
Variable Speed - Time Remap
Easy, we can now Keyframe speed. And keyframing speed is no different than keyframing 'scale', 'rotation' or 'center'. No kidding folks that's it. Park your playhead on a frame in the Canvas where you want to have a speed change occur (or forward/reverse) and set a keyframe using the Pen tool. Drag the very last keyframe of the clip (the anchor) up to increases the speed of the clip, drag it down to decreases the speed. Drag down far enough and the clip stops, even further and the clip starts to run in reverse. Move the keyframe left or right to change its position in the timeline. This is how Time Remapping is done in the Motion tab. Time Remapping in the timeline Keyframe Editor is done in the same way, as we will see later.
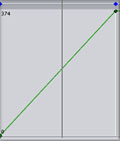
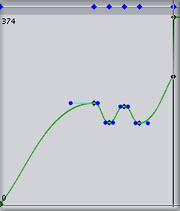
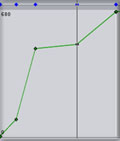
New to FCP 4 is The Time Remap section, with it's 'keyframe graph', found in the Motion tab in the Viewer window. Place a clip on the timeline and then double click to load it into the Viewer, select the Motions tab and open the Time Remap section. As shown below, this is what your clip will look like when you first open the section. The default setting is 'Constant Speed' and if played as is, the clip will play at normal speed all the way through. There are two keyframes, one at the start of the clip and one at the end, these two keyframes act as anchor points, if your clip has handles there will be two keyframes at each end. You will note that the green keyframe line does not run horizontally as it does with other parameters in the Motion tab. The layout of this graph is different than other Motions graphs. The vertical axis shows the frame count starting with the first frame at the bottom and the last frame of the clip at the top of the graph. The horizontal axis represents the timeline.

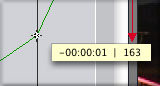
In addition, the Time Remap section in the Motion tab displays the velocity of your clip at the playhead location (below left). In the Keyframe graph, click and hold on a keyframe this will produce a yellow tip box that displays the frame number that the keyframe is set on (below right).
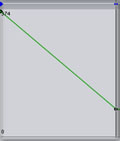
*It is the angle of the green keyframe line that determines both the speed of the motion in a clip and the direction that the clip runs, either forwards or reverse.
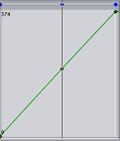
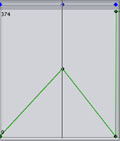
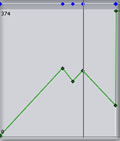
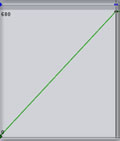
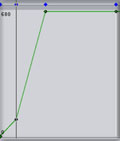
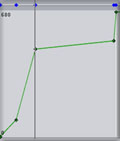
Simple really. The first illustration below shows the green keyframe line running at a 45 degree angle. 45 degrees represents Constant speed and as such is the default setting. Click on the last keyframe and drag up past 45 degrees (number 2 below) and the clip will run faster. Drag the keyframe below the 45 degree line (number 3 below) and the clip runs slower . When the keyframe line is horizontal (number 4 below) there will be no motion, a freeze frame. When the green keyframe line is running down hill (number 5 below) the clip will run in reverse.
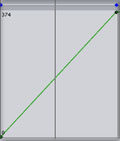
Constant speed |

Faster speed |
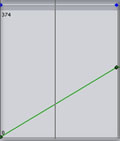
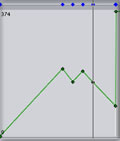
Slower speed |
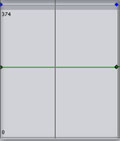
Stop motion freeze frame |
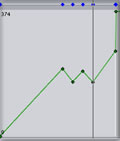
Reverse motion |
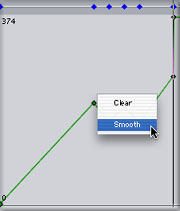
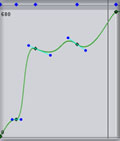
When you first open the Time Remap keyframe graph 'Setting' defaults to Constant Speed. After you set your first keyframe and change it's position this 'Setting' will change to Variable. The illustrations above have 'Setting' at Constant Speed. Control click on the keyframe that you set and select smooth. The keyframe line turns in to a curve (shown below), a gradual acceleration/deceleration. In addition, there is a Bezier handle on both keyframes for addition manipulation of the curve.
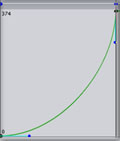
Variable forward speed |
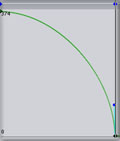
Variable reverse speed |
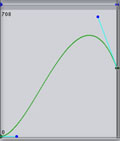
Variable - Bezier handle |
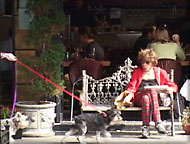
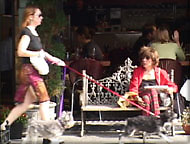
Okay, lets do some Time Remapping. I have a clip shot in New York. A lady, sitting on a bench outside a coffee shop reaches out her hand to a dog that is walking by. The dog pays her no mind and keeps on walking.

|
|
|
I want to have a little fun with this clip. At that point where the lady reaches out to pet the dog I want the motion to stop and run in reverse til the dog is almost out of the frame. Then I want the motion to run forwards up to that same point where the lady reaches out to the dog. Again, I want the motion to stop and run in reverse. Then, finally, have the dog walk completely by the lady.
1. Drop the clip into the timeline and double click the clip to load in to the Viewer. Open the Motion tab > open the Time Remap section.
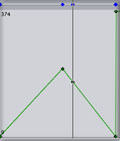
2. While viewing the clip in the Canvas, move the playhead to the position where the lady is reaching out to the dog. In the Time Remap section, in the keyframe graph, the playhead line will intersect the green keyframe line. Using the Pen tool, set a keyframe at the intersection of the two lines in the graph. Click on the last keyframe at the end of the clip and pull it down. When the keyframe line is running down hill the clip is running in reverse. Try to angle the keyframe line at 45 degrees if you want normal reverse speed.
|
Reaching out |
Lines intersect |
Keyframe set |
Pull keyframe line down |
3. Now, using the right arrow key, advance the playhead. As the playhead is advancing to the right and the green keyframe line is running down hill, the clip is reversing. Continue until the dog is almost out of the frame. Set a keyframe at this intersection. Click on the keyframe at the bottom of the keyframe line and drag back up. This will cause the clip to start playing forward .

Dog almost out of shot |
Set new keyframe |
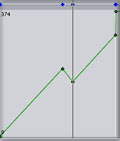
Pull the keyframe line back up |
4. Using the right arrow, advance further down the timeline until you are once again at that frame where the lady is reaching down to the dog. Set a keyframe and drag the keyframe at the top of the keyframe line back down. We are now running in reverse again.
|
Reaching out again |
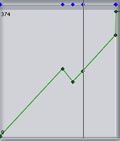
Set new keyframe |
Pull the keyframe line back down |
5. Advance further down the timeline until the dog is once more almost out of frame. Set a keyframe and drag the keyframe at the bottom of the keyframe line back up, returning motion to forward. You will notice that I try to keep the up and down running sections of the keyframe line at a 45 degree angle. This is because I want the motion to run at close to normal speed.
|
Dog almost out of shot |
Set new keyframe |
Pull the keyframe line back up |
6. Once you have set you basic keyframes you can further adjust them. Placing the Pen tool cursor on top of any keyframe turns it into a + and you can click and drag the keyframe to a new location. In addition, you can control click on a keyframe and select 'Smooth'. This will turn the straight keyframe line in to a curve, a smoothing of the speed change at the keyframe. You will be provided with Bezier handles.
Now lets do some speed ramps in the Time Remap section of the Motion tab. It is the same process used above to run a clip forwards and backwards. While viewing in the Canvas window move the playhead to find the frame that you want your speed change to start. Set a keyframe then drag the last keyframe up or down to effect the speed change. Move your playhead to the next frame you want to have a speed change and set another keyframe and adjust the green keyframe line. Continue til done.
Open in Time Remap section |
Keyframe - drag up for faster speed |
Keyframe - drag down for slower speed |
Keyframe - drag up for normal speed |
Control click Smooth set Bezier handles |
Time Remap in the timeline
Time Remapping in the timeline is exactly the same as working in the Motion tab. The timeline has been rebuilt to accommodate the Time Remap feature. There is now a workspace beneath the clip called the 'Keyframe Editor'. This workspace is where Time Remapping is done. Other Motion attributes can be keyframed in the Keyframe Editor as well. At the bottom of the Keyframe Editor is the Speed Indicator bar which graphically displays 'Tics', representing frames of the clip. And a new tool has been added, the Time Remap tool.
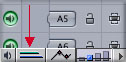
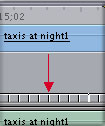
Lets set up the timeline 'Time Remap' features. Place a clip onto the Timeline (below left). Click on the 'Clip Keyframe Control' button lower left hand side of the timeline (red arrow below center). The clip portion of the timeline will expand vertically revealing the 'Keyframe Editor' space (red arrow below right).

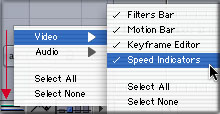
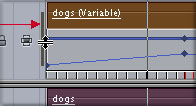
Control click on the 'Clip Keyframe Control', select Video and select the Motion Bars as well as Speed Indicators (below left). The Keyframe Editor will now display the 'Speed Indicator bar' with it's Tics (red arrow below center). Once you have set your first keyframe the Blue Motion bar will appear with a blue keyframe (red arrow below right).
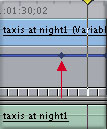
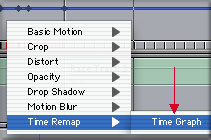
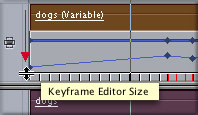
Control click anywhere in the Keyframe Editor, the space between the clip and the Speed Indicator bar, Select Time Remap > Time Graph (red arrow below left). This will produce a blue keyframe line, the same as the keyframe line found in the Motion tab. At default, the Keyframe Editor has limited vertical height making work in the Keyframe Editor difficult, everything is just too small. Move your cursor just to the left of the Keyframe Editor space, it will turn into a up/down arrow and display 'Keyframe Editor Size' (red arrow below center). Click and drag up to resize the height of the Keyframe Editor. As you drag a thin gray vertical line will will appear showing you the amount of size increase (red arrow below right). Drag up as far as you need to give yourself enough room to work properly. As the Keyframe Editor now takes up a great deal more vertical space on the timeline you may want to drag down the Video/Audio separator bar to better see the Keyframe Editor.
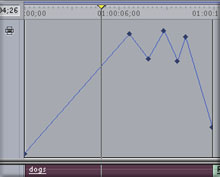
A fully expanded Keyframe Editor (shown below) looks exactly the same as the graph found in the Motion tab > Time Remap section, that because it is the same. Working in one space will automatically update the Keyframe graph in the other space and you can have both open at the same time. You will work in the Keyframe Editor using the Pen tool and using the same procedures as working in the Motion tab > Time Remap section, Smooth and Bezier handles are available here as well.
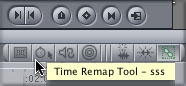
As I said, working in either the Motion tab > Time Remap section or in the Keyframe Editor in the timeline uses the same workflow and the same tool, the Pen tool. There is yet another way to Time Remap in the timeline. This proceedure uses the Time Remap tool. Select the 'Time Remap' tool from the tool palette (below left). As you can see I have been using another new feature in FCP 4 - Buttons and I have placed a Time Remap tool button on my timeline (below right).

The Time Remap tool does not work in the Keyframe Editor space but rather is used on the clip itself in the timeline. This can be done for a quick speed change or the fact that you do not wish to open the Keyframe Editor and lose the screen space. The Remap tool does the same job as the Pen tool. In the Motion tab, click with the Pen tool to set a keyframe, in the timeline click on the clip with the Remap tool to set a keyframe. In the Motion tab when the Pen tool is placed over a keyframe it turns into a + and you are able to drag the keyframe. In the timeline, place the Remap tool over a keyframe, hold down the Option key and you are able to drag the keyframe.
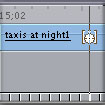
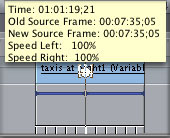
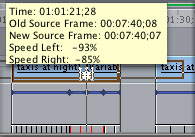
With The Time Remap tool selected place the tool cursor over the clip (below left). Holding down the Shift key, scrub through the clip. The Canvas window will display as you drag. Find the frame where you want your speed change to start. Click to set a keyframe, continue to hold and you will be presented with the yellow tip box showing information and speed. As you have not yet dragged with the time Remap tool you will see that Speed Left and right are both showing 100% speed (below right).
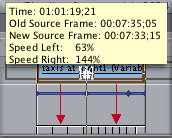
After you have set a keyframe drag it to the left, this will slow the motion on the left hand side of the keyframe (and speed it up on the right). In the yellow tip box below, you will see that the left speed is now 63% and that the right speed is 144%. The speed tic indicators (below red arrows) on the left are now further apart demonstrating that the clip will run slower over that portion of the clip. The speed tic indicators on the right are now closer together showing that the clip will play faster when on that portion of the clip. Remember that the duration of the clip does not change, slowing down one part of the clip will necessitate a speed up somewhere else. This speed indicator tics are a graphic representation of that fact.
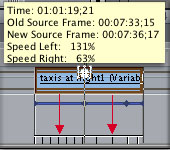
Dragging to the right has the opposite effect, speeding up the frames on the left hand side of the selection point and slowing down the frames on the right side.
You can set any number of keyframes and speed up and slow down any number of times. Just click to set a keyframe and drag. When both the left and right speeds are running at a minus percentage (-%) the clip will play in reverse . Reverse direction is demonstrated by red Tics in the speed indicator bar (below).
Limitations
Time Remap is not the end all, be all, of time mapping tools. It has its limitations. The fact that Time Remap works by trading off speed changes (every speed change must have an opposite speed change) limits the effects that you might want to achieve. It means that if you want to make a speed change at one place in the clip, FCP is going to make an opposite speed change somewhere else in the clip. Not exactly what you had in mind. If you want to start a clip at normal speed and then accelerate it to 300% by the end of the clip, you can't. Somewhere in that clip the speed will have to slow down to compensate for the 300% increase.
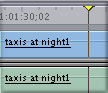
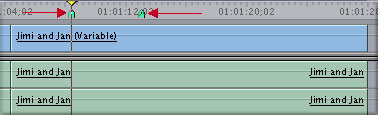
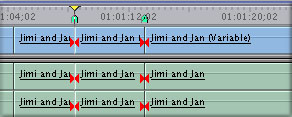
I have a workaround for this limitation so that you can achieve the effects you want. You'll need to have extra media surrounding the portion of the clip you want to effect, not talking handles here, I'm talking about lots of extra footage inside the In and Out points. Place the clip with extra footage on the timeline and set Markers where you want your finished clip to begin and end (red arrows below).
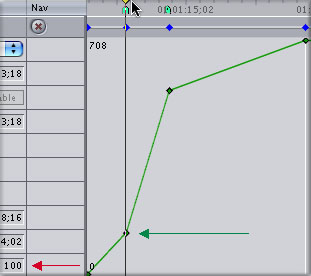
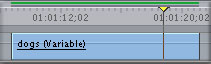
With the Time Remap section of the Motion tab open you will see the two Markers at the top. Move your playhead to the first Marker and set a keyframe (green arrow below). You will see in the Speed box that the speed at this point is 100% (red arrow below).
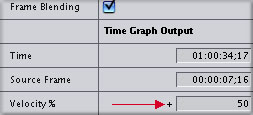
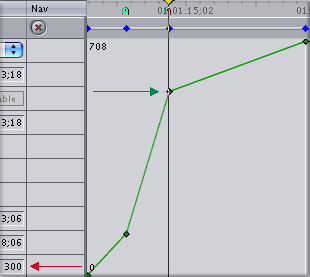
Now move your playhead to the second Marker, set a keyframe (green arrow below) and pull the keyframe up until you have a speed of 300% as shown in the speed box (red arrow below).
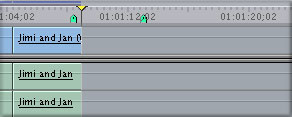
Now render your Time Remap effect, you may want to 'Smooth' your keyframes first. Back on the timeline get out the trusty Razor Blade tool and cut at the two markers (below left). Delete the unwanted head and tail of the clip (below right).
You might expect that changing the speed inside a clip would also change the duration of the clip to reflect the speed change. Unlike 'Duration' which does change the length of the clip, with Time Remap, this is not the case. The fact that Time Remap can not reflect speed changes by altering the length of the clip on the timeline is the cause of this limitation.
Conclusion
Up until this time we have had to rely on third party plugins to do Time Remapping. FCP 4 now has its own Time Remap feature. When you have finished with your Remap effect you can save it as a Favorite just like any other motion effect. I personally prefer doing my Time Remap work in the Motion tab. There are a number of steps that you must go through to prepare the timeline for Time Remapping work. There is a new feature in FCP 4, 'Save Track Layout' but unfortunately, at least for me, it does not save my custom timeline Time Remap Layout completely. The size and position of the Keyframe Editor and 'Time Graph' are not saved. Of the three ways to do Time Remap work I find using the Time Remap tool directly on a clip in the timeline to be rather cumbersome. Time Remap works well despite it's limitations and gives us the ability to do some exciting motion effects and right from inside the FCP interface.
Some good news (well for me). Running a dual 800 set to RT Safe and playback quality at Medium I get real time out firewire. It is so great to be able to view these effects on NTSC as you build them.
--ken
copyright © www.kenstone.net 2003