June 4, 2007
By Steve Martin
Every few years when Apple releases a major upgrade to Final Cut Pro, Ken calls upon me to write a "first look" article covering the new features. Given that Apple does an unmatched job of selling the "sizzle" of a new product, I have given myself the job of selling the "steak" of what these new features mean in your everyday, bread and butter workflow. There are quite a significant number of features to cover, so let's dive right in.
Open Format Timeline
With new cameras and formats appearing on the scene in intervals that feel like weekly, it is becoming increasingly common you will be faced with the necessity of mixing clips with differing formats in the same sequence. Anyone who has ever edited in Final Cut Pro is familiar with the dreaded "red render bar" that appears over clips whose format does not match the native format of the sequence. The gymnastics necessary to get the red bar to go away have been the subject of countless articles and posts and now, thanks to Final Cut Pro 6's Open Format Timeline, this issue has been finally put to rest.
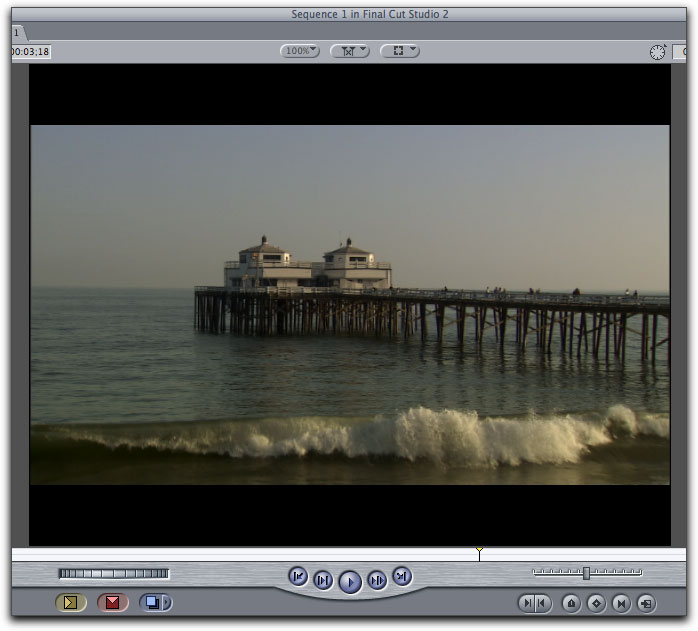
Here is a timeline that contains clips in three different video formats - DVCPRO HD, HDV and DV. A sequence that contains clips whose media files do not match the sequence format are called "mixed format sequences".
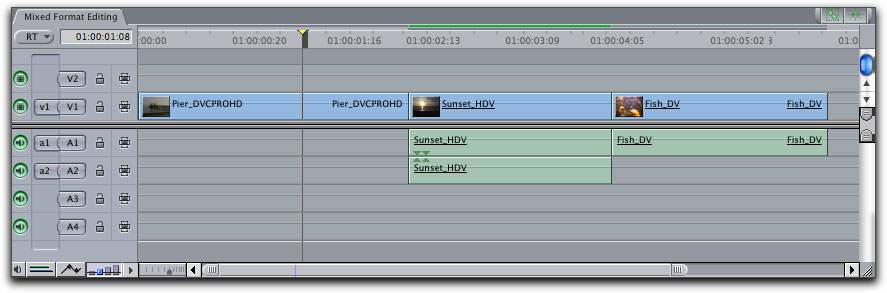
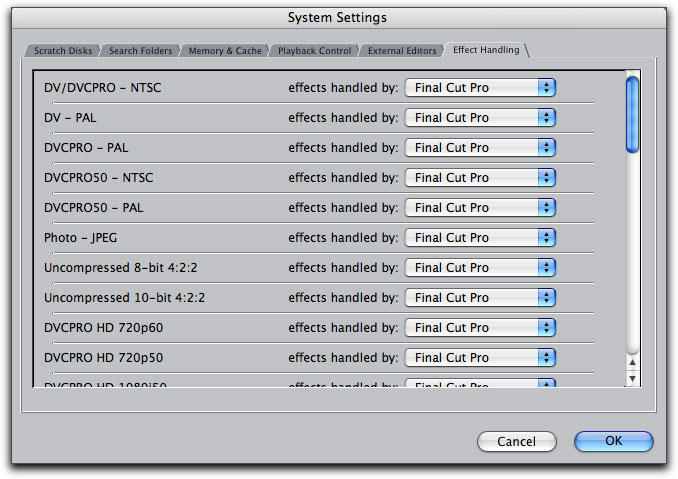
A clip will play back in any sequence as long as the clips' media file format and the sequence format are both supported by Final Cut Pro's real time processing engine. By pressing Shift-Q to call up the System Settings window and clicking the Effects handling tab, you can view a list of the formats supported.
Since Final Cut Pro has to do some heavy lifting in order to play back clips with differing frame sizes, frame rates and codecs in the same timeline, you will get the best real time performance from Macs with a lot of processing power.
New Easy Setup
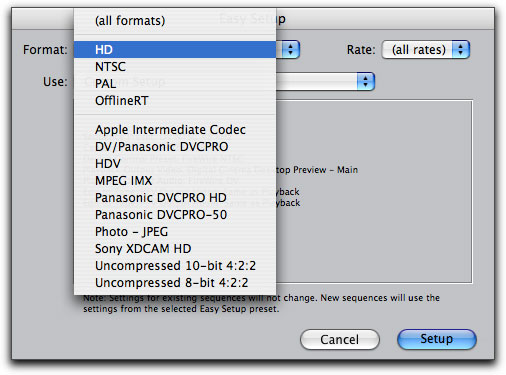
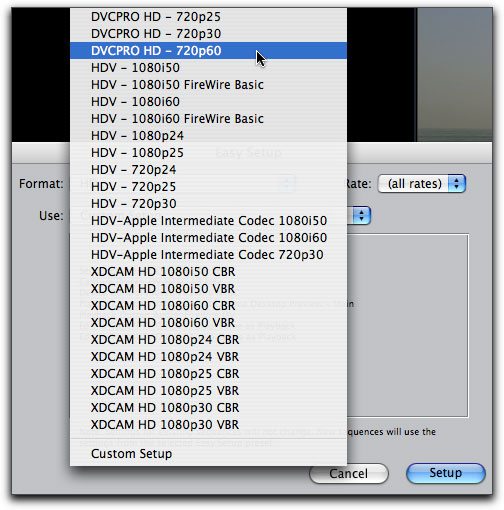
Related to these formats is the new Easy Setup window. In the past all the formats were thrown together in one long unmanageable list. Using the format menu, you can now view only the setups related to a particular format. For example, by choosing HD from the Format menu, only setups related to that format will show up in the Use menu.
Mixed Format Editing
As in previous versions of Final Cut Pro, you must choose a default setup for your project. Even if you plan on changing the setup later, you still must make an initial setup choice. A standard sequence has the potential to become a mixed format sequence once you add the first clip. If the clip you are adding does not match the format of the sequence you will get a warning dialogue asking if you want to conform the sequence to the clip.
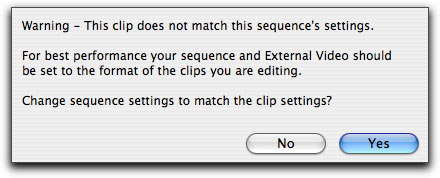
For example, if the sequence was setup for DV (as determined by your Easy Setup choice) and you were adding a DVCPRO HD clip, clicking "yes" would convert the sequence to DVCPRO HD. On the other hand, clicking "no" would keep the sequence setup as DV and place the non-conformed DVCPRO HD clip into it. In this scenario the DVDPRO HD clip would be scaled to match the DV sequence's frame dimensions and frame rate.
At the end of the day when you are ready to output to tape, any clip that does not match the sequence format will need to be rendered for the highest quality output. Using the example above, the DVCPRO HD clip, even though real time during playback, would ultimately need to be rendered into the DV format for final mastering.
Motion Templates
Even if you have never used Motion, you will find Final Cut Pro's new Motion Template integration quite liberating. Here is a good case in point. I was hired to train a large department at Disney that creates Electronic Press Kits to promote shows currently running on ABC. A large part of their workflow includes creating "slates" that precede the on-screen talent (in many cases, actors responding to off-camera questions). The slates are necessary to inform the various media outlets who is speaking, in addition to the subject matter the talent is responding to. In an environment where the editorial department would normally shoulder the burden for all last minute changes to these slates, a scheduling bottleneck would occur because only the editorial department would have the means necessary to make the changes.
With video templates, anyone with an iMac on his or her desk running Final Cut Studio connected to a network could make these changes without the requisite knowledge of Motion. Plus, the potential for altering the basic formatting of the slate would be mitigated. In this scenario, anyone from an intern to a production assistant could modify a slate, help meet broadcast deadlines, and not put unnecessary scheduling burdens on the editorial department.
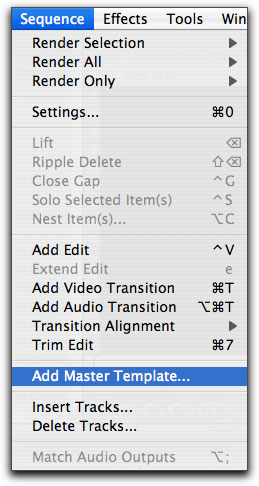
Video Templates are nothing more than Motion projects that can be accessed and modified directly in Final Cut Pro. Whether you create a custom template in Motion or use one of the "stock" templates that ship with Final Cut Studio, the methods for accessing them is the same. The most common approach would be to park the playhead in the timeline where you want to add the template then choose "Add Master Template" from the Sequence Menu,
The Template Browser appears.
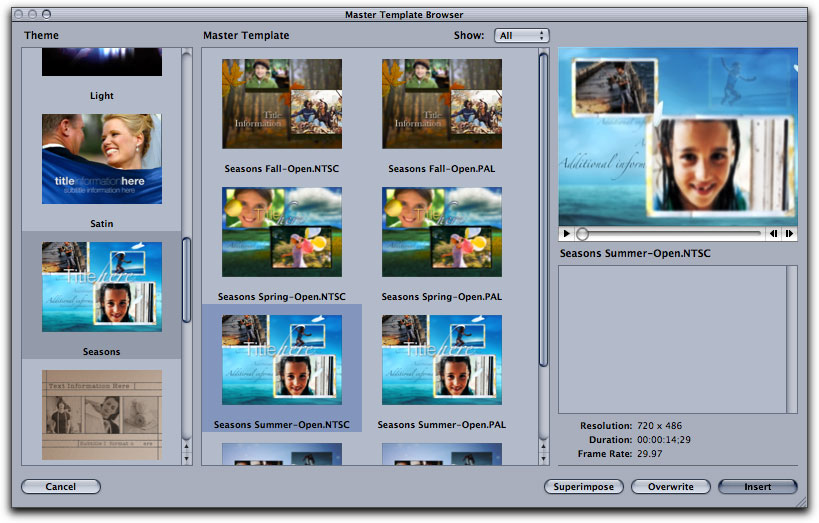
You can choose a theme category on the left, then a particular template from that category on the right. You will also see a QuickTime thumbnail of your chosen template. If you did a full install of Final Cut Studio, these templates were installed as part of the Motion content. If you opted not to install Motion, these templates will not be available when you open the template browser. In the lower right of the browser you are presented with 3 edit options � Superimpose, Overwrite, and Insert. These buttons function identically to the edit options found in the Canvas overlays.
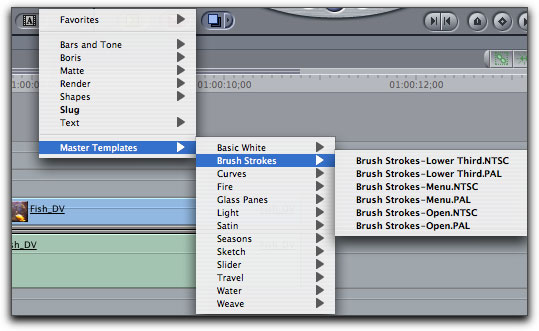
You can also access video templates from the Generators drop down menu on the Viewer. A menu item appears called "Master Templates" Just choose a theme category, then select the particular template from the category. Using this method, the template is loaded into the Viewer but is not added to your sequence. You might choose this option if you wanted to mark in and out points before adding the template to your sequence.
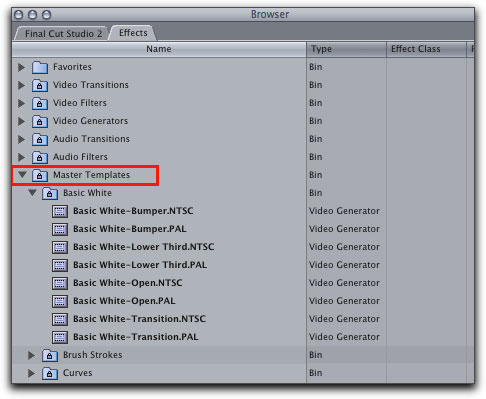
You'll also find templates is in the Effects Tab of the Browser. A bin labeled "Master Templates" has been added and inside you will find bins organized by template themes. From here you can drag a template directly to the timeline or load it into the Viewer for editing.
If you opted to add the template using the Sequence Menu method, the Controls tab in the Viewer will automatically become active.
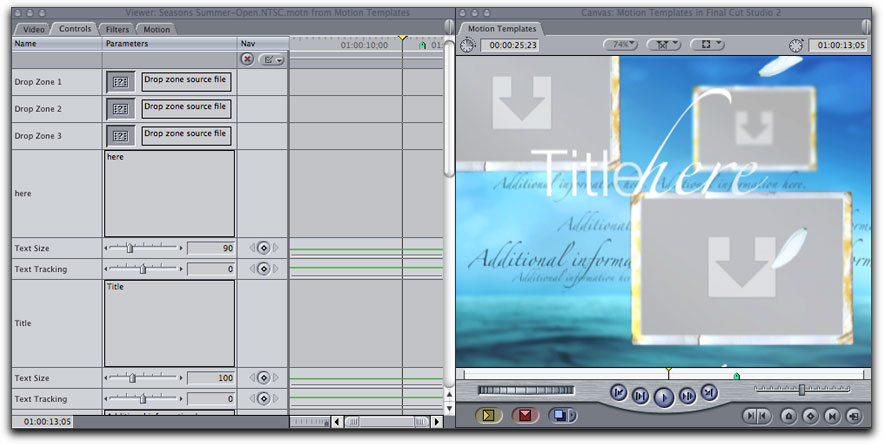
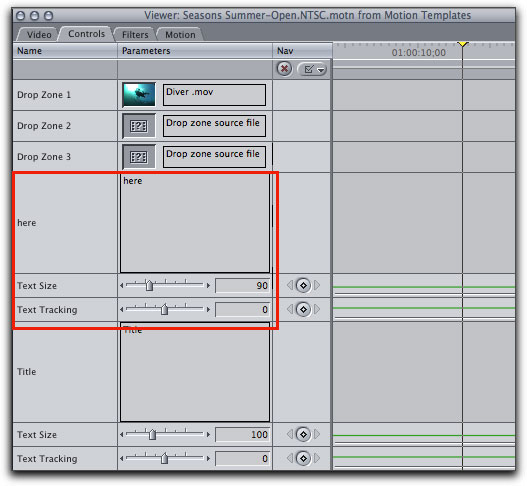
If you do not see these controls, just double-click on the template clip to load it into the Viewer. You will also want to park your playhead over the template clip so you can see your changes in the Canvas window. Because templates contain moving elements you may need to move the playhead to different positions over the template clip in order to see different motion elements in the Canvas window. In the Controls tab you are given placeholder items for both drop zones and text. Drop zones are familiar terms for anyone who has used iDVD or DVD Studio Pro. They are basically "placeholders" for your video or still image content. You can add content to drop zones by dragging video clips or still images from the Browser into the gray boxes called "Image Wells".
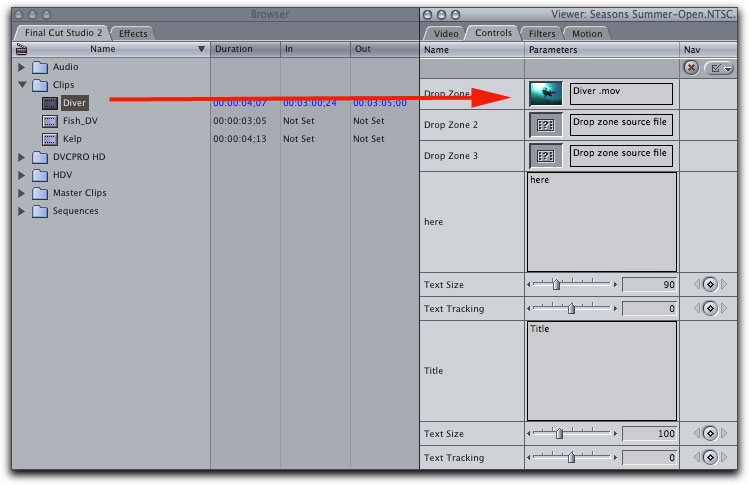
The Canvas updates as you make these changes in the Controls tab. To modify the placeholder text, select the text in the input fields then begin typing. You can adjust the text size, text tracking, speed and timing, but you cannot change the font, it's color or position. If you could, they wouldn't be templates anymore.
That said, there will be occasions when you need to change the basic formatting of the template. For that, you will need to send your template to Motion.
Modifying Templates in Motion
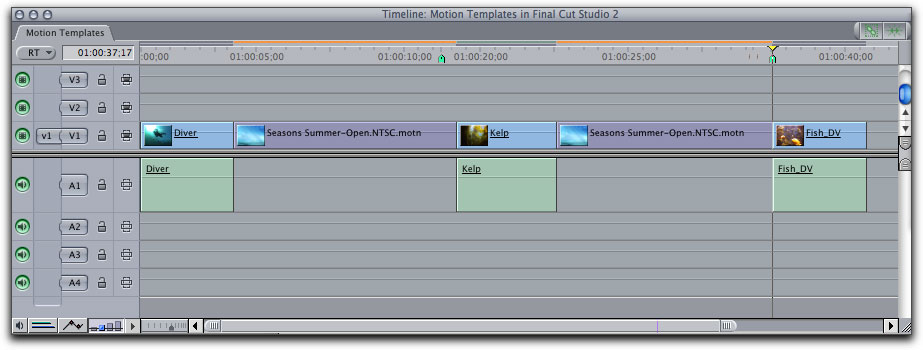
Let's examine how you modify your templates in Motion when you have multiple instances of a template in your project. Here is a sequence containing two instances of the template. To create a copy of a template, select it and press Command-C. Move your playhead to the edit point you wish to insert the template copy, then press Shift-V. (Pressing Command-V would paste overwrite the template. Not what we want to do here).
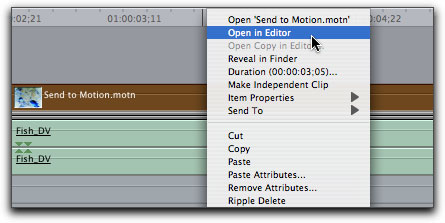
If you right-click on a template you can choose either "Open in Editor" or "Open Copy in Editor".
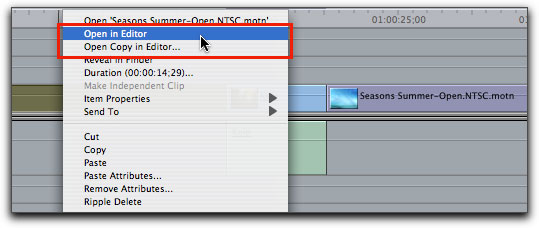
If you choose "Open in Editor" you will be sending this template to Motion for changes. Any changes you make in Motion when saved, will update all instances of that template wherever it occurs in the Final Cut Pro project. Because Apple write-protects (save disables) the default theme folder so you cannot alter the stock templates.
The other option, "Open Copy in Editor" is useful when you only want to modify a single instance of a template. In other words, by opening a copy in Motion any changes you make will not affect the other instances of the template in your project. However, this process requires a work-around because of the same write disabled problem outlined above. When you choose "Open Copy in Editor" the default "Save" dialogue box won't let you save! (The Save button is grayed out). This is because the folder that it's pointing to is locked.
The work-around is to save the copy into the templates folder (one directory level up). For organizational purposes, you may find it helpful to create a folder at this level to save all your copied templates into. When sending templates to Motion, there are some things you will need to keep in mind. First, make sure you do not delete any elements in the Motion project that are used as editable parameters in Final Cut Pro. Doing so will compromise Final Cut Pro's ability to properly interpret the changes in Motion. Second, if you modify a copy of a template, and plan on editing on another system, make sure you copy the template file into the library of that system to avoid the "missing media" dialogue.
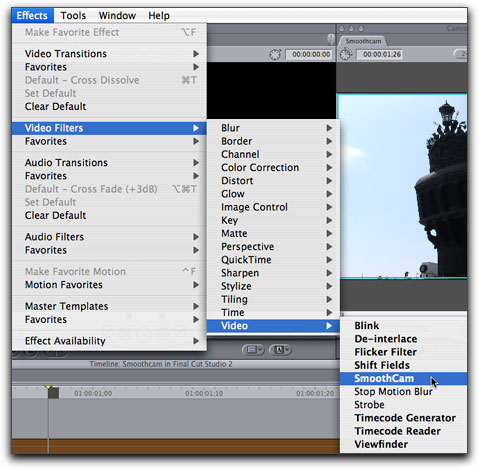
SmoothCam
Final Cut Pro 6 now includes a SmoothCam filter that intelligently reduces unwanted camera movement from your shots using technology inherited from Shake. You can apply the SmoothCam filter to clips directly in the Browser or to clips in the timeline. The SmoothCam filter like all filters in Final Cut Pro can be found in both the Effects menu and Effects Tab of the browser. Select the clip in the timeline, then choose >video filters>video>SmoothCam.
Before you can see the result of the filter, the clip must first be analyzed for camera motion. The overlay in the Canvas lets you know the analysis is in progress.
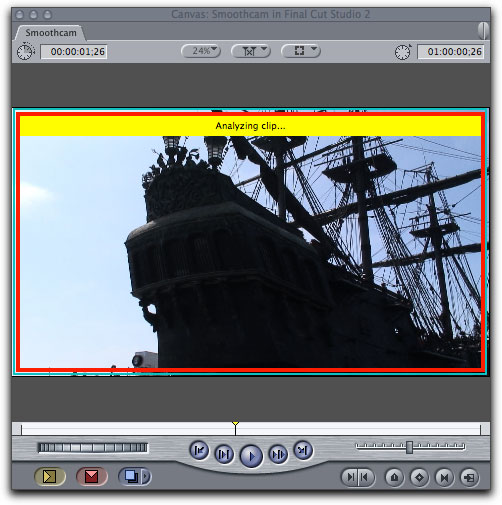
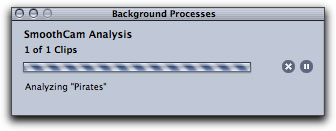
Every pixel must be examined to determine the direction of the camera movement. SmoothCam rendering will ultimately be applied to the media between your clip's in and out points, but in order for the filter to produce accurate results, the entire media file must be analyzed. Depending on the duration your media file is, this could take some time. A window called "Background Processes" also appears informing you know how far along the analysis is.
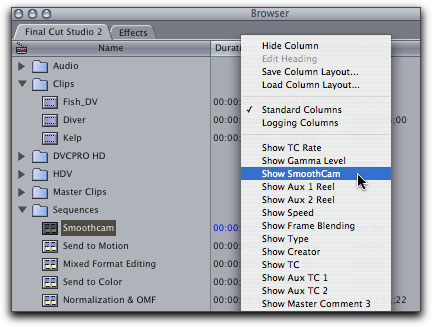
The cool thing is, applying a SmoothCam filter does not interrupt your workflow. The clip is analyzed in the background while you continue editing. You can also pause the analysis at any time or halt the analysis entirely. A really powerful feature is the ability to submit clips for analysis directly in the browser. Make sure your Browser is in list view, then Right-click on a column header, and choose >Show SmoothCam> from the list.
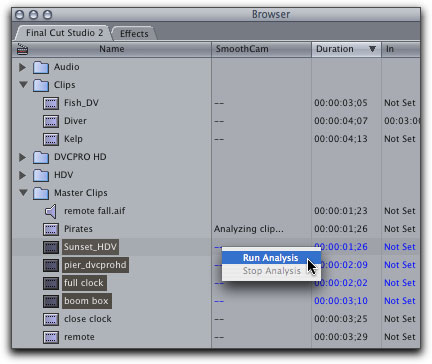
You can select single clips or groups of clips then by right-clicking in the column next to the clip choose "run analysis" from the menu.
The background process window updates to show you how many clips are currently in the queue for processing. Once the clip has been analyzed it does not have to be analyzed again. The analysis data is stored on your hard drive. By default, this data file is stored in the same directory as the media file. To achieve optimal results from the filter, make sure to set in and out point for the portion of the clip you want to stabilize. As I mentioned, the entire media file must be analyzed, but the results of the filter will only be applied to the portion of the clip between the in and out points. If your clip has already been edited into the timeline, in and out points will most likely have already been established. However, clips you plan on analyzing in the Browser may or may not have in and out points sets and you will want to set them before analyzing.
If you media manage your projects, keep in mind that because your media will be trimmed before being copied or moved, the original SmoothCam data file will no longer apply and you will need to re-analyze the clips. As I mentioned, this is because the filter always analyzes the entire media file and media managed files constitute "new media" as far as the filter is concerned. Once a clip or clips have been analyzed you can adjust the SmoothCam parameters as you would any other filter. Double-click the clip to load it into the Viewer and click the filters tab.
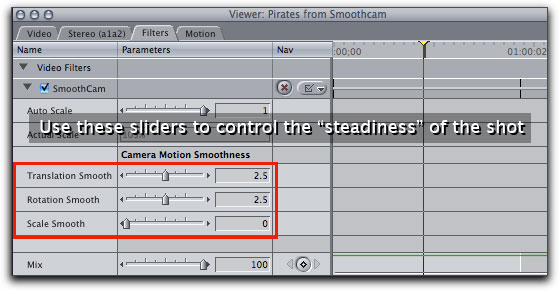
You can adjust the steadiness of the shot by dragging one of three independent sliders. The Translation Smooth slider controls the camera's horizontal and vertical movement along the X and Y axis, the Rotation Smooth slider controls the camera movement around the center point of the image and the Scale Smooth slider controls the forward or backward camera or lens movement along the Z axis. I've discovered that in most cases the default settings work very well.
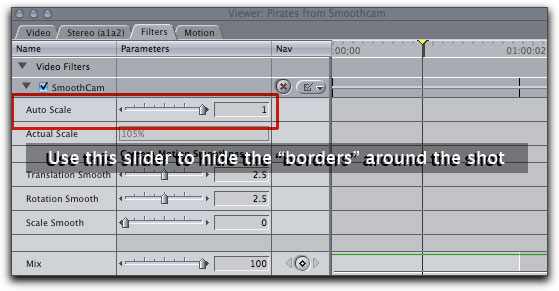
Each parameter can be set to a value between zero and five. A value of zero disables the parameter and a value of five applies the strongest possible transformation. The higher you set each parameter, the more camera motion is compensated for in that direction. To hide the black edges that result from all this motion compensation, the filter applies some slight scaling to the clip. By default, an auto scaling value of 1 is applied. Generally this is the best setting and anything further applies noticeable softening to the image.
Audio - Normalization and Gain
A common occurrence when working with production audio is that it was not recorded evenly in terms of overall volume. For example, the average volume reading for DV should be -12db. If you have audio that was recorded lower you can use Final Cut Pro's Normalization Gain filter to adjust the audio without introducing potential peak distortion into the audio that could happen if you just increased the levels manually.
The downside of increasing the gain using this method is that it introduces the possibility of audio distortion. Most professional audio applications have a feature called "normalization" that analyzes the audio for it's loudest peak then raises the gain of that peak to a level you specify. Once the peak is raised, everything else in the audio is raised in relationship to that peak. So you get maximum gain without distortion. With a clip selected in the Timeline choose Modify > Audio > Apply Normalization Gain. A dialog appears that let's you define the peak decibel to normalize to.
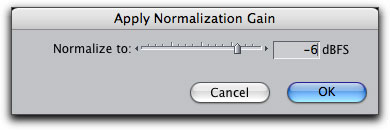
The dialog defaults to zero db, but you'll rarely in real-world situations use this setting. For example, if you are working with a DV dialog track, you could set the peak to between -12 and -6 and that would keep the audio within a desirable range. You should always use your Audio Meters as a basis for where to set this slider. If you are applying this filter to dialogue, 0dB is almost never a good choice, because with the increase in gain comes an increase in noise. And frankly, you would never want your spoken dialogue peaking at 0 dB. If for some reason you still need to make gain adjustments to a clip, just double-click the clip to load it into the Viewer, then click the filters tab.
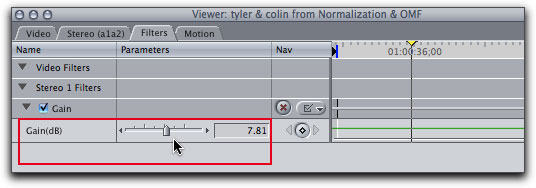
Use the gain slider to make real time adjustments while keeping an eye on the audio meters. One little thing that is minor, but it still annoys me, is the fact that the audio waveforms do not update after you apply the normalization and gain filter.
OMF Export Enhancements
While we're on the subject of audio, Final Cut Pro made some improvements on how OMF files are exported. For those of you unfamiliar with OMF, it is shorthand for "Open Media Framework" and it's nothing more that a transport file that contains both the media and descriptions of your audio edits. So why would you want to export an OMF file of your audio? Well frankly, because not everyone will be finishing their sound on their Final Cut Studio system.
If your sound editor works with Pro Tools or similar audio workstation, the best thing you can do is hand him or her an OMF file of your sequence, and he or she will have everything they need to mix, sweeten and otherwise finish your audio. In this sequence, some of the audio work has been done by the video editor.
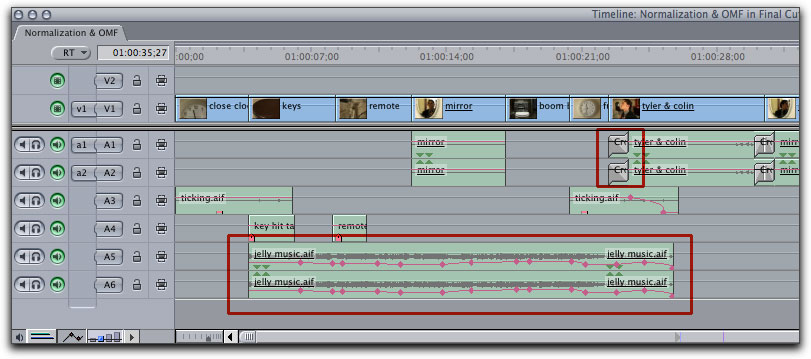
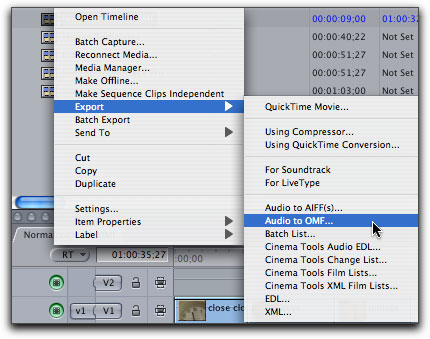
Here we see audio keyframes placed in the music clip to raise and lower the volume. We also see a few audio cross fades placed at cut points to make the audio transitions from one cut to the next less jarring. Let's imagine, that as a video editor, we have roughed out our audio, but now we want a professional sound editor to take over where we left off. To create an OMF file, right-click the sequence in the browser, then choose "Audio to OMF" from the menu.
The OMF export dialogue appears.
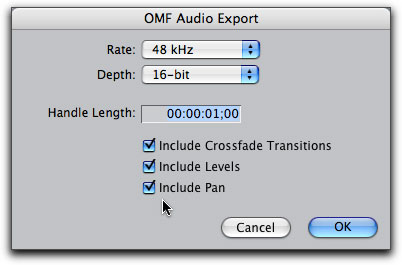
In addition to setting the bit depth and sample rate of your exported audio files, you can include cross fades, and both level and pan settings. Place a check in the "include levels" and "include pans" boxes then click ok. Name the file and save it to your hard drive.
Improved Studio Integration
Final Cut Pro was designed to be the hub of a complete post production workflow.
And while you can do your audio work, motion graphics design and even professionally color correct your footage within the walls of Final Cut Pro, there is endless creative potential once you venture out into the greater universe of Motion, Soundtrack Pro and Color.
In this section we'll take a look at the workflow involved in sending your Final Cut Pro clips and sequences into other Studio apps, then look how your work in those apps gets integrated back in Final Cut Pro. The Final Cut Studio term for this is called "round tripping". So why would you want to send your clips to another app in the first place? The short answer is, you send something to another app because there is a feature not found in Final Cut Pro directly � or if it is in Final Cut Pro, the app you're sending it to, does a superior job.
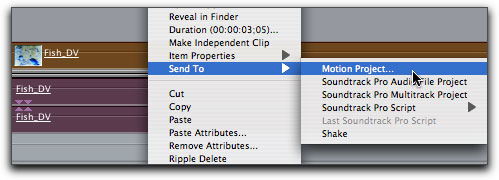
1. Sending to MotionRenaming Clips and Media filesTo send this clip over to Motion, right-click on the clip and choose "Send to Motion Project". The save dialogue will appear. Be default, the name of the sequence you are sending from will appear in the "Save As:" field.
Give the file a name and save the file to a convenient location on your hard drive. In Motion, make all your changes, add effects, animate, and otherwise create your visual eye candy. In order for your changes to appear in Final Cut Pro, you will need to save your project. Toggle back to Final Cut Pro. In the timeline the original clip you sent has been replaced by the motion project you saved.

If you need to make further changes to the motion document, simply right click on the motion file in the sequence and choose "open in editor".
The project will open in Motion and you can make your changes. Don't' forget to save your project, otherwise any changes you make will not update in Final Cut Pro.
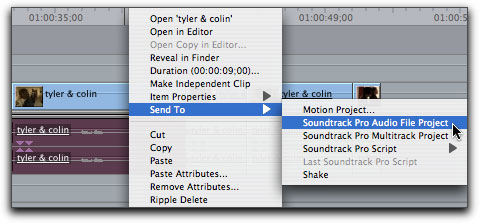
2. Sending to Soundtrack Pro
There have also been some significant changes to how you round trip to Soundtrack Pro from Final Cut Pro. There are two types of files you can send to Soundtrack Pro � Audio File Projects and Multitrack Projects. The project file type you choose depends on your particular needs and requirements. You would choose an Audio File Project if for example, you only wanted to modify one or more clips in Soundtrack Pro, then have those clips update in your sequence with your changes. This is approach is similar to the method we just looked at when sending clips to Motion. The second file type is called a Soundtrack Pro Multitrack Project. In the typical multitrack scnenario, you would send the entire sequence over to Soundtrack Pro for adding sound effects, sweetening, and final mixing. You would not necessarily need to return to Final Cut Pro, although in some cases you might need to do this. Both of these file types will let you to edit your audio non-destructively.
Let's look at how to send an Audio File Project first. You send a clip to Soundtrack Pro the same way you send a clip to Motion. Right-click on the audio clip and choose "Send to Soundtrack Pro Audio File Project".
In the previous version, the entire audio file was sent to Soundtrack Pro. Now you can limit the duration to just the portion of the source audio being sent from your sequence. By clicking the checkbox labeled, "Send only referenced media" you can enter "handle" durations for the media you are sending.

In Final Cut Pro, the original clip will be replaced with the new Soundtrack Audio File project. Just as with Motion projects you can make any further changes to the media by right or control clicking the clip and choosing Open in Editor from the shortcut menu. All changes you make in Soundtrack Pro are non-destructive.
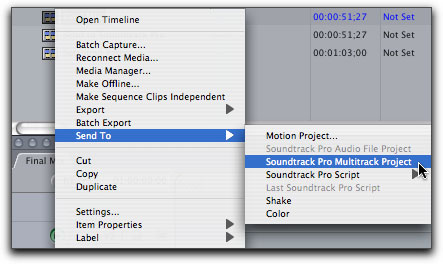
The second major improvement is how Soundtrack Pro Multitrack projects are handled. When you send a Multitrack project to Soundtrack Pro, you can edit all your tracks non-destructively, then send the final mix back to Final Cut Pro for output.
Once you've completed your mix in Soundtrack Pro, choose Export from the File Menu. In most cases, when sending back to Final Cut Pro you'll want to choose Master Mix from the Exported Items menu and AIFF File from the File Type pop-up menu. This will create a stereo mixdown of the entire Multitrack project. In the After Export menu choose Send Files to Final Cut Pro Sequence.
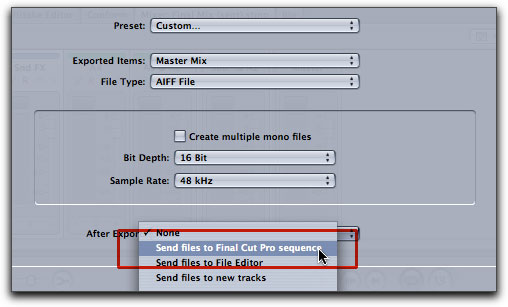
Sending the mixed sequence back to Final Cut Pro will create a new sequence in the Browser that contains your final mix as a stereo pair. Unlike, Motion projects or Audio File projects you cannot send these final mixes back to Soundtrack Pro by using the Open in Editor command. You will need to return to the original Multitrack file you created for the mix to make any changes, and then re-export to Final Cut Pro.
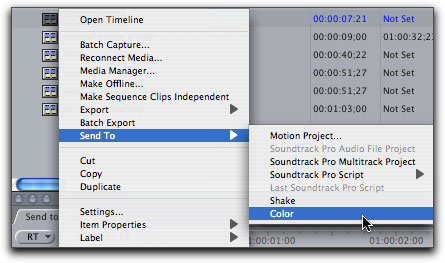
3. Sending to Color
You can also round-trip sequences from Final Cut Pro to the new addition to Final Cut Studio - Color. Before sending a sequence though, there are some limitations: Motion projects and LiveType projects will not export, nor will any filters or transitions you've applied to clips in the timeline. But fortunately because of the XML interchange between the applications, those assets and elements will be put back when the sequence returns to Final Cut Pro from Color. Select the sequence you want to send to Color from the Browser and then choose File > Send To > Color.
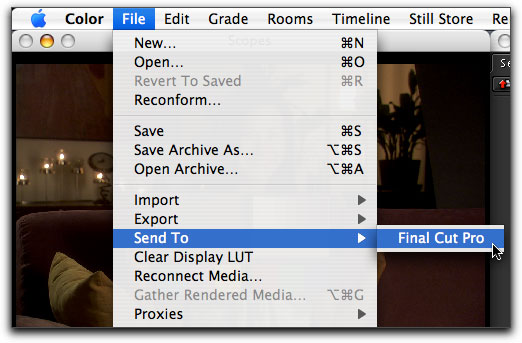
A dialog will open announcing the total sequence duration and presenting you with a field to enter the project name. After you've made all your adjustments in Color and rendered the clips, you can send the project back to Final Cut Pro by choosing Send To> Final Cut Pro from the File Menu.
If there are clips that you haven't made any adjustments to, Color will present a dialog informing you that there are clips that have not been rendered
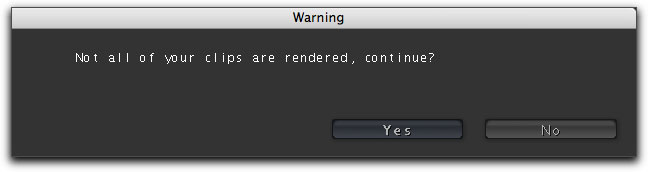
The original source clips will be used when relinking the sequence. Back in Final Cut Pro a new sequence will be created with (From Color) next to the original sequence name. Any file that you adjusted in Color and rendered will replace the source media in the new sequence.
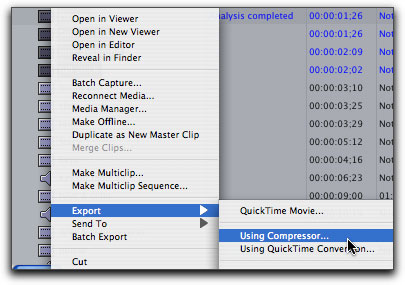
4. Improved Compressor Integration
In the Previous version of Final Cut Studio you could export sequences directly from Final Cut Pro into Compressor for encoding. Final Cut Studio 2 offers a new option for the one way trip from Final Cut Pro to Compressor: you can export clips directly from the Browser to Compressor by right or control clicking a clip and choosing Export > Using Compressor from the shortcut menu.
This is a seemingly small feature, but one that I have personally lobbied for. Let's say you were handed a project where the media files were not given proper names during the logging process. You can now rename these clips in the Browser with a single command. Select a clip or group of clips you wish to rename, then choose "Rename" from the Modify menu.
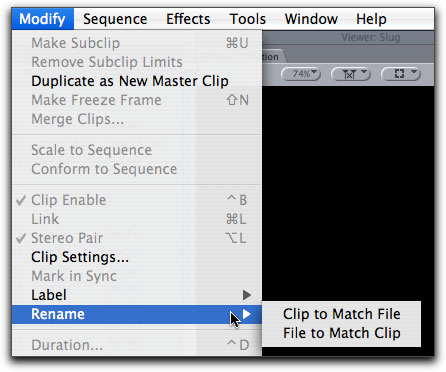
Two options are presented. If you choose "Clip to Match File" the clip in the Browser will be given the name of the media file on your hard drive. You would use this option if the clip names in the Browser were changed and you now want the clip names to match the actual names of the media files (on the hard drive).
If you choose "File to Match Clip" the media file on your hard drive (most likely the file in your Capture Scratch) will be renamed to match the current clip name in the Browser. However, a small warning is in order. It should go without saying that if you choose the second option, you need to make sure you will not be changing the names of media files that belong to another project or worse, belong to projects that other editors need to reference on a shared storage network. Oops.
External HDV Video Monitoring
Two years ago when Final Cut Pro 5 was announced, you'll recall that one of Apple's marketing tent poles was "native HDV editing". Your initial excitement was soon tempered by the realization that you could not monitor HDV material on an external monitor. In version 6, you can now output an HDV sequence through FireWire.
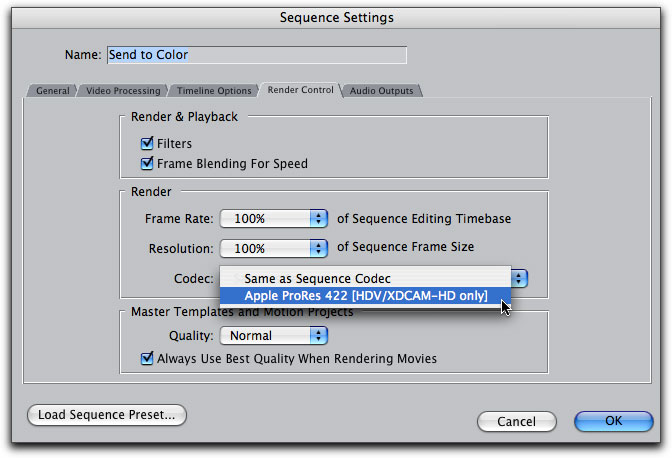
Apple ProRes 422
Apple has introduced a new suite of codecs called Apple ProRes 422. These codecs are particularly well suited for editing high bandwidth content (ie uncompressed HD and SD source material). These codecs allow you to work with and edit images that are visually lossless. While the ProRes codec will most often be used in high-bandwidth workflows, there are reasons for using it with lower bandwidth material such as HDV or XDCAM HD. These formats record in Long-GOP MPEG-2, which are extremely processor intensive. Rendering these formats into ProRes 422 is less processor intensive and reduces MPEG-2 artifacts.
Wrap Up
While I've heard it said that Final Cut Pro 6 does not have that much in terms of "new features" I would have to disagree with that assessment. I always base the value of an upgrade not so much on how many new "bells and whistles" have been added, but in the sheer weight of a given tool's worth in terms of saving time and ultimately money. The mixed format timeline alone is worth the cost of the upgrade in this reviewer's opinion. When looking at Final Cut Pro, it is now impossible to consider it apart from the suite of apps called Final Cut Studio. Apple has once again given us dollar for dollar, a most impressive set of tools unmatched by anything else in its price range.

If you are interested in exploring these new features in a video tutorial, I've created an in-depth learning experience called "Final Cut Pro 6 on 6".
Steve Martin runs www.rippletraining.com where you can download QuickTime tutorials and purchase tutorials on DVDs covering all of the Final Cut Studio applications. He is also a lead instructor for Apple's certified training program and has taught workshops at NAB, Macworld, DV Expo, and the American Film Institute.
copyright © www.kenstone.net 2007
are either registered trademarks or trademarks of Apple. Other company and product names may be trademarks of their respective owners.
All screen captures, images, and textual references are the property and trademark of their creators/owners/publishers.