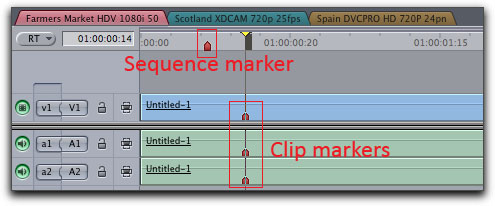
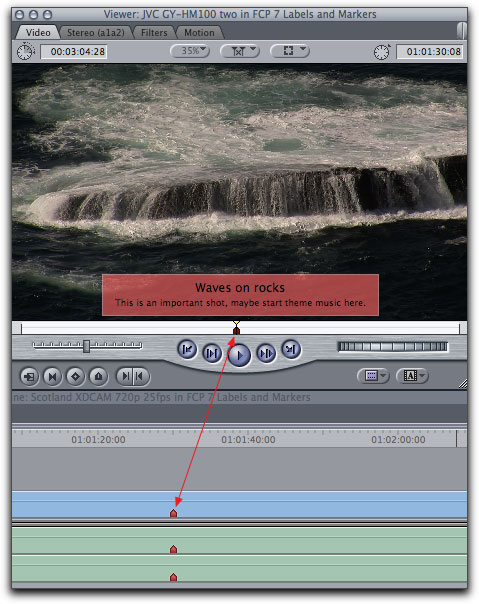
Clip markers show in the Viewer window
|
|
Sequence markers show in the Canvas window.
|
If you add a marker to a clip in the Viewer window and then place the clip on the timeline, the clip marker will show there as well. But, because this is a clip marker, it will only show in the Viewer window, not in the Canvas window. Only sequence markers show in the Canvas window.
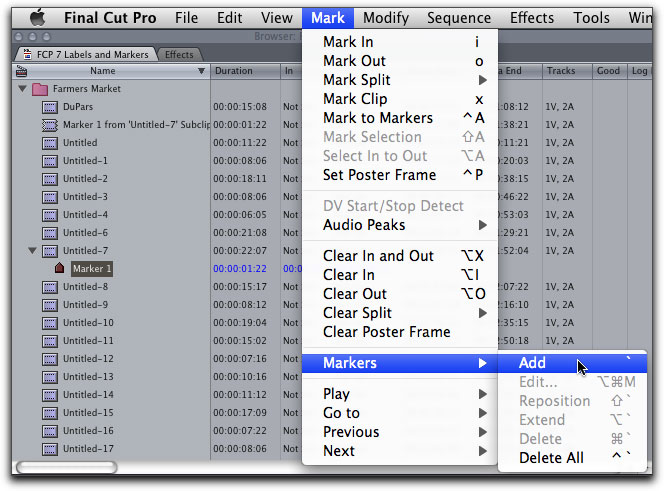
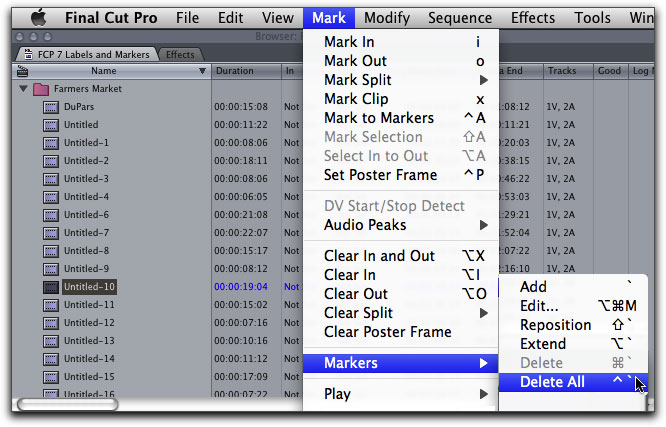
It can be easier to add markers than to delete them. There are several ways to clear all markers, from the Mark menu > Markers > 'Delete All'. We need to remember that we are dealing with two different types of markers, sequence markers and clip markers. If the sequence is active, then 'Delete All' will remove all of the sequence markers. If a clip is selected and the playhead is on the clip, then 'Delete All' will remove all of that clips' markers. If you have several clips with clip markers and you select the clips, 'Delete All' will only work for the clip that the playhead is on. You would have to delete clip markers from multiple clips, one clip at a time. It would be nice if we had two different commands from the Mark menu > Markers; 'Delete all Sequence markers' and 'Delete all Clip markers'.
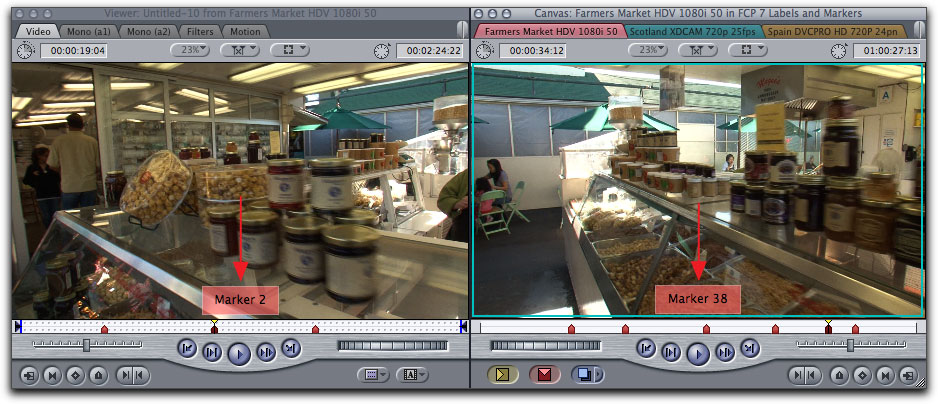
When we want to delete just one marker from either a sequence or a clip, then the sequence or clip must be active (selected) and the playhead must be on the marker, then from the Mark menu > Markers > Delete. If the playhead is not on a marker, in either the sequence or clip, then 'Delete' from The Mark menu will be grayed out. Having Snapping on will help position the playhead exactly on a marker. You can always tell when you are exactly on a clip marker, because the marker will show in the Viewer window, (the clip must be loaded into the Viewer) and a sequence marker will show in the Canvas window.
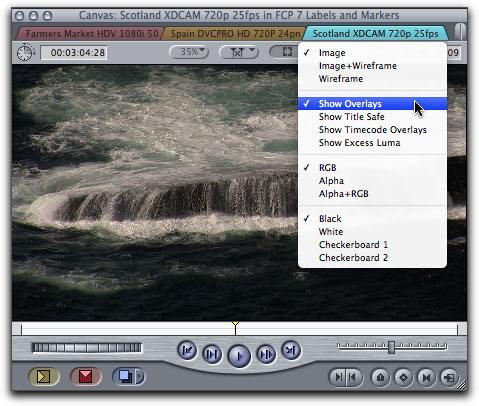
In order to see markers in the Canvas window, Overlays must be turned on.
There is another way to clear sequence markers one at a time. Command click on a sequence marker, and while still holding down the Command key, drag the marker up and out of the sequence ruler. The marker will be deleted but there will be no puff of smoke. Unfortunately, Command drag does not work with clip markers, you'll need to place the playhead on the clip marker and then use the Mark menu > Markers > Delete, or hit the 'm' key which will open the Edit Markers window and click on the Delete button.
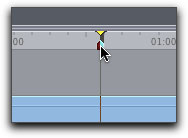
Hold down the Command key
and click on the sequence marker.
|
Continue to hold down the Command key
and drag the marker out of the timeline.
|
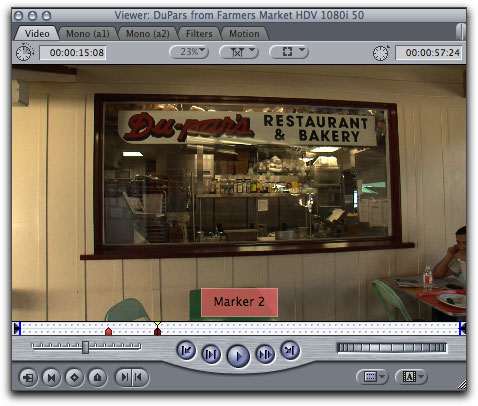
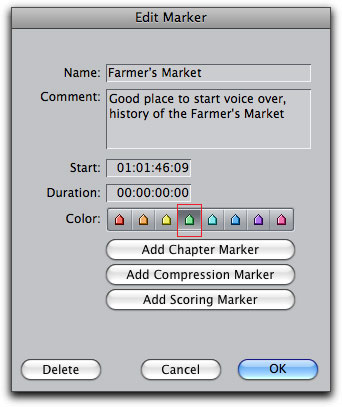
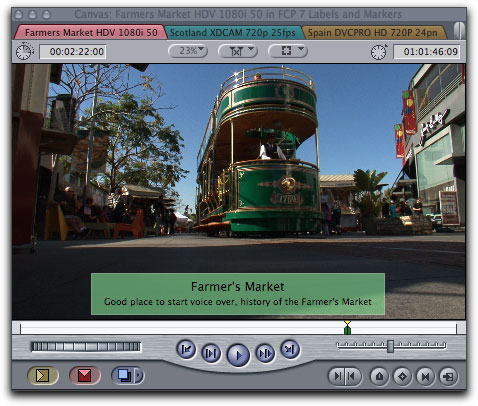
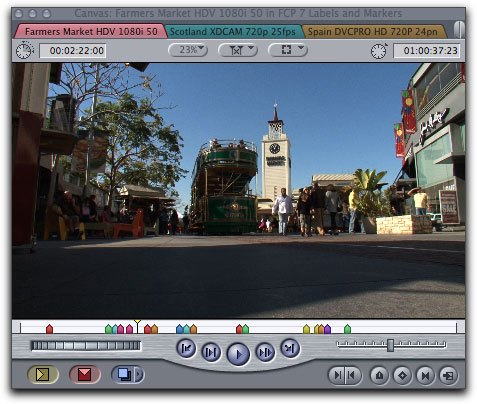
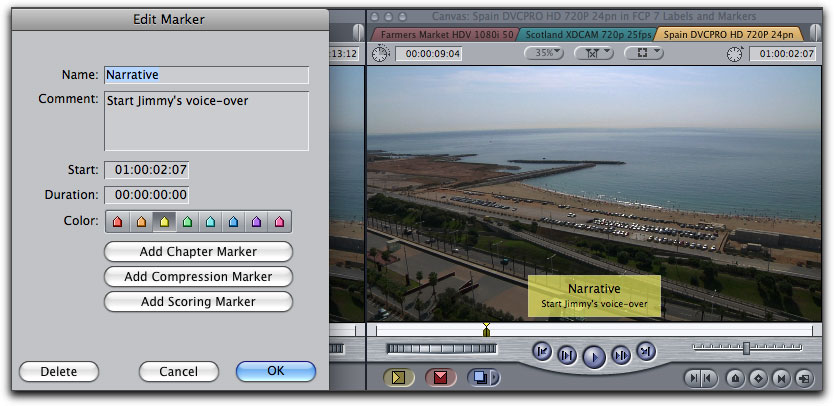
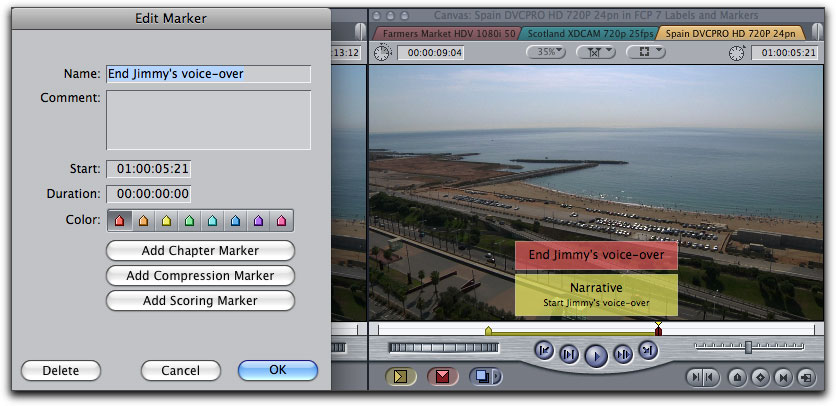
So far we have be working with simple markers, but most often we will want to use more advanced markers. To do this we will access the 'Edit Markers' window which has been improved in FCP 7. Hitting the 'm' key on the keyboard will apply a simple marker, hitting 'm' twice opens the Edit Marker window. If you already have a marker, navigating to the marker and hitting 'm' once will also open the Edit Marker window. What's new in the Edit Marker window are the 'Color' options, I have selected green for this example. Below right, is the marker displayed in the Canvas window. The marker in the Canvas window scrub bar is green as is the background color of the text box in the Canvas window. Having the ability to color code our markers is a real organizational convenience.
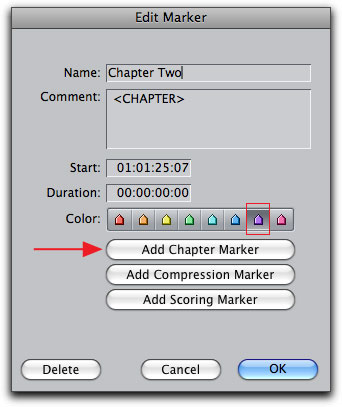
It is important to note that FCP uses three of the colors for the three different function markers; Purple for Chapter markers, Blue for Compression markers and Orange for Scoring markers. When you click on one of the function markers buttons, FCP will automatically set the proper color. These function markers are used when we send our video to Compressor, DVD Studio Pro, iDVD or SoundTrack Pro.
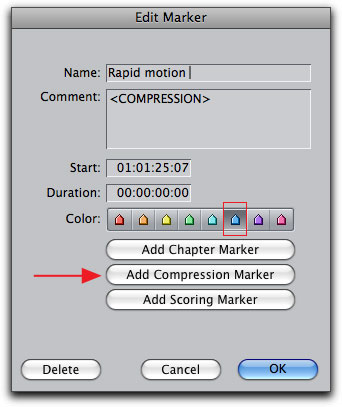
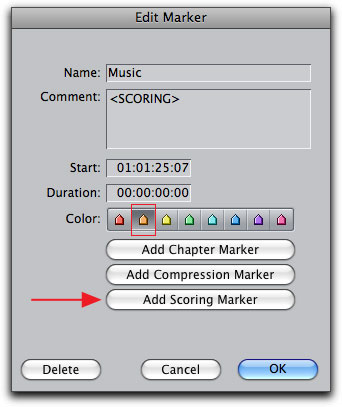
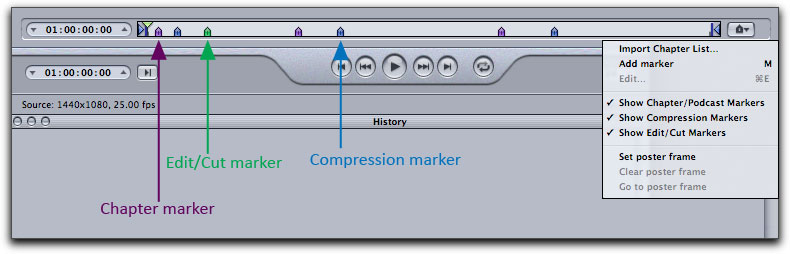
When using either the 'Send to Compressor' command from the File menu in FCP, or by exporting from FCP as a 'QuickTime Self-contained and selecting 'DVD Studio Pro markers' during export, two of the function markers, Chapter and Compression markers will show up in the Compressor Preview window with their color coding. The Compressor Preview window will also show Green 'Edit/Cut' markers which are added to the project automatically for us during 'Send to Compressor' or export 'QuickTime Self-contained'. These 'Edit/Cut' markers instruct Compressor to place an I frame at each 'Edit/Cut' marker. The Orange Scoring markers do not show in the Compressor Preview window, they are meant for SoundTrack Pro.
However, you can assign any of the available colors to your markers, even the ones that FCP uses for; Chapter, Compression, Edit/Cut or Scoring. It's is not the color that assigns functionality to the marker, functionality is added to the marker when you click on the Chapter, Compression or Scoring buttons in the Edit Marker window.
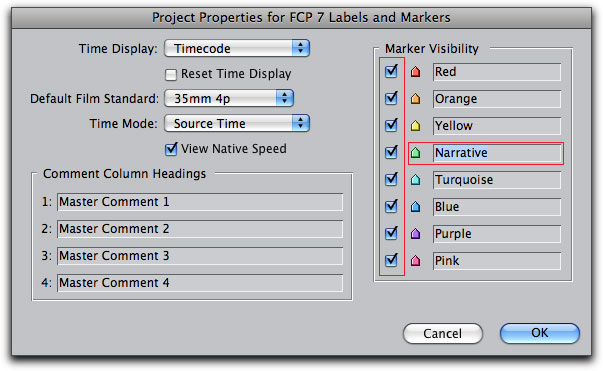
We now can add our own descriptors to each of the different color markers. From the Edit menu > Project Properties. I have assigned the title 'Narrative' to the color green. If you use a large number of differently colored markers and the scrubber bar or sequence ruler becomes overly populated with different colored markers, you can hide any colored marker from view by unchecking the 'Marker Visibility' box for that color. There is also 'Comment Column Headings' box where you can assign different 'Comments' names. This is helpful when using the Search feature in FCP. You can also search for your markers by using the names assigned in the 'Project Properties' window.
There is an other new feature that has been added to Markers in FCP 7. We have always been able to add simple markers to the sequence on the fly, but new in FCP 7, is the ability to open the 'Edit Marker' window at the same time and enter Name, Comment and even select marker colors, all while FCP is playing in RT. Of course this will probably only work well with long clips and you'll need to be a very fast typist.
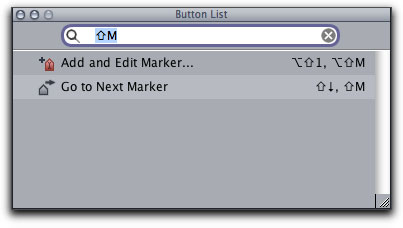
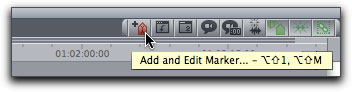
From the Tools menu > Button List. Start to type in the word 'Marker'. You will be offered a button called 'Add and Edit Marker'. Click on the button in the list and drag it to your timeline. Now, while you are playing the timeline, clicking on this button will open the 'Edit Marker' window and you can type in your information, all while FCP is playing. You can use the 'Add and Edit Marker' button at any time and in place of 'm' from the keyboard.
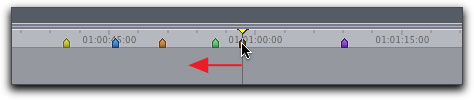
Another important new Marker feature in FCP is the ability to move Markers up and down the timeline. Shown below is a section from the timeline with markers in place. I am going to reposition the orange marker.
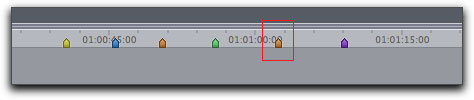
Right side, between the green and purple marker is the orange marker. While holding down the Command key, I then click and drag the orange marker (playhead snaps to marker) to any location in the timeline. In this case I have moved it a bit to the left.
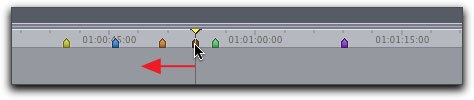
Now this is interesting, you can even drag a marker past another marker to a new location. As shown below, I have dragged the orange marker to the left, past the green marker.
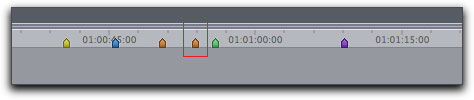
The orange marker that started to the right of the green marker is now to the left of the green marker. Unfortunately this little trick does not work with clip markers, you can not drag them around.
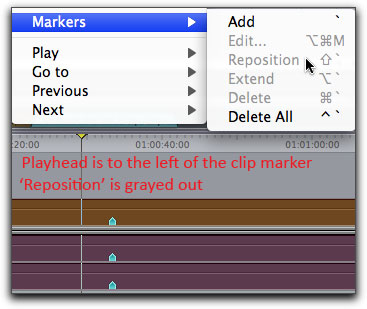
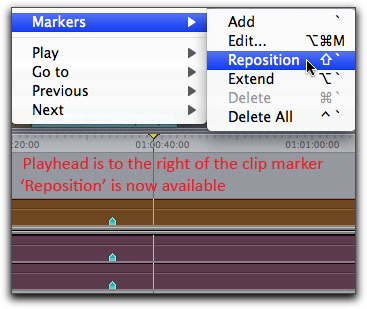
If you need to reposition a clip marker, select the clip, then move your playhead to the new position and from the Mark menu > Markers > Reposition. However, and I know that this is a little crazy, but the playhead must be to the right of the clip marker in order to be able select Reposition from the Mark > Markers menu. If there are multiple clip markers on a clip, Reposition will only work on the marker that is to the left of the playhead. This means that you can only reposition a clip marker down the timeline, not back up the timeline. There really is no good way to reposition clip markers.
If while dragging a marker to a new position you accidently drag out of the timeline ruler, the marker will disappear, not to worry, as long as you continue to hold down the mouse button, you can drag back into the timeline ruler and the marker will reappear.
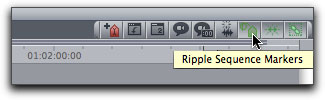
We have all built timelines and then added markers, like Chapter markers, only to discover that somewhere in the sequence, we either need to add or remove some video, which changes the duration of the sequence. Up until now, sequence markers have been 'glued' in place to the timeline ruler, immovable, intractable. If we change the duration of the sequence, all of the markers, from the point of the change on down to the end of the sequence, will no longer be positioned properly. They will have gone out of sync. With what is probably the most important new marker feature, we now have the option to 'Ripple Sequence Markers'. That is to say, that when we change the duration of a sequence by adding or trimming video, the markers will 'ripple' to match the change, and as a result, the markers will stay in the correct position relative to the video. So important is this new feature that Apple has placed a 'Ripple Sequence Marker' button on the timeline for us, with this feature turned on by default. You can also enable this feature from the Sequence menu > 'Ripple Sequence Markers'. And if you were wondering, clip markers ripple just like sequence markers. To me, this is a big deal.

[Top]
Extended Markers
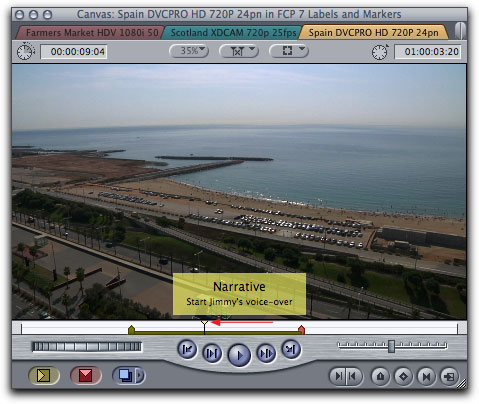
The markers that we have worked with so far are placed on just one frame, they have no duration. But it is possible to extend both sequence and clip markers. This can be useful when you need to add comments or instructions for a particular portion of a clip. As shown below, working in the timeline, I have added a marker, 'Narrative' and instructions in the Comment box.
The timeline is shown below with the one marker in place.

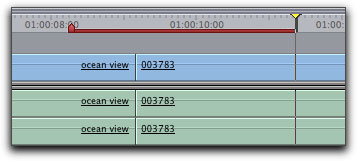
In this case I want to mark out just how long the narrative lasts. In the timeline I have moved my playhead to the point where I want the narrative to end.

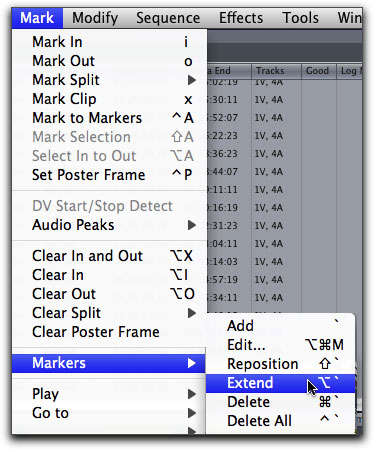
From the Mark menu > Markers > Extend. Or, use the keyboard shortcut, Option Tilde. The Tilde key is the key just beneath the 'esc' key, top left of the keyboard.
The Extended marker now shows in the timeline.

After extending the marker, hitting 'm' on the keyboard opens the Edit Marker window. It is possible to add a marker at the end of the extended marker and add Comments.
When we extend a marker, the marker will display in the Canvas window whenever the playhead is over any part of the extension. It is also possible to extend markers across multiple clips.
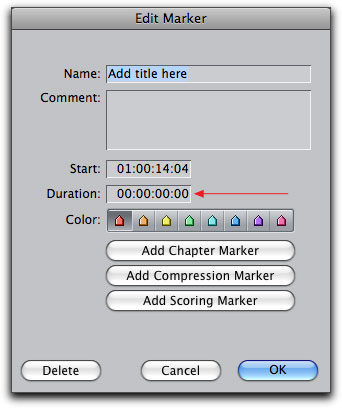
If you know the exact duration that you want to extend the marker, when you set the marker, in the Edit Marker window, there is a 'duration' box.
If you need to change the duration of either a sequence or clip marker, shorten or lengthen, place your playhead where you now want the extension to end, (below left). From the Mark menu > Markers > Extend. The duration of the extension will be changed, (below right). You can also open the Edit Marker window and enter a new Duration.

[Top]
Aligning Markers in the Timeline
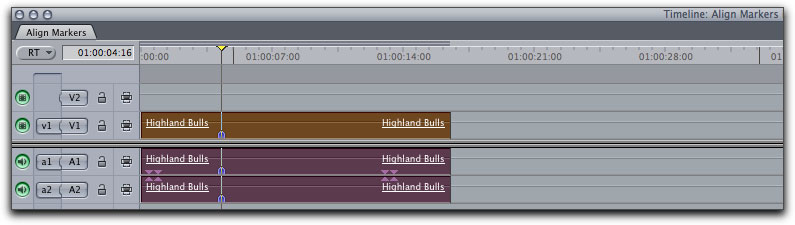
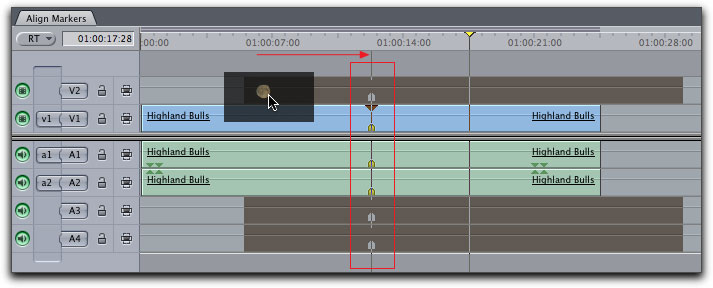
It turns out that Markers have some other utilitarian abilities, we can use a marker in one clip to align to a marker in another clip, works with both audio or video clips. In order to get this marker to marker alignment behavior, we need to have Snapping turned on in the timeline. As shown below, the clip in the timeline is selected and the playhead is positioned at the frame I want to align to, a marker has been added.
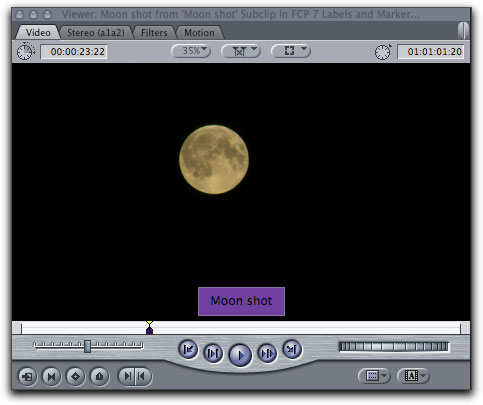
I have a shot of the moon that I want to use in the timeline. After loading the clip into the Viewer window, I have positioned my playhead where I want the moon shot to begin and set a marker.
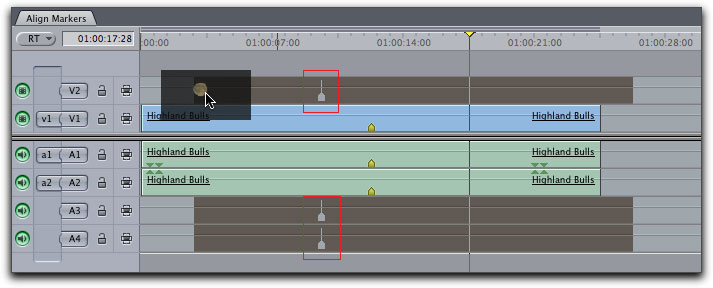
Dragged the Moon clip out of the Viewer window and brought it down to the timeline. As shown below, you can see the yellow marker in the clip on the timeline. The marker in the Moon shot is visible, red box below. Note that both the video and audio show the markers. When dragging, the markers always display as 'ghost' markers, with a vertical snapping line.
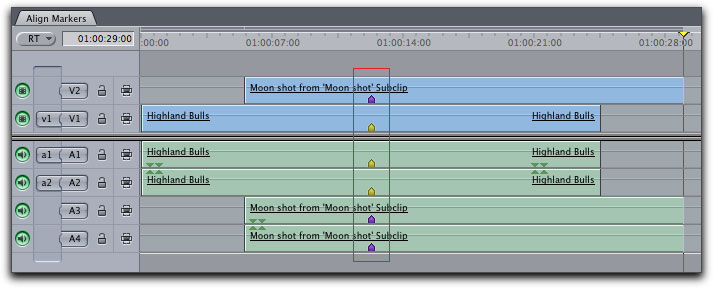
I then slide the Moon clip along the timeline until the marker in the Moon clip snaps to the yellow marker in the timeline.
The two sets of markers are now aligned to each other.
The same process can be done with clips that are already on the timeline. Add a clip marker and then drag to position over clip with marker.
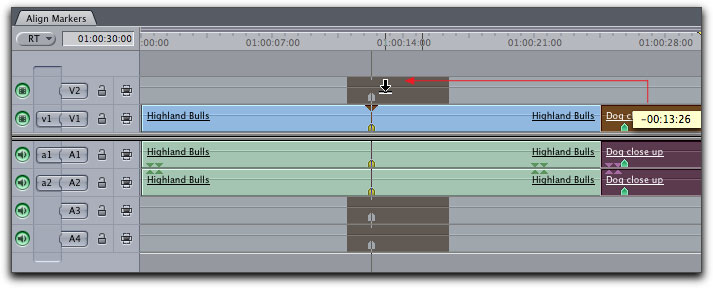
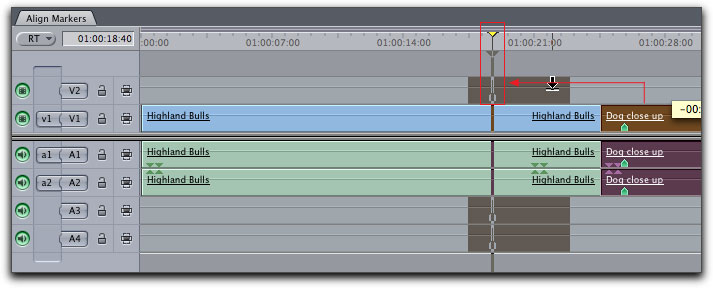
While it is necessary to have a marker on the clip you are moving, not so for the clip that you are moving to. Markers will snap to markers, but a marker will also snap to the playhead. Below I have removed the marker on the 'Highland Bulls' clip and positioned my playhead where I want to align the second clip. Just drag the clip with the marker until it snaps to the playhead.
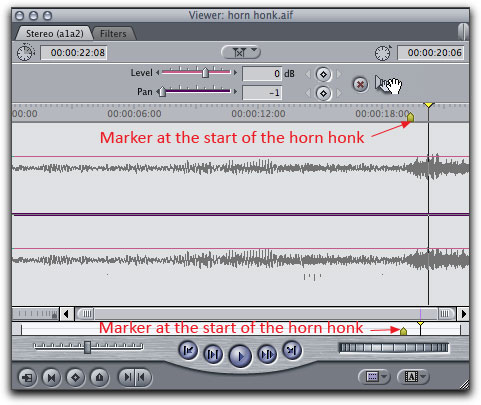
This process can be helpful when aligning video clips but would most likely be used when one needed to insert some audio at a particular point in the timeline. For example, I have a street scene and I need to add a horn honk at an exact place in time. I have loaded a .aif file into the Viewer and set my marker at the start of the horn honk. Because this audio clip is stereo, there are two markers, one for each audio track, but you only have to set one marker.
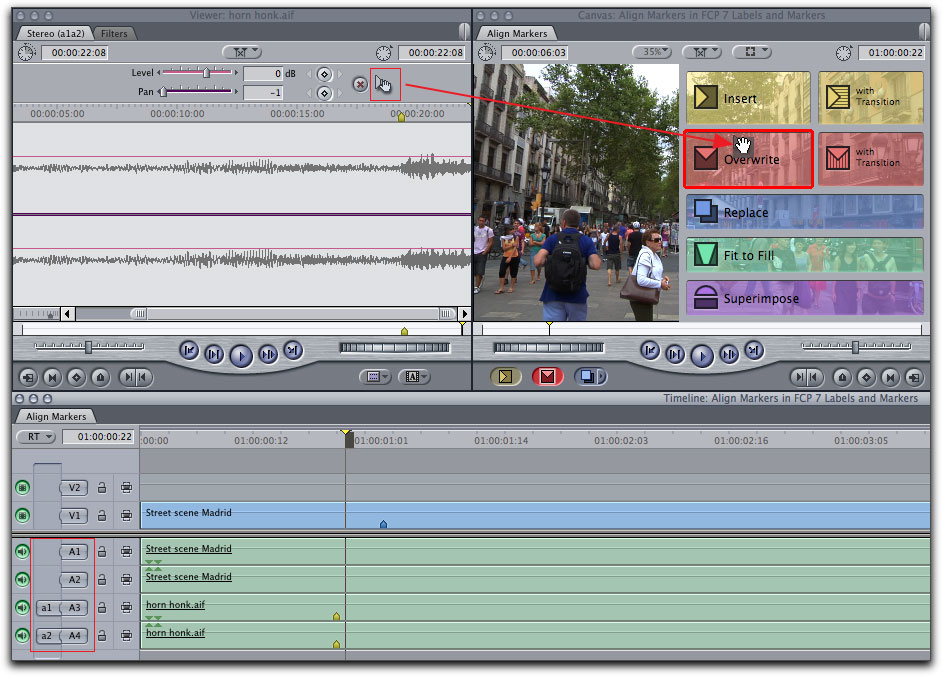
In the audio 'Patch Panel, lower left of the timeline, I have moved the audio patches down to A3 and A4. Now, in the Viewer window, I click on the audio 'grabber hand speaker' icon and drag the icon to the Canvas and Overwrite. This drops the 'Horn Honk' audio on to A3 and A4.
Click on the Audio clip in A3 and A4 and drag to the right until it snaps to the clip marker in the video 'Street Scene'.
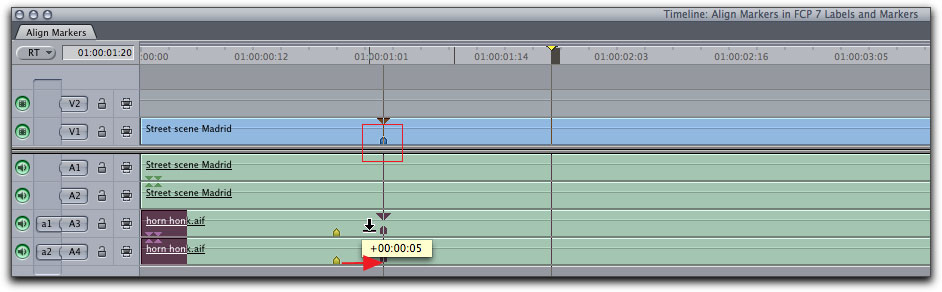
The audio clip markers are now aligned with the video clip marker. This process will also work if you place a sequence marker over the video clip where you want the audio to align.

[Top]
Logging Markers
Markers can be added during the Logging process.
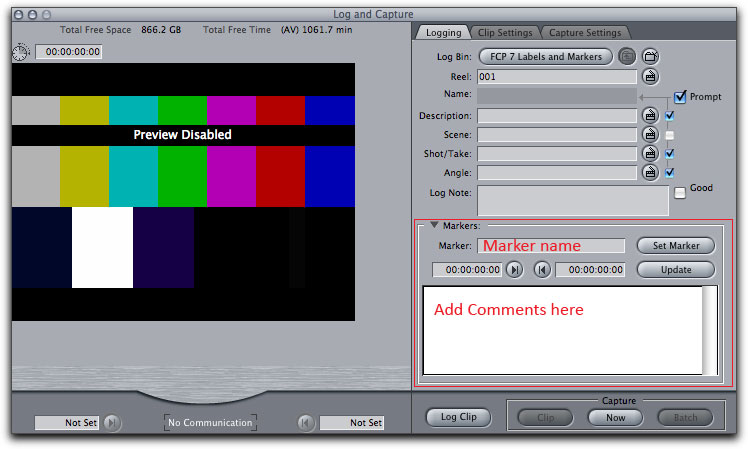
- Twirl down the Marker disclosure triangle.
- Move to the frame that you want to add a marker to, using the play controls in the Preview window and enter a marker name in the 'Marker' box.
- Enter comments into the Comments box.
- There is a timecode Marker In and Marker Out box, that you can use to set starting and ending markers using timecode.
- Click on the 'Set Marker' button.
- The information that you have entered in the Marker window will attached to the clip and will pass through into the Browser for use in editing.
[Top]
Exporting Markers List as Text
We can export our Marker Lists as a tab-delimited text file that can be opened by Excel or Numbers, spreadsheet applications. The file format can be modified, columns can be renamed and repositioned and the files can be printed out.
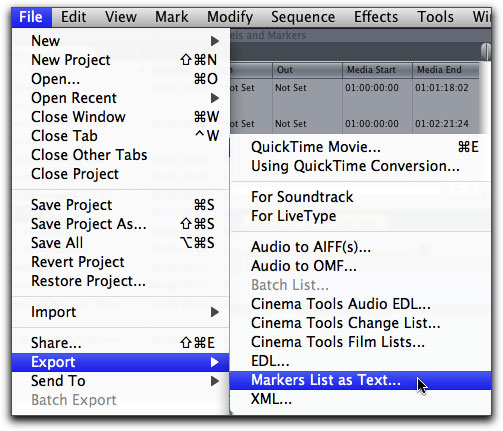
Select the sequence or clip whose markers you want to export. From the File menu > Export > Markers List as Text.
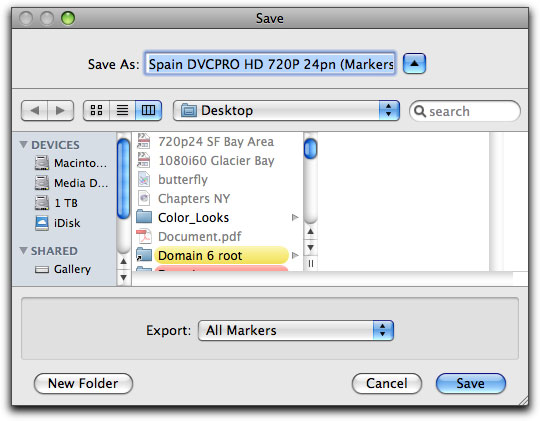
In the Save dialog box, enter a name and destination. At the bottom of the window is the 'Export' drop-down menu where you can specify which types of markers you want to export.

Your Markers List Text file has a .txt extension.

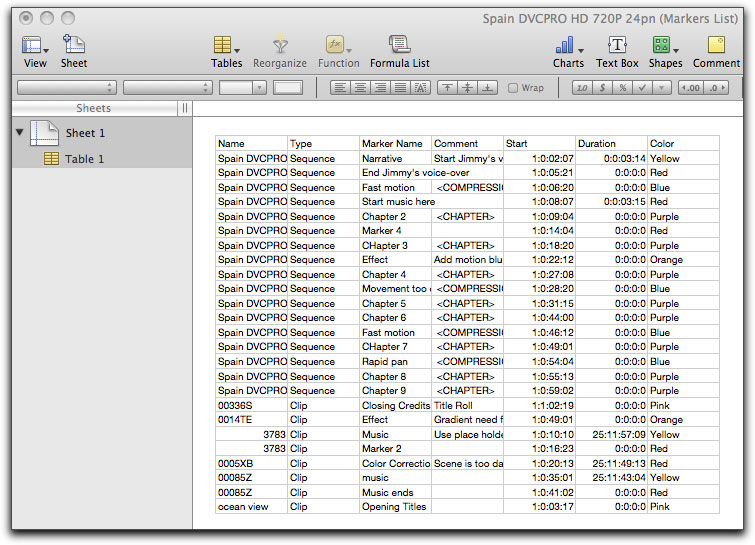
I have used Apple's Numbers spreadsheet application to open the Markers List Text file. The default columns are;
- Sequence or clip name.
- Type, Sequence or clip.
- Marker name, or if no name was given then a marker number will be used.
- Comment, either a comment that you entered or one of the functional markers; ,
, and .
- Starting Timecode.
- Duration.
- Assigned marker color.
[Top]
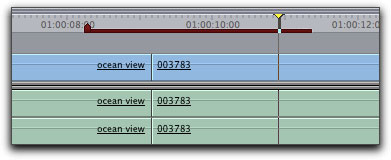
Subclips
Subclips are shorter clips that are made from larger master clips. Subclipping can be very helpful if you are working with one long master clip, as you can break the master into as many smaller subclips as you need (not unlike DV Start/Stop Detection). While the master clip is in the Viewer, you can make any number of subclips from the master. When you make a subclip, FCP will give it the name of the master clip and add 'subclip' to the name and then place it back into the same project bin as the master clip. If you make more than one subclip from a master, FCP will append it with a number, You can rename and label subclips. Subclip can be loaded back into the Viewer window, have In and Out points set, and be edited as a normal clip. Any changes you make to the subclip will have no effect on the master clip. It is now independent of the master. If you are working on a subclip and, for any reason, need to go beyond it's duration limits, select the subclip and from the Modify Menu > Remove Subclip Limits. This will restore the subclip to the full length of the master clip. You can now set new In and Out points for it.
One way to make subclips is to load a clip into the Viewer window, and set In and Out points.
From the Modify menu > Make Subclip. The new subclip will be placed back into the Browser. You can always tell a subclip by its jagged edges.

[Top]
Subclips from Markers
In FCP we can also make subclips by using Markers. To make a subclip from a master clip using markers, load the master clip from the Browser into the Viewer window.
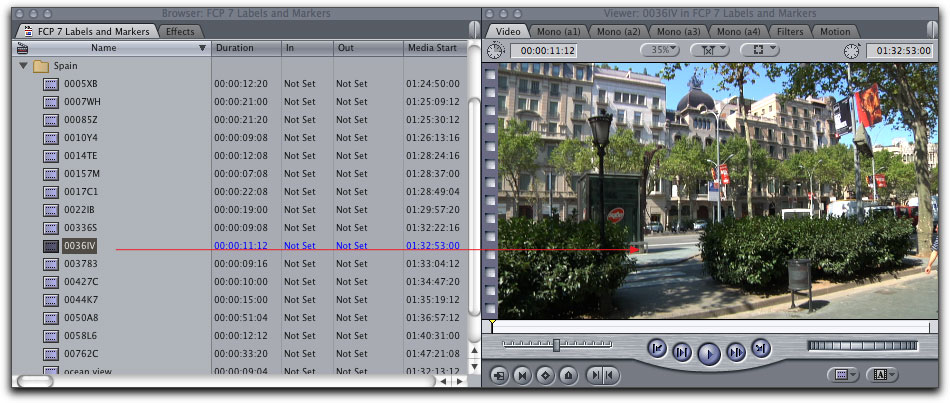
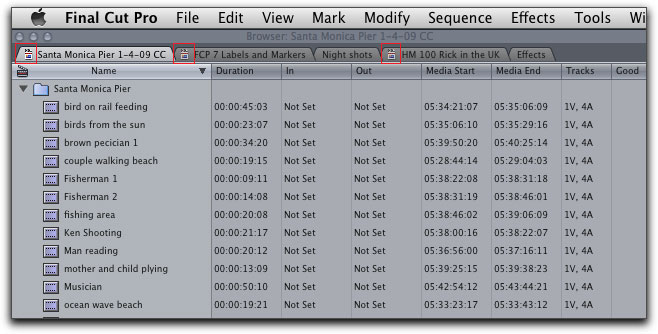
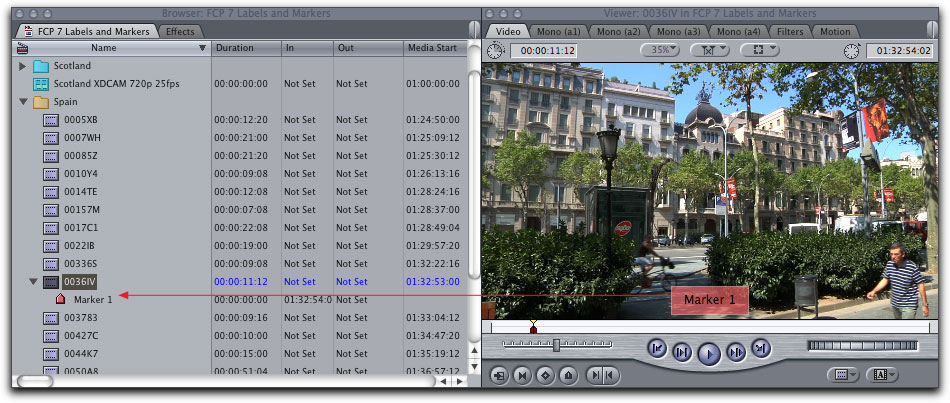
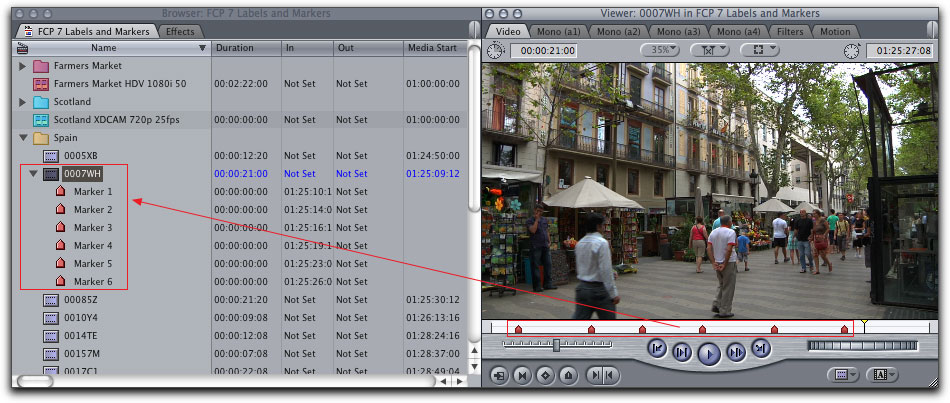
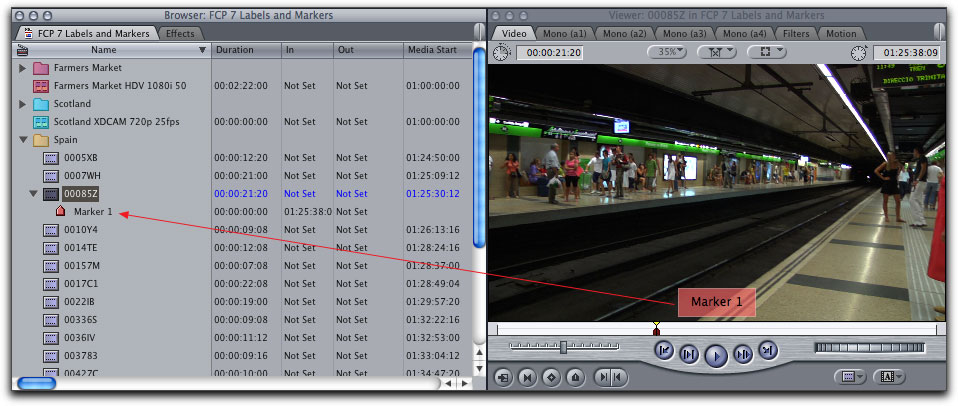
Move the playhead in the Viewer scrubber bar to the position that you want to start your subclip and hit 'm' on the keyboard. As you can see below, 'Marker 1' has been added to the master clip in the Viewer window. In addition to having the marker added in the Viewer window, back in the Browser window, the master clip now has a disclosure triangle and the marker that we just made has been placed inside the Browser. You will notice that the new marker has an 'In' point that represents the position of the playhead on the master clip in the Viewer window when we added a marker. The Browser shows 'Not Set' for the Out point because we did not set one in the Viewer.
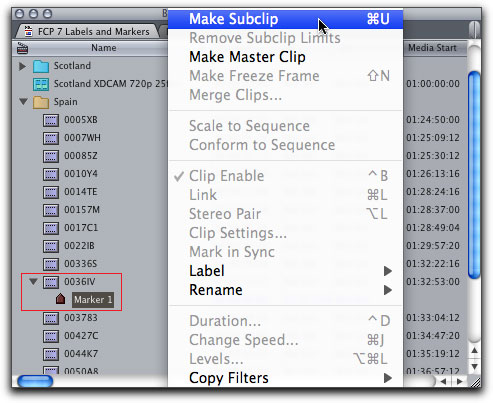
In the Browser, select the Marker and then, from the Modify menu > 'Make Subclip'.
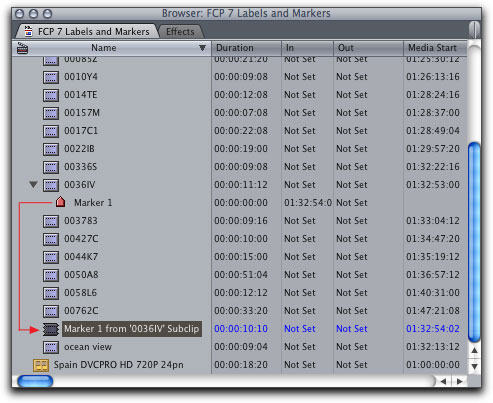
A subclip has now been made from the master clip. The subclip starts at the position in the clip where the marker was added in the Viewer window. The subclip will be placed back into the same bin in the Browser that holds the master clip, the subclip is denoted by its torn edges.
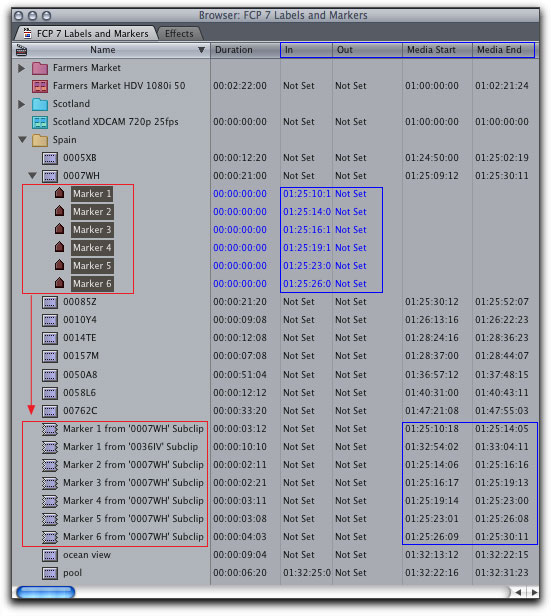
If you place a master clip into the Viewer window and apply a number of markers, each marker will be added back in the Browser. The starting point for each new marker will become the end point for the previous marker. The duration of each marker is determined from one marker to the next.
Select all of the markers and from the Modify menu > Make Subclip. This will add the subclips to the Browser. Looking below you'll see that while markers are limited by the In and Out column, the subclips generated from those markers do not have In and Outs. Rather subclips have 'Media Start' and 'Media End' times.
[Top]
Subclips from Extended Markers
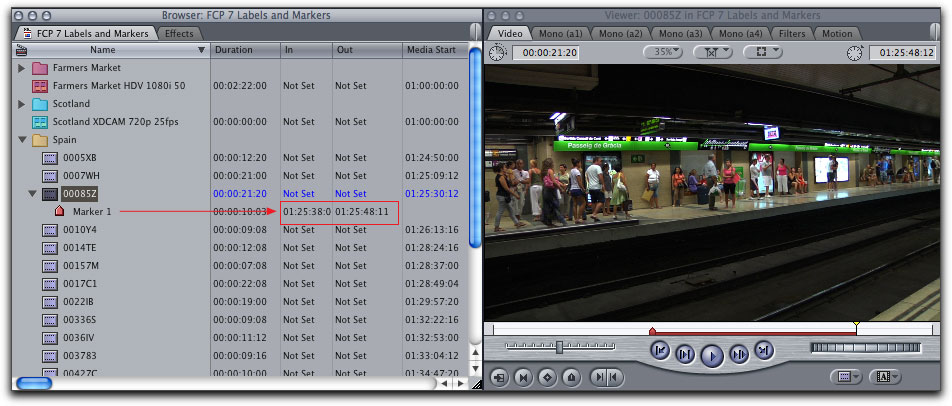
The process of making subclips from extended markers is done in the same way that we made subclips from simple markers. Load a clip from the Browser into the Viewer and set a marker where you want the subclip to begin. As before, when we add a marker to a clip in the Viewer, a marker is added to the master clip in the Browser in the disclosure triangle.
Now, in the Viewer, move the playhead to where you want the subclip to end.
From The Mark menu > Markers > Extend
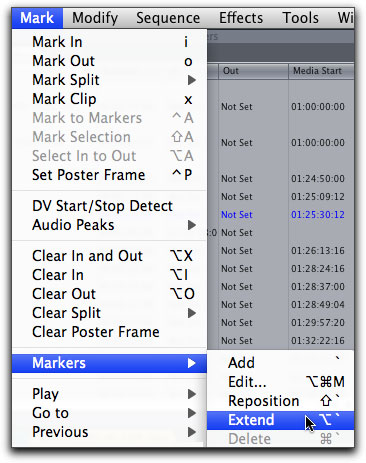
In the Viewer, the marker will now extend to the position of the playhead. If you'll look back in the Browser window, you'll see that that 'Marker 1' now has an 'Out' point to match the extended marker in the Viewer.
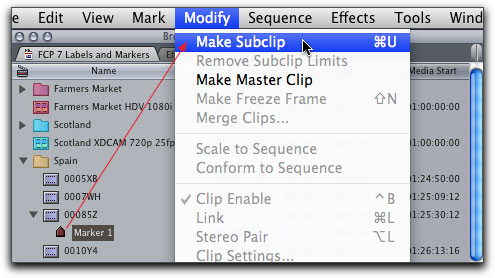
Select the Marker in the Browser and from the Modify menu > Make Subclip.
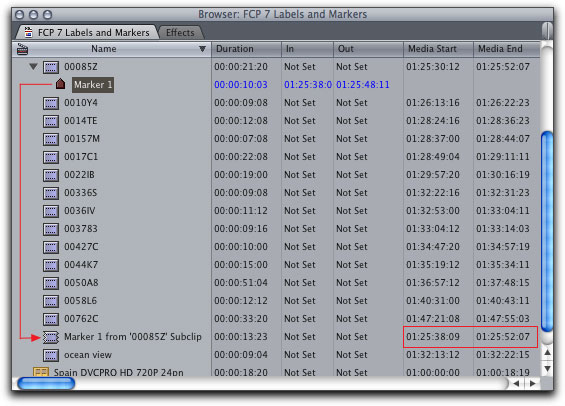
The subclip made from 'Marker 1' has been added back into the Browser in the same bin as both the master clip and 'Marker 1'. The subclip does not have In and Out points but rather Media Start and Media End points.
[Top]
Notes
- When extending markers, rather then go to the Mark menu > Markers > Extend, every time, use the keyboard shortcut, Option Tilde. The Tilde key is the key just beneath the 'esc' key, top left of the keyboard.
- In the FCP manual, page 469, it states that it is possible to have two or more markers on the same frame and that if you need to edit one of the markers, move to the frame with the markers, then hit the 'm' key to open the Edit Marker dialog box. At the top of the Edit Marker window is supposed to be a 'Choose Marker' pop-up menu in which you can select which marker you want to edit. While I do have two markers on several different frames in my timeline, my Edit Marker window offers no 'Choose Marker' pop-up menu.
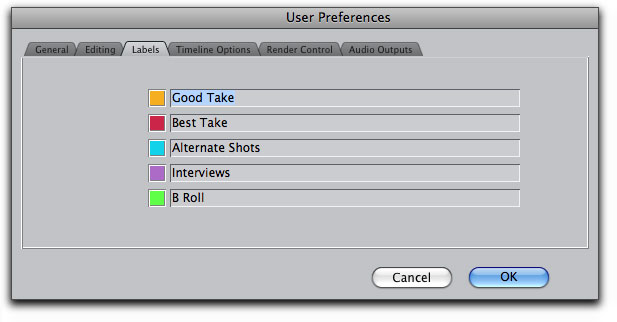
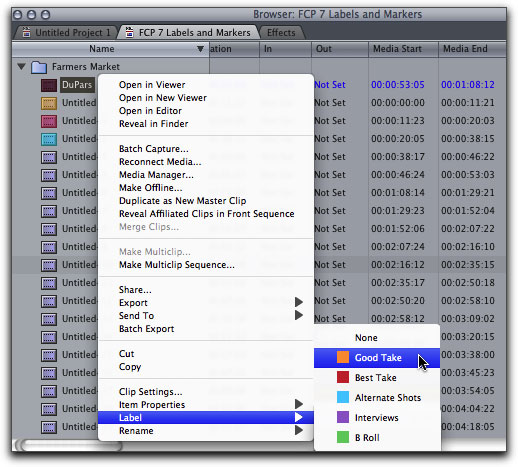
- This article covers both FCP Labels and Markers. Each of these can have their names changed to suit your editing needs, but it is important to note that Labels and Markers are completely independent of each other. Changing the color name of one will have no effect on the other.
- If you are working with DV, DVCAM, DVCPRO, DVCPRO 50, or DVCPRO HD formats, FCP will set a 'Start/Stop' flag in the metadata of the clip, which will show up as a marker in the Browser window. You can use these 'Start/Stop' markers to create subclips. The FCP Start/Stop feature is based on 'time of day' and not on timecode.
- When creating subclips from markers, the new subclips will be come Master clips and be completely independent of the clip from which they came.
- Subclips have been made from clip markers that were set in the Viewer window.
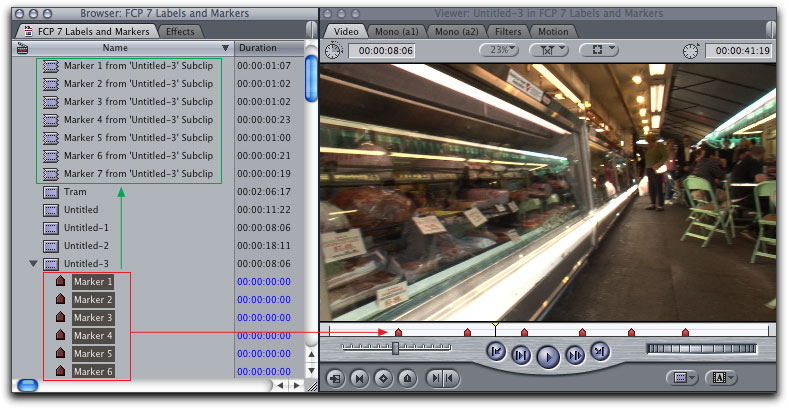
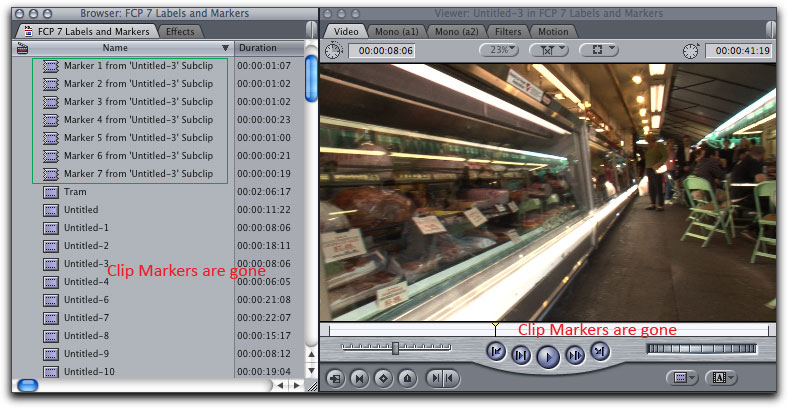
If, after you have made subclips from the markers in the Browser, and you then delete the markers in the Browser, the markers will disappear from the clip in the Viewer window, but the subclips will remain.
- After you have created subclips, you can load them back into the Viewer and add clip markers to the subclips.
- Should you need to recapture video in your project that contains subclips, you need to know that FCP will recapture the entire Master clip that the subclip came from.
Enjoy,
--ken
[Top]
copyright © www.kenstone.net 2009
© 2000 -2009 Ken Stone. All rights reserved. Apple, the Apple logo, Final
Cut Pro, Macintosh and Power Mac
are either registered trademarks or trademarks of Apple. Other
company and product names may be trademarks of their respective
owners.
All screen captures, images, and textual references are the property and trademark of their creators/owners/publishers.