December 14, 2009
By Steve Martin
Since the early days of cinema, filmmakers have manipulated time for dramatic or comedic effect. Altering speed is therefore a staple in editorial aesthetics and new tools to this end must keep the process simple, straight-forward and efficient. With the release of Final Cut Pro 7, it seems clear that Apple has listened to its user base and in my opinion, the new Speed Tools present one of the strongest arguments for upgrading to the latest release of Final Cut Studio. In this article, my intention is to walk you through these new speed tools using a short 3 clip sequence from the MavTV show "SpeedFreaks". To make this article more interactive, I'm including a link to the project and media I refer to in this article so you can follow along in your own copy of Final Cut Pro 7. Feel free to follow along using your own footage, just keep in mind that the results you obtain may not match my examples do to the fact that your media will have differing timecodes, durations and in some cases, differing frame rates.
Download the project and project files. (89 Megs)
After downloading, launch the project and make sure the SpeedFreaks sequence is open. You'll need to have Final Cut Pro 7.01 or later installed in order to follow along.
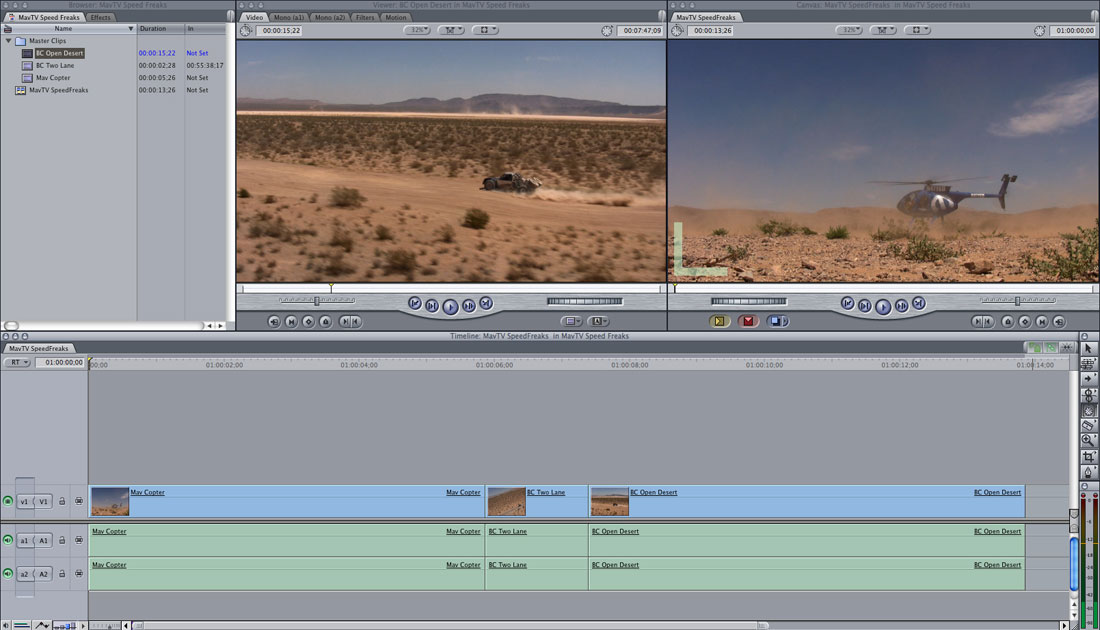
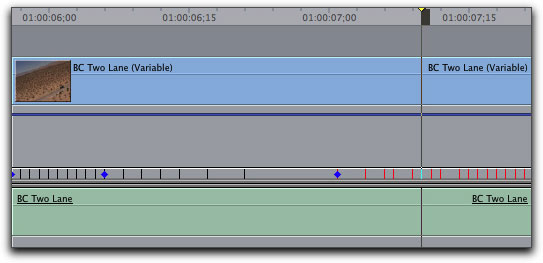
In order to see how your speed changes are being applied to the clips, click the Toggle Clip Keyframes button in the lower left of the timeline. The clip keyframe graph is displayed along with speed tick marks.

There are two types of speed changes you can apply - constant speed changes, that affect the clip's speed by a fixed percentage over time, and variable speed changes that affect the clip's speed by altering the speed percentage over time.
Applying Constant Speed Changes
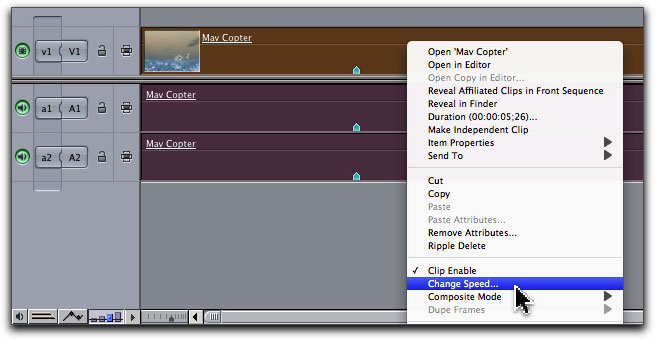
To apply a constant speed change to a clip, right-click on the first clip and choose Change Speed from the menu.
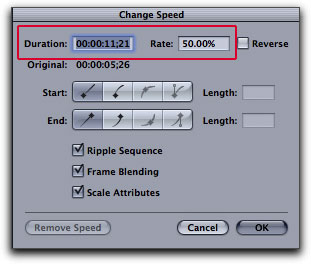
Final Cut Pro's Change Speed dialogue appears. You can also bring this window up by selecting a clip (or multiple clips) and pressing Command-J on your keyboard. Enter 50% into in the rate field. Now here's a gotcha; do not press Return unless you want this speed change immediately applied to your clip. Press your Tab key instead, and the duration field will update with the clip's new duration based on your entered speed. In this example, the duration value is doubled because we are slowing down the clip by 50 percent.
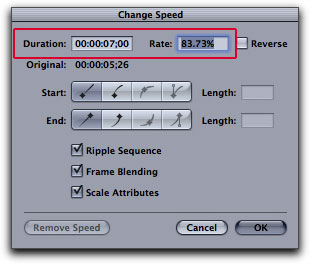
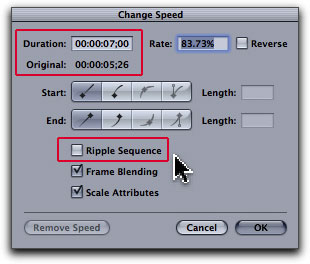
You can also change the speed by entering a duration. Enter 7 seconds in the duration field and press the Tab key. The speed percentage is auto-adjusted to 83 percent. The original clip duration of 5 seconds and 26 frames is reported for comparison.
Because constant speed changes alter the duration of your clip, any clip in the timeline to the immediate right of the clip you are speed-adjusting will be moved later (or earlier) in time by the amount equal to the difference between the original duration and the new duration. In this example, the difference between the new duration and original duration is roughly 1 second. If we were to take no further action and apply the speed change by pressing Return, the 2 clips to the right in the timeline, would move or "ripple" 1 second later in time. If you want to prevent the other clips from moving, uncheck the box labeled "Ripple Sequence" and the clip's original duration will be maintained. Now click OK.
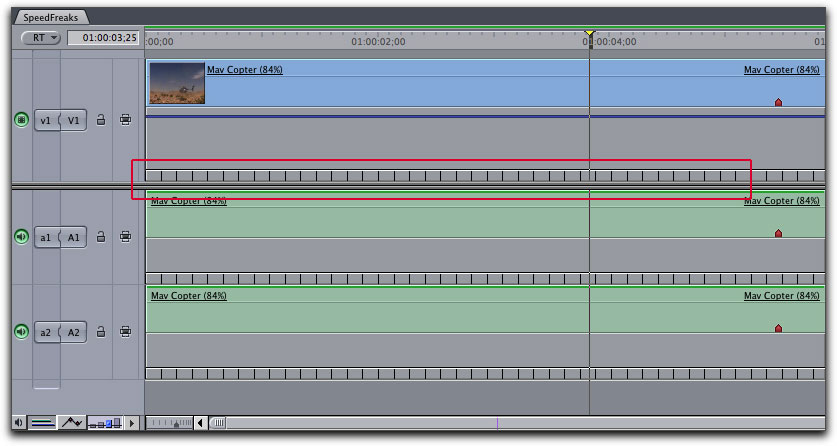
If you look at the speed ticks in the timeline, they appear further apart. Speed ticks that are further apart indicate a speed reduction, and speed ticks that are closer together indicate a speed increase. The speed ticks are applied uniformly which indicates a constant or "fixed" speed for the clip's entire duration. What is also important to understand is that constant speed changes affect both the video and the audio. This means that your audio will always play back with a pitch change. The amount of pitch change is proportional to the speed percentage you entered in the Change Speed dialogue. Variable speed changes on the other hand, only affect the video portion of the clip. More on that in a bit.
Ease In and Ease Out Controls
After playing back the speed-adjusted clip, you'll notice the clip starts and ends abruptly. In the real world, objects moving through space observe laws of physics and change velocity over time. To make your speed changes more ballistically accurate, you'll want to add some ease in and ease out controls. With the first clip still selected, press Command-J on your keyboard to bring up the Change Speed dialogue. There are two rows of buttons labeled Start and End that are used for controlling the rate of the speed change at the beginning and end of your clip. You can also think of them as speed ramping buttons. By default, the Linear from Start/End buttons are selected which produce no speed ramps.
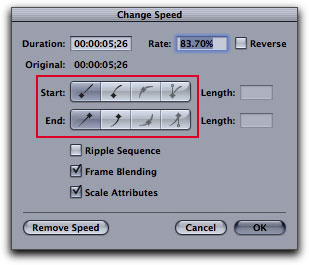
The buttons with curves to the immediate right of the linear buttons are called "Curve from Start/Curve from End" buttons. These buttons represent speed ramps that produce smooth speed changes at the beginning and end of your clip. Once selected, a curve value is assigned in the start and end length field.
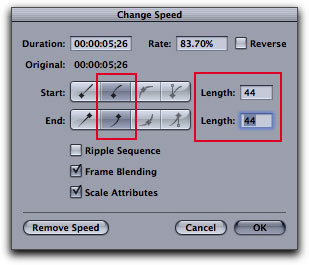
Higher values entered here will produce more drastic speed ramps at the beginning and end of the clip, while lower values will produce more subtle speed ramps. In most cases, you'll find the default value works quite nicely. Press return to apply the change.
If you look at the speed ticks applied to the clip in the timeline, the ticks at the beginning and end of the clip are closer together, and the ticks in the center of the clip are uniformly distributed.
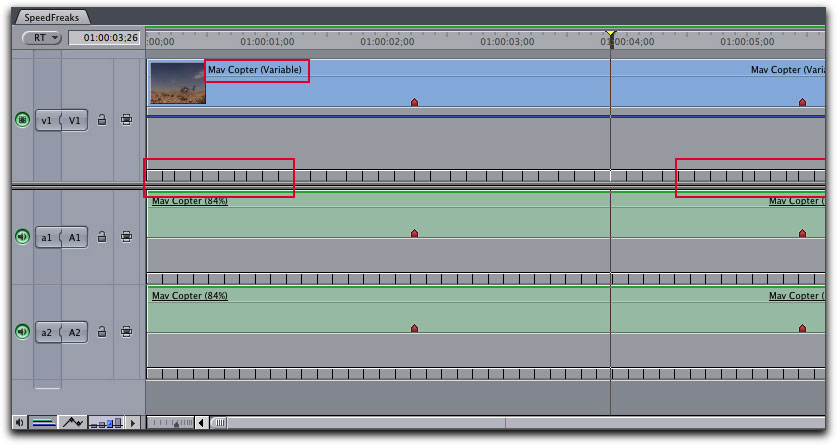
Play back the clip to see the result. You will not notice a drastic change, the effect is very subtle, but it produces motion that is much more realistic. If you look next to the name in the clip, you'll also see the word "Variable" in parenthesis. Earlier I mentioned that variable speed changes affect the clip's speed by altering the speed percentage over time - which is exactly what's happening at both ends of the clip. Because of this, Final Cut Pro will unlink the video and audio and any variable speed changes will only be applied to the video. If you look closely at the video portion of the clip, the underline no longer appears below the clip name which indicates an unlinked clip.

Modifying Speed on a Graph
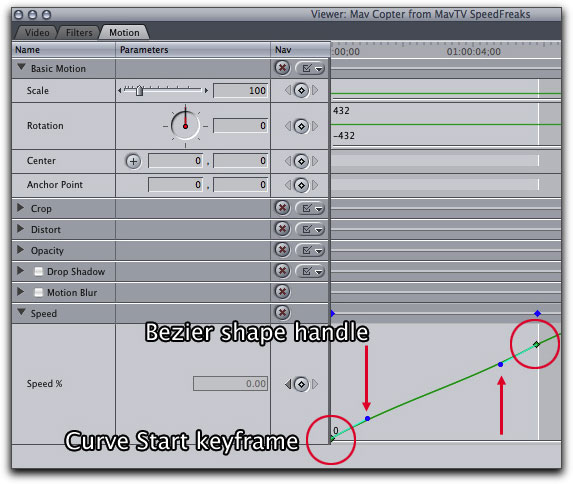
In the Timeline, double-click the clip with the speed change applied to load it into the Viewer for further editing. Select the Motion tab and click the disclosure triangle next to Speed to reveal the Speed Graph. Because we applied speed curves to the beginning and end of the clip, two keyframes were created at opposite ends of the graph. The speed ramps are represented as bezier curves with control handles for changing the shape of the curve.
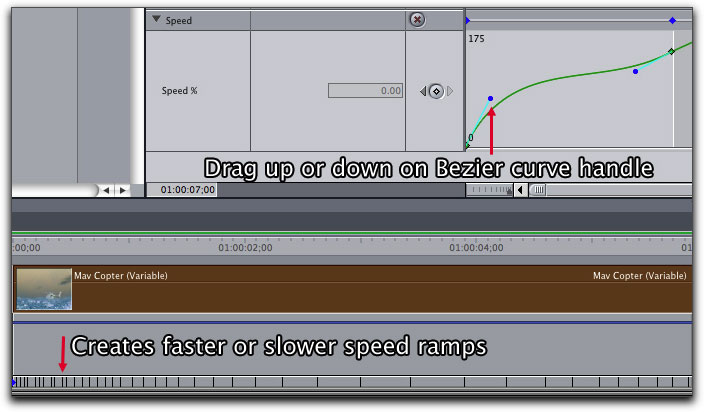
Drag upward on the start curve handle and the speed ticks move closer together at the beginning of the clip which indicates a faster speed ramp. The opposite effect happens when dragging downward on the curve handle; the ticks move further apart which indicates a slower speed ramp. Use these handles whenever you want to customize your clip's Start and End ramping speeds.
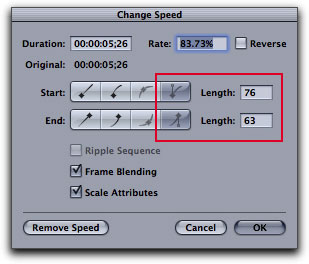
Select the clip and press Command-J to bring up the Change Speed dialogue. Whenever you manipulate the curve handles directly in the Motion tab, the Custom buttons will automatically become selected. Notice the length values update as well. If you're following along, the Length values shown below will most likely differ from your own.
Variable Speed Changes with Keyframes
Until now we've been applying constant and variable speed changes to an entire clip using the Change Speed dialogue. We're now going to look at how to create variable speed changes using keyframes and the Speed Segment Dialogue. Move your playhead to the next clip in the timeline and play it back. This is an arial shot of two trucks passing on an open highway.
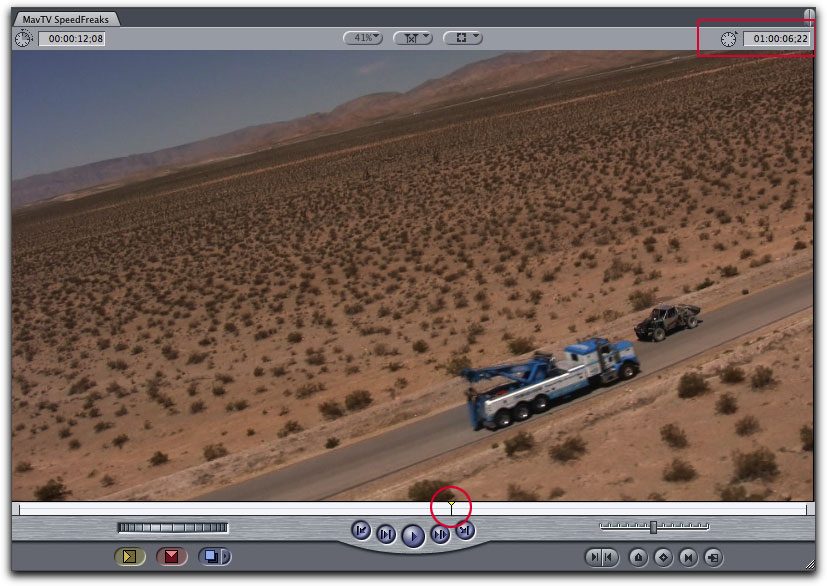
We're going to create a speed effect that is commonplace in commercials, movie trailers and music videos. The two trucks will speed toward each other, then just as they are about to pass, will slow down dramatically before speeding back up again. Begin by moving the playhead on the frame just before the trucks meet.
The frame where this occurs is at timecode 01:00:06;22. Move your mouse cursor into the speed tick area, keeping it aligned with the playhead then click once to add a keyframe.
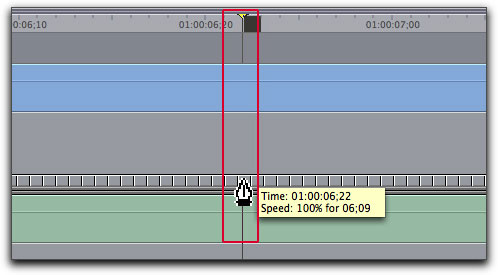
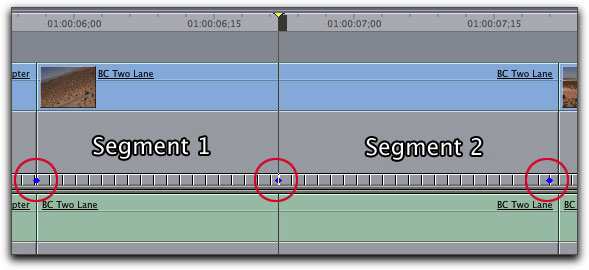
In the speed tick area, not just one, but three keyframes appear. This is because Final Cut Pro must set a starting and ending keyframes at both ends of the clip to create speed segments. The frames to the left of the center keyframe is the first segment, and the frames to the right of the center keyframe is the second segment. With the clip divided into segments you can isolate your speed changes to a specific segments without affecting other segments.
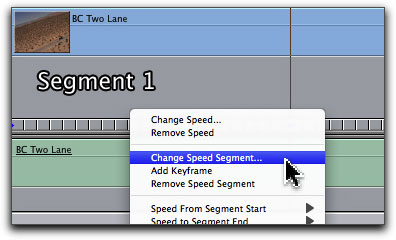
To create the effect, move your cursor into the tick area of segment 1, right-click and choose "Change Speed Segment" from the menu that appears.
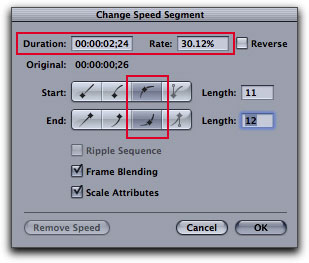
The Change Speed Segment dialogue appears and looks similar to the Speed Change dialogue we worked with earlier, but with a few differences. Because variable speed changes never affect the clip duration, the Ripple Sequence button will not be available. Also, the duration that is reported is just the segment duration, not the entire clip duration.
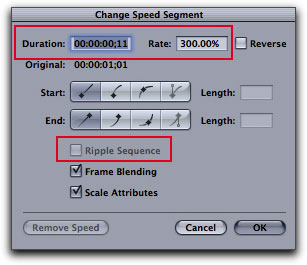
Enter a rate value of 300% for segment 1. Press Tab and the duration field updates with the new segment duration based on the 300% entered speed. Because of the high speed percentage we entered, this produces a new segment duration of 11 frames. Create a speed ramp at the beginning of the segment by clicking the Curve on Start button and enter a curve value of 5 in the Length field. Press return to apply the change, then play the clip to see the effect.

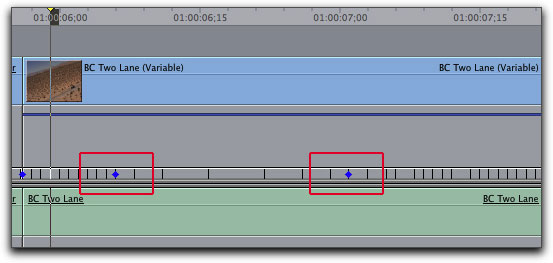
After applying the speed change to segment 1, your speed ticks will look like the image below.
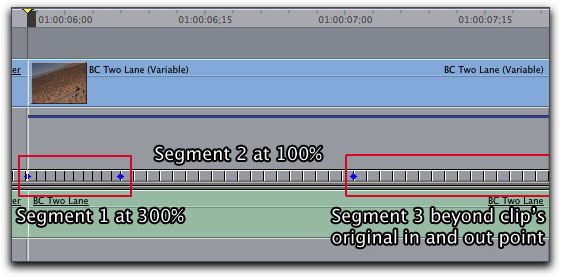
The speed ticks are bunched up in the first segment, but the ticks in the second segment remain unaffected. There also appears to be a third segment beyond keyframe 3. Where did this segment come from? Because the first segment created a short 11 frame duration, Final Cut Pro was forced to pull frames from the unseen handle frames beyond the clip's original in and out points in order to maintain the clip's duration. This is something you need to keep in mind as you work with this tool. You may find it helpful to think of the clip as a strip of rubber with a fixed length; whenever the rubber is compressed in one place, it must be expanded in another place (and vice versa) in order to maintain the strip's original length.
This next exercise should crystalize this for you. Place your mouse directly over the third keyframe and a tooltip will appear.
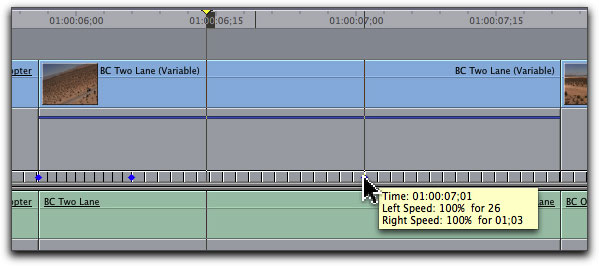
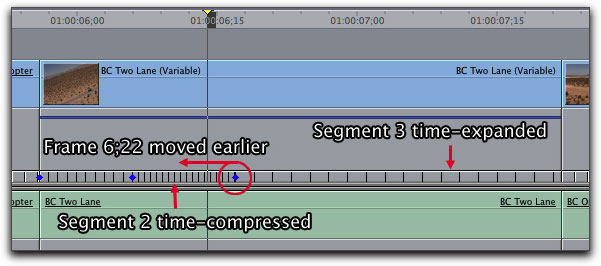
This tooltip informs you that the speed value on the left and right side of the keyframe is 100%. You can change the speed percentage of segment 2 by dragging the third keyframe. Drag the third keyframe to the left, toward the center keyframe. What you are doing is moving the frame locked at that keyframe (frame 01:00:06;22) earlier in time, which causes the frames in between keyframes 2 and 3 (segment 2) to become time-compressed (sped up). The frames on the right side of keyframe 3 in order to compensate for frame 6;22 being moved earlier, become time-expanded (slowed down).
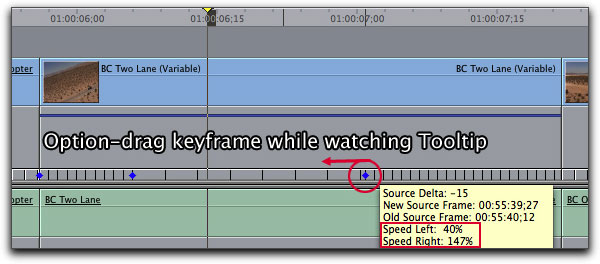
But this is not the effect we're after. In fact, we want just the opposite to occur; we need segment 2 to become time-expanded (slowed down) and the frames on the right side of keyframe 2 to become time-compressed (sped up). So how do we achieve this? We'll need to use a modifier key. Press Command-Z to undo that last operation. This time, press and hold the Option key while dragging the third keyframe to the left.
What the Option key does is keep the keyframe fixed in time, but moves the frames "underneath" the keyframe, very similar to the way a slip edit works. What is happening under the hood is that a frame earlier in time is being "remapped"to the current keyframe location. The keyframe never moves.
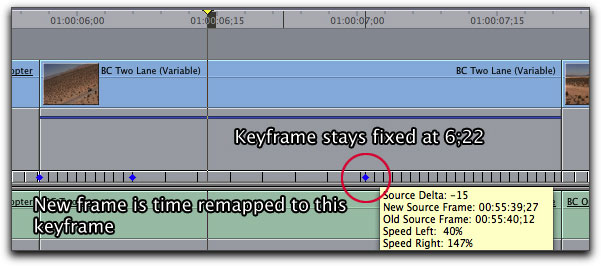
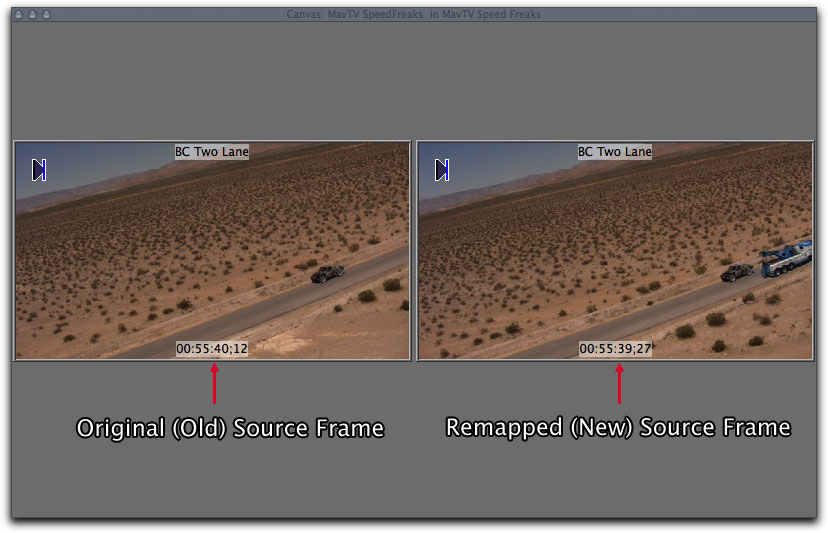
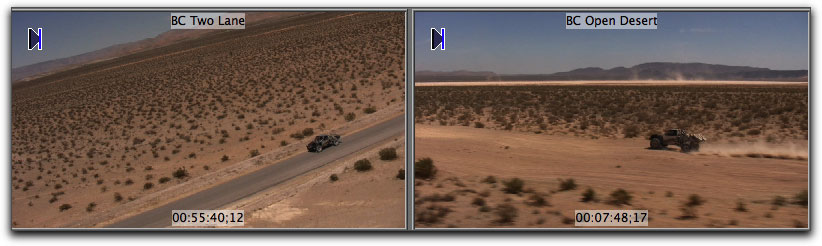
As you drag to the left with the Option key pressed, the Canvas becomes a 2-up display. The image on the left is the Old Source Frame (00:55:40;12) and the image on the right is the New Source Frame (00:55:39;27).
But more importantly, the speed on the left side of the keyframe is now time-compressed (slowed down) and the speed on the right side of the keyframe is now time-expanded (sped up). Keep dragging until the Speed Left value reads 40%. Now play back the clip and you'll see the effect is very close to what we intended.
Finessing the Speed Effect
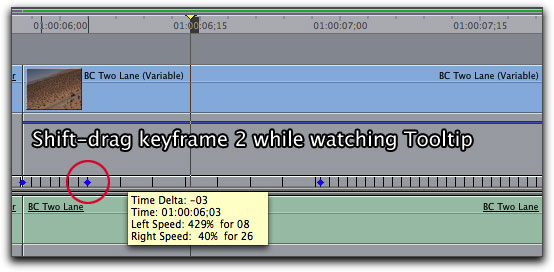
While this effect looks good, we can tweak it further. Let's say we wanted to speed up segment one without changing the speed of segment two. We could of course, right-click in the speed ticks for segment one and call up the Speed Segment dialogue and enter a new rate, but there's a much faster method. Hold down the Shift key and drag the middle keyframe to the left. By shift-dragging on a keyframe you can alter the speed of the clip on the left side of the keyframe without affecting the speed of the clip on the right side of the keyframe. Watch the tooltip as you drag. Drag until the Speed Left value is 429%. Notice, the Speed Right value stays fixed at 40%. Play back the clip to see the change.
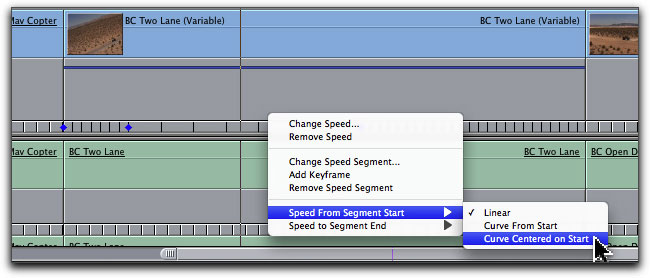
We can also smooth out the speed transitions coming into and out of segment 2. Place your mouse over the ticks in Segment 2, then right-click and choose "Change Speed Segment" to bring up the Change Speed Segment dialogue. Select the buttons with icons that look like curves with keyframes in the center of them. These buttons are called "Curve Centered on Start/Curve Centered on End buttons. You would use these buttons whenever you needed to quickly create smooth speed ramps coming into and out of a speed segment.
Press return to apply the change. In the image below, the curves (speed ramps) have been applied on both sides of the keyframes that constitute segment 2.
Play the clip back and you'll notice a subtle improvement in the fluidity of the motion. There's also another way to quickly apply speed ramps without having to call up the Change Speed Segment dialogue. Right-click on the speed ticks for the segment you want speed ramps applied to, and a contextual menu appears where you can choose the type of speed curve you want applied.
For additional practice, play with increasing or decreasing the speed percentage of segment 3 and try out different combinations of speed curves to see the result.
Reversing a Speed Segment
Let's look at reversing a speed segment. Right-click in the ticks for segment 3 and choose "Change Speed Segment". Place a check in the Reverse checkbox. When a clip is placed in reverse the speed rate value turns red.
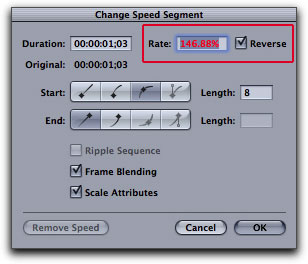
After applying the change, the speed ticks become red as well. Notice the reverse percentage is only applied to segment 3. Segments 1 and 2 are left alone. Play back the clip to see the effect.
Using the Speed Tool
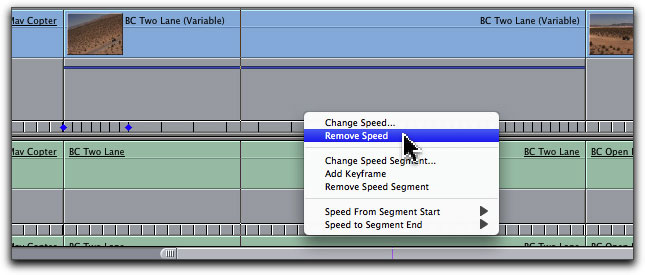
Lets look at one more tool that has been re-engineered for Final Cut Pro 7. In Final Cut Pro versions 4-6, this tool was known as the variable speed tool. It's now simply called the Speed Tool and it's much more intuitive to work with. Before we begin working with the tool, let's remove all the speed changes to the second clip. Right-click on the ticks for segment 2 and choose "Remove Speed".
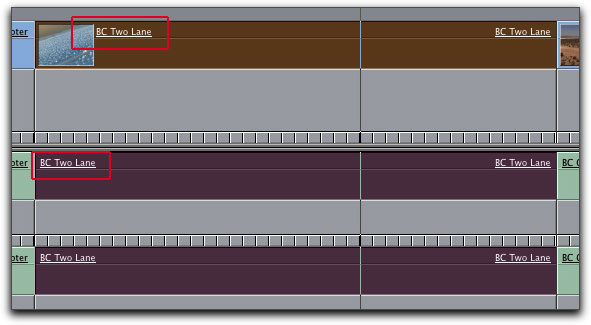
This operation removes all speed keyframes and brings the clip back to it's default 100% speed. Although the speed changes have been removed, the video is unlinked from the audio because Final Cut Pro does not remember the clip's original linking status. So you'll need to re-link the clip yourself. Select both the audio and video for clip 2 and press Command-L to link them. When video and audio is linked, the clip's name will appear with an underline.
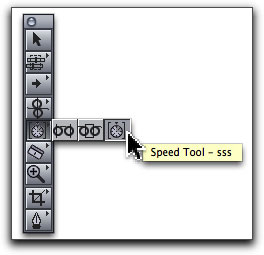
In the tool palette, click and hold on the slip tool button to reveal the Speed Tool and select it. You can also call it up by using the keyboard shortcut, SSS.
With the Speed Tool you can simultaneously change the speed of any two linked clips that are adjacent in the timeline. In this regard, The Speed Tool behaves very much like the Rolling Edit Tool in that it affects both sides of an edit point. But unlike the Rolling Edit Tool that changes each clip's originally marked edit points, the Speed tool only changes the clip's speed on both sides of the edit point while maintaining the clip's originally marked edit points.
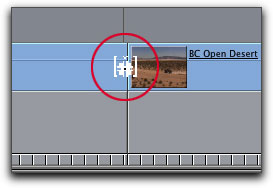
Place the tool over the edit point between the second and third clips. The cursor will appear as a stopwatch between two brackets.
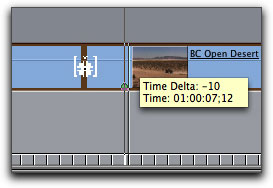
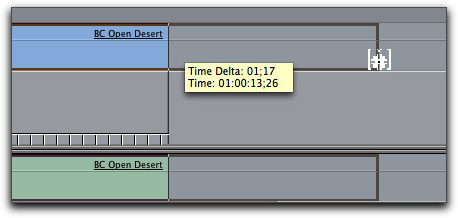
Drag to the left or right. Dragging to the left will time-compress (speed up) the outgoing clip while simultaneously time-expanding (slowing down) the incoming clip. Dragging to the right will have the opposite effect. For this exercise, drag to the left until the Tooltip reports a time delta of -10 and a time of 01:00:07;12. These numbers are telling you how far you are moving the edit point from it's original location. The Canvas also displays a 2-up image with your outgoing frame appearing on the left and your incoming frame on the right. You may wonder why the images do not update as they do with the Rolling Edit Tool. This makes sense given what I said earlier; you are not changing the original edit points and the Canvas 2-up simply reinforces this.
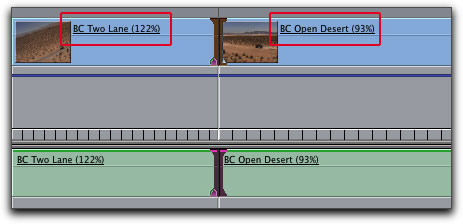
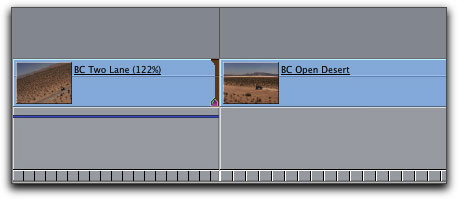
When you release your mouse, you'll notice the clip on the left has been sped up by 122% and the clip on the right is has been slowed down to 93%. The combined durations of both clips remains the same.
There's a really cool variation on this operation that involves the Shift key. Undo that last operation. Let's say you wanted to change the speed of one clip without affecting the speed of the other clip. Press and hold the Shift key then select the out point of the second clip. With the Shift key held down, drag to the left. When the mouse is released, the clip on the left is sped up to 122%, but the clip on the right is at normal speed (100%). In order for Final Cut Pro to make this edit, the incoming clip's in point had to be extended to accommodate the edit point being moved earlier in time. I call this edit a "two-fer". You get a speed change on one side and a roll edit on the other side.
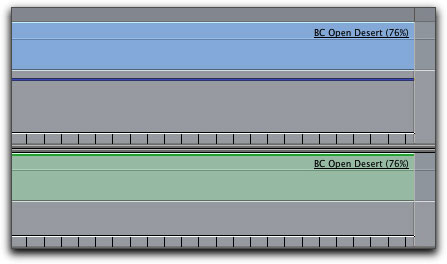
You can also use the Speed Tool to adjust the speed of a single clip. Pan over to the end of the sequence, then drag the out point of the last clip with the Speed Tool.
When you release the mouse, the clip is time stretched (or compressed if you drag the other way) and the new speed percentage is stamped on the clip.
If much of your editorial work involves changing the speed of your clips, you are going to love these new Speed Tools. They are easy to use and most of all fun to work with. If you want to learn Final Cut Pro 7, we recently released a 5 hour tutorial covering all the core features of Final Cut Pro 7. To read more click here.

Steve Martin runs www.rippletraining.com where you can download QuickTime tutorials and purchase tutorials on DVDs covering all of the Final Cut Studio applications. He is also a lead instructor for Apple's Certified Training (ACT) program and has taught workshops at NAB, Macworld, DV Expo, and the American Film Institute.
copyright © www.kenstone.net 2009
are either registered trademarks or trademarks of Apple. Other company and product names may be trademarks of their respective owners.
All screen captures, images, and textual references are the property and trademark of their creators/owners/publishers.