

White Paper - FCP and OS X June 10, 2002
Final Cut Pro in OS X
Hey, where did everything go?By Ken Stone
White Paper - FCP and OS X June 10, 2002
Final Cut Pro in OS X
Hey, where did everything go?By Ken Stone
"Some people are born to it, others have had OS X thrust upon them". Confucius, 571 B.C.
"With the release of version 3.0.2 planned development for Final Cut Pro under Mac OS 9 has ended. All future development will be under Mac OS X". Quote from Apple on the FCP 3.0.2 updater page.
After spending 8 years with the old Mac OS I pretty much know where everything is and I am quite comfortable with the system. I do have my FCP Mac Hard Drive partitioned, OS 9.2.2 on one side and OS 10.1.4 on the other with FCP 3.0.2 installed on both partitions. My plan was to stay with OS 9.2.2 as long as I could waiting for OS X to mature. Well, with Apple's announcement that FCP will no longer be developed for OS 9.2.2, the jig is up.
What follows is not intended to be a Basic Guide to OS X. There are a number of good books that will take you through OS X. What I want to do is to take a look at OS X and how it effects FCP. Many things have changed, many things have been moved. The good news is that the FCP interface remains the same. It looks and works exactly as it did in OS 9, well, except for a few Aqua buttons.
The Menu Bar

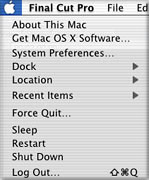
Apple Menu
Starting from the left the first item is the Apple menu. This is not the Apple menu of old. You can no longer place aliases or anything else into the Apple menu, it's closed. Aliases now go into the Dock. The Apple System Profiler has been moved from the Apple menu to the Utilities folder on your Hard Drive. 'Control Panels' is still in the Apple menu only it has been renamed 'System Preferences' and can also be accessed from the Dock. The Apple menu now contains items that are relevant to the general operation of the Mac. The 'Special Menu' is gone. The items that were in the 'Special Menu' have, for the most part, been moved to the Apple menu. Items like Sleep, Restart, and Shut Down."Empty Trash' has been moved to the Finder menu but the Trash can also be emptied from the Dock.
Application Menu
Next to the Apple menu is the Application menu which is a new menu and identifies, by name, the application that is currently running. This new menu is dedicated to the management of that application. Items have been move into this menu from other menus in OS 9. Audio/Video Setting, Preferences, and Easy Setup were previously found in the Edit menu. About Final Cut Pro came from the old Apple menu, and Quit came from the File menu.

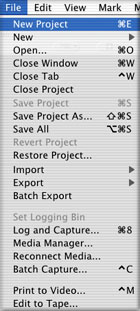
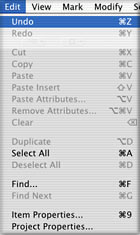
File and Edit Menus
The new File and Edit menus are shown below. They are basically the same as under OS 9 except for those items that were moved to the Applications menu.
The New Finder
There have been major changes made to the Finder. With OS 9 the DeskTop and the Finder were almost synonymous. In OS X, the Finder has been redesigned and upgraded with many new powerful features. In OS 9, double clicking on a hard drive would open the hard drive window. Now in OS X, clicking on a hard drive opens the new Finder window. This new Finder window is much more like a web browser then a simple window. While it is still possible to set the Finder window to 'List' or 'Icon' view, a new view has been added, 'Columns'. It's in the column view that the Finder window is the most powerful.
Near the top of the Finder window is the Tool Bar shown below at its default setting.

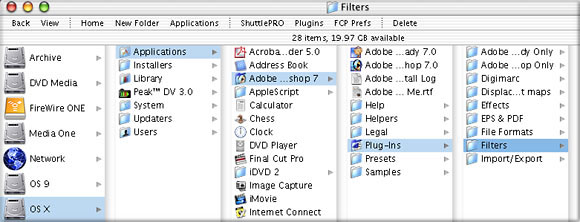
The new Finder Window, shown below in Column view, is divided in to Panes. The pane on the far left displays all mounted drives and will show removable media as well. Clicking on the triangle to the right of a drive's name will open that drive into the next pane to the right. Clicking the triangle of any folder in this pane will open the folder into a new pane to the right, and so on.
The Tool Bar is highly customizable. I have my Tool Bar set to 'text only' though you can set it to show icons as well. Each item in the Tool Bar; Back, View, Home, New Folders, Applications, ShttlePro, etc. are alias that when clicked, jump you to that particular folder. So, in essence, any item in the Tool Bar is like an active Link in a web browser. You can add any application, folder or item to the Tool Bar by simply dragging the item from the pane into the Tool Bar. This will create an alias. To remove an alias simply drag it out off the Tool Bar. You will note that I have placed aliases for my FCP plugins and Prefs right in the Tool Bar. Now to access these folders all I have to do is click on the aliases.
Power Features for FCP in the Finder window
Ever go hunting through your many Capture folders look for a particular captured clip who's name you can't remember. In OS 9 you could double click on a clip which would open that clip in a QT window and you could then play the clip. Very slow going particularly if you have hundreds of clips. Now, in the new Finder window, simply click on a clip and a QT thumbnail movie will open in the next pane. Click the play button to see your clip, audio plays as well.

And what about render files with their obtuse names. The same feature works for render files only instead of clicking a play button, you scrub through the render file, no audio though. I can't tell you the number of old captured clips and render files that I found and trashed right from the Finder.

The New Finder and Where Things Are
OS X places our FCP related folders and items is very different locations than OS 9. One item that we need to access from time to time, 'FCP Preferences', is shown below in its new location.
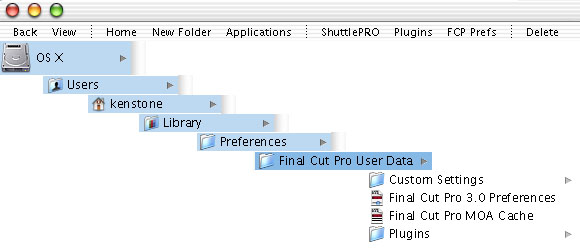
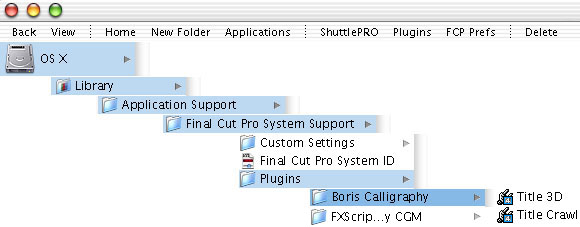
Other items that we need to access; FCP System ID (your serial number), Custom Settings and application installed Plugins. As you can see from these two pictures, there are several different locations for both Custom Settings and Plugins. You can see that my Boris Calligraphy and CGM plugins were installed into the plugins folder below.
QuickTime Preferences are found in: OS X > System > Library > Preferences > QT Prefs. Installation of QT for FCP has also changed in OS X. In OS 9, during the install process, we selected 'custom install' then checked the 'install all' box. In OS X the 'custom install' option is gone. Just do a regular install.
Memory
One of the biggest and most important changes in OS X involves Memory Management, how the Mac uses installed RAM. In OS 9 each application was assigned RAM, each open application held onto that amount of RAM that it was assigned. This could cause problems if several applications were open. We all have gotten 'Out of Memory - Close Open Applications' messages and we have all had to restart our Macs to clear out RAM.
In OS X we no longer assign RAM to applications, the system does it for us. OS X uses 'Dynamic Memory Allocation' which manages the allotment of RAM to open applications and provides RAM as needed by the applications. Applications that are open but are in the background require little RAM. If a background application is made active, the MAC OS X will give it the RAM that it needs. However, there is a limit to the number of open applications based on the amount of installed RAM. This is a much improved and more stable RAM management system.
In OS 9 we used the Memory Control Panel, which is now gone in OS X, to turn off Virtual Memory. Virtual Memory is a procedure used by the Mac OS to write information to a hard drive when all of the installed RAM is in use, the hard drive is used as temporary storage. This works for some applications but FCP can bog down if it is required to use Virtual Memory. In OS 9 we could turn VM off, in OS X it is on all the time and the drive that holds the Mac OS X system folder is the drive that Virtual Memory writes to. If FCP bogs down you can close other open applications which might help, or add additional RAM to your Mac.
AppleTalk
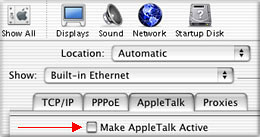
We still need to turn off AppleTalk when running FCP. In OS 9 AppleTalk was found in the Chooser. In OS X the Chooser is gone. To turn off AppleTalk, open System Preferences > Network preference pane. Set the 'Show' box to 'Built-in Ethernet' to access the AppleTalk tab. Deselect 'Make AppleTalk Active', Red arrow below. Click the Apply Now button.
Energy Saver
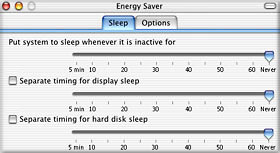
The Energy Saver control is found in System Preferences > Hardware pane. Set Sleep to 'Never'.
Fonts
In OS X, fonts no longer go into the system folder. To make fonts available to all users: OS X > Library > Fonts > Fonts folder. To make fonts available to only one user: OS X > User > Name > Library > Fonts > fonts folder. In OS X, ATM (Adobe Type Manager) is no longer needed to smooth on screen fonts. OS X does this work for us. If you have been using a font management program you will have to update to an OS X version. At this time PostScript fonts still do not work with FCP.
Gone from OS X
Both the Control Strip and the Launcher are gone, their functionality has been moved to the Dock. Extension Manager is now a thing of the past as is rebuilding the DeskTop. OS X no longer supports 256 colors or the screen resolution of 640 x 480.
CD Audio
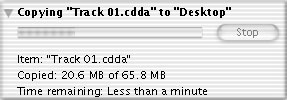
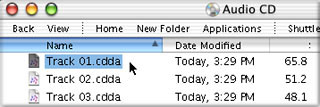
In OS 9, Option dragging a track from an audio CD window to the desktop produced an empty icon. The Finder told us it was copying but it wasn't. Eject the CD and the track disappeared from the desktop. It was never really there, it was just an alias. In OS X, Option dragging a track to the desktop actually copies the file to the desktop. Boy is it slow. Even though dragging a file from the CD drive to your Mac is a Finder function, this copying process is done by iTunes by default. Below right, you can see the iTunes icon, and that the file extension for iTunes is .cdda. Any file with the .cdda extension will open in iTunes. If the file extension is .aif, it will open in QuickTime Player . If you copy an audio CD track to your Mac in OS X and then transfer the audio file to OS 9 you will have to make sure that the extension name reads .aif to work in OS 9.

Importing CD Audio into FCP - Two ways
Importing using QuickTime
Before we import CD audio into FCP we need to change the audio sample rate from 44.1 k to 48 k. We also need to convert the file format to "AIFF". This can be done with either iTunes or QuickTime. I use the QT process because I often trim my audio tracks before I import them. Using QT you can only import one track at a time.
I think your going to like this.
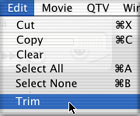
Open the audio CD window on the desktop, select your track and drag the track down to the Dock. Drop the track icon onto QT Player. This will open the the audio track in the QT Player window. In this window you can set 'in and out' points for your audio, shown below left. When you have set your 'in and out' points, from the Edit menu > Trim.

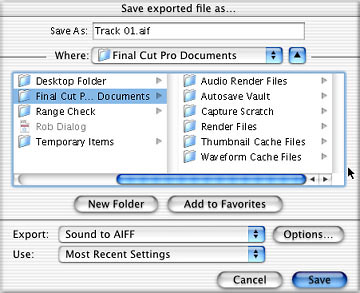
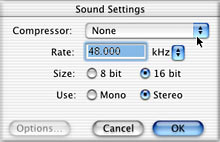
From the File menu select Export. This will open the 'Save exported file as...' dialog box. At the top, name your audio, you will notice that it has the .aif extension name as we are using QT to create our exported audio file. Just below in the 'Where'' box navigate to to the location that you want the audio saved. You can save it right into your FCP media folder on your scratch drive. In the lower panel of this box set 'Export' to 'Sound to AIFF'. Next click the Options button. In the Options box, set compressor to none, Rate to 48.000 kHz, 16 bit Stereo. click the okay button. The 'Use' box will now show 'Most Recent Settings. Click Save.
![]() The Export process is extremely fast. When done, simply import the audio into your Browser. Importing audio into FCP is now a simple and quick process. Drag the audio onto QT Player, trim, set Options and Save it to your media drive.
The Export process is extremely fast. When done, simply import the audio into your Browser. Importing audio into FCP is now a simple and quick process. Drag the audio onto QT Player, trim, set Options and Save it to your media drive.
Importing using iTunes
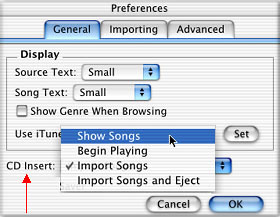
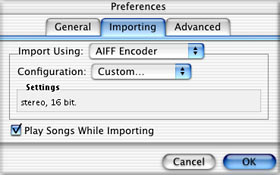
With iTunes you are able to import an entire audio CD in one shot. However you will not be able to trim the audio tracks before import. Launch iTunes and from the iTunes Application menu > Preferences. In the 'General' tab set the 'CD Insert' to 'Show Songs". Next click on the 'Importing' tab and set Import Using to 'AIFF Encoder'. Set Configuration To 'Custom',
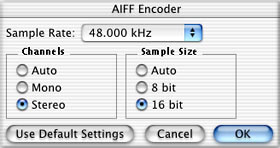
Double click on the Custom button to open the AIFF Encoder window. In the AIFF Encoder window set Sample Rate to 48,000 kHz, Stereo at 16 bits. Click Okay.
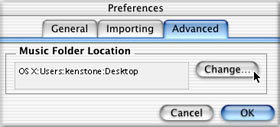
Select the Advanced tab. 'Music Location Folder', click on the Change button and navigate to the folder that you want to store your CD audio.
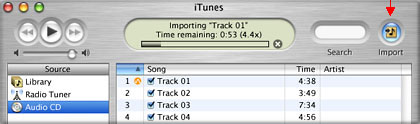
In the iTunes window, in the Source column on the left you will see your Audio CD, select it. In the main window you will see all your tracks. Uncheck any tracks that you do not wish to Import. Click on the Import button, top right.
Conclusion
There is no doubt about it, OS X is here and we are going to have to migrate to X for the next FCP update which will only run in OS X. For a detailed article on setting up FCP in OS X check out Final Cut Pro v.3.0 for Mac OS X by Charles Roberts. Having spent some time in OS X I am becoming more comfortable with this new operating system. While skeptical at first, I have found that X is very powerful and the new Finder has become something that I would not want to do without. Rumor has it that 'Spring Loaded' folders will be in the next system update. With any luck they will put colored 'Labels' back in as well. I hope that this article helps you find what you are looking for.
Enjoy,
--ken
copyright © Ken Stone 2002