
February 18, 2001
Out of Final Cut Pro and into the Fire of DVD Studio Pro 1
Exporting from FCP and reassembling in DVD Studio Pro
By Jeff Warmouth
So you've just edited a piece in Final Cut Pro and now you want to create a DVD. You've already printed a copy to DV tape, and maybe made a VHS dub. You want to distribute it, or at least cut a few dubs to play on something other than a camcorder or the DV deck in your edit suite. And you know that VHS doesn't cut it anymore. You've scored a copy of DVD Studio Pro, and have been waiting for a chance to dig into it. Whether you're just getting started editing, or you're an experienced Final Cut editor, this article will show you the steps to convert your Final Cut Pro sequence into the proper formats for importing into DVD Studio Pro.
This article assumes that you have a basic working knowledge of Final Cut Pro. If not, there are plenty of articles on this site to get you started. It also assumes that you have some footage to work with. Either an edited sequence or a single clip in Final Cut will work fine. So if you have no finished sequence ready, fire up your DV device, capture a clip, and let's go!
DVD & Authoring & Assets, oh my
DVD Studio Pro, like other DVD applications on the market, is an authoring application. It is used to string together video and audio tracks, build interactive menus, slideshows, and scripted navigation, and to prepare everything to be burned to a DVD for testing or duplication. DVD Studio Pro also has a preview function, which is used for viewing and testing the functionality of a DVD or its elements before shelling out tons of time and money burning physical discs. Even if you don't own a DVD burner of any kind, the preview function will allow you to view a DVD project in progress (deep sighs of relief from the 75% of you who don't own a burner).
The bottom line is that DVD Studio Pro does not create any content, it merely arranges it. Before your audio and video materials can be imported into DVD Studio Pro, they need to be prepared as assets, meaning they have to be converted to formats that are supported by the DVD specification, and consequently, by DVD Studio Pro. The primary assets are video, audio, still images, and subtitles. DVD Studio Pro includes several utilities for generating assets, including The Quicktime MPEG Encoder and The Apple A.Pack Application.
The QuickTime MPEG Encoder is a Quicktime codec which will convert DV format video files into the MPEG-2 video assets required for DVD-Video. The MPEG Encoder runs as a system extension, becoming active when you export QuickTime from any application that supports it. You will use the MPEG-2 encoder when exporting directly from Final Cut Pro, although you can also use it to export from the Quicktime Pro Player or Cleaner DV.
The Apple A.Pack Application is used to generate the Dolby AC-3 audio assets recommended for DVD-Video. A-Pack can be used to generate AC-3 audio assets with up to six channels, by allowing you to place existing audio tracks into a six-channel surround-sound matrix. However, since most of you are working with stereo or monaural audio in Final Cut Pro, we will use A.Pack only to generate one- or two-channel AC-3 assets.
Note that video and audio assets are generated and encoded separately, then relinked in DVD Studio Pro to be multiplexed and burned to a disc. Thus, the audio and the video in your synced Final Cut Pro sequence will be encoded separately. Both of the resulting audio and video assets will be imported into DVD Studio Pro to be relinked.
Encoding Video into MPEG-2
Your first step will be to export your video sequence or clip from Final Cut Pro. To get the most out of this article, your sequence/clip should contain audio as well as video. The Quicktime MPEG Encoder will let you export without having to leave the comfort of your own FCP application.
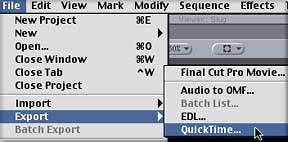
With your sequence loaded into the Canvas and the Canvas selected (or your clip loaded into the Viewer, and the Viewer selected), select File > Export > Quicktime.
In the QuickTime dialog box, select MPEG 2 in the Format pop-up menu.
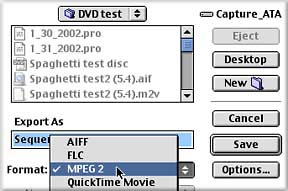
If MPEG 2 does not appear as an option, make sure that DVD Studio Pro is installed with a valid serial number. The MPEG Encoder does require a G4 processor, so if you're trying to run it on an iBook or an old Blue & White, it's time to upgrade. Even though you may be running DVD Studio Pro on a G3 (even though it lists a G4 as the minimum requirement), the MPEG Encoder will not function on anything less than a G4.
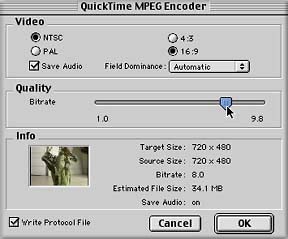
Selecting the Options button will allow you to configure your export settings. Be sure that your Video System (NTSC vs. PAL) and Aspect Ratio (4:3 vs. 16:9) settings match those of your sequence. You can leave Field Dominance set to Automatic.

If your sequence or clip contains audio, make sure to Save Audio (see above). This will export the audio from your sequence as one continuous stereo audio file in AIFF format, which you will later convert into AC-3 using A.Pack. In order to combine your audio and video clip into a track in DVD Studio Pro, they must be the same length, so it is best to export them together. If you forget to Save Audio and export anyway, you don't need to re-encode the video. Simply go to File > Export > Quicktime and select AIFF; this will export just the audio as an AIFF file.
The Quality slider allows you to select a Bitrate between 1.0 and 9.8. Which setting you use depends upon the length of your footage and how you plan to use it within DVD Studio Pro. If you are using a simple video track with a single audio stream (no additional video angles or alternate audio tracks) the maximum bitrate you can get away with is about 8.1. When you start adding additional video angles or audio streams, you will need to drop your bitrate to avoid playback issues in a burned disc, such as loss of audio sync, pixellation and skipping, or causing the DVD Player to "choke" and stop playing. If your footage is longer than an hour or so, you will need to lower the bitrate to fit all your footage on a 3.7 GB DVD.
I recommend testing a small portion of footage at first, especially if your clip or sequence is longer than a minute or two. Encoding takes both time and file space. Although fast by MPEG encoder standards, it can take anywhere from real time to 4x real time to encode your footage. For example, a one minute sequence takes around four minutes to encode on my 350 MHz G4. A dual 800 should encode in real-time, but even so, how long do you want to sit in front of the dreaded render bar?
Name your file, hit SAVE and watch that render bar go. You should wind up with two files: An MPEG-2 file in the .m2v format, and a similarly-named audio file in the .aif (AIFF) format.
Encoding Audio into AC-3
You notice that when you exported from Final Cut, you created two files, an MPEG-2 file and an AIFF file. DVD Studio Pro will accept audio in AIFF and other PCM-formats (pulse-code modulation, the standard way to write audio data -- also
includes WAV files). However, the larger size of PCM audio files vs. AC-3 files, and the resulting higher bandwidth, can result in loss of audio sync in the final disc. Thus, you will use A.Pack to encode your audio stream in the preferred Dolby AC-3 format.
Launching the Apple A.Pack Application should bring you into the Instant Encoder. The left side is a graphical representation of the 5.1 (six) channels supported in the Dolby Digital Surround-Sound system; Left, Center, Right, Left Surround, Right Surround, and Low FrequencyLX. Note that A.Pack is unfortunately NOT a 5.1 surround-sound mixing program (it simply assigns channels of audio to one of the six positions within the 5.1 channel matrix. To mix surround-sound, you need a 5.1-capable audio editor, such as Digidesign ProTools, MOTU Digital Performer 3, or Nuendo).
The Audio Coding Mode dropdown menu in the Audio tab allows you to select
the channel configuration of your final AC-3 file. Since most of you are
working with either stereo or monaural audio in Final Cut Pro, we will stick
to one-channel or two-channel setups. If your audio in Final Cut Pro was a
stereo mix, select "2/0 (L, R)" from the dropdown menu. If your audio was
mono, you might select "1/0 (C)" (the "C" here stands for Center channel).
The Input Channels graphical view will update to reflect your choice. Now
you can assign specific audio files to the audio channels in the A.Pack
Input Channels matrix.

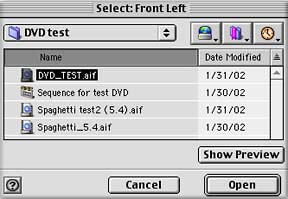
Clicking on the Left Input Channel button (or Center Input Channel if you
are working in mono) will bring up a dialog box allowing you to assign a
file to the channel. Choose the AIFF created by the Apple MPEG Encoder, and
select Open.
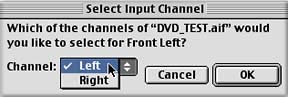
A.Pack will allow you to select any channel from the AIFF file you have selected. In this case, go with the default of Left.
Assign the Right Input Channel in the same way: Click the Right Input Channel button and choose a file & channel. You can also drag and drop files directly from the Finder onto the appropriate Input Channel button.
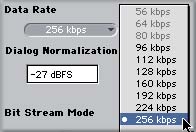
Once you have assigned all audio channels, you are basically ready to encode. Set the audio Data Rate to 256 kbps. This is not crucial, but will ensure maximum compatibility with DVD set- top players - higher bitrates are necessary for 5.1 channel encoding, but 256 is more than adequate for stereo.
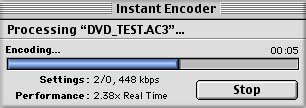
Make sure that the Target System is set to DVD Video, and leave other settings at their defaults. Punch "Encode," set your destination folder, and watch that Processing bar roll...
DVD Studio Pro
Now that you have an MPEG-2 and an AC-3 asset prepared, you are ready to bring them into DVD Studio Pro to relink them, and to watch them as a preview. Launch the DVD Studio Pro Application.
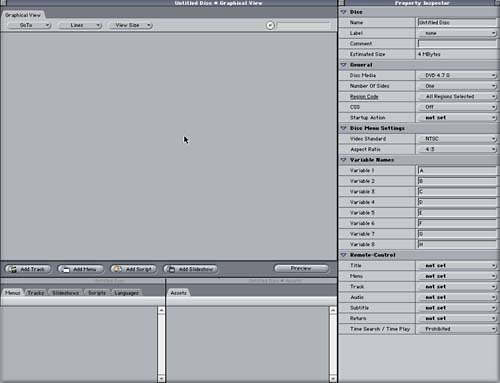
Here we see the DVD Studio Pro interface. Not so intuitive if you're used to the virtual video preview monitors of Final Cut Pro or the visual canvas of Photoshop. However, it is a fairly simple program to get comfortable in. For a fairly complete introduction to the DVD Studio Pro application, you should work through the tutorial contained in the manual. This tutorial will walk you through the basic functions of the program, including building menus and structuring links to create interactivity. In this article, the demo will be limited to linking your video and audio assets into a track, allowing you to preview it, and burning the resulting DVD to a disc.
The interface is composed of the Graphical View taking the largest portion of the screen, the Property Inspector on the right, and the Asset containers at the bottom left.
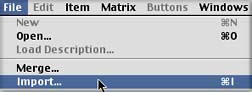
To import your video and audio assets, Go to File > Import.
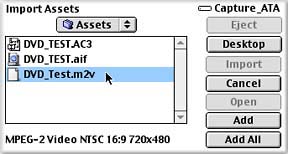
Select the assets you created in the previous steps and click the "Add" button, or simply double-click each asset. When you have added all assets, click the "Import" button.
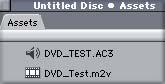
All the assets that you import will now appear in the Asset Container, the bottom center window in the DVD Studio Pro interface. the Asset container is comparable to the Browser in Final Cut Pro. The assets don't actually live inside your DVD Studio Pro file, but are merely pointers to media files on your hard drive. In fact, if you want to make changes or to substitute a different file, you can simply relink the asset to a different file.
Your next step will be to add a new Video Track. A Video Track is one of the primary data types in DVD Studio Pro, along with Slideshows and Menus. The simplest way to add a track is to drag your .m2v file from the Asset Container into the Graphical View.
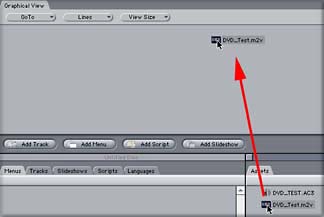
DVD Studio Pro will automatically create a new track which contains your MPEG asset. You could also click the Add Track button, then either drag your .m2v file to it or manually assign the Video Asset in the Property Inspector. Frankly, why waste two steps when we have the comfort & convenience of Drag-n-Drop at our service!
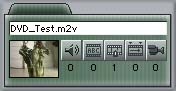
If you were to Preview your video track now, you would see the video playing with no audio. The Audio stream must be added as well. Again, the easiest way is to drag & drop your .AC3 file from the Asset Container to the Track in the Graphical View. DVD Studio Pro knows where it goes from there.
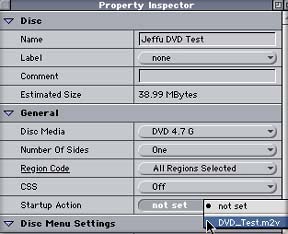
Now for a quick trip to the Properties Inspector to make this a functional
disc. Click anywhere in the gray area of the Graphical View Window to view
the properties for the entire disc in the Property Inspector. Under General
> Startup Action, you want to select the track that you have created. This will
tell a DVD player (or the Preview function of DVD Studio Pro) to
automatically play the track.
Now let's check out your handiwork. Hit the Preview button in the lower right corner of the Graphical View to enter Preview mode. This will play a full-screen preview of your disc. In this case, you have built a very rudimentary disc, with only one video track and no interactive menus. If you had created non-linear content, the preview window would also allow you to step through using the remote-control buttons, just as if you were viewing on a set-top DVD player. To leave the Preview mode, hit the Stop button, located to the right of the remote-control buttons at the bottom of the screen.
Previewing in Apple DVD Player
Now we move down the road of viewing. The next step is to view your project outside of DVD Studio Pro, using the Apple DVD Player. This allows you to test the project before wasting time and money on DVD-R media.
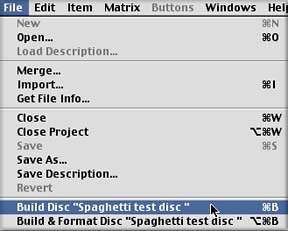
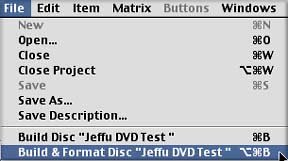
Choose Build Disc from the File Menu. Choose a location and save.
DVD Studio Pro will multiplex the project, recombining the video and audio assets into the single stream required to play in DVD players.

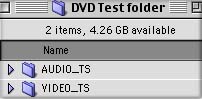
This process will create two folders in the location you specified: VIDEO_TS and AUDIO_TS. The VIDEO_TS folder is essential to every DVD-Video Disc;
this folder contains all the data for that DVD title.
Launch your Apple DVD Player application and open the Preferences (Edit > Preferences).
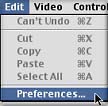
In the Advanced Controls tab, make sure that the "Add 'Open VIDEO_TS' menu item to File Menu" is checked, then hit OK.

Now you can open the VIDEO_TS folder that you created, and play it in the DVD player. If your tab says "Audio Controls" instead of "Advanced Controls," you may have an older version of the Apple DVD Player. Reinstall DVD Studio Pro or download Apple's free upgrade to the Apple DVD Player.
Feeling the Burn
Let's say that everything runs smoothly. Your project plays fine in the Apple DVD player, and now you want to burn a DVD. Of course for this you need a DVD burner, either the SuperDrive or an external FireWire burner.
Head back into DVD Studio Pro and select Build & Format Disc from the File Menu.
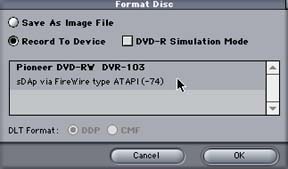
Choose "Record to Device" and select your DVD-R burner from the list of available devices. Hit OK.
If you already performed a Build Disc, you might get a message asking
whether your VIDEO_TS data should be reused. Assuming that everything worked
fine, and that you didnŐt modify anything, hit Reuse. This will save lots of
time, as your project will not need to be multiplexed again. Now DVD Studio
Pro will burn your project to DVD-R.

In Conclusion
Now you may be wondering, "is that all there is to it?" True, this was only a brief taste of the simplest aspects of DVD Studio Pro and compression. In reality, the DVD authoring process can be much more complex, dealing with menus, link structures, multiple audio and video streams, etc. But I hope that you enjoyed this little tutorial, and that it sparks your interest to learn more about DVD Studio Pro and the DVD authoring and production process. Have fun, and don't let the bitrates get you down!
Jeff "Jeffu" Warmouth is a media artist based in Massachusetts. He teaches digital media at Fitchburg State College, and maintains a website of ridiculous media arts projects at www.jeffu.tv.
copyright © Jeff Warmouth 2002
[Top]
All screen captures, images, and textual references are the property and trademark of their creators/owners/publishers.


